
Sure, here's the introduction in HTML format:
html
Are you experiencing a rapid decline in your Moto G’s battery life? If so, you may need to replace the battery to restore your phone’s performance. The Moto G is a reliable and popular smartphone, but over time, the battery may lose its ability to hold a charge effectively. In this guide, we’ll walk you through the steps to replace the battery in your Moto G, ensuring that you can continue to enjoy the full functionality of your device. By following these simple instructions, you can breathe new life into your Moto G and avoid the hassle of constantly needing to recharge. Let’s get started!
Inside This Article
- Preparing for Battery Replacement
- Removing the Back Cover
- Disconnecting the Old Battery
- Installing the New Battery
- Conclusion
- FAQs
Preparing for Battery Replacement
Before you dive into replacing the battery in your Moto G, it’s essential to gather all the necessary tools and prepare your workspace. Here’s a quick rundown of what you’ll need and the steps to take before starting the battery replacement process.
1. Gather the Tools: To begin, ensure that you have all the required tools at hand. This typically includes a set of precision screwdrivers, a plastic opening tool, and a new replacement battery specifically designed for the Moto G model.
2. Work in a Clean Environment: Find a well-lit and clean workspace to carry out the battery replacement. A clutter-free area will help prevent the loss of small components and make it easier to keep track of screws and other parts during the process.
3. Power Off the Device: Before you start the battery replacement, power off your Moto G completely. This is a crucial safety measure to avoid any potential electrical hazards during the replacement process.
4. Backup Data: It’s a good practice to back up any important data on your phone before proceeding with the battery replacement. This ensures that your valuable information remains secure in case of any unexpected issues during the replacement.
Removing the Back Cover
Before you can access the internal components of your Moto G, you need to remove the back cover. This process is relatively simple, but it requires a gentle touch to avoid damaging the cover or the phone itself.
Start by powering off your Moto G to prevent any potential damage during the removal process. Once the device is powered off, flip it over to the back side. You’ll notice a small notch or groove near the bottom of the phone. This is where you’ll begin the removal process.
Using your fingernail or a plastic opening tool, gently insert it into the notch and carefully pry the back cover away from the phone. Work your way around the edges, applying even pressure to gradually release the clips holding the cover in place. Take your time and be patient to avoid any unnecessary force that could cause damage.
Once you’ve loosened all the clips, carefully lift the back cover away from the phone and set it aside. With the cover removed, you now have access to the internal components, including the battery that you’ll be replacing.
Disconnecting the Old Battery
Before proceeding with disconnecting the old battery, it’s crucial to ensure that the device is powered off. This step is essential for your safety and to prevent any potential damage to the phone’s components. Once the phone is turned off, you can begin the process of removing the old battery.
Using a small screwdriver or a plastic opening tool, carefully detach the connector that links the old battery to the phone’s motherboard. It’s important to exercise caution and precision during this step to avoid damaging the connector or surrounding components. Gentle, steady pressure should be applied to disconnect the battery without causing any harm to the internal circuitry.
After successfully disconnecting the old battery, carefully lift it out of its housing, ensuring that no cables or components are snagged or damaged during the removal process. Take note of how the old battery is positioned within the phone to facilitate the smooth installation of the new battery.
**
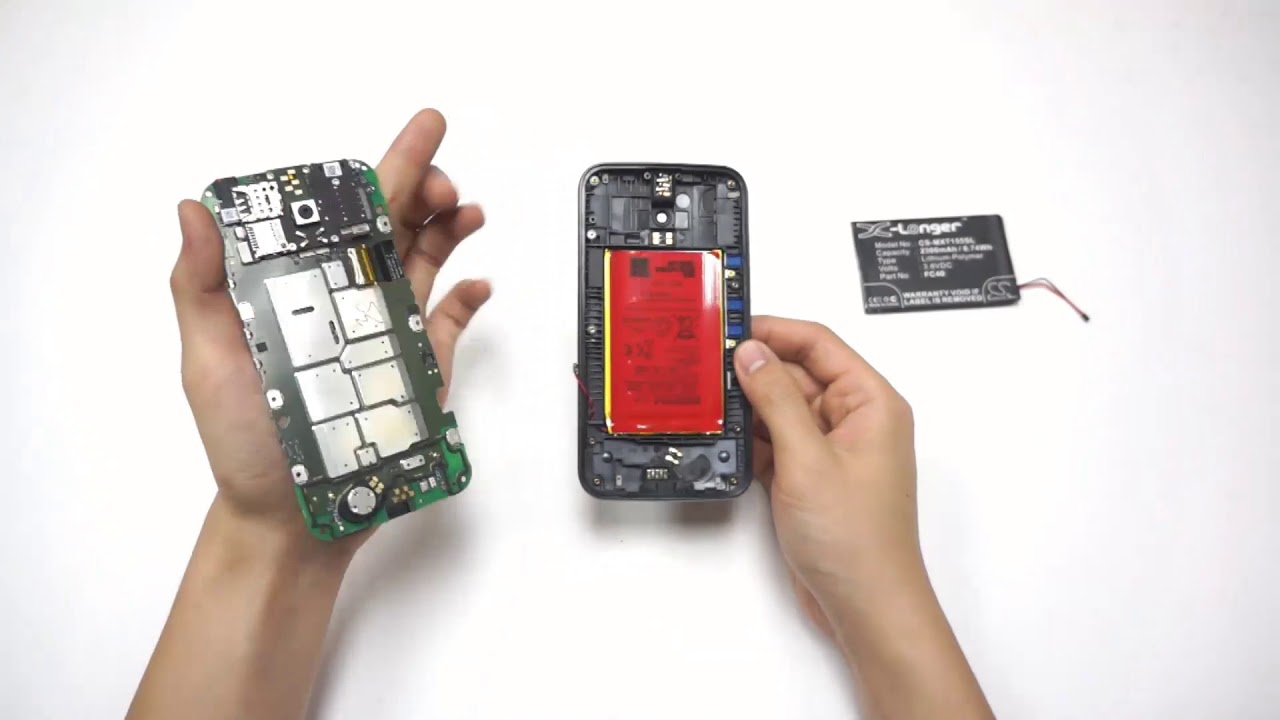
Installing the New Battery
**
Now comes the exciting part – installing the new battery in your Moto G. Carefully place the new battery into the designated slot, ensuring that it aligns properly with the connectors. Gently press down on the battery to secure it in place.
Next, reconnect the battery connector to the motherboard. Take your time with this step to ensure a secure and proper connection. Once the connector is in place, carefully press down on it to ensure it’s firmly seated.
After reconnecting the battery, it’s time to put the back cover back on. Align the cover with the edges of the phone and gently press around the perimeter to snap it back into place. Ensure that the cover fits snugly and securely.
Once the back cover is securely in place, power on your Moto G to ensure that the new battery is functioning properly. If everything looks good, you’ve successfully installed a new battery in your Moto G!
It's crucial to prioritize battery health to ensure optimal performance of your Moto G. By following the steps outlined in this guide, you can successfully replace the battery, extending the lifespan of your device. This not only enhances the user experience but also contributes to the overall sustainability of the device. Regular maintenance and care for your smartphone can significantly impact its longevity, allowing you to enjoy its features for an extended period. With a new battery in place, you can continue to explore the full potential of your Moto G without concerns about power limitations. Embracing these practices empowers you to make the most of your device and stay connected seamlessly. Always remember, a well-maintained battery leads to a seamless smartphone experience.
html
It’s crucial to prioritize battery health to ensure optimal performance of your Moto G. By following the steps outlined in this guide, you can successfully replace the battery, extending the lifespan of your device. This not only enhances the user experience but also contributes to the overall sustainability of the device. Regular maintenance and care for your smartphone can significantly impact its longevity, allowing you to enjoy its features for an extended period. With a new battery in place, you can continue to explore the full potential of your Moto G without concerns about power limitations. Embracing these practices empowers you to make the most of your device and stay connected seamlessly. Always remember, a well-maintained battery leads to a seamless smartphone experience.
Certainly! Below is the FAQ section for "How To Replace The Battery In A Moto G" article:
html
FAQs
Q: Can I replace the battery in my Moto G?
A: Yes, the battery in a Moto G can be replaced. However, it’s recommended to have it replaced by a professional technician to ensure safety and proper installation.
Q: How do I know if my Moto G battery needs to be replaced?
A: Signs that indicate a failing battery include rapid draining, overheating, or the phone powering off unexpectedly. If you notice any of these symptoms, it may be time for a battery replacement.
Q: Where can I purchase a replacement battery for my Moto G?
A: Replacement batteries for Moto G can be found online through reputable retailers or purchased from authorized service centers to ensure authenticity and quality.
Q: Is it possible to extend the battery life of my Moto G without replacing the battery?
A: Yes, optimizing the phone’s settings, reducing background app activity, and using power-saving modes can help extend the battery life of your Moto G.
Q: How long does it take to replace the battery in a Moto G?
A: The time required for replacing the battery in a Moto G can vary based on the technician’s expertise and workload. On average, it may take around 30 minutes to an hour.