
Introduction:
Changing the battery in your Sentry Safe is a simple and important task to ensure the security of your valuable items. A dead battery can leave you locked out of your safe and unable to access its contents. In this article, we will guide you through the process of changing the battery in your Sentry Safe with ease. Whether you have a digital keypad lock or a combination lock, we have got you covered. We will provide step-by-step instructions, along with helpful tips and precautions to take. So, if you are ready to keep your safe in optimal working condition, let’s dive into the world of Sentry Safe battery replacement.
Inside This Article
- Overview
- Precautions before Changing the Battery
- Step-by-Step Guide to Changing the Battery
- Troubleshooting Common Issues
- Conclusion
- FAQs
Overview
Changing the battery in your Sentry Safe is an important maintenance task that ensures your safe operates smoothly and keeps your valuables secure. A dead or low battery can prevent the safe from opening or cause other issues. In this article, we will provide step-by-step instructions on how to change the battery in your Sentry Safe, along with some precautions to take before getting started.
Precautions before Changing the Battery
Before you begin the battery replacement process, it is important to take a few precautions to ensure your safety and the safety of your valuables:
- Read the manual: Familiarize yourself with the specific instructions provided by Sentry Safe in the user manual. This will help you understand the correct procedure for changing the battery on your particular model.
- Choose the right battery: Make sure you have the correct replacement battery. Check the manual or the label inside the safe to find out the required battery type.
- Gather your tools: Keep all the necessary tools, such as a screwdriver or key, handy before you begin the process.
- Confirm the safe is unlocked: Ensure that your safe is unlocked before attempting to change the battery. Trying to replace the battery while the safe is locked can cause damage and potentially lock you out of your safe.
Step-by-Step Guide to Changing the Battery
Follow these steps to safely replace the battery in your Sentry Safe:
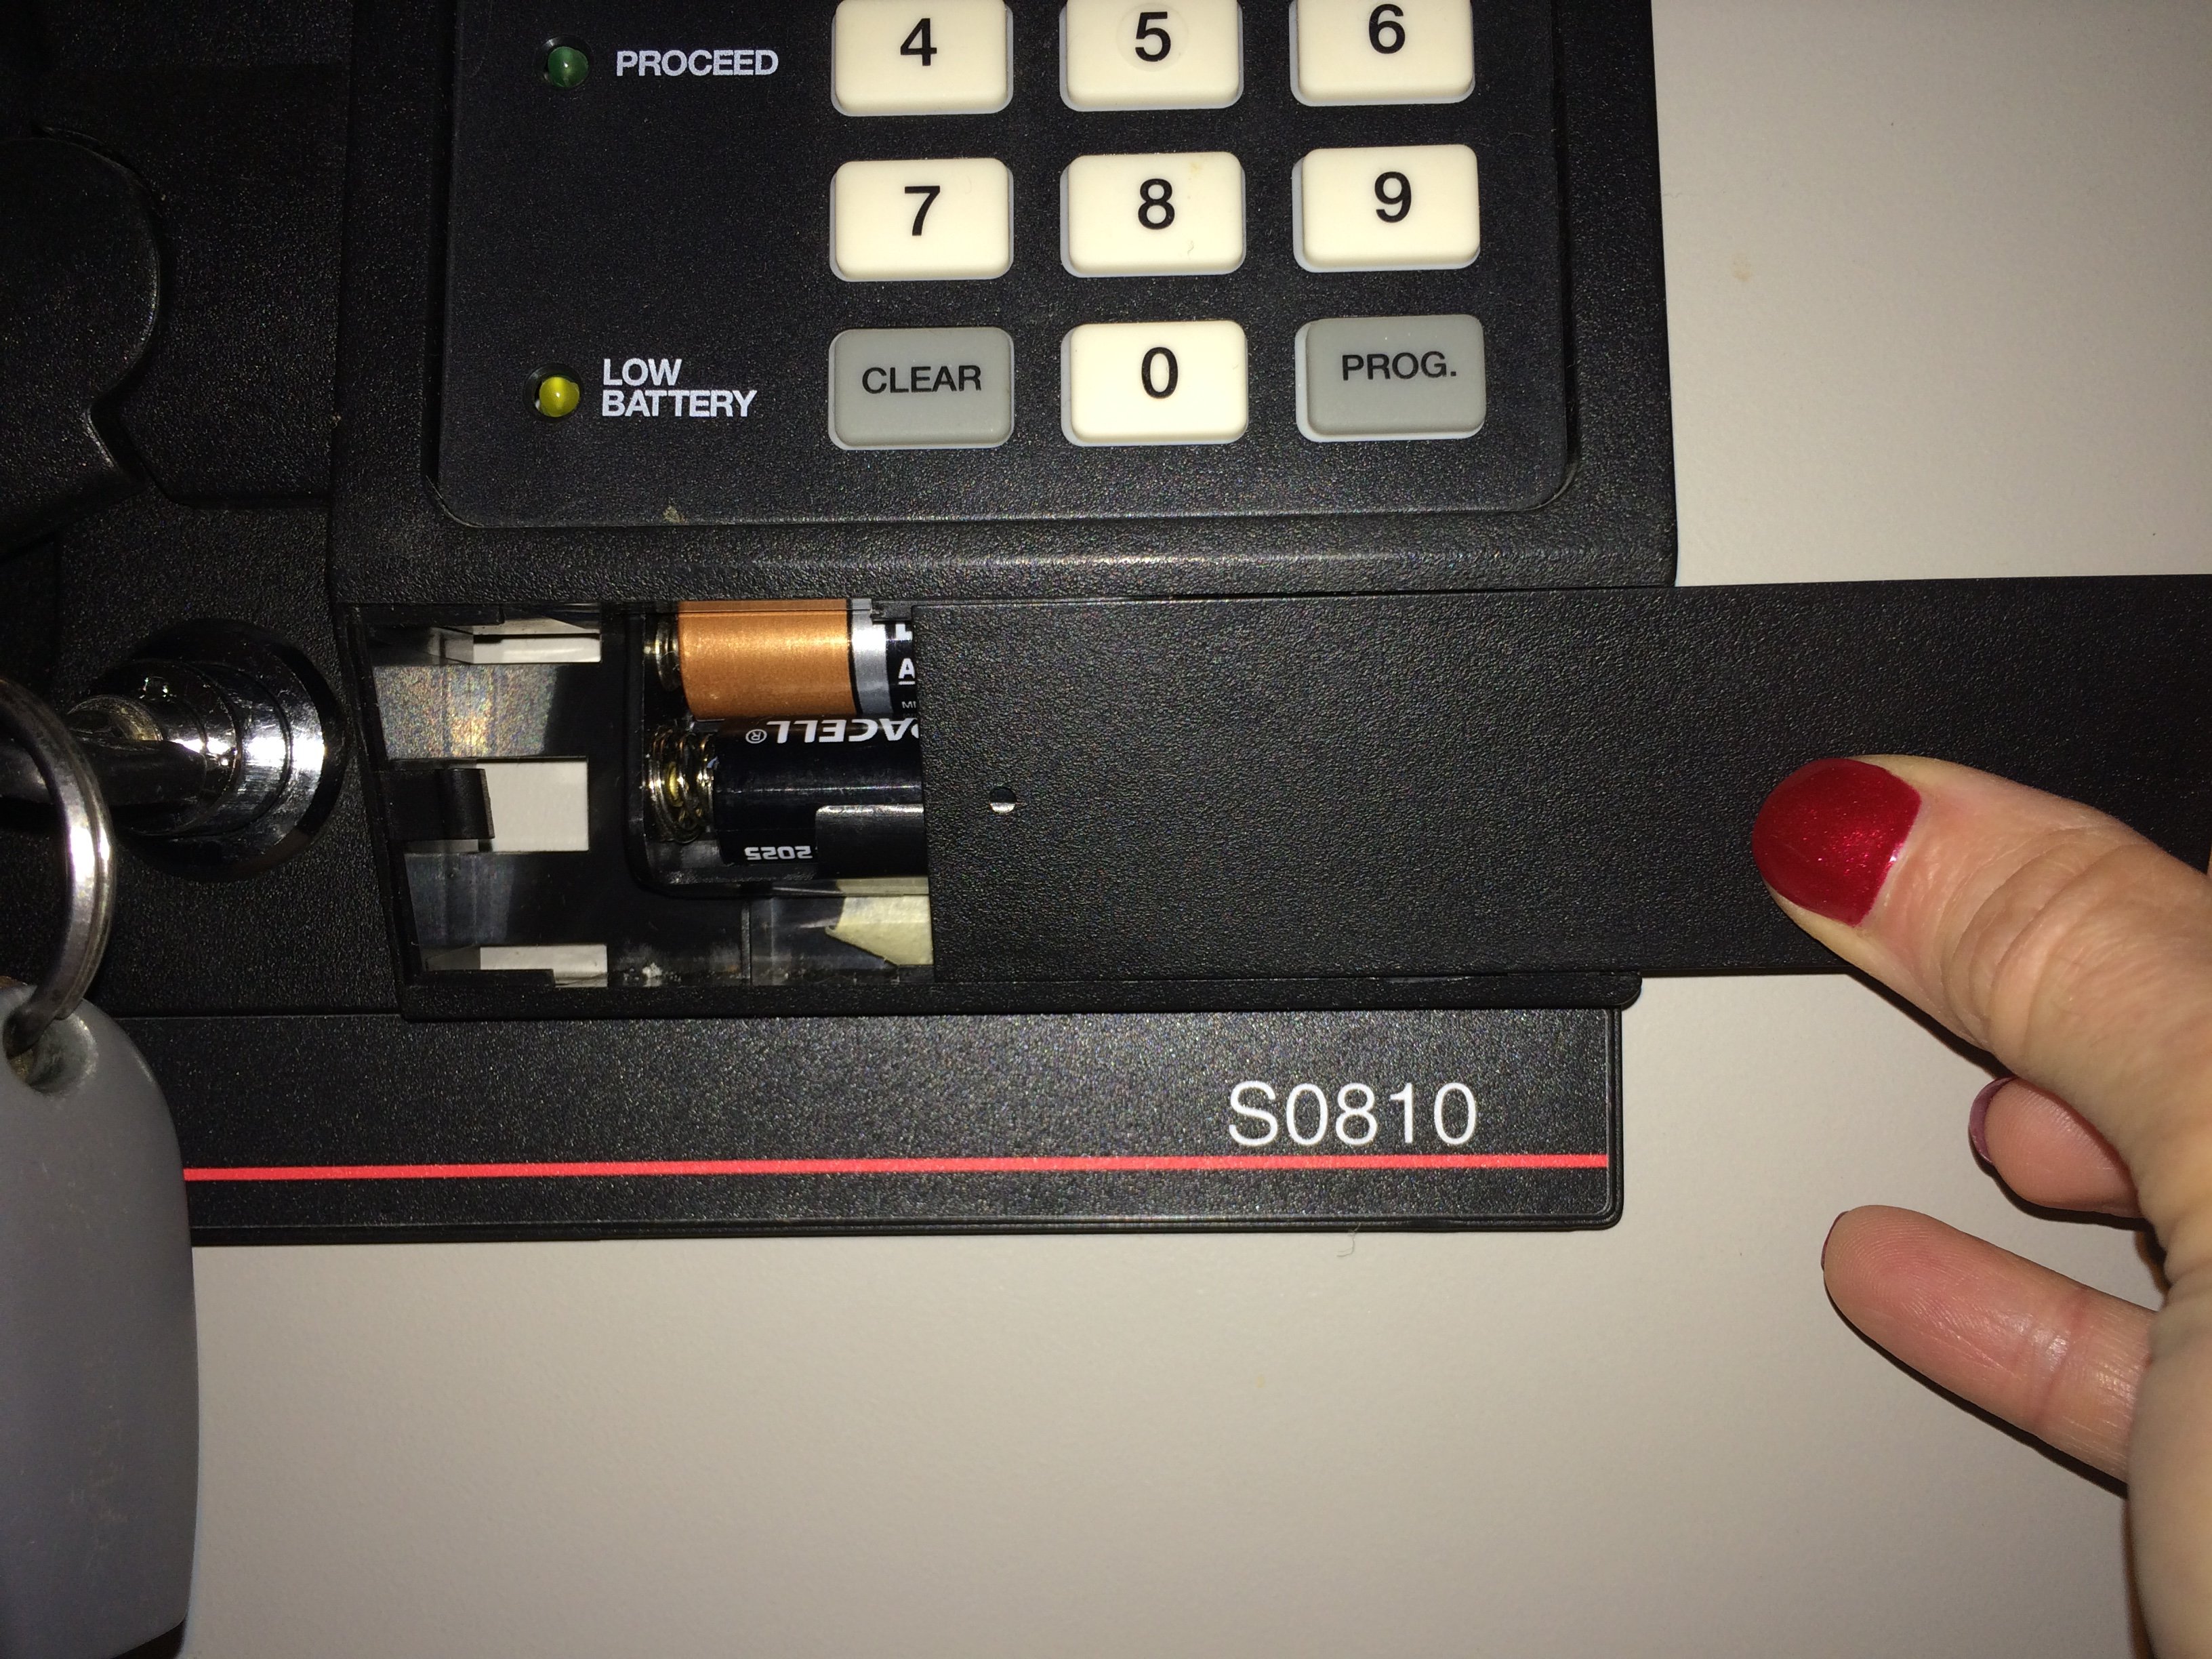
- Locate the battery compartment: Depending on your safe model, the battery compartment may be located on the inside of the door or at the bottom of the safe. Refer to the manual to find the exact location.
- Unlock and open the safe: Use the provided key or your security code to unlock and open the safe.
- Remove the old battery: Take out the old battery from the compartment. Pay attention to how the battery is positioned so that you can install the new battery correctly.
- Insert the new battery: Insert the new battery into the compartment, making sure to align it correctly with the polarity markings.
- Test the battery: Before closing the safe, test the new battery by entering your security code or using the key to ensure that the safe functions properly.
- Secure the battery compartment: Once the new battery is working correctly, secure the battery compartment by closing it and locking the safe.
Troubleshooting Common Issues
If you encounter any issues after replacing the battery, here are some troubleshooting steps you can take:
- Check the battery position: Make sure the battery is inserted correctly according to the polarity markings. A loose connection can cause the safe to malfunction.
- Replace the battery: If the safe is still not functioning properly, try replacing the battery with a fresh one, as the previous battery may be defective or drained.
- Contact Sentry Safe customer support: If you have followed all the steps correctly and the safe still does not work, it is recommended to reach out to Sentry Safe customer support for further assistance.
By following these guidelines, you can easily change the battery in your Sentry Safe and ensure your valuables remain safe and secure. Regularly checking and replacing the battery will give you peace of mind, knowing that your safe is always ready to protect your important possessions.
Precautions before Changing the Battery
Before you begin the process of changing the battery in your Sentry Safe, it’s important to take a few precautions to ensure your safety and the proper functioning of the safe. Here are some important steps to follow:
1. Read the Manual: Start by carefully reading the instruction manual provided by Sentry Safe. This will give you a clear understanding of the steps involved in changing the battery and any specific precautions to take for your particular safe model.
2. Choose the Right Battery: Make sure to select the correct type and size of battery recommended by the manufacturer. Using the wrong battery can lead to malfunctions or damage to your safe. Check the manual or the label on your safe for the specific battery requirements.
3. Prepare the Area: Clear the area around your safe to provide ample space for the battery replacement process. Remove any items that may obstruct your access to the battery compartment.
4. Wear Protective Gear: To protect yourself from any accidental mishaps, it’s advisable to wear gloves and safety goggles before beginning the battery replacement. This will prevent any potential injuries or exposure to harmful battery chemicals.
5. Disconnect External Power: Before replacing the battery, disconnect any external power sources, such as a power adapter or USB cable. This will ensure that you are not working with electricity while changing the battery and minimize the risk of electric shock.
6. Remove Jewelry: Take off any jewelry, such as rings, bracelets, or watches, before starting the process. This will prevent any accidental contact with electrical components and reduce the risk of damage or injury.
7. Handle Batteries with Care: When handling the batteries, be cautious and avoid touching the metal contacts or exposing them to water or extreme temperatures. Follow the instructions provided in the manual to safely remove and replace the battery.
8. Follow Safety Guidelines: Lastly, ensure that you follow all the safety guidelines provided by Sentry Safe in the instruction manual. These guidelines may include specific details about battery maintenance, disposal, and safe handling practices.
By taking these precautions, you can ensure a safe and successful battery replacement process for your Sentry Safe. Remember to always prioritize your safety and refer to the manual for any specific instructions related to your safe model.
Step-by-Step Guide to Changing the Battery
Is your Sentry Safe running out of battery? Don’t worry, changing the battery is a simple process that you can do yourself. Here is a step-by-step guide to help you through the process:
- Locate the battery compartment – The battery compartment is usually located on the inside of the safe door. Look for a small plastic panel or cover that can be opened.
- Remove the panel – Use a screwdriver or your fingers to carefully remove the panel. Be gentle, as you don’t want to damage the panel or the safe door.
- Identify the battery type – Look for the type of battery required for your Sentry Safe. It is usually labeled on the battery compartment or in the user manual.
- Get the replacement battery – Purchase the appropriate battery for your Sentry Safe. Make sure to get the correct size and type to ensure compatibility.
- Insert the new battery – Take the new battery and insert it into the battery compartment. Make sure to follow the correct polarity, aligning the positive and negative terminals with the corresponding marks inside the compartment.
- Secure the battery – Once the new battery is inserted, secure it in place by reattaching the panel or cover. Make sure it locks or fastens securely to prevent any movement.
- Test the new battery – Close the safe door and test the new battery by entering your access code or using the keypad. The safe should power on and function properly.
- Dispose of the old battery – Safely dispose of the old battery according to local regulations. Do not throw it in the trash, as batteries can be hazardous to the environment.
That’s it! Following these simple steps, you can easily change the battery in your Sentry Safe and keep it running smoothly. Remember to replace the battery when needed to maintain the security of your safe.
Troubleshooting Common Issues
Despite taking the necessary precautions and following the step-by-step guide, you may still encounter some common issues when changing the battery of your Sentry Safe. Here are some troubleshooting tips to help you resolve these issues quickly:
1. Incorrect Battery Placement: Double-check the placement of the new battery in the battery compartment. Ensure that the positive (+) and negative (-) terminals align correctly with the corresponding markings in the safe. An incorrect placement can prevent the safe from functioning properly.
2. Dead Battery: If the safe does not respond or the electronic keypad does not light up after replacing the battery, it is possible that the new battery is dead or low on charge. Try using a different battery, preferably from a trusted brand, to eliminate the possibility of a faulty battery.
3. Battery Corrosion: Over time, batteries can leak or corrode, causing damage to the battery compartment. If you notice any signs of battery corrosion, such as a white or greenish substance on the battery or inside the compartment, use gloves and a battery cleaning solution to safely remove the corrosion. Replace the battery and clean the compartment before attempting to use the safe again.
4. Keypad Issues: If the safe’s keypad does not respond or inputs are not registered after changing the battery, it could be a keypad malfunction. Try cleaning the keypad surface with a soft cloth and mild detergent to remove any dirt or debris that may be hindering the keypad’s functionality. If the issue persists, contact Sentry Safe customer support for further assistance.
5. Error Messages: If your Sentry Safe displays an error message after replacing the battery, refer to the user manual or contact customer support for a specific troubleshooting guide. Error messages can indicate various issues, ranging from a faulty keypad to a mechanical problem within the safe’s locking mechanism.
6. Resetting the Safe: If all else fails and the safe is still not functioning properly, you can try resetting it to factory settings. Refer to the user manual for instructions on how to perform a factory reset. Keep in mind that a factory reset will erase all previously programmed settings and codes, so make sure to retrieve any important information from the safe before proceeding.
By following these troubleshooting tips, you can overcome common issues that may arise when changing the battery of your Sentry Safe. Remember to always prioritize safety and refer to the user manual or seek professional assistance if needed.
Conclusion
Changing the battery in your Sentry Safe is a simple yet important task to ensure the continued security of your valuables. By following the step-by-step guide outlined in this article, you can confidently replace the battery and maintain the functionality of your safe.
Remember to choose the correct battery size and type recommended by Sentry Safe and handle the new battery with care. Regularly checking the battery level and replacing it when necessary will prevent any unexpected lockouts and provide you with peace of mind.
Don’t overlook the importance of maintaining your Sentry Safe’s battery life. By taking a few minutes to replace the battery as needed, you can ensure that your safe remains a reliable and secure storage solution for your valuable items.
Now that you have the knowledge and instructions, you can confidently change the battery in your Sentry Safe and avoid any potential issues in the future. Follow the steps carefully, and you’ll have your safe up and running in no time.
FAQs
1. How often do I need to change the battery in my Sentry Safe?
The frequency of battery changes for your Sentry Safe depends on several factors, such as how often the safe is used and the model you have. It is recommended to check the battery status regularly and replace them as needed. As a general rule of thumb, it is advisable to change the batteries every 6-12 months to ensure uninterrupted operation.
2. What type of batteries should I use for my Sentry Safe?
Sentry Safe typically uses AA or AAA batteries. However, it is essential to refer to your specific safe model’s user manual to determine the exact battery requirements. Using the recommended battery type will ensure optimal performance and prevent potential damage to the safe’s electronic components.
3. How do I know when the battery in my Sentry Safe needs to be changed?
Most Sentry Safe models have a low battery indicator that will notify you when the battery power is running low. This indicator can be in the form of a beeping sound, flashing light, or an error message displayed on the safe’s electronic keypad. If you notice any of these signs, it is a good indication that the battery needs replacement.
4. Can I change the battery in my Sentry Safe myself?
Yes, changing the battery in your Sentry Safe is a simple process that can usually be done by the owner. Refer to your safe’s user manual for specific instructions on how to access and replace the batteries. It is important to follow the manufacturer’s guidelines to avoid any potential damage to the safe or its locking mechanism.
5. What should I do if I can’t open my Sentry Safe due to a dead battery?
If you are unable to open your Sentry Safe due to a dead battery, there are a few steps you can take. Firstly, check if there is an override key included with your safe. This key can be used to manually unlock the safe when the battery is depleted. If you don’t have an override key or if it doesn’t work, contact Sentry Safe customer support for further assistance. They will guide you on how to open the safe and replace the battery if necessary.