
Are you facing issues with your thermostat’s battery? Is your thermostat not functioning properly and in need of a battery replacement? Don’t worry, because in this article, we will guide you through the process of changing the battery in your thermostat. A thermostat plays a vital role in maintaining the desired temperature in your home, and having a properly functioning battery is essential for its smooth operation.
Whether your thermostat has a traditional battery compartment or requires specialized tools, we will provide you with step-by-step instructions, tips, and precautions to ensure a successful battery replacement. So, let’s dive into the details and learn how you can easily change the battery in your thermostat and get it working efficiently again.
Inside This Article
- Overview
- Step 1: Turn off Power
- Step 2: Remove Faceplate
- Step 3: Disconnect Wires
- Step 4: Remove Old Battery
- Step 5: Insert New Battery
- Step 6: Reconnect Wires
- Step 7: Reattach Faceplate
- Step 8: Restore Power
- FAQs
- Conclusion
- FAQs
Overview
Changing the battery in your thermostat is a simple process that can help ensure your heating and cooling system continues to function properly. The thermostat relies on a battery to power its various features, such as temperature control and programmable settings. Over time, the battery can become weak or depleted, leading to inconsistencies in temperature readings and inefficient performance.
By regularly replacing the battery in your thermostat, you can maintain accurate temperature control and avoid unexpected issues. In this article, we will guide you through the step-by-step process of changing the battery in your thermostat, providing you with the knowledge and confidence to perform this task on your own.
Whether you have a traditional, programmable, or smart thermostat, the battery replacement process is typically similar. However, it’s always best to consult your thermostat’s user manual for specific instructions, as different models may have slight variations in the procedure.
Before we dive into the steps for changing the battery, it’s important to point out that not all thermostats require batteries. Some thermostats are directly wired into your home’s electrical system and do not rely on batteries for power. If you’re unsure whether your thermostat has a battery or not, check the user manual or look for a battery compartment on the device.
Now that we have a general understanding, let’s proceed with the step-by-step process of changing the battery in your thermostat.
Step 1: Turn off Power
Before you begin changing the battery in your thermostat, it’s essential to turn off the power. This step is crucial to ensure your safety and prevent any electrical accidents or damage to the equipment.
To turn off the power, locate your circuit breaker panel or fuse box and identify the breaker or fuse that controls your thermostat. Flip the switch or remove the fuse to cut off the power supply to the thermostat.
Double-check that the power is indeed off by attempting to adjust the temperature on the thermostat. If the display remains blank or unresponsive, it’s a clear indication that the power has been successfully turned off.
Alternatively, you can turn off the power to your entire HVAC system if you’re not sure about the specific breaker or fuse for the thermostat. Locate the main power switch near your HVAC unit and switch it off to ensure complete power shutdown.
Remember, safety should always be your top priority when dealing with electrical appliances. Turning off the power before replacing the battery will protect you from potential shocks or short circuits.
Step 2: Remove Faceplate
Now that we have turned off the power, it’s time to remove the faceplate of the thermostat. This step is crucial as it will give you access to the inner components of the thermostat, including the battery compartment. Follow these steps to safely remove the faceplate:
1. Locate the screws on the faceplate: Look for small screws holding the faceplate in place. They are usually located at the top and bottom corners of the thermostat. Use a screwdriver that fits the screw head to remove the screws.
2. Gently lift the faceplate: Once the screws are removed, gently lift the faceplate from the base of the thermostat. Be careful not to pull too hard, as there may be wires connecting the faceplate to the base.
3. Check for wire connections: As you lift the faceplate, take a moment to inspect if there are any wires attached to it. If there are, you will need to disconnect them before completely removing the faceplate. Most thermostats have labeled terminals, so it’s a good idea to take a picture or make note of the wire connections before disconnecting them.
4. Disconnect the wires: To disconnect the wires, use a Phillips-head screwdriver or a small pair of pliers to loosen the terminal screws. Once the screws are loose, gently pull out the wires from the terminals. Take care not to damage the wires or the terminals during this process.
5. Completely remove the faceplate: After disconnecting the wires, lift the faceplate away from the base of the thermostat. Set it aside in a safe place where it won’t get damaged or misplaced.
With the faceplate removed, you can now proceed to the next step of the battery replacement process. Ensure that you keep track of the screws and wires to avoid any confusion when reassembling the thermostat later.
Step 3: Disconnect Wires
Once you have successfully removed the faceplate, you will see the wiring connections behind it. Take a moment to examine the wires and familiarize yourself with their colors and positions. This will make it easier to reconnect them later.
Before proceeding with disconnecting the wires, it is important to ensure that the power to your thermostat is turned off. This will prevent any accidents or electrical shocks during the process. If your thermostat is wired directly to the electrical system, you may need to turn off the power at the circuit breaker.
Pro tip: If you are unsure about which circuit breaker controls the thermostat, simply turn off the main power switch to be on the safe side. It’s always better to be cautious when working with electrical components.
Using a small screwdriver or needle-nose pliers, carefully loosen the screws holding the wires in place on the thermostat’s terminal block. Take note of the wires’ positions and remove them one by one, being careful not to damage the wires or the terminals.
As you disconnect each wire, gently pull it away from the terminal and ensure that it doesn’t come into contact with any other wires. This will help prevent any potential short circuits or damage to the thermostat.
Caution: It’s important not to mix up the wires or forget their positions. If needed, you can take a picture or make a labeled drawing to help you remember where each wire was connected.
Once you have disconnected all the wires, set them aside safely. It’s a good idea to keep them organized to avoid confusion later when reconnecting them.
Now that you have successfully disconnected the wires from the thermostat, you can proceed to the next step of replacing the battery in your thermostat.
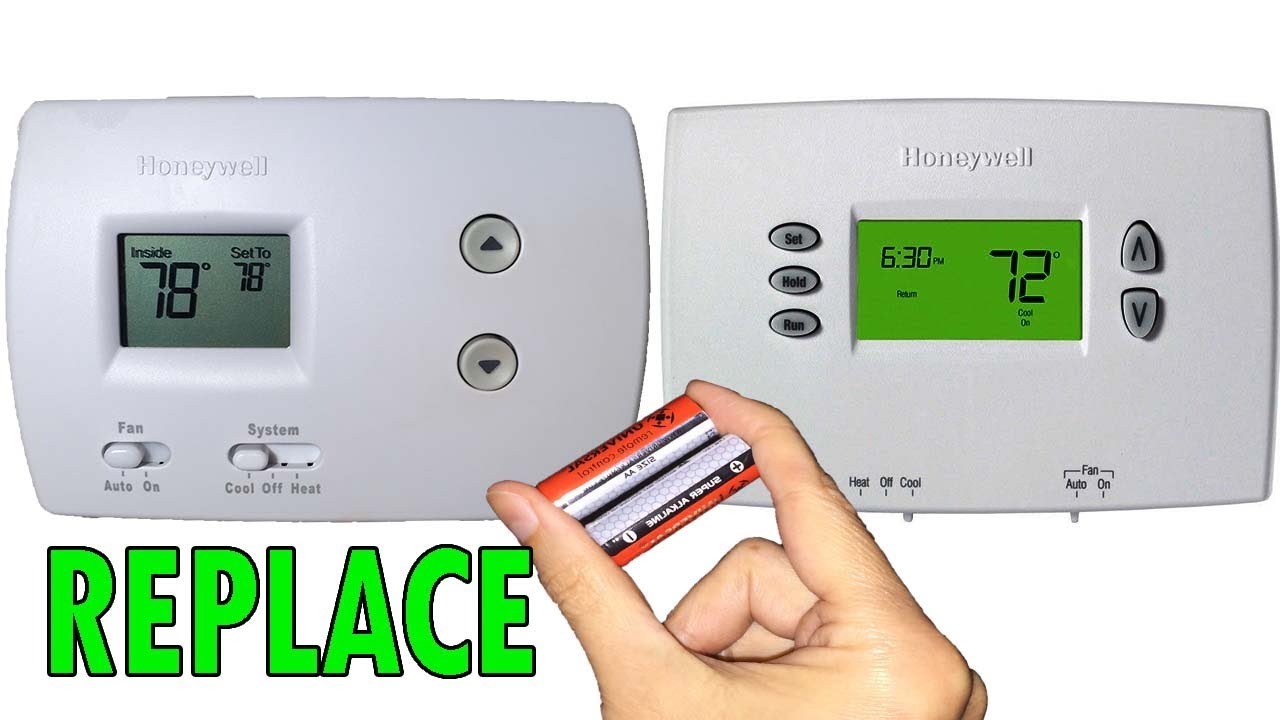
Step 4: Remove Old Battery
Removing the old battery from your thermostat is a crucial step in the process of changing the battery. Here’s how you can do it:
1. Locate the compartment where the battery is housed. This is typically located on the back of the thermostat or behind the faceplate.
2. Carefully remove the faceplate or cover to access the battery compartment. Depending on the model of your thermostat, you may need to use a small screwdriver or gently pry the cover off with your fingers.
3. Take a moment to familiarize yourself with the battery compartment. Look for any clips or tabs that may be securing the battery in place.
4. Once you’ve identified the securing mechanism, gently release it. This may involve sliding a clip to the side or pressing on a tab to release the battery.
5. With the securing mechanism released, carefully remove the old battery from the compartment. Grip it firmly and pull it straight out.
6. Inspect the battery for any signs of damage or leaking. If you notice any, handle the battery with caution and dispose of it properly according to local regulations.
7. Dispose of the old battery in an environmentally friendly way, such as recycling it at a designated battery disposal facility or through a battery recycling program in your area.
8. Before proceeding to the next step, take a moment to clean the battery compartment with a dry cloth or compressed air to remove any dust or debris.
By following these steps, you’ll be able to successfully remove the old battery from your thermostat, paving the way for the installation of a new one.
Step 5: Insert New Battery
Now that you have removed the old battery in your thermostat, it’s time to insert a new one. Follow these simple steps to ensure a smooth installation:
- Refer to your thermostat’s user manual or manufacturer’s instructions to determine the type and size of battery required.
- Ensure that the new battery is readily available and within reach.
- Confirm that the contacts or terminals in the thermostat’s battery compartment are clean and free of any dust or debris. If necessary, use a soft cloth or cotton swab to gently clean them.
- Take your new battery and carefully orient it according to the markings or polarity indicators inside the battery compartment. Typically, there will be (+) and (-) symbols to guide you.
- Gently insert the battery into the compartment, making sure the positive and negative ends align with the corresponding terminals or contacts. Be cautious not to force the battery or cause any damage to the compartment.
- Once the battery is securely inserted, double-check that it is placed correctly and the contacts are making good contact. Poor contact can lead to issues with the thermostat’s functionality.
- If your thermostat has a locking mechanism for the battery compartment, make sure to secure it properly to prevent accidental dislodging of the battery.
That’s it! You have successfully inserted a new battery in your thermostat. Proceed to the next step to reconnect the wires and complete the battery replacement process.
Step 6: Reconnect Wires
Now that you have successfully removed the old battery from your thermostat, it’s time to reconnect the wires and ensure proper electrical connections. Follow these steps to complete the process:
- Identify the wires: Take a close look at the wires that were disconnected earlier. Each wire should be labeled with a letter or color code, such as R for red, W for white, G for green, Y for yellow, and so on. Make a note of the labels or take a picture for reference.
- Match the labels: Locate the corresponding terminals on the thermostat. These terminals are usually labeled with the same letters or color codes as the wires. Ensure that you connect each wire to the correct terminal to prevent any issues with the thermostat’s functionality.
- Strip the wires: If the ends of the wires are stripped, ensure that there is enough exposed copper to make a solid connection. If needed, use wire strippers to remove the outer insulation and expose the copper strands. Be careful not to damage the wires in the process.
- Connect the wires: Once the wires are stripped, insert each wire into its respective terminal. Push the wire in firmly, making sure it is secure. Some thermostats have screw terminals, while others have push-in connectors. Follow the specific instructions provided with your thermostat to ensure a proper connection.
- Tighten the terminal screws: If your thermostat has screw terminals, use a screwdriver to securely tighten the terminal screws. This will ensure that the wires are held in place and will not come loose over time.
- Check for loose wires: After connecting all the wires, gently tug on each wire to ensure they are securely attached. If any wires feel loose, double-check the connection and make any necessary adjustments.
Once you have reconnected all the wires and ensured they are securely attached, you can proceed to the next step of reattaching the faceplate to the thermostat.
Step 7: Reattach Faceplate
Now that you have replaced the battery in your thermostat, it’s time to reattach the faceplate. Follow these steps to complete the process:
- Gently line up the faceplate with the base: Place the faceplate back onto the base of the thermostat, making sure that the screw holes are properly aligned.
- Secure the faceplate: Once the faceplate is properly aligned, use the screws you removed earlier to secure it in place. Tighten the screws just enough to hold the faceplate firmly, but be careful not to overtighten them.
- Double-check the alignment: Take a moment to ensure that the faceplate is firmly attached and properly aligned with the base of the thermostat. This will help ensure the overall functionality and appearance of the device.
- Power on the thermostat: With the faceplate securely attached, you can now turn on the power to the thermostat. This can usually be done by flipping the circuit breaker back to the “on” position or by using the power switch associated with your thermostat.
With the faceplate reattached and the power restored, your thermostat should now be ready to use. Take a moment to verify that everything is working correctly by adjusting the temperature settings and checking if the thermostat responds accordingly.
Remember, if you encounter any issues or have concerns about the functionality of your thermostat after replacing the battery and reattaching the faceplate, it’s always a good idea to consult the user manual or reach out to the thermostat manufacturer for assistance.
Step 8: Restore Power
Now that you have successfully replaced the battery in your thermostat, it’s time to restore power and get your HVAC system up and running again. Follow these steps to safely restore power:
1. Double-check the battery orientation: Before restoring power, make sure the new battery is correctly inserted with the proper polarity (+ and – symbols).
2. Turn the power switch back on: Locate the power switch or breaker that you turned off in Step 1. Flip it back on to restore the power to your thermostat.
3. Wait for the thermostat to reboot: Once the power is restored, your thermostat will go through a short reboot process. This may take a few moments, but don’t worry, it’s just a normal part of the startup sequence.
4. Verify the display: After the reboot, check the display on your thermostat. It should light up and show the current temperature or any settings you had previously programmed. If the display remains blank or shows an error message, double-check the battery installation or consult the thermostat’s user manual for troubleshooting steps.
5. Adjust temperature settings: With the power restored, you can now adjust your thermostat to your desired temperature settings. Use the thermostat’s controls to increase or decrease the temperature and ensure that your HVAC system is functioning properly.
6. Monitor the thermostat: After restoring power, keep an eye on your thermostat for the next few hours. Ensure that it is accurately displaying the temperature and properly controlling your HVAC system. If you notice any issues or discrepancies, you may need to recheck the battery or consult a professional for further assistance.
By following these steps, you can safely and effectively restore power to your thermostat after replacing the battery. Enjoy your comfortable and efficient HVAC system!
FAQs
Q: How often do I need to change the battery in my thermostat?
A: The frequency of battery replacement depends on the type of thermostat you have and the usage. Typically, it is recommended to change the battery once a year or when the low battery indicator appears on the thermostat display.
Q: Can I use rechargeable batteries in my thermostat?
A: It is not recommended to use rechargeable batteries in thermostats. Rechargeable batteries have a lower voltage output compared to standard alkaline batteries, which may cause the thermostat to malfunction or result in inaccurate temperature readings.
Q: How can I tell if the battery in my thermostat is dead?
A: If the battery in your thermostat is dead, you may notice that the thermostat display is blank, or the temperature readings are inaccurate. Additionally, some thermostats come with a low battery indicator that alerts you when the battery needs to be replaced.
Q: What type of battery does my thermostat require?
A: The type of battery required for your thermostat depends on the specific model. Most thermostats use AA or AAA batteries. Refer to the user manual or the manufacturer’s website to determine the correct battery type for your thermostat.
Q: Do I need to turn off the power before changing the battery in my thermostat?
A: Yes, it is crucial to turn off the power to the thermostat before changing the battery. This will help prevent any electrical mishaps and ensure your safety during the replacement process.
Q: Can I change the battery in my thermostat without professional help?
A: Yes, changing the battery in your thermostat is a simple task that can be done without professional help. However, it is important to follow the manufacturer’s instructions and ensure that the power is turned off before attempting the replacement.
Q: Will changing the battery in my thermostat reset the programming?
A: In most cases, changing the battery in your thermostat will not reset the programming or settings. However, it is always a good idea to take a photo or make a note of your thermostat’s programming before replacing the battery, just to be safe.
Q: What should I do if my thermostat is still not working after changing the battery?
A: If your thermostat is not working after replacing the battery, there may be other issues at play. Check the wiring connections to ensure they are secure and properly connected. If the problem persists, consult the user manual or contact the manufacturer for further assistance.
Q: Can I replace the battery in my thermostat while it is running on AC power?
A: It is generally not recommended to replace the battery in your thermostat while it is running on AC power. This is because the AC power can interfere with the battery replacement process and potentially cause damage to the thermostat. It is best to turn off the power before replacing the battery.
Q: How can I extend the battery life of my thermostat?
A: To extend the battery life of your thermostat, you can try the following tips:
- Ensure that the thermostat is not exposed to extreme temperatures, as this can drain the battery faster.
- Reduce the screen brightness or use the power-saving mode, if available.
- If your thermostat has a built-in motion sensor, consider adjusting the sensitivity or disabling it if not needed.
- Regularly clean the battery contacts and remove any corrosion.
Q: Can I use a different brand of battery in my thermostat?
A: It is generally safe to use a different brand of battery in your thermostat as long as it is the correct type (AA or AAA) and meets the required voltage specifications. However, it is always recommended to use the same brand of batteries recommended by the manufacturer for optimal performance.
Changing the battery in your thermostat is a simple task that can have a significant impact on the efficiency and effectiveness of your heating and cooling system. By following the steps outlined in this article, you can easily replace the battery and ensure that your thermostat continues to function properly.
Remember, regular battery replacement is essential to prevent any disruptions in temperature control and to keep your HVAC system running smoothly. It’s always a good idea to keep spare batteries on hand, so you’re prepared whenever the battery needs to be replaced.
By taking the time to maintain and care for your thermostat, you can enjoy a comfortable living environment while optimizing energy usage. So don’t neglect this small yet crucial task – give your thermostat the power it needs to keep your home at the perfect temperature!
FAQs
1. Why would I need to change the battery in my thermostat?
Over time, the battery in your thermostat may lose its charge, resulting in a loss of power to the device. This can lead to your thermostat not functioning properly or not turning on at all. Changing the battery is a simple solution to ensure your thermostat continues to operate correctly.
2. How often should I change the battery in my thermostat?
The frequency of changing the battery in your thermostat can vary depending on the type of thermostat you have and the brand. In general, it is recommended to check the battery level every six months and change it if it is weak or depleted. Regularly checking and replacing the battery will help avoid any disruptions in the thermostat’s performance.
3. What type of battery is needed for my thermostat?
The type of battery required for your thermostat will typically be indicated in the manufacturer’s instructions or on the back of the thermostat itself. Commonly, thermostats use AA or AAA batteries. Ensure to check the specific battery size mentioned and use a high-quality battery for optimal performance.
4. How do I know when the battery in my thermostat needs to be changed?
Most thermostats will display a low battery indicator when the battery power is running low. This can appear as a symbol or a message on the screen, indicating that it is time to replace the battery. Additionally, if you notice your thermostat not responding to commands or not displaying accurate information, it might be a sign that the battery needs to be changed.
5. How do I change the battery in my thermostat?
To change the battery in your thermostat, follow these simple steps:
- Locate the battery compartment on your thermostat.
- Open the compartment using a screwdriver or by simply sliding it open.
- Remove the old battery from the compartment.
- Insert a new battery of the correct size and make sure it is placed correctly with the positive and negative terminals aligned.
- Close the battery compartment securely.
- Check the battery level indicator, if available, to ensure the new battery is recognized and functioning properly.
Always refer to the manufacturer’s instructions for your specific thermostat model when changing the battery to ensure a correct and safe process.