
Are you tired of using a slow and unreliable internet connection on your MacBook? Maybe you’re on the go and there’s no Wi-Fi available. Well, the good news is that you can easily connect your MacBook to a hotspot to enjoy a fast and stable internet connection. Whether you’re using your smartphone’s hotspot or a portable Wi-Fi device, setting up a hotspot connection with your MacBook is a breeze. In this article, we’ll guide you through the step-by-step process of connecting your MacBook to a hotspot. We’ll cover the different methods you can use, the settings you need to configure, and some troubleshooting tips in case you encounter any issues. So grab your MacBook and get ready to enjoy seamless internet connectivity wherever you are!
Inside This Article
- Step 1: Enable Personal Hotspot on iPhone
- Step 2: Connect MacBook to iPhone Hotspot via Wi-Fi
- Step 3: Connect MacBook to iPhone Hotspot via Bluetooth
- Step 4: Connect MacBook to iPhone Hotspot via USB
- Troubleshooting Tips
- Conclusion
- FAQs
Step 1: Enable Personal Hotspot on iPhone
Enabling the Personal Hotspot feature on your iPhone allows you to share your mobile data connection with your MacBook, so you can access the internet on the go. Follow these simple steps to activate the Personal Hotspot:
- Open the Settings app on your iPhone.
- Tap on “Personal Hotspot” or “Internet Sharing” (depending on your iPhone’s version).
- Toggle the switch to turn on the Personal Hotspot.
- Set a Wi-Fi password for your hotspot to ensure a secure connection.
- You can also choose to enable Bluetooth or USB connection options for your MacBook, in addition to Wi-Fi.
Once the Personal Hotspot is activated, your iPhone will broadcast a Wi-Fi network that your MacBook can connect to. Let’s move on to the next step to connect your MacBook to the iPhone hotspot via Wi-Fi.
Step 2: Connect MacBook to iPhone Hotspot via Wi-Fi
Connecting your MacBook to your iPhone’s hotspot via Wi-Fi is a straightforward process that allows you to access the internet on your laptop while on the go. Here’s how you can do it:
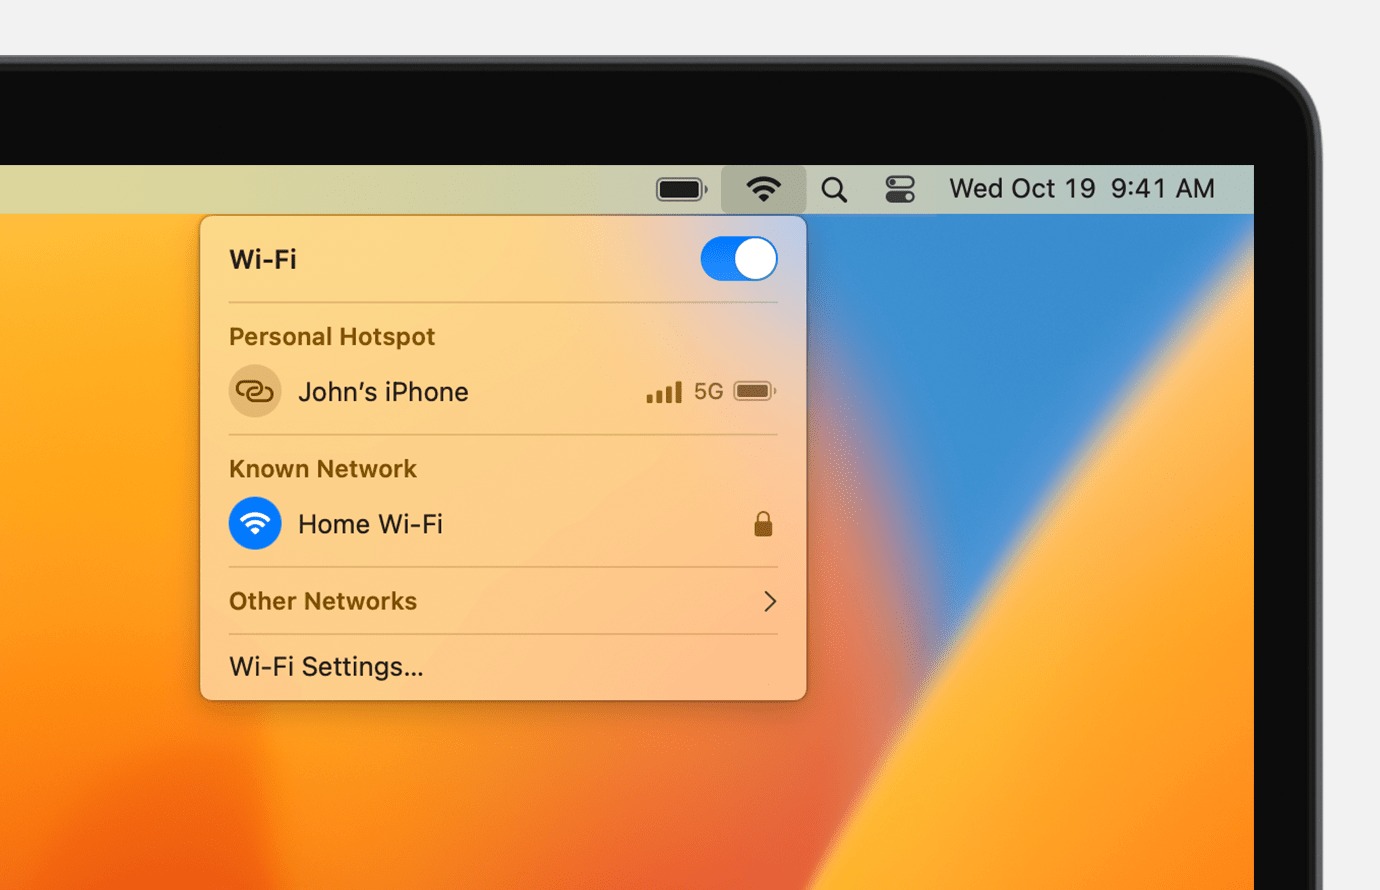
1. On your MacBook, click on the Wi-Fi icon located in the menu bar at the top right corner of the screen. A dropdown menu will appear, showing a list of available Wi-Fi networks.
2. In the list of available networks, locate and select your iPhone’s hotspot. It should be labeled with the name you designated when setting up your hotspot.
3. You will be prompted to enter the password for your iPhone’s hotspot. Enter the password and click “Join.” Make sure you enter the password correctly to establish a successful connection.
4. Once you have entered the correct password, your MacBook will attempt to connect to the iPhone hotspot. It may take a few moments to establish a connection, so be patient.
5. Once the connection is established, you will see a Wi-Fi icon with signal bars appear on your MacBook’s menu bar. This indicates that you are now connected to your iPhone’s hotspot and can start using the internet on your MacBook.
6. You can now open your preferred web browser or any other internet-dependent applications on your MacBook and start browsing, streaming, or downloading content as you would on any regular Wi-Fi network.
It is essential to note that using your iPhone’s hotspot to connect your MacBook to the internet consumes cellular data. Therefore, ensure that you have an adequate data plan or are connected to a Wi-Fi network to avoid unnecessary data charges.
Additionally, it is recommended to keep your iPhone and MacBook in close proximity for a stable and reliable Wi-Fi connection.
Now that you’ve successfully connected your MacBook to your iPhone’s hotspot via Wi-Fi, you can enjoy internet access wherever you go, even when traditional Wi-Fi networks are unavailable!
Step 3: Connect MacBook to iPhone Hotspot via Bluetooth
Connecting your MacBook to your iPhone hotspot via Bluetooth is another convenient option. By using a Bluetooth connection, you can access the internet on your MacBook without the need for a Wi-Fi or USB connection. Here’s how you can do it:
1. Enable Bluetooth: First, make sure that Bluetooth is enabled on both your iPhone and MacBook. On your iPhone, go to Settings > Bluetooth and toggle it on. On your MacBook, click on the Bluetooth icon in the menu bar and select “Turn Bluetooth On.”
2. Pair your devices: Once Bluetooth is enabled on both devices, you need to pair them. On your iPhone, make sure that it is discoverable by going to Settings > Bluetooth and ensuring that the “Discoverable” toggle is enabled. On your MacBook, click on the Bluetooth icon in the menu bar and select “Open Bluetooth Preferences.” In the Bluetooth preferences window, click on “Pair” next to your iPhone’s name and follow the on-screen instructions to complete the pairing process.
3. Connect to iPhone Hotspot: After successfully pairing your devices, you can now connect your MacBook to your iPhone hotspot via Bluetooth. On your MacBook, click on the Bluetooth icon in the menu bar and hover over your iPhone’s name. From the drop-down menu, select “Connect to Network.” Your MacBook will now establish a Bluetooth connection with your iPhone hotspot.
4. Verify the connection: Once the connection is established, you can verify the connection status by checking the Bluetooth icon in the menu bar of your MacBook. If the icon is solid with no exclamation mark, it means that your MacBook is successfully connected to your iPhone hotspot via Bluetooth.
5. Enjoy the internet: Now that your MacBook is connected to your iPhone hotspot via Bluetooth, you can start browsing the internet, accessing online services, and using any apps that require an internet connection.
Note: Connecting your MacBook to your iPhone hotspot via Bluetooth may not provide the same speed as a Wi-Fi or USB connection. However, it can be a useful option when a stable Wi-Fi network is unavailable or when you want to conserve battery life on your iPhone.
By following these steps, you can easily connect your MacBook to your iPhone hotspot via Bluetooth and enjoy internet connectivity wherever you go.
Step 4: Connect MacBook to iPhone Hotspot via USB
Connecting your MacBook to your iPhone’s hotspot via USB is another convenient way to access the internet. This method ensures a stable and reliable connection, especially in situations where Wi-Fi signals may be weak or intermittent. Here’s how you can do it:
1. Begin by connecting your iPhone to your MacBook using a lightning to USB cable. Make sure both devices are turned on and unlocked.
2. On your iPhone, navigate to the “Settings” app and tap on “Personal Hotspot.”
3. Toggle on the “Allow Others to Join” option. This will enable your iPhone to share its cellular data connection with your MacBook.
4. Now, on your MacBook, go to the Apple menu and select “System Preferences.”
5. In the System Preferences window, click on “Network.”
6. On the left-hand side, select “iPhone USB” from the list of available network connections.
7. Click on the “Apply” button to save the changes.
8. Once the connection is established, you will see a small USB icon in the menu bar at the top of your MacBook screen, indicating that you are connected to the iPhone’s hotspot via USB.
Now you can enjoy a fast and stable internet connection on your MacBook using your iPhone’s cellular data. This method is particularly useful when you need a reliable connection for tasks such as video conferencing, large file downloads, or streaming content.
Troubleshooting Tips
If you are experiencing difficulties connecting your MacBook to an iPhone hotspot, don’t worry. Here are some troubleshooting tips to help you get connected:
1. Restart your devices: Sometimes, a simple restart can resolve connectivity issues. Restart your MacBook and iPhone, and then try connecting again.
2. Check your hotspot settings: Make sure that the Personal Hotspot feature is enabled on your iPhone. Go to “Settings” -> “Personal Hotspot” and toggle the switch to enable it.
3. Check Wi-Fi signal strength: Ensure that your iPhone has a strong Wi-Fi signal. Move closer to your iPhone or try connecting in a different location to improve signal strength.
4. Forget the network: If you have previously connected your MacBook to the iPhone hotspot, try forgetting the network and then reconnecting. Go to “System Preferences” -> “Network” -> “Wi-Fi” -> “Advanced” -> “Wi-Fi” tab, select the iPhone hotspot network and click on the “-” button to remove it. Then, reconnect to the hotspot.
5. Check for software updates: Ensure that your MacBook and iPhone are running the latest software updates. Outdated software can sometimes cause connectivity issues. Go to “System Preferences” on your MacBook and “Settings” -> “General” -> “Software Update” on your iPhone to check for updates.
6. Disable VPN or Proxy: If you have a VPN (Virtual Private Network) or proxy settings enabled on your MacBook, try disabling them. VPNs and proxies can interfere with hotspot connections.
7. Reset network settings: If all else fails, you can try resetting the network settings on your iPhone. Go to “Settings” -> “General” -> “Reset” -> “Reset Network Settings”. Keep in mind that this will remove all saved Wi-Fi networks and passwords from your iPhone.
8. Contact your service provider: If none of the above steps work, contact your mobile service provider for further assistance. They may be able to help troubleshoot any network-related issues.
By following these troubleshooting tips, you should be able to resolve any connection issues between your MacBook and iPhone hotspot. Enjoy seamless internet connectivity on your MacBook wherever you go!
Conclusion
Connecting your MacBook to a hotspot is a simple and convenient way to access the internet on the go. By following the steps outlined in this article, you can easily connect your MacBook to a hotspot and enjoy seamless internet connectivity wherever you are.
Whether you’re traveling, working from a remote location, or simply need to connect your MacBook to a hotspot temporarily, the process is straightforward and can be done in just a few clicks.
Remember to choose a reliable hotspot provider with a strong internet connection to ensure a stable and fast connection. Additionally, always prioritize your online security by using a strong password and avoiding public networks that may be unsecured.
Now that you’re armed with the knowledge of how to connect your MacBook to a hotspot, you can stay connected and productive while on the move. So, grab your MacBook, find a suitable hotspot, and enjoy uninterrupted internet access wherever you go!
FAQs
1. How do I connect my MacBook to a hotspot?
To connect your MacBook to a hotspot, follow these steps:
– Click on the Wi-Fi icon in the menu bar at the top right corner of the screen.
– A dropdown menu will appear, showing available networks.
– Select the hotspot you want to connect to from the list.
– If the hotspot is password-protected, enter the password when prompted.
– Once connected, the Wi-Fi icon will change to indicate your MacBook is connected to the hotspot.
– You are now successfully connected to the hotspot and can access the internet.
2. Can I connect my MacBook to a mobile hotspot?
Absolutely! Your MacBook can be easily connected to a mobile hotspot. Simply follow the steps mentioned in the previous FAQ to connect your MacBook to a mobile hotspot. It works the same way as connecting to any other Wi-Fi network.
3. Are there any limitations to connecting a MacBook to a hotspot?
In general, there are no specific limitations to connecting your MacBook to a hotspot. However, the speed and stability of your internet connection may depend on various factors such as the signal strength of the hotspot, the distance between your MacBook and the hotspot, and the number of devices connected to the hotspot at the same time.
4. Can I share my MacBook’s internet connection as a hotspot?
Yes, you can share your MacBook’s internet connection with other devices by setting up a personal hotspot. Here’s how:
– Open “System Preferences” on your MacBook.
– Click on “Sharing”.
– Check the box next to “Internet Sharing” in the list of options on the left.
– Select “Wi-Fi” as the “Share your connection from” option.
– Choose a name and password for your personal hotspot.
– Enable the “Wi-Fi” option on your other devices and connect them to your MacBook’s personal hotspot using the provided name and password.
5. Is there a way to prioritize Wi-Fi networks on a MacBook?
Yes, you can prioritize Wi-Fi networks on your MacBook by following these steps:
– Click on the Apple menu and open “System Preferences”.
– Select “Network”.
– Click on the Wi-Fi option in the left sidebar and then click on “Advanced” in the bottom right corner.
– In the list of preferred networks, drag the networks in the desired order. The network at the top will be given priority when connecting.
– Click on “OK” to save the changes.