
Connectivity is essential in today’s digital world, and being able to connect your MacBook to a wireless network is crucial for productivity and convenience. Whether you’re at home, in the office, or at a café, accessing the internet wirelessly allows you to stay connected and access various online resources effortlessly. In this article, we will explore the step-by-step process of connecting your MacBook to a wireless network, ensuring that you can browse the web, send emails, and stream media with ease. Whether you’re a tech-savvy individual or a novice user, this guide will provide you with the knowledge and confidence to connect your MacBook to a wireless network in no time.
Inside This Article
- Step 1: Check your network connection
- Step 2: Connect to a wireless network
- Step 3: Enter network password
- Step 4: Troubleshooting tips
- Conclusion
- FAQs
Step 1: Check your network connection
Before attempting to connect your MacBook to a wireless network, it’s essential to ensure that your network connection is working properly. Here are a few steps to help you check your network connection:
1. Make sure your Wi-Fi is turned on: Locate the Wi-Fi icon in the menu bar at the top right corner of your MacBook’s screen. If the Wi-Fi icon is grayed out or displays a status of “No Wi-Fi,” click on it to enable the Wi-Fi functionality.
2. Verify that your Wi-Fi network is visible: Check if your wireless network appears in the available networks list. If it doesn’t, there may be an issue with your router or the network may be out of range. In such cases, try moving closer to the network source or resetting your router.
3. Test other devices: If other devices can connect to the same Wi-Fi network without any issues, it’s likely that the problem lies with your MacBook’s network settings. If this is the case, proceed to the next step.
4. Restart your MacBook: Sometimes, a simple restart can resolve network connectivity issues. Try restarting your MacBook and then check if you can connect to the Wi-Fi network.
5. Check for software updates: Outdated software can sometimes cause network problems. Go to the “Apple menu” in the top left corner of your screen, select “System Preferences,” and then click on “Software Update.” If there are any available updates, install them and restart your MacBook if necessary.
By following these steps, you can ensure that your MacBook’s network connection is functioning properly before attempting to connect to a wireless network. This will help prevent any unnecessary troubleshooting further down the line.
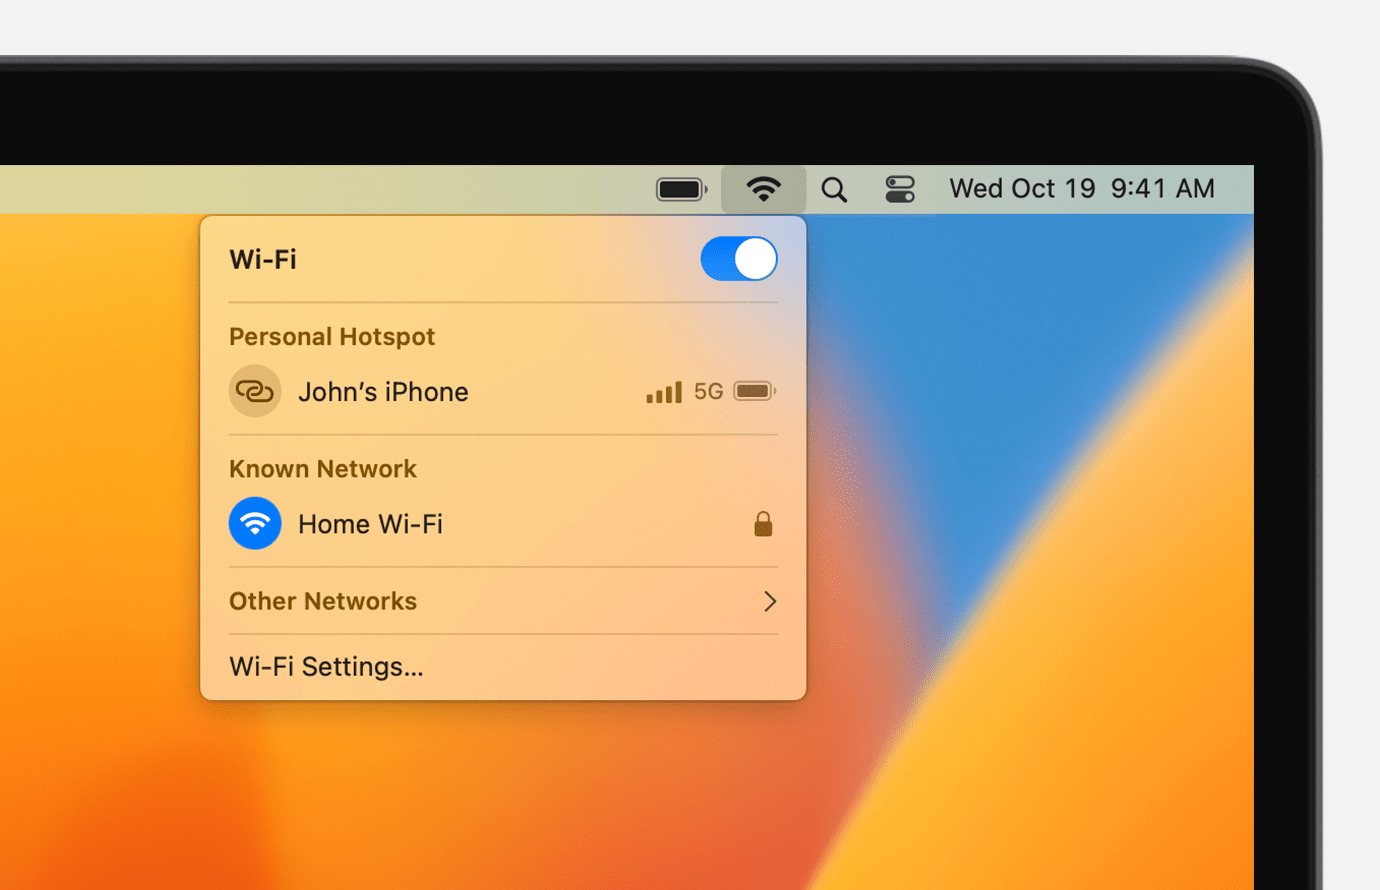
Step 2: Connect to a wireless network
Once you have ensured that your MacBook is capable of connecting to a wireless network and that the network is available, it’s time to proceed with actually connecting to the network. Follow the steps below:
1. Click on the Wi-Fi icon in the menu bar at the top right corner of your MacBook’s screen. This will open a dropdown menu displaying the available wireless networks in your vicinity.
2. From the list of available networks, locate the network you want to connect to and click on its name. If the network is password-protected, a password prompt will appear.
3. If the network is an open network, meaning it doesn’t require a password, your MacBook will automatically connect to it. You can verify the successful connection by the Wi-Fi icon in the menu bar turning solid and displaying signal strength bars.
4. If the network is password-protected, enter the correct password into the password prompt. Make sure to type the password accurately, as it is case-sensitive.
5. Once you have entered the password, click the “Join” or “Connect” button. Your MacBook will attempt to connect to the network. If the password is correct, the connection will be established, and the Wi-Fi icon in the menu bar will show signal strength bars.
6. If the connection is unsuccessful, double-check the password you entered. It’s important to note that some Wi-Fi passwords may be hidden, so be sure to click the “Show password” option if provided.
7. If you are still unable to connect, ensure that you are within range of the wireless network and that your MacBook’s Wi-Fi is turned on. Additionally, try restarting your MacBook and repeating the steps above.
8. Once successfully connected to the wireless network, you can browse the internet, check emails, stream videos, and perform various online activities on your MacBook.
Remember, it’s important to protect your personal information and secure your internet connection when connecting to public Wi-Fi networks. Use a VPN (Virtual Private Network) for added security and consider avoiding sensitive activities when connected to unfamiliar networks.
Step 3: Enter network password
Now that you’ve successfully found and selected your wireless network, it’s time to enter the network password. The network password is a security measure to ensure that only authorized users can access the network.
When prompted, you will usually see a dialog box or a pop-up window asking for the password. Simply type in the password exactly as it is provided by your network administrator or as printed on the back of your router.
It’s essential to ensure that you enter the password accurately. Most passwords are case-sensitive, so be sure to pay attention to uppercase and lowercase letters. If you enter the password incorrectly, you won’t be able to connect to the wireless network.
Some networks have a “Show password” option that allows you to see the characters you are typing. This can be helpful for double-checking the accuracy of your password. If your network doesn’t have this option, make sure to be extra careful when entering the password.
If you’re having trouble remembering the password for your network, try looking for a sticker on your router that contains the default password. Alternatively, you can contact your network administrator or internet service provider for assistance. They should be able to provide you with the password or guide you through the steps to reset it.
Once you have entered the network password, click on the “Connect” or “Join” button to proceed. Your Macbook will then attempt to establish a connection with the wireless network using the provided password. If the password is correct, you will be successfully connected to the network.
If, however, you receive an error message stating that the password is incorrect, double-check the password and try again. It’s essential to enter the password precisely to establish a successful connection.
Remember, the network password is designed to protect your network’s security. It’s crucial not to share your password with unauthorized individuals, as this could compromise the safety of your network and your personal information.
Step 4: Troubleshooting tips
If you encounter any issues while trying to connect your MacBook to a wireless network, don’t worry! Here are some troubleshooting tips to help you overcome common problems:
1. Check your Wi-Fi signal strength: Sometimes, a weak Wi-Fi signal can cause connectivity issues. Make sure your MacBook is within range of the wireless network and move closer to the router if needed.
2. Restart your MacBook and the router: Sometimes, a simple restart can fix minor connectivity issues. Restart your MacBook and power off/on your router to see if that resolves the problem.
3. Forget and rejoin the Wi-Fi network: Go to the “Network” settings on your MacBook and forget the Wi-Fi network you’re having trouble with. Then, rejoin the network by entering the correct password.
4. Reset the network settings on your MacBook: If you’re still experiencing issues, you can try resetting the network settings on your MacBook. Go to “System Preferences” > “Network” > “Advanced” > “TCP/IP” and click on “Renew DHCP Lease” followed by “Apply.” Restart your MacBook after making these changes.
5. Update your macOS: Outdated software can sometimes cause connectivity problems. Check for any available updates for your macOS and install them to ensure that your MacBook has the latest bug fixes and improvements.
6. Disable any VPN or proxy settings: If you’re using a VPN or have configured proxy settings on your MacBook, try disabling them temporarily to see if it resolves the connectivity issue.
7. Disable third-party security software: Some third-party security software, like firewall applications, can interfere with your Wi-Fi connection. Temporarily disable any such software and check if the issue persists.
8. Contact your internet service provider (ISP): If none of the above solutions work, it’s possible that the problem lies with your internet service provider. Reach out to your ISP’s customer support for further assistance.
By following these troubleshooting tips, you should be able to identify and address any issues preventing your MacBook from connecting to a wireless network. Remember to stay patient and persistent, and soon enough, you’ll have a stable and seamless Wi-Fi connection!
Conclusion
Connecting your MacBook to a wireless network is essential for seamless internet access and productivity. By following the simple steps outlined in this guide, you can easily connect your MacBook to a wireless network, whether it’s a personal home network or a public Wi-Fi hotspot.
Remember to double-check your network settings, ensure that Wi-Fi is enabled on your MacBook, and enter the correct network password if necessary. Troubleshoot any connection issues by restarting your MacBook and the router, or by updating your network drivers if needed.
With a stable wireless connection, you can enjoy fast internet speeds, stream your favorite movies, browse the web, and stay connected with friends and colleagues. So, go ahead and connect your MacBook to a wireless network, and experience the freedom and convenience of wireless connectivity.
FAQs
1. Can I connect my Macbook to a wireless network?
Yes, absolutely! Macbooks are equipped with built-in Wi-Fi capabilities, allowing you to connect to wireless networks without any additional hardware. Simply navigate to the Wi-Fi settings on your Macbook and select the desired network to connect to.
2. How do I connect my Macbook to a wireless network?
To connect your Macbook to a wireless network, follow these steps:
– Click on the Wi-Fi icon in the menu bar at the top right corner of your screen.
– A list of available networks will appear. Select the network you want to join.
– If the network is secured, you will be prompted to enter the password. Enter the password and click “Join.”
– Once you are connected, the Wi-Fi icon will display signal strength indicating the strength of the connection.
3. What should I do if I can’t connect my Macbook to a wireless network?
If you are experiencing difficulties connecting your Macbook to a wireless network, try the following troubleshooting steps:
– Verify that your Wi-Fi is turned on by checking the Wi-Fi icon in the menu bar.
– Restart your Macbook and the router.
– Make sure you are within range of the Wi-Fi network.
– Check if other devices can connect to the network.
– Forget the network on your Macbook and then join it again.
– Reset network settings on your Macbook if necessary.
4. Can I connect to a hidden wireless network using my Macbook?
Yes, you can connect to a hidden wireless network using your Macbook. To do so, follow these steps:
– Click on the Wi-Fi icon in the menu bar.
– Select “Join Other Network” at the bottom of the network list.
– Enter the precise network name (SSID) and security type (if applicable).
– Enter the password (if required) and click “Join.”
5. How can I improve the Wi-Fi signal on my Macbook?
If you’re experiencing a weak Wi-Fi signal on your Macbook, try the following tips to improve it:
– Position your Macbook closer to the Wi-Fi router for a stronger signal.
– Reduce obstructions between your Macbook and the router, such as walls or furniture.
– Resetting your router or upgrading its firmware.
– Avoiding interference from other electronic devices.
– Adjusting the Wi-Fi channel to a less congested one.