
In today’s world, where we rely heavily on gadgets and electronic devices, the idea of powering something using a humble potato may seem outdated or even unbelievable. However, believe it or not, a potato can actually be used as a battery to generate electricity. This fascinating experiment has been a favorite among science enthusiasts and curious individuals for many years.
So, how does it work? In simple terms, the potato acts as an electrolyte-filled vessel, while two different metal rods serve as electrodes. When these electrodes are inserted into the potato, a chemical reaction occurs, creating a flow of electrons. This flow of electrons is known as electricity, which can be harnessed to power small devices such as LED lights or electronic clocks.
In this article, we will dive deeper into the world of potato batteries and explore how you can make one for yourself. Get ready to be amazed by the power of nature and the incredible potential of everyday vegetables!
Inside This Article
- # How To Make A Potato Battery
- Materials Needed
- Step 1: Gathering the Materials
- Step 2: Preparing the Potatoes
- Step 3: Creating the Electrodes
- Step 4: Assembling the Potato Battery
- Step 5: Testing the Potato Battery
- Troubleshooting Tips
- Conclusion
- FAQs
# How To Make A Potato Battery
Have you ever wondered if you can power a small electronic device with a simple potato? Well, wonder no more! In this article, we will show you how to make a potato battery that can generate enough electricity to light up an LED bulb or power a small clock.
Before we dive into the steps, let’s first understand the science behind a potato battery. A potato contains phosphoric acid, which acts as an electrolyte. When two dissimilar metals are inserted into the potato, a chemical reaction occurs, producing a flow of electrons. This flow of electrons is what creates the electrical current used to power your device.
Materials Needed:
- 2 large potatoes
- Copper and zinc electrodes (nails will work)
- 2 alligator clip wires
- LED bulb or small electronic device (clock, calculator, etc.)
Step 1: Gathering the Materials
The first step is to gather all the materials needed to create your potato battery. Make sure you have two large potatoes, copper and zinc electrodes (nails work well), two alligator clip wires, and the LED bulb or small electronic device you plan to power.
Step 2: Preparing the Potatoes
Now that you have your materials ready, it’s time to prepare the potatoes. Take one of the potatoes and insert a copper electrode into it, making sure it goes in about halfway. Repeat the process with the other potato, but this time insert a zinc electrode. Make sure the electrodes are not touching each other inside the potatoes.
Step 3: Creating the Electrodes
If you don’t have copper and zinc electrodes readily available, you can use nails instead. Make sure to clean the nails thoroughly before using them. The copper electrode will act as the positive terminal (anode), while the zinc electrode will serve as the negative terminal (cathode).
Step 4: Assembling the Potato Battery
Once the potatoes and electrodes are ready, it’s time to assemble your potato battery. Take one end of the alligator clip wire and attach it to the copper electrode/nail of one potato. Attach the other end of the wire to the longer leg of the LED bulb or the positive terminal of your small electronic device. Repeat the process with the other potato, connecting the zinc electrode/nail with the remaining alligator clip wire and the shorter leg of the LED bulb or negative terminal of your device.
Step 5: Testing the Potato Battery
You are now ready to test your potato battery! Connect the alligator clip wires to the LED bulb or small electronic device, making sure the positive and negative terminals match. If everything is connected correctly, the LED bulb should light up or your small device should power on. Congratulations! You have successfully made a potato battery.
Troubleshooting Tips
If your potato battery is not working, here are a few troubleshooting tips:
- Make sure the electrodes are securely inserted into the potatoes without touching each other.
- Check that the alligator clip wires are properly connected to the electrodes and the LED bulb or device.
- Ensure that the LED bulb or device is functioning correctly.
- Try using fresh potatoes as they tend to have more phosphoric acid.
Now that you know how to make a potato battery, you can experiment with different types of small electronic devices or even power multiple LED bulbs using a series or parallel connection of potato batteries. It’s a fun way to learn about the principles of electricity and the chemical reactions that can occur in everyday objects!
Materials Needed
Before you embark on your potato battery experiment, gather the following materials:
- Potatoes: You’ll need two or three potatoes for your battery. Choose larger ones for better results.
- Copper and Zinc Electrodes: Copper and zinc are essential for creating the necessary chemical reactions in the battery. You can use pieces of copper and zinc, such as nails, electrodes, or strips.
- Connecting Wires: Use insulated copper wires to connect the electrodes to each other and to other components of the circuit.
- Alligator Clips: These clips will help you easily connect the wires to the electrodes.
- LED or Light Bulb: You’ll need a small LED or a low-voltage light bulb to test the power generated by your potato battery.
- Small Screwdriver: Use a small screwdriver to make holes in the potatoes for inserting the electrodes.
- Saltwater or Vinegar: To enhance the conductivity of the potato battery, you can use saltwater or vinegar as an electrolyte. This step is optional but can improve the efficiency of your battery.
Once you have gathered these materials, you’re all set to start building your potato battery!
Step 1: Gathering the Materials
Before you embark on the exciting journey of creating your own potato battery, it is crucial to gather all the necessary materials. These items will not only make the process more convenient but also ensure that you can successfully generate electricity from potatoes. Here’s a list of materials you will need:
- Potatoes: Choose a couple of fresh, medium-sized potatoes. The number depends on how many batteries you wish to create.
- Copper and Zinc electrodes: These are essential for the chemical reactions that generate electricity. You can use galvanized nails for the zinc electrode and pennies or copper wire for the copper electrode.
- Alligator clips/wires: These will help you connect the electrodes to create a circuit and allow the flow of electricity.
- LED light: This acts as the load, demonstrating the successful generation of electricity. Make sure you choose an LED that requires low voltage to light up.
- Knife: You’ll need a knife to cut the potatoes and make small slits for inserting the electrodes.
- Optional: Multimeter – If you want to measure the voltage or current produced by your potato battery, a multimeter can be a fantastic addition.
Once you have gathered all these materials, you’ll have everything you need to get started on your potato battery experiment. Now, let’s move on to the next step and prepare the potatoes!
Step 2: Preparing the Potatoes
Once you have gathered all the necessary materials for your potato battery experiment, it’s time to move on to the next step: preparing the potatoes. This crucial step ensures that the potatoes are suitable for use as a power source by maximizing their electrical conductivity.
Here’s what you need to do to prepare the potatoes:
- Wash the potatoes thoroughly to remove any dirt or debris that may interfere with the experiment.
- Using a knife or a potato peeler, carefully remove a small section of the skin from each potato. This will expose the interior flesh, which contains the electrolytes necessary for the battery to work.
- Cut a small slit into each potato to create a space for inserting the electrodes. Make sure the slit is deep enough to securely hold the electrodes in place.
- If you are using copper and zinc electrodes, you can attach them to alligator clips or wires for easier insertion. This will also help establish a firm connection between the electrodes and the potato.
It’s crucial to handle the potatoes with care during this step to avoid damaging them or injuring yourself. Remember to exercise caution when using sharp objects, such as knives or potato peelers.
By properly preparing the potatoes, you are ensuring that they are ready to harness the chemical reactions that will generate electricity in the following steps. Once you have completed this step, it’s time to move on to creating the electrodes for your potato battery.
Step 3: Creating the Electrodes
Creating the electrodes for your potato battery is an essential step in making it work. The electrodes are responsible for carrying the electric charge produced by the chemical reactions happening inside the potato. Here’s how you can create the electrodes:
1. Choose Your Metals: Select two different kinds of metal that will serve as your electrodes. Common choices include zinc and copper. These metals should be easily accessible, such as using galvanized nails or copper wire.
2. Prepare the Copper Electrode: If you choose copper wire, strip off the insulation coating to expose the metal. Cut the wire into small strips, each about 1 inch long. These strips will be inserted into the potato.
3. Prepare the Zinc Electrode: If you opt for galvanized nails, ensure that the nails are made of zinc-coated steel. This coating is crucial for the chemical reaction to occur. Remove any coating or paint from the portion that will be inserted into the potato.
4. Insert the Electrodes: With the potato at hand, carefully insert the copper strip and the zinc-coated nail into the potato. Ensure that they are placed at least an inch apart from each other and that they are deep enough to have good contact with the potato flesh.
5. Keep the Electrodes Separate: It’s important to keep the electrodes separated inside the potato to prevent short-circuiting. You can do this by inserting the copper strip on one side of the potato and the zinc-coated nail on the other side.
6. Secure the Electrodes: To ensure that the electrodes stay in place, you can use alligator clips or electrical tape to hold them in position. Make sure they are firmly connected to the metal parts of the electrodes.
By following these steps, you will have successfully created the electrodes for your potato battery. These electrodes will facilitate the transfer of electrons and create the necessary electrical charge for your battery to function.
Step 4: Assembling the Potato Battery
Once you have prepared the potatoes and created the electrodes, it’s time to assemble the potato battery. Follow these simple steps to bring your potato battery to life:
1. Connect the electrodes to the potatoes: Take the zinc and copper electrodes that you created in the previous step and insert them into their respective potatoes. Make sure that each electrode is inserted deep enough to have good contact with the potato’s flesh, but be careful not to pierce the opposite side of the potato.
2. Connect the electrodes with wires: Take two pieces of wire, one for each potato, and securely connect the zinc electrode of one potato to the copper electrode of the other potato. This creates a circuit that allows the electrons to flow from one potato to the other.
3. Test the circuit: Using a multimeter or a simple LED light bulb, you can test whether your potato battery is working. Connect the positive terminal of the multimeter or one end of the LED to the copper electrode of one potato, and the negative terminal or the other end of the LED to the zinc electrode of the other potato. If the circuit is complete and functioning properly, you should see a small current or the LED light up.
4. Secure the connections: Once you have verified that the potato battery is working, it’s important to secure the connections to prevent them from coming loose and interrupting the circuit. You can use electrical tape or twist the wires together and cover them with a layer of insulating material such as plastic wrap or heat shrink tubing.
5. Optional: Increase the power: If you want to increase the power output of your potato battery, you can connect multiple potato batteries in series or in parallel. In series connection, you connect the positive terminal of one potato battery to the negative terminal of another. This increases the voltage but keeps the current the same. In parallel connection, you connect the positive terminals of all the potato batteries together, and likewise the negative terminals. This increases the current but keeps the voltage the same.
By following these steps, you have successfully assembled your potato battery. Now you can use it to power small electronic devices or simply marvel at the wonders of science. Get creative and see what other things you can power using a humble potato!
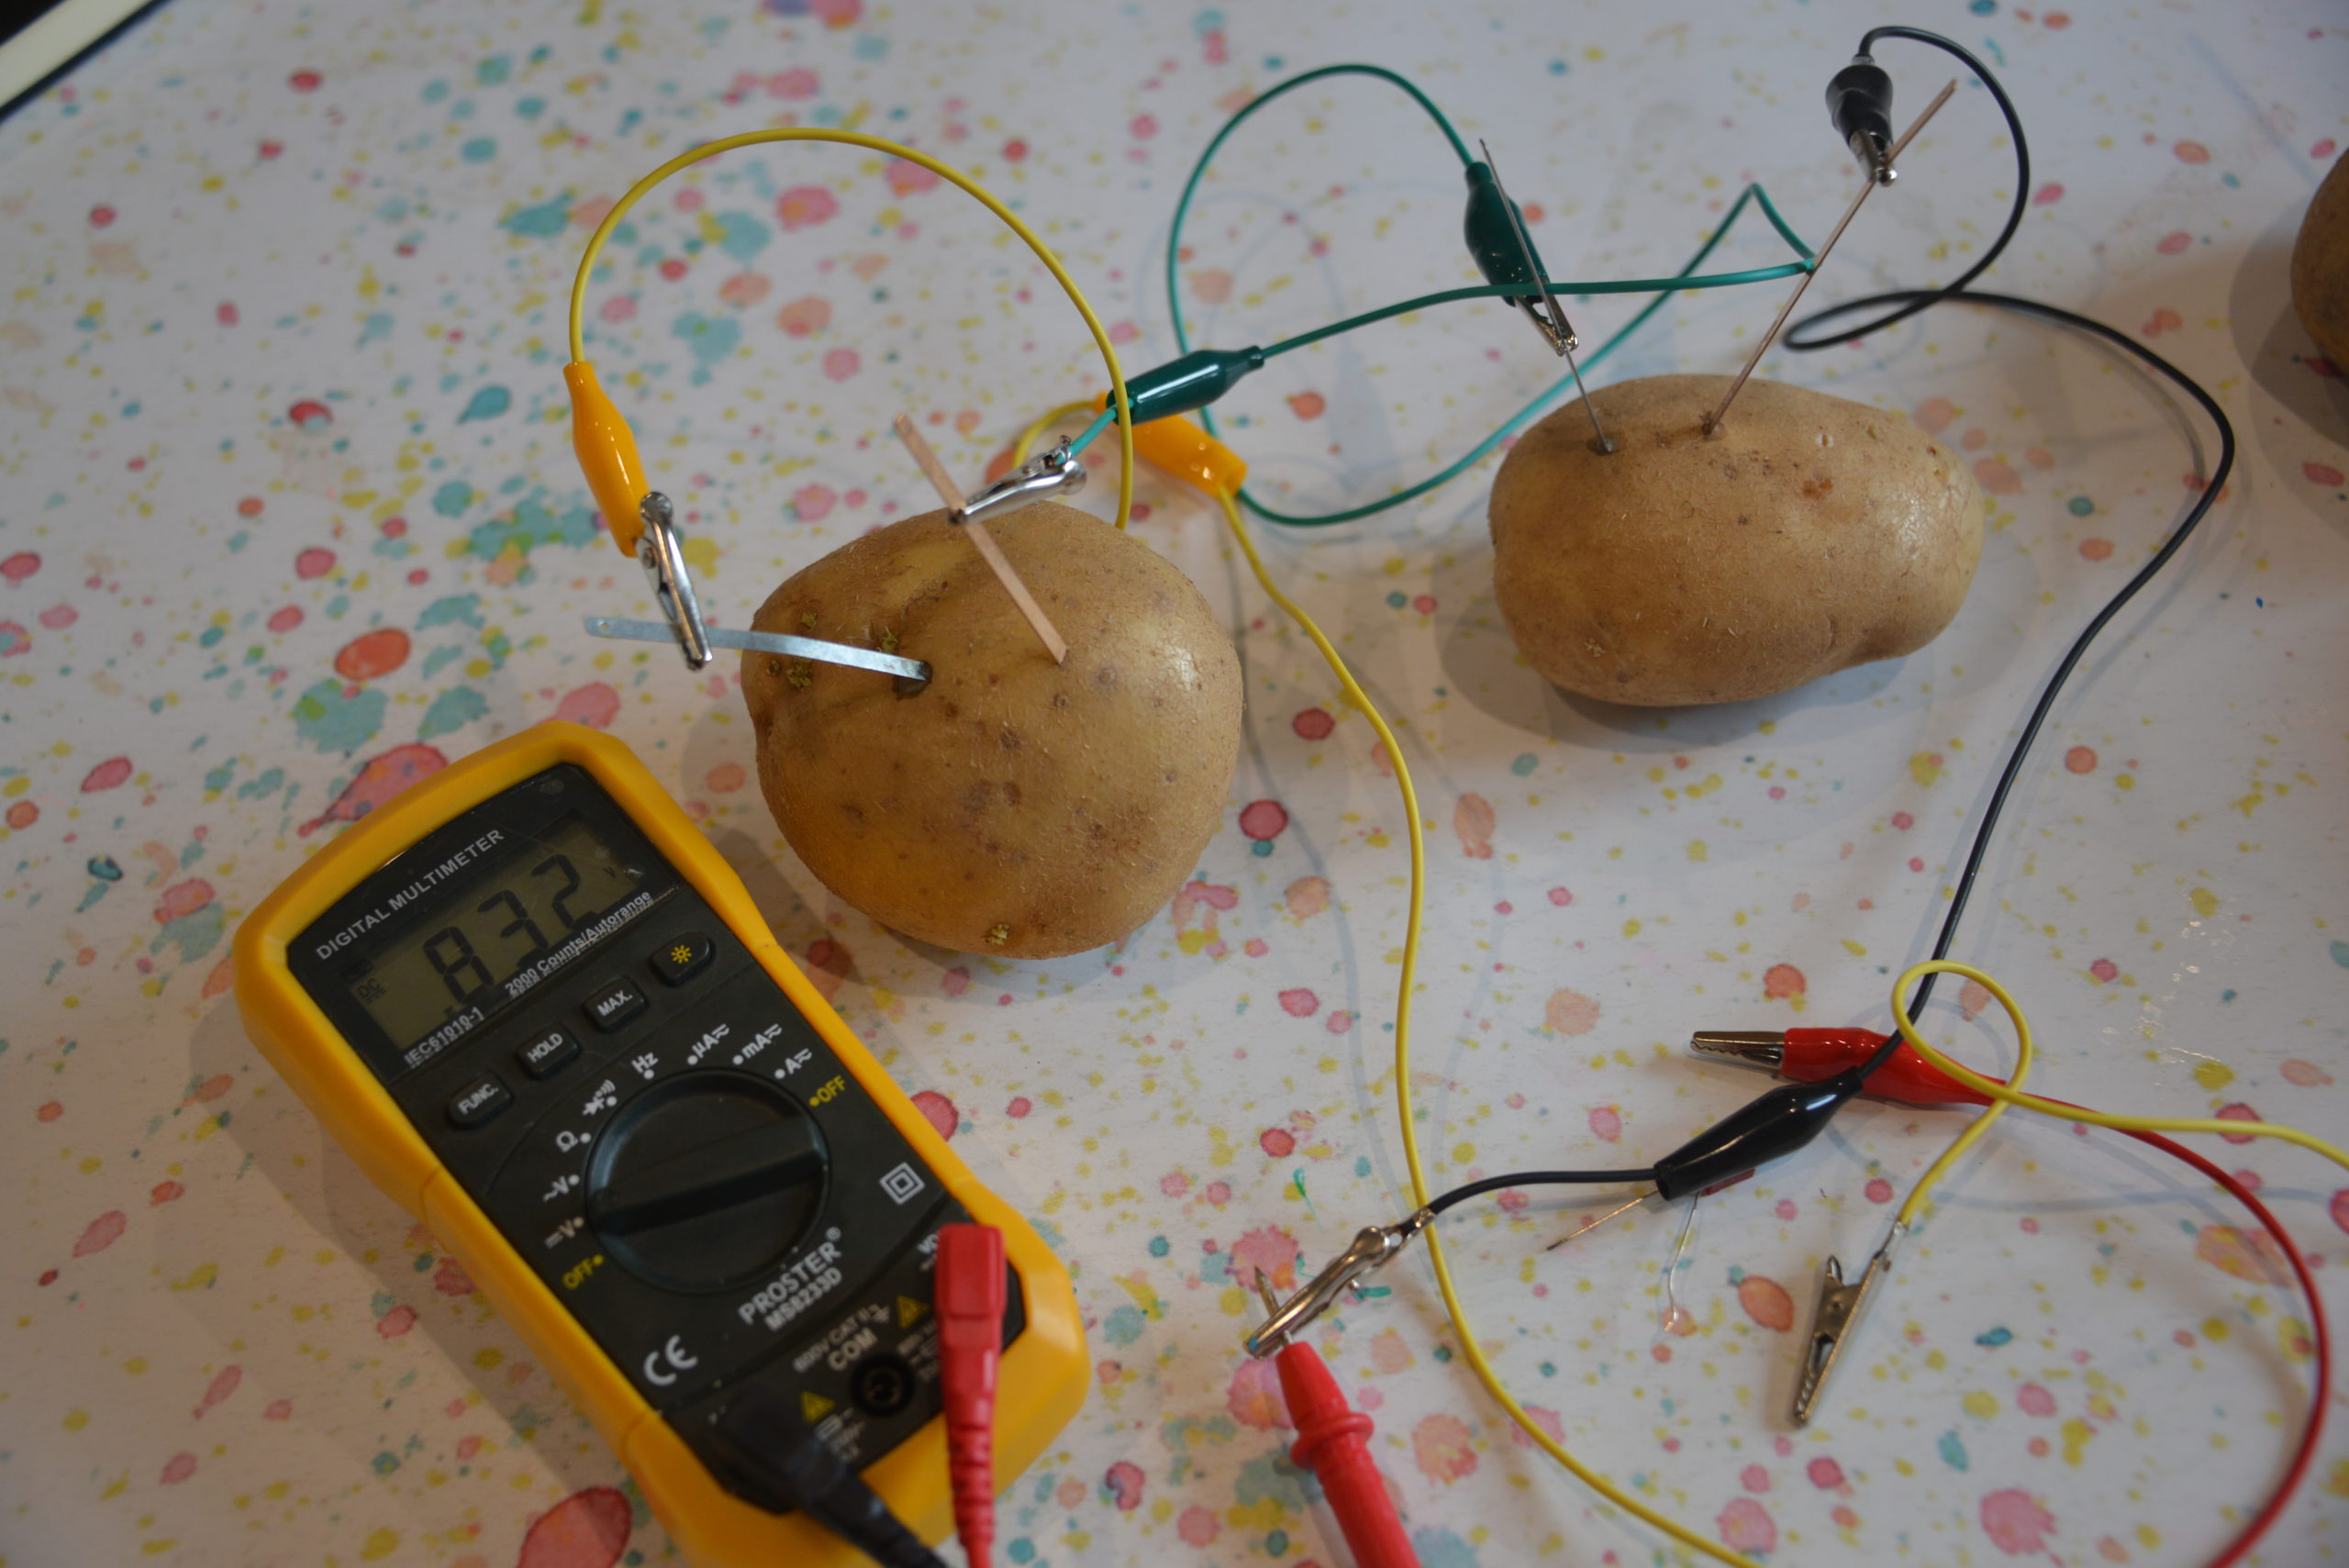
Step 5: Testing the Potato Battery
After assembling your potato battery, it’s time to put it to the test. Testing the potato battery involves checking if it can produce enough voltage to power a small electronic device. Here’s how you can do it:
1. Connect the electrodes: Take the two electrodes, one with a copper or galvanized nail and the other with a zinc-coated nail or galvanized washer, and insert them into the potato. Make sure the two electrodes do not touch each other.
2. Check the voltage: Use a multimeter set to measure voltage and connect the probes to the exposed ends of the electrodes. The positive probe (red) should be connected to the copper or galvanized nail, while the negative probe (black) should be connected to the zinc-coated nail or galvanized washer.
3. Measure the voltage: Once the probes are connected, observe the readout on the multimeter. The voltage produced by a potato battery is typically low, around 0.5 to 1 volt. If the voltage reading falls within this range, your potato battery is generating power.
4. Test with a small device: If your potato battery is producing voltage, you can try connecting it to a small electronic device such as an LED bulb or a digital clock. Connect the positive electrode (copper or galvanized nail) to the positive terminal of the device and the negative electrode (zinc-coated nail or galvanized washer) to the negative terminal. If the device lights up or starts working, your potato battery is successfully powering it.
5. Troubleshoot if needed: If your potato battery is not generating enough voltage or the connected device does not work, double-check the connections, ensure the electrodes are inserted properly into the potato, and verify that the zinc-coated nail or washer is not corroded. You can also try using multiple potatoes in series to increase the overall voltage output.
Remember, the potato battery is a fun science experiment and can only produce a small amount of power. It may not be suitable for powering larger devices or gadgets, but it can be an exciting way to learn about the basic principles of electricity and experiment with alternative sources of energy.
Troubleshooting Tips
Even though making a potato battery is a simple and straightforward process, you may encounter some issues along the way. Here are a few troubleshooting tips to help you overcome common problems:
1. Check the freshness of the potatoes: One common issue is using old or rotting potatoes. Make sure you use fresh, firm potatoes for better conductivity.
2. Ensure proper contact: The success of a potato battery depends on good electrical contact between the electrodes and the potatoes. Double-check that the electrodes are securely inserted into the potatoes.
3. Clean the electrodes: If you notice a weak or no electrical output, there may be a buildup of dirt or oxidation on the electrodes. Clean the electrodes with a damp cloth or sandpaper to remove any obstructions.
4. Try different electrode materials: If you are not getting the desired voltage or electrical output, experiment with different materials for your electrodes. Copper and zinc are commonly used, but you can also try other metals like aluminum or iron.
5. Increase the surface area: The larger the surface area of the electrodes, the better the contact with the potato. Consider using larger or multiple electrodes to improve conductivity.
6. Check the circuit connections: Ensure that all the wires and connections are securely fastened and in good working condition. Loose or faulty connections can disrupt the flow of electricity.
7. Use fresh electrolyte: The electrolyte solution used in the potato battery can lose its potency over time. If the battery output is weak, try replacing the electrolyte solution with a fresh batch.
8. Give it time: Sometimes, the potato battery may take a while to generate enough voltage. Allow the battery to sit undisturbed for some time to see if the voltage increases gradually.
Remember, troubleshooting is all about experimenting and making adjustments. Don’t get discouraged if your first attempt doesn’t yield the desired results. By following these troubleshooting tips and making necessary modifications, you’ll be able to make a successful potato battery.
In conclusion, a potato battery is a simple yet fascinating experiment that demonstrates the potential of using everyday objects to generate electricity. It showcases the basic principles of electrochemistry and highlights the concept of chemical reactions producing electrical energy.
By harnessing the natural chemical energy stored within the potato, we can power small electrical devices and gain a better understanding of how batteries work. This hands-on experiment is not only educational but also a fun way to engage with science and promote sustainability.
So, why not give it a try? Gather a few materials, grab a potato, and embark on the exciting journey of creating your very own potato battery. Not only will you be amazed by the power of nature, but you will also gain a newfound appreciation for the energy sources that surround us in our everyday lives.
FAQs
-
Can I power a cell phone with a potato battery?
Yes, it is possible to power a cell phone with a potato battery, but the amount of power generated is quite small. It may be enough to light a small LED bulb or power a simple circuit, but not sufficient to charge or operate a cell phone. -
How does a potato battery work?
A potato battery harnesses the chemical energy stored in a potato to generate electricity. When two different metals, such as copper and zinc, are inserted into the potato, a chemical reaction occurs between the metals and the potato’s juice. This reaction releases electrons and creates a flow of electricity. -
What materials do I need to make a potato battery?
To make a potato battery, you will need a potato, copper and zinc nails or rods, wire, and an LED bulb or small electronic device to test the power output. You can also use vinegar or lemon juice as an electrolyte to enhance the conductivity of the potato juice. -
How do I assemble a potato battery?
Start by inserting a copper and zinc nail or rod into the potato about an inch apart. Make sure the metals are not touching each other. Connect a wire to the copper nail and another wire to the zinc nail. Then, connect the other ends of the wires to the LED bulb or electronic device you want to power. The flow of electricity should activate the LED bulb or power the device. -
What other fruits or vegetables can be used to make a battery?
Besides potatoes, you can also use other fruits and vegetables to make batteries. Some popular choices include lemons, oranges, tomatoes, and even apples. Each of these items contains acidic juice, which can act as an electrolyte and help facilitate the chemical reaction necessary for generating electricity.