
Setting up a docking station with a laptop can greatly enhance your productivity and convenience. Whether you are a professional constantly switching between the office and home, or a student looking for an efficient way to connect multiple peripherals to your laptop, a docking station is the perfect solution.
A docking station serves as a centralized hub that allows you to connect various devices, such as monitors, keyboards, mice, external hard drives, and more, to your laptop with just a single cable. This eliminates the hassle of plugging and unplugging multiple cables every time you move your laptop.
In this article, we will guide you through the process of setting up a docking station with your laptop. We will cover everything from choosing the right docking station for your needs, connecting the devices, and configuring the settings to ensure optimal performance. So, let’s dive in and make your laptop setup more efficient and seamless!
Inside This Article
- Setting up the Docking Station
- Connecting the Docking Station to the Laptop
- Configuring Display and Audio Settings
- Connecting Peripherals to the Docking Station
- Conclusion
- FAQs
Setting up the Docking Station
Setting up a docking station with your laptop can greatly enhance your productivity and convenience. A docking station provides a centralized hub for connecting multiple peripherals and expanding the capability of your laptop. Whether you’re looking to connect additional displays, external storage devices, or other accessories, the following steps will guide you through the process of setting up a docking station with your laptop.
Before you begin, make sure you have chosen a docking station that is compatible with your laptop’s model and operating system. Read the user manual or online documentation provided by the docking station manufacturer to familiarize yourself with any specific requirements or instructions.
1. Find a suitable location: Choose a sturdy and accessible location for your docking station. It should be close to a power outlet and have enough space to accommodate the docking station and all connected peripherals.
2. Prepare your laptop: Shut down your laptop and disconnect any power cords or peripherals that are currently connected. Ensure that your laptop is fully charged or connected to a power source before proceeding.
3. Connect the docking station to power: Plug the power adapter of the docking station into a nearby power outlet. Ensure that the power adapter is securely connected and that the docking station’s power indicator light turns on.
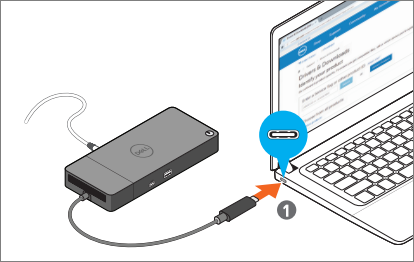
4. Connect the docking station to your laptop: Depending on the type of docking station, you may need to use a USB-C, Thunderbolt, or proprietary connector to establish a connection between the docking station and your laptop. Follow the provided instructions to securely connect the two devices.
5. Configure display and audio settings: Once the docking station is connected to your laptop, you may need to configure the display and audio settings. This can usually be done through the operating system’s display and sound settings menu. Follow the on-screen instructions to set up the desired display arrangement and audio output options.
6. Connect peripherals to the docking station: Now that your docking station is set up and connected to your laptop, you can start connecting your peripherals. This can include monitors, keyboards, mice, printers, external hard drives, and other devices. Use the ports provided on the docking station to connect the peripherals and ensure that they are securely attached.
7. Test the setup: Once all the peripherals are connected, power on your laptop and check if they are recognized and functioning properly. Test the display output, audio output, and the functionality of connected peripherals. Make any necessary adjustments in the operating system settings if required.
Now that you have successfully set up your docking station with your laptop, enjoy the convenience of having a centralized hub for all your peripherals. You can quickly connect and disconnect your laptop, making it easier to transition between workstations or connect to larger displays and other accessories.
Connecting the Docking Station to the Laptop
Connecting a docking station to your laptop is a straightforward process that can greatly enhance your productivity and convenience. Follow these steps to ensure a seamless connection:
1. Start by identifying the ports on your laptop and the corresponding ports on the docking station. Common ports on a docking station include USB, HDMI, DisplayPort, Ethernet, and audio jacks. Determine which ports you need to use based on the peripherals you want to connect.
2. Place the docking station next to your laptop, ensuring that it is within reach of the laptop’s ports. This makes it easier to connect the cables without any strain.
3. Carefully align the ports on the docking station with the corresponding ports on your laptop. Ensure that the connectors are properly aligned before inserting them to avoid damage to the ports.
4. Gently insert the cables into the ports, making sure they fit snugly. Be cautious not to apply excessive force as it may damage the connectors or the ports themselves.
5. Once the cables are securely connected, double-check that all connections are properly established. A loose connection can lead to unreliable performance or no connection at all.
6. Depending on the docking station model, you may need to install additional drivers or software to enable the docking station’s full functionality. Refer to the docking station’s user manual or the manufacturer’s website for detailed instructions.
7. Once the drivers and software are installed, restart your laptop to ensure that the changes take effect. This step is essential for the laptop to recognize the docking station and configure the necessary settings.
8. After the restart, your laptop should detect and recognize the peripherals connected to the docking station. You can confirm this by checking the device manager or the system tray for any notifications related to new devices.
9. Finally, test the connectivity and functionality of the peripherals connected to the docking station. Ensure that the audio, video, networking, and any other connected devices are working properly.
That’s it! You have successfully connected the docking station to your laptop. Now you can enjoy the convenience of a single connection point for all your peripherals, helping you stay organized and boosting your productivity.
Configuring Display and Audio Settings
Once you’ve successfully connected your laptop to the docking station, the next step is to configure the display and audio settings. This step is crucial for ensuring that you have the best visual and audio experience while using the docking station.
First, let’s focus on the display settings. Many docking stations support multiple monitor setups, allowing you to connect additional external monitors to your laptop. To configure the display settings, follow these steps:
- Right-click on the desktop and select “Display settings” from the dropdown menu.
- In the display settings window, you will see a diagram showing the arrangement of your displays. If you have multiple monitors connected, they will be represented by numbered boxes.
- Click and drag the numbered boxes to rearrange the position of your monitors according to your preference. This will ensure that the displays are aligned correctly when you move your mouse between them.
- Scroll down to the “Multiple displays” section and select the desired display mode. You can choose to extend your desktop across multiple monitors, duplicate the display on all monitors, or use only one monitor.
- Click “Apply” to save the changes. Your monitors will briefly flicker as the settings are applied.
Now let’s move on to the audio settings. Most docking stations have built-in audio outputs, allowing you to connect external speakers or headphones. To configure the audio settings, follow these steps:
- Click on the speaker icon in the system tray of your laptop to open the volume mixer.
- At the top of the volume mixer window, you will see a dropdown menu that displays the available audio output devices. Click on the dropdown menu and select the docking station’s audio output.
- Adjust the volume levels as needed using the slider controls. You can also click on the speaker icon to mute or unmute the audio.
- If you have a microphone connected to the docking station, you can also choose the docking station’s audio input in the volume mixer for recording or communication purposes.
- Once you have configured the display and audio settings, ensure that everything is working properly by playing a video or audio file and checking for both visual and audio output.
By following these steps, you can easily configure the display and audio settings on your docking station, enhancing your overall multimedia experience. Make sure to save the changes and adjust the settings as needed to suit your preferences.
Connecting Peripherals to the Docking Station
Once you have set up and connected your docking station to your laptop, you can start connecting your peripherals to enhance your productivity and convenience. The docking station provides multiple ports and connectivity options, making it easy to connect various peripheral devices.
The first step is to identify the ports available on your docking station. Typically, a docking station will have USB ports, HDMI or DisplayPort for video output, audio ports, Ethernet port for wired internet connection, and more. Refer to the user manual or specifications of your docking station to determine the specific ports it offers.
To connect a peripheral device, simply locate the corresponding port on the docking station and plug in the cable provided with the device. For example, if you want to connect a USB mouse, find an available USB port on the docking station and insert the USB connector of the mouse cable into the port. The docking station will automatically recognize the peripheral device and install the necessary drivers.
Common peripheral devices that can be connected to a docking station include:
- External monitors or projectors: Connect the HDMI or DisplayPort cable from the docking station to the monitor’s or projector’s input port. This allows you to extend or mirror your laptop screen for a larger display area.
- External keyboard and mouse: Use the USB ports on the docking station to connect wired or wireless keyboards and mice. This gives you a comfortable and efficient input solution while working.
- External storage devices: Connect external hard drives or USB flash drives to the USB ports on the docking station to transfer, backup, or access files conveniently.
- Printers and scanners: Most printers and scanners nowadays have USB connectivity. Simply connect them to the docking station’s USB ports to enable seamless printing and scanning functionality.
- Speakers or headphones: The audio ports on the docking station allow you to connect your favorite speakers or headphones for an immersive audio experience.
Remember to check if additional drivers or software are required to enable full functionality of certain peripheral devices. Visit the device manufacturer’s website and download any necessary drivers or software updates.
It’s important to note that depending on your docking station model, you may have limited ports or different types of ports available. Always refer to the user manual or specifications of your docking station for accurate information on port availability and compatibility.
Once you have connected your peripheral devices to the docking station, you can enjoy the convenience of having all your devices connected and ready to use with a single connection to your laptop. This eliminates the hassle of constantly plugging and unplugging devices and provides a clutter-free workspace.
Now that you know how to connect peripherals to your docking station, you can maximize your productivity and take advantage of the convenience it offers. Explore the possibilities and enjoy the seamless integration of your devices!
Conclusion
Setting up a docking station with a laptop can greatly enhance your productivity and convenience. It provides a centralized hub for connecting multiple devices, extending the capabilities of your laptop. By following the steps outlined in this guide, you can easily establish a functional and efficient workstation.
A docking station eliminates the hassle of constantly plugging and unplugging peripherals, allowing you to seamlessly transition from a desktop-like setup to a portable configuration. With the ability to connect additional monitors, keyboards, mice, and other accessories, you can create a customized workspace that meets your specific needs.
Remember, when purchasing a docking station, ensure that it is compatible with your laptop’s model and features the necessary ports and connections. This will guarantee a seamless integration and optimal performance.
So, go ahead and set up your docking station to unlock the full potential of your laptop, making your work and entertainment experience more efficient and enjoyable.
FAQs
**1. What is a docking station?**
A docking station is a device that allows you to connect your laptop to multiple peripheral devices, such as monitors, keyboards, mice, printers, and more. It serves as a central hub, enabling you to conveniently use your laptop as a desktop computer with various accessories.
**2. Why would I need a docking station for my laptop?**
A docking station offers several benefits. Firstly, it provides a convenient and efficient way to connect multiple devices to your laptop with a single cable connection. This reduces cable clutter and makes it easy to switch between different accessories. Additionally, a docking station allows you to expand your laptop’s capabilities, providing additional ports and connections that may not be available on your laptop alone.
**3. How do I set up a docking station with my laptop?**
Setting up a docking station with your laptop is generally a straightforward process. First, ensure that your laptop is compatible with the docking station you have. Then, connect the docking station to your laptop using the appropriate cable or connector. Once connected, power on the docking station and connect your peripherals, such as the monitor, keyboard, mouse, and other accessories, to the docking station’s available ports. Finally, power on your laptop, and it should recognize and configure the connected devices automatically.
**4. What should I consider when purchasing a docking station?**
When purchasing a docking station, it’s important to consider compatibility with your laptop and the devices you intend to connect. Make sure that the docking station supports the necessary connections, such as HDMI, USB, Ethernet, etc., and that it is compatible with your laptop’s operating system. It’s also worth considering the number and types of ports available on the docking station, as well as any additional features or functionalities that may be important to you.
**5. Are all docking stations compatible with any laptop?**
No, not all docking stations are compatible with any laptop. Docking stations are designed to be compatible with specific laptop models or series. Before purchasing a docking station, it is crucial to check its compatibility with your specific laptop make and model. Manufacturers usually provide compatibility information on their websites or product documentation.