
If you’re an avid gamer, you most likely own a PlayStation 4 (PS4) and have experienced the frustration of wanting to use the mic on your PS4 controller without a headset. Whether it’s for in-game communication or voice commands, having a working mic is essential to enhance your gaming experience.
In this article, we will explore different methods and techniques on how to use the mic on your PS4 controller without a headset. We will dive into various options, including using the controller’s built-in microphone, connecting an external microphone, and exploring third-party solutions. So, if you’re tired of being restricted by a headset and want to enjoy gaming with just your controller, read on to find out how!
Inside This Article
- How To Use Mic On PS4 Controller Without Headset
- # 1. Connecting a microphone directly to the controller
- # 2. Adjusting microphone settings on the PS4
- Testing the microphone on the PS4
- # 4. Troubleshooting Common Microphone Issues
- Conclusion
- FAQs
How To Use Mic On PS4 Controller Without Headset
Playing games on the PlayStation 4 (PS4) can be even more enjoyable with the ability to communicate with your fellow gamers. While headsets are commonly used for voice chat, it is possible to use a microphone directly with the PS4 controller. This allows you to communicate without the need for a separate headset, making it a convenient option for gamers.
Here, we will guide you through the steps to use a microphone on your PS4 controller without a headset:
1. Connecting a microphone directly to the controller
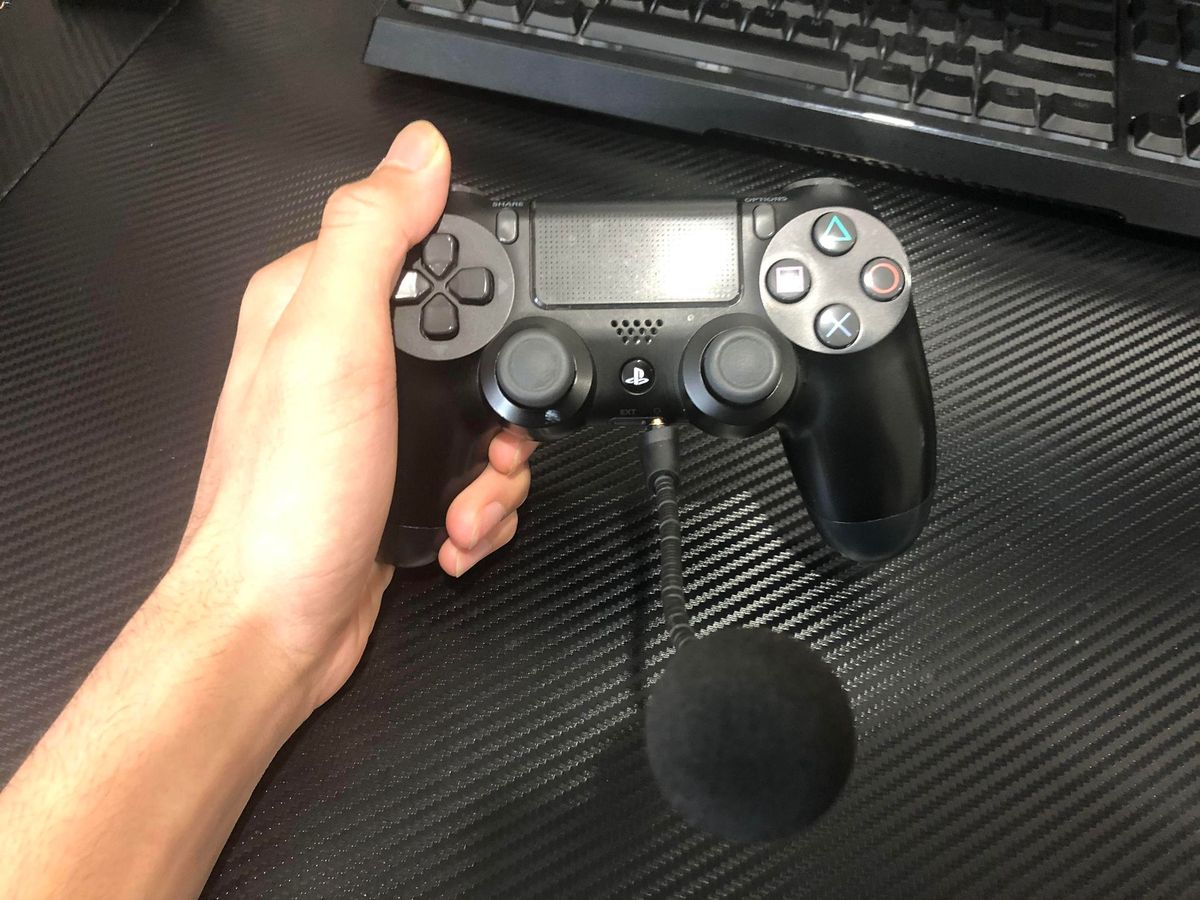
The first step is to connect a compatible microphone to your PS4 controller. Most microphones with a 3.5mm audio jack can be plugged directly into the 3.5mm headphone jack present on the controller. Simply insert the microphone’s 3.5mm plug into the jack on the bottom of the controller.
2. Adjusting microphone settings on the PS4
Once your microphone is connected, you’ll need to configure the audio settings on your PS4 to ensure it recognizes the microphone input. To do this, go to the PS4 home screen and navigate to “Settings” > “Devices” > “Audio Devices”. In the “Input Device” section, select “Headset Connected to Controller” to enable the use of the connected microphone.
3. Testing the microphone on the PS4
To ensure that the microphone is functioning correctly, you can test it using the PS4’s built-in microphone test feature. From the PS4 home screen, go to “Settings” > “Devices” > “Audio Devices” and select “Adjust Microphone Level”. Follow the on-screen instructions to adjust the audio level and test the microphone’s recording and playback.
4. Troubleshooting common microphone issues
If you encounter any issues with the microphone, there are a few troubleshooting steps you can try. First, check the connection between the microphone and the controller to ensure it is securely attached. If the microphone still doesn’t work, try using a different microphone or testing the current microphone on another device to confirm if it’s functioning properly. Additionally, make sure that the microphone’s volume is not muted on the PS4 settings.
Using a microphone directly with your PS4 controller can be a convenient and straightforward way to communicate while gaming. By following these steps and troubleshooting tips, you can enjoy seamless voice chat without the need for a headset. Happy gaming!
# 1. Connecting a microphone directly to the controller
If you want to use a microphone with your PS4 controller without a headset, you can connect it directly to the controller itself. Follow these simple steps to get started:
1. First, make sure your microphone has a 3.5mm audio jack. This is the standard size for most headphones and microphones.
2. Locate the 3.5mm audio jack on your PS4 controller. It is usually located at the bottom of the controller, near the headset port.
3. Plug the microphone into the 3.5mm audio jack on the PS4 controller.
4. Once connected, you may need to adjust the microphone settings on your PS4 to ensure it is recognized and functioning properly.
By following these steps, you can easily connect a microphone directly to your PS4 controller without the need for a headset. This method allows you to communicate with other players while gaming or use voice commands during gameplay.
# 2. Adjusting microphone settings on the PS4
Once you have connected a microphone to your PS4 controller, you may need to adjust the microphone settings to ensure optimal performance. Here are some steps you can follow:
1. Start by turning on your PS4 and navigating to the settings menu. You can do this by selecting the “Settings” option on the home screen.
2. In the settings menu, scroll down and select “Devices.”
3. Within the “Devices” menu, choose the “Audio Devices” option.
4. You will see various audio settings options. Select the “Input Device” option.
5. In the “Input Device” menu, you can choose the connected microphone that you want to use. If you have multiple microphones connected, ensure that the correct one is selected.
6. After selecting the microphone, you can adjust the microphone volume by using the “Microphone Level” slider. Move the slider to adjust the volume levels based on your preferences.
7. There might also be an option to enable or disable the microphone. Ensure that the microphone is enabled if you want to use it.
8. Once you have adjusted the microphone settings to your liking, exit the settings menu and start using your microphone on the PS4.
It’s important to note that the options within the settings menu may vary slightly depending on your PS4 model and the system software version you are running. However, the general steps outlined above should help you find and adjust the microphone settings on your PS4.
It’s also a good idea to test your microphone after adjusting the settings to ensure that it is working properly. You can follow the steps mentioned in the next section to test your microphone on the PS4.
Testing the microphone on the PS4
After connecting the microphone to your PS4 controller and adjusting the settings, it is important to test the functionality of the microphone to ensure it is working properly. Here are the steps to test the microphone on your PS4:
1. Start by navigating to the “Settings” menu on your PS4. You can access this menu by scrolling to the left on the main home screen and selecting the “Settings” icon.
2. Once you are in the “Settings” menu, scroll down and select “Devices”. This will open the devices settings menu.
3. In the devices settings menu, select “Audio Devices”. This will bring up the audio devices settings page.
4. On the audio devices settings page, select “Microphone”. Here, you will find options related to microphone settings.
5. To test the microphone, select the “Test Microphone” option. This will initiate a test recording where you can speak into the microphone and check if the audio is being captured.
6. Speak into the microphone clearly and check if the audio bars are moving in response to your voice. If you see the audio bars moving, it means that the microphone is functioning properly.
7. If you are unable to see the audio bars moving or if there is no sound coming through the microphone, double-check the connection of the microphone to the PS4 controller and make sure it is securely connected.
8. Additionally, ensure that the microphone volume is turned up in the audio devices settings. You can adjust the microphone volume by selecting the “Microphone Level” option and increasing the volume if necessary.
9. If despite these steps, the microphone is still not working, try using a different microphone or test the microphone on a different controller to identify if the issue lies with the microphone or the controller itself.
By following these steps, you can test the functionality of the microphone on your PS4 and troubleshoot any issues that may arise. It is essential to have a working microphone, especially for multiplayer gaming or communication in online multiplayer games.
# 4. Troubleshooting Common Microphone Issues
While using a microphone with your PS4 controller can greatly enhance your gaming experience, you may encounter some common issues along the way. Here, we will discuss a few troubleshooting tips to help you resolve these problems and ensure smooth communication during gameplay.
1. No audio input detected: If your microphone is connected to the controller but the audio input is not being detected, there are a few steps you can take to fix this issue. First, ensure that the microphone is securely connected to the controller. You can also try unplugging and re-plugging the microphone to refresh the connection. Additionally, check the audio settings on your PS4 to make sure that the correct input device is selected. Remember to test the microphone after each troubleshooting step.
2. Low microphone volume: If your microphone volume is too low and others are having difficulty hearing you, you can increase the microphone volume through the PS4 settings. Go to the “Settings” menu on your PS4, then select “Devices” followed by “Audio Devices”. From there, adjust the microphone level to the desired volume. You can also try positioning the microphone closer to your mouth for better sound pickup.
3. Audio feedback or echoing: If you or other players are experiencing audio feedback or echoing during gameplay, it could be due to the microphone picking up sound from the speakers. To avoid this, make sure to reduce the volume of your TV or gaming headset. You can also try adjusting the microphone sensitivity settings on your PS4. Lowering the sensitivity can help reduce background noise and prevent feedback issues.
4. Muffled or distorted audio: If your voice sounds muffled or distorted to others, it may be caused by a few factors. First, check if there is any debris or obstruction on the microphone. Clean it gently if needed to ensure clear audio transmission. Additionally, make sure to position the microphone away from any sources of excess noise, such as fans or air conditioning units, which can interfere with the audio quality.
5. Mic not working on certain games: In some cases, the microphone may not work properly on specific games. This can be due to compatibility issues or game-specific settings. If you encounter this problem, check the game’s audio settings to ensure that the correct input device is selected. It is also worth checking the game’s forums or support pages for any known issues or troubleshooting steps specific to that game.
6. Try a different microphone: If none of the above troubleshooting steps resolve the microphone issue, it may be worth trying a different microphone. It’s possible that the original microphone is faulty or incompatible with the PS4. Testing a different microphone can help determine if the problem lies with the original equipment or with the PS4 settings.
By following these troubleshooting steps, you should be able to resolve common microphone issues and enjoy clear communication during your gaming sessions. Remember to test the microphone after making any changes to ensure that it is working correctly. Happy gaming!
Conclusion
Using the mic on your PS4 controller without a headset is a convenient way to communicate with friends and teammates during gaming sessions. By following the steps outlined in this article, you can easily set up and use the mic on your controller without the need for a headset.
Whether you’re playing multiplayer games or engaging in voice chat, having the ability to communicate clearly is essential. With the mic on your PS4 controller, you can enjoy seamless communication without compromising on comfort.
Remember to adjust the mic sensitivity settings and position the controller appropriately for optimal performance. Experiment with different levels to find the balance that works best for you.
Incorporating a mic into your gaming setup opens up a whole new world of social interaction and teamwork. So don’t let the absence of a headset hold you back. Take advantage of the built-in mic on your PS4 controller and elevate your gaming experience to new heights.
FAQs
Q: Can I use the microphone on my PS4 controller without a headset?
A: Yes, you can use the microphone on your PS4 controller without a headset. The PS4 controller has a built-in microphone that allows you to communicate with other players online. However, note that the audio quality may not be as good as when using a dedicated headset.
Q: How do I use the microphone on the PS4 controller?
A: To use the microphone on the PS4 controller, simply connect the controller to your PS4 console using a USB cable. Once connected, press the PS button on the controller to turn it on. You can then use the microphone to speak and communicate with other players during gameplay or in online chat.
Q: Can I adjust the microphone settings on the PS4 controller?
A: Yes, you can adjust the microphone settings on the PS4 controller. To do this, go to the PlayStation 4 home screen and navigate to “Settings”. From there, select “Devices”, then “Audio Devices”. You will find options to adjust microphone volume, input/output device settings, and sidetone level.
Q: Why is the microphone not working on my PS4 controller?
A: If the microphone is not working on your PS4 controller, there could be a few reasons. Firstly, check if the microphone is properly plugged into the controller. Make sure the connection is secure and the cable is not damaged. If the issue persists, try connecting the controller to another USB port on your console. Additionally, ensure that the microphone settings are configured correctly on your PS4.
Q: Can I use a separate headset with the PS4 controller?
A: Yes, you can use a separate headset with the PS4 controller. The PS4 controller has a 3.5mm audio jack that allows you to connect a compatible headset for a better audio experience. Simply plug in your headset into the audio jack on the controller, and you will be able to listen to game audio and use the microphone on the headset for communication.