
Are you trying to add an email account to the Mail app on your iPhone? Look no further! Adding an email account to the Mail app is a simple process that allows you to have all your email accounts neatly organized and easily accessible in one place. Whether you use Gmail, Yahoo, Outlook, or any other email provider, the Mail app on your iPhone is designed to seamlessly integrate with them all.
In this article, we will guide you through the step-by-step process of adding an email account to the Mail app on your iPhone. We will cover the different types of email accounts you can add, including both personal and business accounts. By the end of this article, you will have your email accounts set up in the Mail app, making it convenient to manage your emails on the go.
Inside This Article
- Adding an Email Account to the Mail App on an iPhone
- Overview of the Mail App on iPhone
- Steps to Add an Email Account
- Troubleshooting Tips for Adding an Email Account
- Additional Settings and Features for Email Accounts on iPhone
- Conclusion
- FAQs
Adding an Email Account to the Mail App on an iPhone
The Mail app on an iPhone makes it incredibly convenient to access and manage your email accounts on the go. Whether you want to stay connected to your work email or keep up with personal messages, adding an email account to the Mail app is a simple and straightforward process. In this article, we will guide you through the steps to add an email account to the Mail app on your iPhone, as well as provide some troubleshooting tips and explore additional settings and features.
Before we begin, it’s important to note that the Mail app on an iPhone supports various email providers, including Gmail, Yahoo, Outlook, and many others. So, regardless of the email service you use, you can easily add your account to the Mail app and enjoy the convenience of accessing all your emails in one place.
Now, let’s get started with adding an email account to the Mail app on your iPhone:
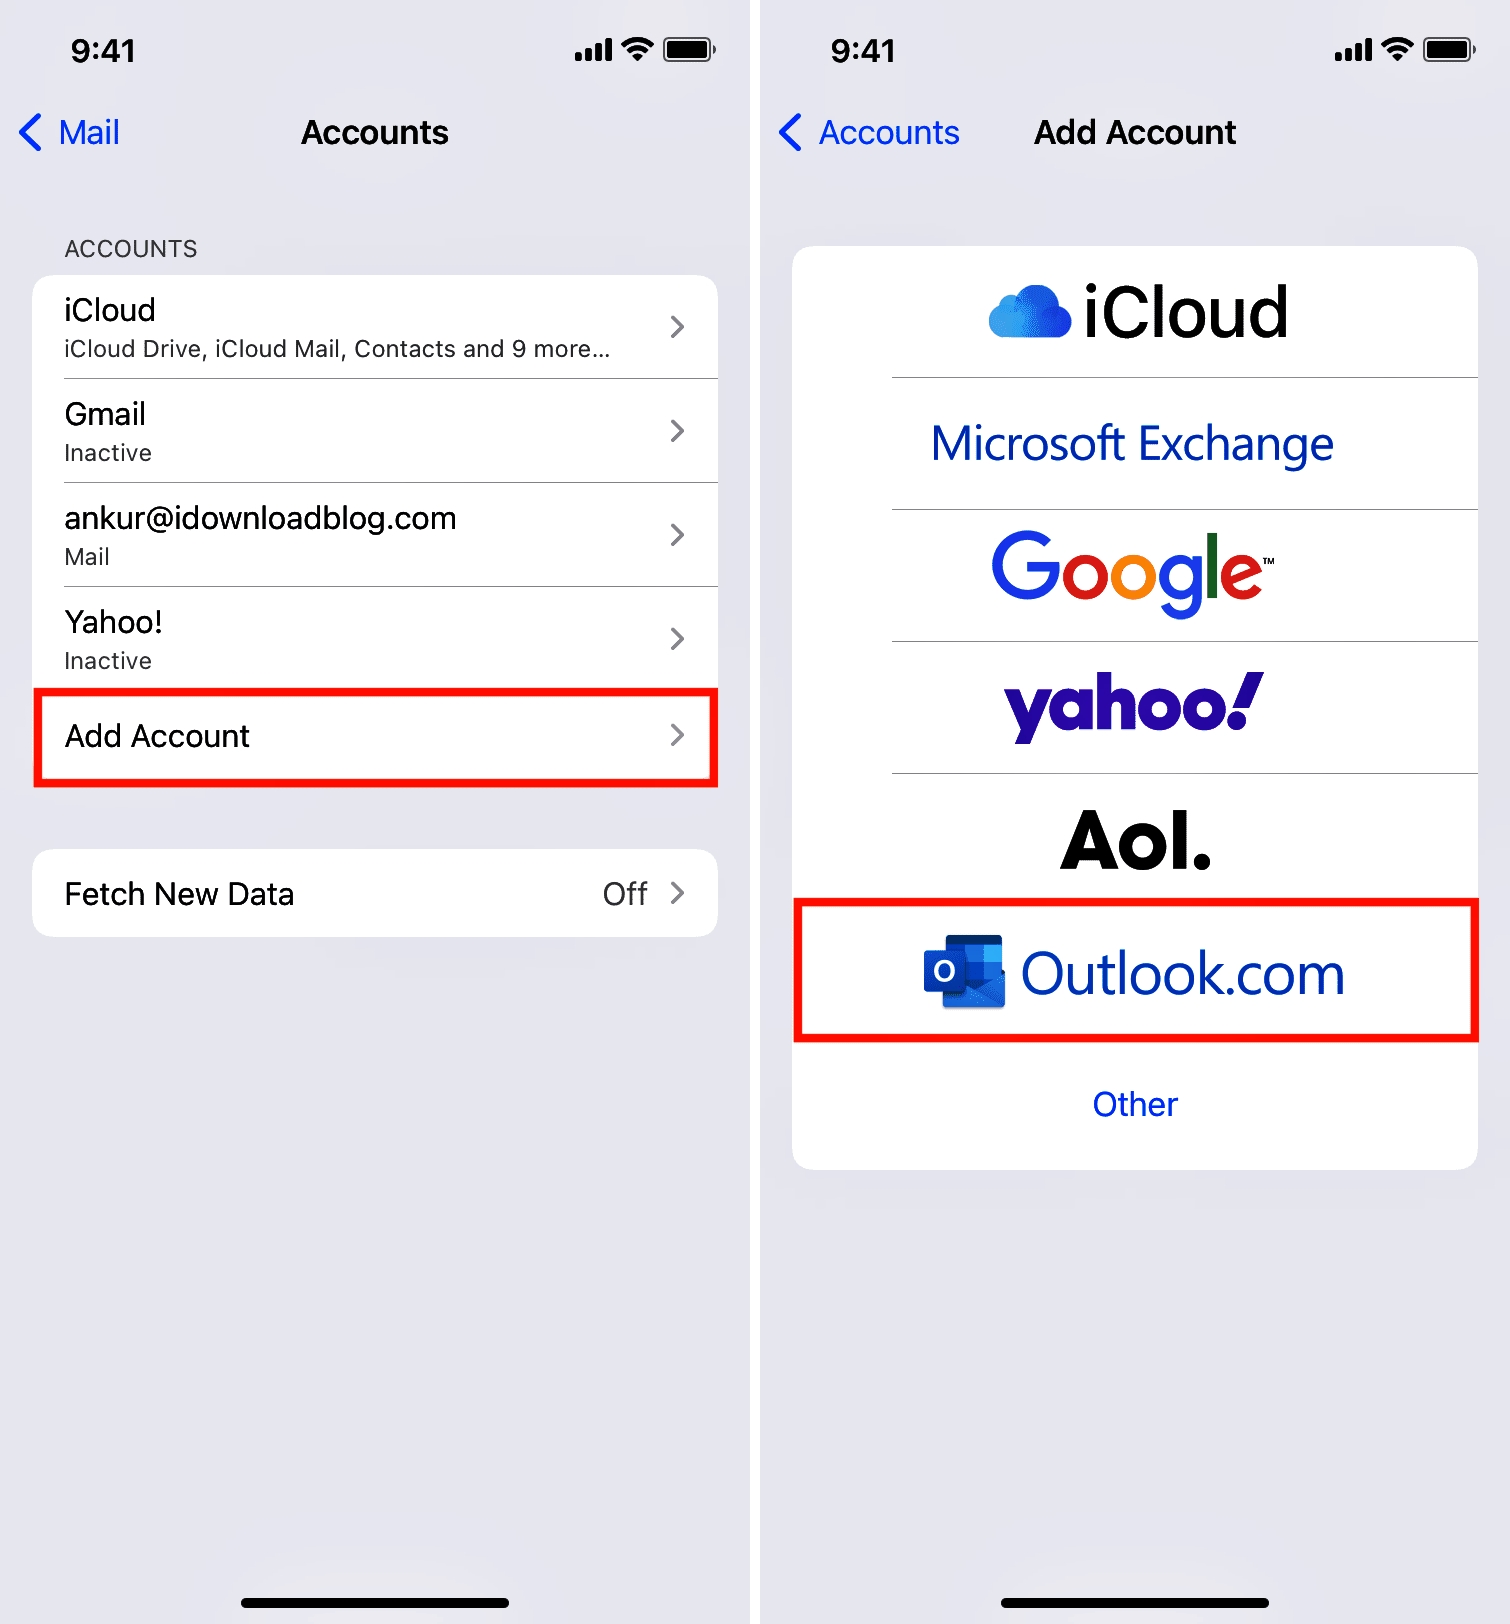
- Open the “Settings” app on your iPhone.
- Scroll down and tap on “Mail.”
- Tap on “Accounts.”
- Tap on “Add Account.”
- You’ll see a list of popular email providers. If your email provider is listed, simply select it and enter your email address and password.
- If your email provider is not listed, tap on “Other” and select “Add Mail Account.”
- Enter your name, email address, password, and a description for the account.
- Tap on “Next,” and your iPhone will attempt to automatically configure the email settings.
- If the automatic configuration is unsuccessful, you may be prompted to enter additional information such as incoming and outgoing mail server details. You can obtain this information from your email provider’s website or contact their support team.
- Once you’ve entered the necessary information, tap on “Save” to add the email account.
That’s it! You have successfully added an email account to the Mail app on your iPhone. Now, any new emails received will be automatically synced to your device, allowing you to stay updated with your messages on the go.
If you encounter any issues during the process or have trouble syncing your emails, here are a few troubleshooting tips:
- Ensure that you have a stable internet connection to properly add and sync your email account.
- Verify that you have entered the correct email address and password for your account.
- Double-check the incoming and outgoing mail server settings if you had to manually configure your email account.
- Try restarting your iPhone, as this can often resolve minor software glitches.
- If all else fails, consider deleting the email account from the Mail app and adding it again using the steps outlined above.
In addition to the basic setup process, the Mail app offers several additional settings and features to enhance your email experience on iPhone. For example, you can customize the swipe actions, set up VIP contacts, manage mailboxes and folders, enable push notifications, and much more. Take some time to explore the settings within the Mail app and personalize it according to your preferences.
Adding an email account to the Mail app on your iPhone allows you to effortlessly manage your messages and stay connected no matter where you are. With a few simple steps, you can have all your emails conveniently accessible in one app, making it easier than ever to stay organized and on top of your inbox.
Overview of the Mail App on iPhone
The Mail app on an iPhone is a powerful tool that allows you to manage your email accounts in one convenient place. With this app, you can send, receive, and organize your emails effortlessly. The Mail app supports a wide range of email providers, including Gmail, Yahoo, Outlook, and many more.
One of the key advantages of using the Mail app is its intuitive interface. It provides a seamless and user-friendly experience, making it easy for anyone to navigate and manage their email accounts on their iPhone.
Steps to Add an Email Account
Adding an email account to the Mail app on an iPhone is a quick and straightforward process. Just follow these simple steps:
- Open the “Settings” app on your iPhone.
- Scroll down and tap on “Mail”.
- Tap on “Accounts”, then “Add Account”.
- Select your email provider from the list (e.g., Gmail, Yahoo, Outlook).
- Enter your email address and password, then tap “Next”.
- Wait for your iPhone to verify your account details.
- Enable the desired options, such as Mail, Contacts, Calendars, and Notes.
- Tap “Save” to add the email account to the Mail app.
Troubleshooting Tips for Adding an Email Account
If you encounter any issues while adding an email account to the Mail app, here are some troubleshooting tips to help you resolve them:
- Double-check your email address and password to ensure they are entered correctly.
- Verify that your internet connection is stable and working properly.
- Ensure that your email provider supports IMAP or POP3 for accessing emails on a mobile device.
- Try restarting your iPhone and then attempt to add the email account again.
- If the problem persists, contact your email provider for further assistance.
Additional Settings and Features for Email Accounts on iPhone
Once you have added an email account to the Mail app on your iPhone, you can customize various settings and take advantage of additional features to enhance your email experience:
- Manage multiple email accounts: Easily switch between different email accounts within the Mail app.
- Organize your inbox: Create folders, apply filters, and use VIP contacts to categorize your emails.
- Set up notifications: Receive alerts for new emails, customize notification sounds, and choose whether to show previews of messages on the lock screen.
- Synchronize contacts and calendars: Keep your contacts and calendar events up to date across all your devices by syncing them with your email account on iPhone.
- Use search and filters: Quickly find specific emails by searching keywords or apply filters to narrow down your search results.
With these features and settings, the Mail app on iPhone allows you to stay organized and efficient in managing your email accounts on the go. Whether you need to respond to an important business email or keep in touch with friends and family, the Mail app has got you covered.
Adding an email account to the Mail app on an iPhone is a simple and straightforward process that can greatly improve your email management experience on your mobile device. By following the steps outlined in this article, you can easily set up and access your email accounts right from the default Mail app on your iPhone.
Whether you use Gmail, Yahoo, Outlook, or any other email provider, the Mail app allows you to consolidate all your email accounts in one place, making it convenient to stay on top of your messages, reply promptly, and organize your inbox. Plus, with the added benefit of push notifications, you’ll never miss an important email again!
By leveraging the power of the Mail app, you can streamline your email communication, boost productivity, and stay connected on the go. So why wait? Follow the steps outlined in this article and start enjoying a more seamless and efficient email experience on your iPhone today!
FAQs
1. How do I add an email account to the Mail app on my iPhone?
To add an email account to the Mail app on your iPhone, follow these steps:
- Go to Settings on your iPhone.
- Scroll down and tap on Mail.
- Select Accounts.
- Tap on Add Account.
- Choose your email provider from the list, or select Other if it’s not listed.
- Follow the prompts to enter your email address and password.
- Tap Next and wait for your iPhone to verify your account.
- Once verified, you can customize your email settings if desired.
- Tap Save to complete the process.
2. Can I add multiple email accounts to the Mail app on my iPhone?
Yes, you can add multiple email accounts to the Mail app on your iPhone. Simply repeat the steps mentioned in the previous question for each email account you want to add.
3. What types of email providers can I add to the Mail app on my iPhone?
The Mail app on an iPhone supports popular email providers such as Gmail, Yahoo, Outlook, and iCloud. Additionally, you can add email accounts from other providers by selecting the “Other” option during the setup process and manually entering the server details.
4. Can I access my email folders and labels in the Mail app on my iPhone?
Yes, the Mail app on the iPhone allows you to access your email folders and labels. Once you have added your email account, you can navigate through different folders and labels by tapping on the “Mailboxes” button at the top left corner of the Mail app. From there, you can select specific folders or labels to view and manage your emails.
5. How do I remove an email account from the Mail app on my iPhone?
To remove an email account from the Mail app on your iPhone, follow these steps:
- Go to Settings on your iPhone.
- Scroll down and tap on Mail.
- Select Accounts.
- Tap on the email account you want to remove.
- Scroll to the bottom and tap on Delete Account.
- Confirm the deletion by tapping Delete from My iPhone.
Please note that removing an email account will delete the associated emails and data from your iPhone.