
Creating different signatures for separate email accounts on your iPhone can help you maintain a professional and personalized touch when sending emails. With the increasing use of mobile devices for email communication, having a distinct signature for each account can streamline your messaging and make it easier for recipients to identify the sender.
Whether you have multiple email accounts for work, personal, or other purposes, customizing your signatures can enhance your email management and make a lasting impression. In this article, we will guide you through the steps to create different signatures for separate email accounts on your iPhone. With a few simple settings adjustments, you can ensure that each email account has its own unique signature, reflecting its specific purpose and audience.
Inside This Article
- Steps to Create Different Signatures for Separate Email Accounts on iPhone
- Tips and Considerations
- Conclusion
- FAQs
Steps to Create Different Signatures for Separate Email Accounts on iPhone
Configuring multiple email accounts on your iPhone can be a convenient way to manage all your emails in one place. However, having a single default signature for all your accounts may not always be ideal. If you want to give each email account a personal touch, you can create different signatures for each of them. Here are the steps to help you achieve that:
Configuring Multiple Email Accounts on iPhone
The first step is to configure your multiple email accounts on your iPhone. Follow these simple steps:
- Open the “Settings” app on your iPhone.
- Scroll down and tap on “Mail,” “Contacts,” “Calendars.”
- Tap on “Add Account” and select the type of email account you want to add (e.g., Gmail, Yahoo, Outlook, etc.).
- Follow the on-screen instructions to enter your email address and password, and set up the account.
- Repeat the process for each additional email account you want to configure.
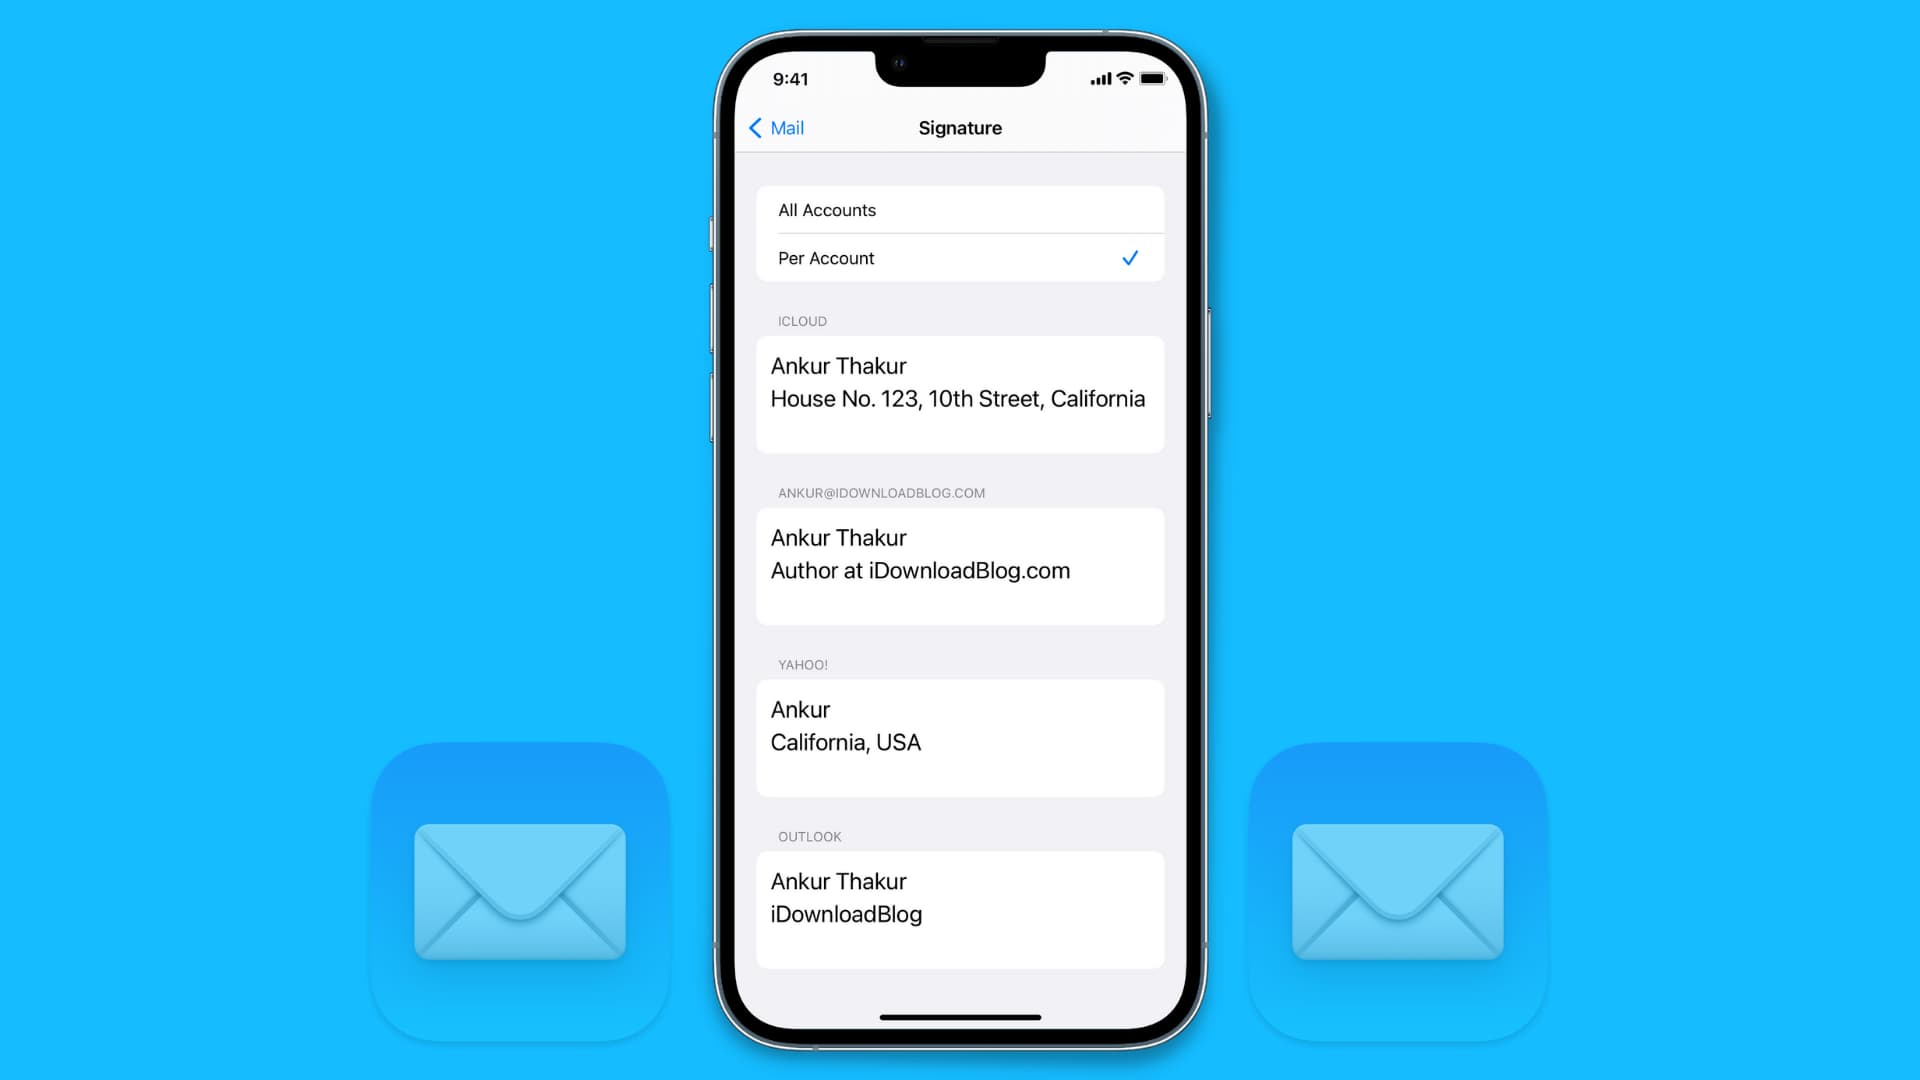
Creating Custom Signatures for Each Email Account
Once you have successfully configured your multiple email accounts, it’s time to create custom signatures for each one. Here’s how:
- Open the “Settings” app on your iPhone.
- Scroll down and tap on “Mail,” “Contacts,” “Calendars.”
- Tap on “Signature.”
- You will see a list of email accounts that you have configured on your iPhone.
- Tap on the email account for which you want to create a custom signature.
- In the text box, create your desired signature for that specific email account. You can use plain text or format it with bold, italics, or links.
- When you are done, tap on “Back” to save the custom signature.
- Repeat the process for each email account, creating a unique signature for each one.
Assigning Signature to Specific Email Account
After creating custom signatures for each email account, you need to assign the signature to the specific email account. Here’s how:
- Open the “Settings” app on your iPhone.
- Scroll down and tap on “Mail,” “Contacts,” “Calendars.”
- Tap on “Signature.”
- You will see a list of email accounts that you have configured on your iPhone.
- Tap on the email account for which you want to assign the signature.
- In the email account settings, tap on “Signature” again.
- Now, select the custom signature you created for that specific email account.
- Tap on “Back” to save the changes.
- Repeat the process for each email account, assigning the appropriate signature to each one.
By following these steps, you can easily create different signatures for each of your separate email accounts on your iPhone. This allows you to maintain a professional and personalized touch when sending emails from different accounts.
Tips and Considerations
When creating different signatures for separate email accounts on your iPhone, it’s important to keep the signatures professional and consistent. Here are some tips and considerations to keep in mind:
Keep the Signatures Professional and Consistent: Remember that your email signatures represent your personal or professional brand. Choose a design and format that aligns with your image and purpose. Avoid using overly casual or informal language, as this can leave a negative impression on recipients. It’s also essential to double-check for any spelling or grammar mistakes and ensure that your contact information is up-to-date and accurate.
Test the Signatures on Different Email Clients: Before finalizing your different signatures for each email account, it’s crucial to test them on different email clients. The appearance and formatting of your signature may vary depending on the email client used by the recipient. Test the signatures on popular email clients such as Gmail, Outlook, Yahoo, and Apple Mail to ensure that they are displayed correctly and maintain their professional look across different platforms.
Update Signatures When Needed: Your contact information or branding may change over time, so it’s essential to keep your signatures updated. Regularly review your signatures and make any necessary changes or additions. This can include updating your phone number, adding social media links, or incorporating new branding elements. By keeping your signatures up-to-date, you ensure that recipients have accurate and relevant information to contact you.
By following these tips and considerations, you can create professional and consistent signatures for each of your email accounts on your iPhone. This allows you to maintain a polished and cohesive image when communicating with clients, colleagues, and other contacts via email.
Conclusion
Creating different signatures for separate email accounts on your iPhone is a simple yet effective way to maintain professionalism and personalization in your communication. With the ability to customize each signature, you can ensure that your emails present a consistent and tailored message to recipients.
By following the steps outlined in this article, you can easily set up multiple signatures for your various email accounts. Whether you want to add your contact information, promote your business, or showcase your creativity, having different signatures for different accounts allows you to communicate in a way that aligns with your needs and branding.
Remember, a well-crafted email signature can leave a lasting impression on the recipients and enhance your professional image. So, take the time to customize your email signatures, express your personality, and make a statement with every message you send.
FAQs
1. Can I create different signatures for separate email accounts on my iPhone?
Yes, you can create different signatures for separate email accounts on your iPhone. The iOS operating system allows you to customize the signature for each email account added to the Mail app. This feature enables you to have unique signatures that align with the specific email accounts you use.
2. How can I create a separate signature for a particular email account on my iPhone?
To create a separate signature for a specific email account on your iPhone:
- Open the “Settings” app on your iPhone.
- Scroll down and tap on “Mail.”
- Select “Signature” under the “Compose” section.
- You will see a list of email accounts you have added to the Mail app.
- Tap on the email account for which you want to create a separate signature.
- Enter the desired signature text in the text field provided.
- Tap “Back” to save the changes.
3. Can I use HTML formatting in my email signatures on iPhone?
Yes, you can use HTML formatting in your email signatures on the iPhone. The Mail app on iOS supports HTML tags, allowing you to add formatted text, hyperlinks, images, and even change the font size and style within your signature. However, it is essential to keep in mind that not all email clients support HTML formatting, so your signature may not display correctly for recipients using unsupported clients.
4. Is it possible to have an image or logo as part of my email signature on iPhone?
Yes, you can add an image or logo to your email signature on your iPhone. To do this, follow the steps mentioned above to access the signature settings for the desired email account. Once there, you can paste the HTML code containing the image into the signature text field. Alternatively, you can upload an image from your iPhone’s camera roll or iCloud Drive by tapping the “Insert Photo or Video” option in the Mail app’s signature settings.
5. Will changing my email signature on the iPhone affect my signature on other devices?
No, changing your email signature on your iPhone will only affect the signature used on the iPhone itself. The signature settings are specific to each device, so modifying it on your iPhone will not change the signature used on other devices, such as your iPad or Mac.