
Are you struggling to add a signature to your emails on your iPhone? Fear not, as this article will guide you through the simple steps to personalize your emails with a unique signature, making your messages stand out. Your email signature is an opportunity to leave a lasting impression and provide essential contact information to your recipients. Whether you want to include your name, job title, company logo, or even a catchy quote, we’ve got you covered. Unlock the full potential of your iPhone and learn how to add a signature to your email effortlessly. Let’s dive in and explore the step-by-step process, so you can start sending personalized and professional emails in no time.
Inside This Article
- # How To Add Signature To Email On iPhone
- Method 1: Using the Mail app settings
- Method 2: Using the Mail app settings for multiple email accounts
- Method 3: Using the Notes app to create a signature
- Method 4: Using a third-party email app with signature functionality
- Conclusion
- FAQs
# How To Add Signature To Email On iPhone
If you regularly use your iPhone to send emails, it can be helpful to include a customized signature at the end of your messages. Adding a signature not only adds a personal touch to your emails, but it also saves you time by automatically including your contact information or any other specific details you want to share. In this article, we will explore different methods to add a signature to your emails on the iPhone.
Method 1: Using the Mail app settings
One of the easiest ways to add a signature to your emails on the iPhone is by using the built-in Mail app settings. Here’s how:
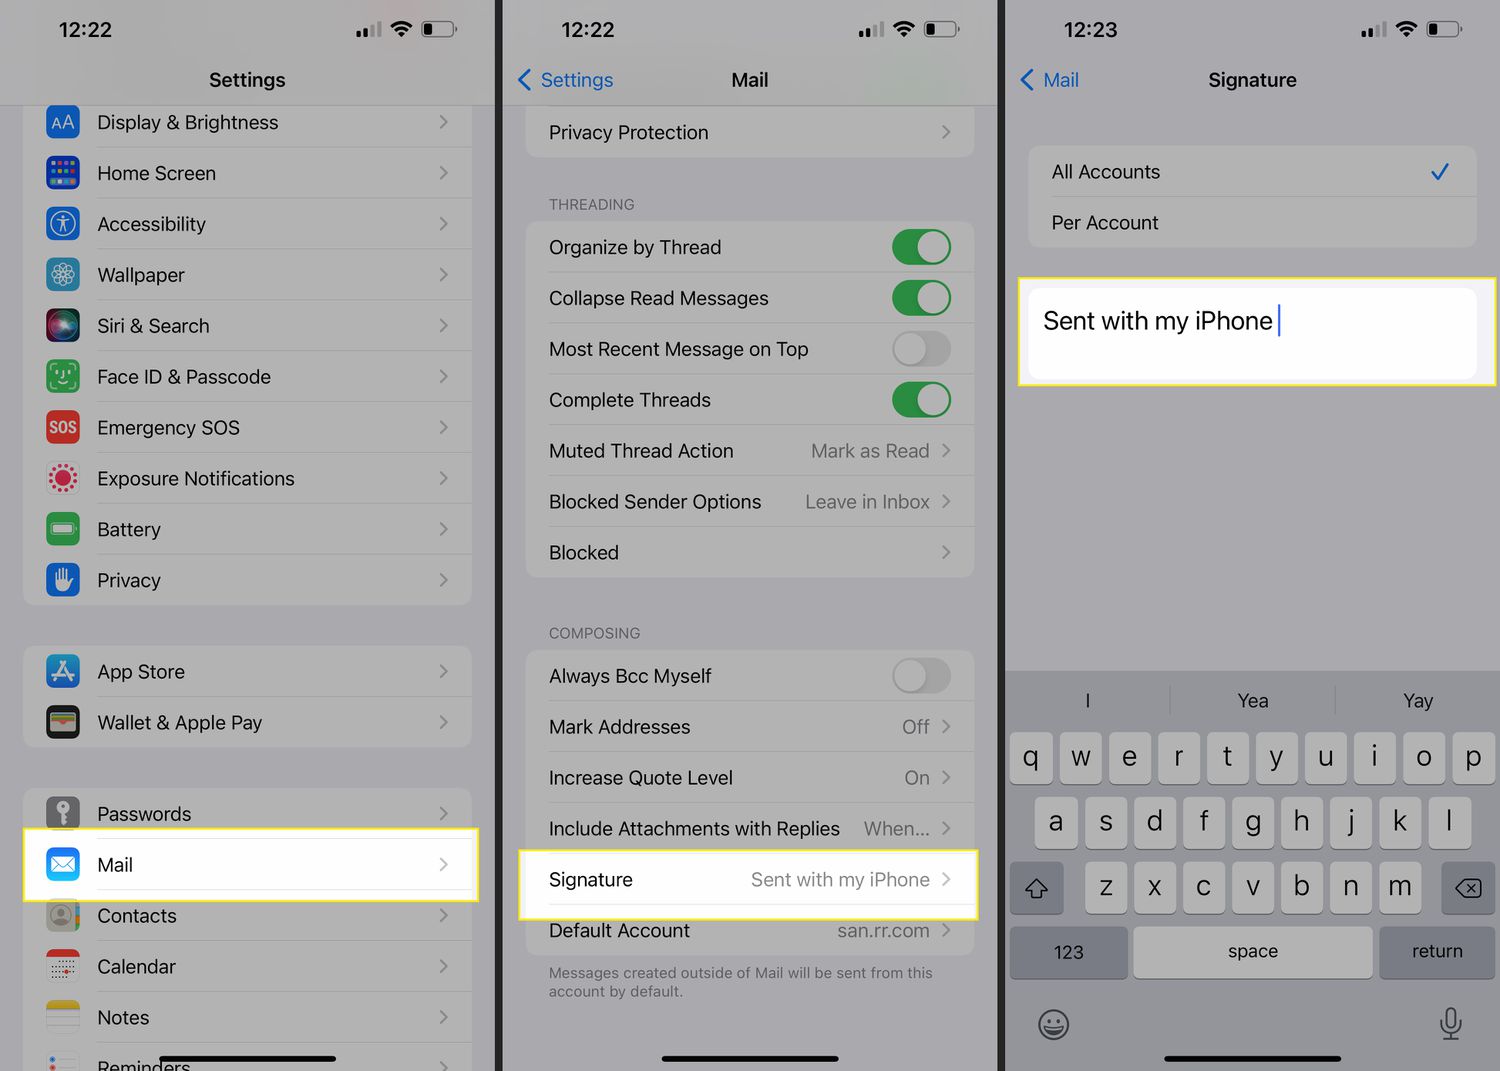
- Open the “Settings” app on your iPhone and scroll down to find the “Mail” option.
- Tap on “Mail” and then select “Signature” under the “Compose” section.
- You will see a text box where you can enter your desired email signature.
- Type your desired signature, including your name, contact information, or any other details you want to include. You can also format the text using the formatting options available.
- Once you are satisfied with your signature, exit the settings. Your signature will now be automatically added to the bottom of your emails in the Mail app.
Method 2: Using the Mail app settings for multiple email accounts
If you have multiple email accounts set up on your iPhone, you can customize a unique signature for each of them. Follow these steps:
- Open the “Settings” app and go to “Mail.”
- Scroll down and select “Signature.”
- You will see a list of your email accounts. Tap on the account you want to add a signature to.
- Enter the desired signature for that particular email account in the text box.
- Repeat these steps for any additional email accounts you want to customize a signature for.
Method 3: Using the Notes app to create a signature
If you want to create a more personalized and stylized signature, you can use the Notes app on your iPhone. Here’s how:
- Open the Notes app on your iPhone.
- Create a new note and use the text editor to design your signature. You can choose different fonts, sizes, and colors to make it unique.
- Once you have created your signature, select and copy it.
- Go to the “Settings” app and navigate to “Mail.”
- Tap on “Signature” and paste your previously created signature from the Notes app.
- Exit the settings, and your new signature will be added to your emails.
Method 4: Using a third-party email app with signature functionality
If you are using a third-party email app like Gmail or Outlook on your iPhone, they often have built-in signature functionality. The process may vary depending on the app, but generally, you can find signature settings within the app’s preferences or settings menu. Enable the signature feature and customize it according to your preferences.
With these methods, you can easily add a signature to your emails on your iPhone, making your messages more professional and personalized. Choose the method that works best for you and start adding a personal touch to your email communications.
Method 1: Using the Mail app settings
Adding a signature to your email messages on an iPhone is a great way to personalize your communications and provide important contact information. Fortunately, the Mail app on your iPhone makes it easy to create and add a signature to your outgoing emails. Follow the steps below to get started:
1. Open the Settings app on your iPhone and scroll down to find the Mail option. Tap on it to access your email settings.
2. Within the Mail settings, scroll down until you see the option for Signature. Tap on it to enter the signature settings.
3. By default, your iPhone will display the option Per Account. This means you can have different signatures for each of your email accounts if you have multiple accounts set up on your device. If you prefer to have the same signature for all accounts, select the All Accounts option.
4. Now, you can create your signature. Tap on the text field under the relevant account, whether it’s your primary email account or one of your secondary accounts.
5. Here, you can type in your desired signature. You have the flexibility to include your name, phone number, website, or any other information you want to share. However, keep in mind that email signatures work best when they are concise and professional.
6. Once you have entered your signature, tap on Mail in the top left corner to save your changes and exit the settings.
7. Now, whenever you compose an email using the Mail app on your iPhone, your signature will automatically appear at the bottom of the message.
With these simple steps, you can effortlessly add a signature to your email messages using the Mail app settings on your iPhone. Enjoy the convenience of having your personalized signature automatically appended to all your outgoing emails!
Method 2: Using the Mail app settings for multiple email accounts
If you have multiple email accounts configured on your iPhone and want to add a signature to each one, you can do so by utilizing the Mail app settings. This method allows you to create and customize a different signature for each of your email accounts, giving them a personalized touch.
Here are the steps to add a signature to multiple email accounts using the Mail app settings:
- Open the “Settings” app on your iPhone.
- Scroll down and tap on “Mail.”
- Next, tap on “Signature.”
- You will see a list of your email accounts under the “Per Account” section.
- Tap on the email account for which you want to add a signature. This will take you to the signature editor for that specific account.
- In the signature editor, you can enter your desired signature using the keyboard. You can include your name, contact information, or any other details you want to appear in your email signature.
- Once you have entered your signature, tap on the “Mail” arrow at the top left corner to save your changes and go back to the previous screen.
- Repeat steps 5-7 for each email account you want to add a signature to.
By following these steps, you can easily add a unique signature to each of your email accounts on your iPhone. This allows you to maintain a professional and personalized presence when sending emails from different accounts.
Note that the signature options in the Mail app settings are specific to each email account. This means that you can have different signatures for your work email, personal email, and any other accounts you have set up on your iPhone.
No matter how many email accounts you have, customizing the signature for each one ensures that your emails are well-branded and adds a personal touch to your communication.
Method 3: Using the Notes app to create a signature
Creating a signature for your email on your iPhone doesn’t have to be limited to the Mail app. If you’re looking for a more customizable option, you can utilize the built-in Notes app to create a unique signature that can be easily copied and pasted into your emails.
Here’s how you can use the Notes app to create a signature:
1. Open the Notes app on your iPhone. If you can’t find it on your home screen, you can use the search function to locate it.
2. Create a new note by tapping on the “+” button at the bottom of the screen.
3. In the new note, type in your desired signature. You can include your name, job title, contact information, or any other information you want to include in your email signature.
4. Customize the formatting of your signature. You can apply bold, italic, or underline to specific parts of your signature to make it stand out.
5. Once you are satisfied with your signature, tap on the share icon at the top right corner of the screen.
6. From the share options, select “Copy” to copy the signature to your device’s clipboard.
7. Now, open the Mail app on your iPhone. Tap on the compose button to start composing a new email.
8. In the email body, tap and hold on an empty space until the context menu appears. From the menu, select “Paste” to paste your copied signature into the email.
9. Adjust the placement of the signature as needed. You can move it to the bottom of the email or align it with your text.
10. Finally, complete your email and send it with your new signature.
Using the Notes app to create a signature gives you more flexibility in formatting and customization. You can update your signature anytime by editing the note in the Notes app and repeating the steps above to copy and paste it into your emails.
With this method, you no longer have to rely on the default signature options in the Mail app. Express your individuality and professionalism by creating a personalized email signature using the Notes app on your iPhone.
Method 4: Using a third-party email app with signature functionality
If you’re not satisfied with the signature options provided by the default Mail app on your iPhone, you can explore using third-party email apps that offer more advanced signature functionality. These apps are designed to enhance your email experience and give you greater control over your signature.
One popular third-party email app that you can consider is Gmail. With the Gmail app, you can easily add a signature to your outgoing emails. Simply open the app and tap on the menu icon in the top-left corner. Then, go to “Settings” and select your email account. From there, you can scroll down to the “Signature” section and customize your signature as desired. You can include your name, contact information, or any other details you want to include in your email signature.
Another option you can explore is the Microsoft Outlook app. This app offers a comprehensive set of features, including the ability to add a signature to your emails. To set up a signature in the Microsoft Outlook app, open the app and tap on the menu icon in the top-left corner. Then, go to “Settings” and select your email account. Under the “Email Signature” section, you can create and customize your signature. You can add images, links, and format the text to make your signature stand out.
If you prefer a more minimalist approach, you might want to check out Spark. This email app focuses on simplicity and allows you to create a clean and professional-looking signature. To set up a signature in the Spark app, open the app and tap on the menu icon in the top-left corner. Then, go to “Settings” and select your email account. Look for the “Signature” option and enter your desired signature. Spark also offers the option to use different signatures for different email accounts, which is helpful if you have multiple accounts.
One more third-party email app with signature functionality worth considering is Newton Mail. Newton Mail offers a range of features, including the ability to create and customize your email signature. To set up a signature in the Newton Mail app, open the app and tap on the menu icon in the top-left corner. Then, go to “Settings” and select your email account. From there, you can find the “Signature” option and design your signature to reflect your personal or professional branding.
By using a third-party email app with signature functionality, you can personalize your email communications and make a lasting impression. Whether you choose Gmail, Microsoft Outlook, Spark, or Newton Mail, these apps offer a range of customization options to help you create a signature that represents your unique style and professionalism.
Adding a signature to your email on your iPhone is a simple and effective way to personalize your correspondence. By following the steps outlined in this article, you can easily customize your emails with a professional signature that includes your contact information, logo, and any other relevant details. This will not only give your emails a polished and professional look but also make it easier for recipients to get in touch with you.
Whether you use the built-in Mail app or a third-party email client, the process of adding a signature is straightforward and can be completed in just a few steps. By taking advantage of the customization options available on your iPhone, you can create a signature that reflects your personal or professional brand and portrays a sense of professionalism and attention to detail.
So, why settle for a generic and impersonal email when you can add a signature that makes a lasting impression?
FAQs
Q: How do I add a signature to my email on iPhone?
Adding a signature to your email on iPhone is simple. Just follow these steps:
- Open the “Settings” app on your iPhone.
- Scroll down and tap on “Mail” or “Mail, Contacts, Calendars” depending on your iOS version.
- Tap on “Signature.”
- Tap on the email account you want to add a signature to.
- Enter your desired signature in the text field.
- Tap “Back” to save your signature.
Q: Can I have different signatures for different email accounts on my iPhone?
Yes, you can have different signatures for different email accounts on your iPhone. Just follow the steps mentioned above to add signatures for each individual email account.
Q: Can I include images in my email signature on iPhone?
As of the current iOS version, you cannot directly add images to your email signature on iPhone. However, you can include links to your social media profiles or personal website that may have your image or logo.
Q: Can I customize the font and formatting of my email signature on iPhone?
Unfortunately, the default Mail app on iPhone does not provide options to customize the font and formatting of your email signature. It uses the default font and style for your email composition.
Q: Does my email signature get automatically added to replies and forwarded emails?
By default, the email signature is added only to new outgoing emails. It does not get automatically added to replies or forwarded emails. However, you can manually insert your signature in these emails if desired.