
Adding an email address to your iPhone 10 is a fundamental task that allows you to stay connected and organized on the go. Whether you're setting up your work email, personal email, or both, the process is straightforward and user-friendly. In this article, we'll delve into the step-by-step guide on how to add an email address to your iPhone 10, ensuring that you can effortlessly access your emails anytime, anywhere. Let's embark on this journey to seamlessly integrate your email accounts with your iPhone 10 and streamline your communication experience. So, let's dive in and explore the simple yet essential process of adding an email address to your iPhone 10.
Inside This Article
- Adding an Email Address to Your iPhone 10
- Setting up an Email Account- Accessing the Settings menu- Selecting the Mail, Contacts, Calendars option- Choosing Add Account
- Entering Email Account Information- Providing the email address and password- Configuring additional settings if necessary- Saving the changes
- Testing the Email Account- Sending a test email- Checking for incoming messages- Verifying successful setup
- Managing Email Accounts- Accessing the Mail app- Navigating through multiple email accounts- Customizing email settings
- Conclusion
- FAQs
Adding an Email Address to Your iPhone 10
Adding an email address to your iPhone 10 is a simple process that allows you to stay connected and access your emails on the go. Whether it’s a personal or work-related email account, integrating it with your iPhone 10 can streamline your communication and productivity.
When setting up an email account on your iPhone 10, you’ll need to access the Settings menu, select the Mail, Contacts, Calendars option, and then choose Add Account. This intuitive process ensures that you can seamlessly integrate various email accounts with your device, keeping all your communications in one convenient location.
After accessing the Settings menu, you’ll be prompted to enter your email account information, including the email address and password. Additionally, you may need to configure additional settings based on your email provider’s requirements. Once you’ve entered all the necessary details, you can save the changes and proceed to the next steps.
Once the email account is set up, it’s essential to test its functionality. This involves sending a test email to ensure that outgoing messages are successfully transmitted. Furthermore, checking for incoming messages verifies that your iPhone 10 can receive emails without any issues, confirming the successful setup of your email account.
Managing multiple email accounts on your iPhone 10 is a breeze. The Mail app allows you to access and navigate through different email accounts effortlessly, ensuring that you can stay on top of all your communications. Additionally, customizing email settings enables you to tailor your email experience to suit your preferences and needs.
Setting up an Email Account- Accessing the Settings menu- Selecting the Mail, Contacts, Calendars option- Choosing Add Account
Setting up an email account on your iPhone 10 is a straightforward process that begins with accessing the Settings menu. To do this, locate and tap the “Settings” app on your home screen. This is typically represented by a gear icon and is an essential hub for configuring various aspects of your device.
Once you’re in the Settings menu, scroll down and look for the “Mail, Contacts, Calendars” option. Tap on it to access a range of settings related to your email and contact information. This is where you can manage existing accounts and add new ones to streamline your communication needs.
After selecting “Mail, Contacts, Calendars,” you’ll find the “Add Account” option. Tapping on this will prompt your iPhone 10 to display a list of compatible email service providers, such as Google, Yahoo, Outlook, and others. Choose the relevant provider for the email account you want to add, and follow the on-screen instructions to proceed with the setup.
Entering Email Account Information- Providing the email address and password- Configuring additional settings if necessary- Saving the changes
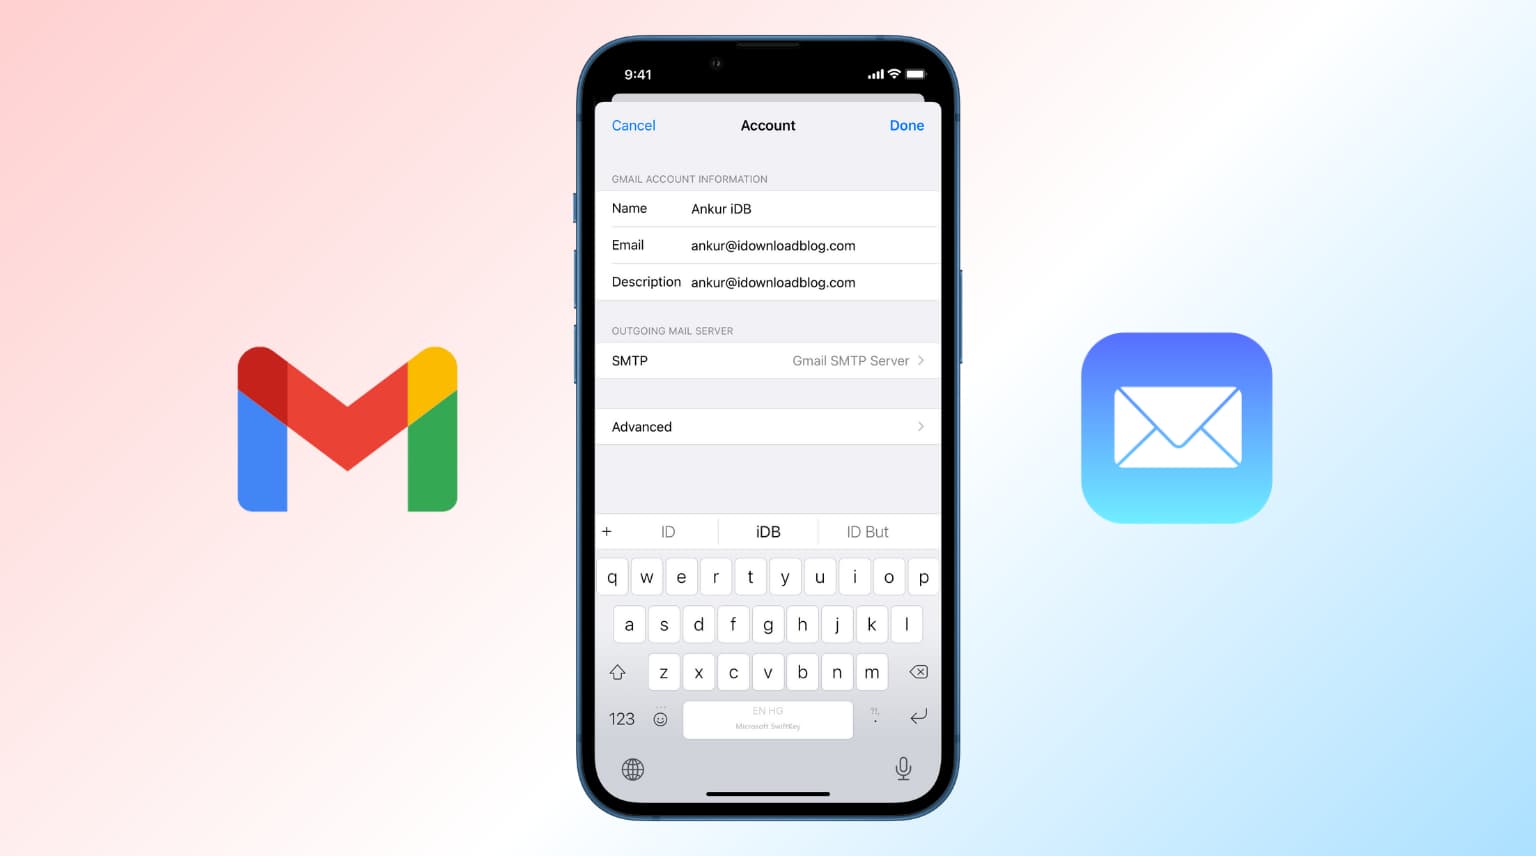
Once you’ve accessed the Mail, Contacts, Calendars section and selected “Add Account” on your iPhone 10, the next step is to provide the necessary information to set up your email account. You’ll start by entering your email address and password, ensuring a seamless connection to your email server.
After inputting your email address and password, you may need to configure additional settings depending on your email provider. This may include server settings, port numbers, and security protocols to ensure proper synchronization of your emails, contacts, and calendars.
Once you’ve entered all the required information and made any necessary configurations, it’s crucial to save the changes to finalize the setup of your email account on your iPhone 10. Saving the changes ensures that your email account is properly integrated with the Mail app, allowing you to send, receive, and manage your emails effortlessly.
Testing the Email Account- Sending a test email- Checking for incoming messages- Verifying successful setup
Once you’ve added your email account to your iPhone 10, it’s essential to test its functionality to ensure that you can send and receive emails seamlessly. The following steps will guide you through the process of testing your email account.
To begin, compose a test email by opening the Mail app on your iPhone 10. Tap the “Compose” button, and in the “To” field, enter an email address that you have access to from another device or computer. Craft a brief message in the body of the email, such as “This is a test email from my iPhone 10.”
After composing the test email, tap “Send” to dispatch it to the recipient’s email address. Once the email is sent, navigate to the “Sent” folder within the Mail app to confirm that the test email has been successfully dispatched. This step ensures that your outgoing emails are functioning as expected.
Next, switch to the other device or computer where you sent the test email. Check the inbox or relevant folder to verify that the test email has been received. If the email appears in the recipient’s inbox, it confirms that your iPhone 10 is successfully sending emails.
Returning to your iPhone 10, open the Mail app and navigate to the inbox of the email account you just tested. Refresh the inbox by swiping down to trigger a manual update. If the test email you sent appears in the inbox, it indicates that your iPhone 10 is successfully receiving emails from the configured account.
By following these steps and confirming the successful sending and receiving of the test email, you can be confident that your email account has been set up correctly on your iPhone 10. This verification process ensures that you can seamlessly send and receive emails using the configured email account on your device.
Managing Email Accounts- Accessing the Mail app- Navigating through multiple email accounts- Customizing email settings
Once you’ve successfully added your email accounts to your iPhone 10, you can effortlessly manage them through the Mail app. To access the Mail app, simply locate and tap the envelope icon on your home screen. This will open the Mail app, where you can view and manage all your email accounts in one convenient location.
If you have multiple email accounts set up on your iPhone 10, navigating through them is a breeze. Inside the Mail app, you can easily switch between accounts by tapping the “Mailboxes” button in the top-left corner and selecting the desired account from the list. This seamless navigation allows you to access and manage emails across different accounts without any hassle.
Customizing your email settings on the iPhone 10 is a great way to tailor your email experience to suit your preferences. Within the Mail app, you can customize settings such as notification preferences, signature, and mailbox behaviors. By tapping on “Settings” within the Mail app, you can access these customization options and personalize your email management to optimize efficiency and convenience.
Conclusion
Adding an email address to your iPhone 10 is a simple yet essential task that allows you to stay connected and organized on the go. Whether it’s for work, personal use, or both, having your email readily accessible on your iPhone 10 ensures you never miss an important message. By following the step-by-step process outlined in this guide, you can seamlessly integrate your email account with your device, enabling you to efficiently manage your correspondence wherever you are.
FAQs
Q: How do I add an email address to my iPhone 10?
A: To add an email address to your iPhone 10, go to Settings, select Mail, tap Accounts, and then choose Add Account. From there, you can select the email provider and enter your email address and password.
Q: Can I add multiple email accounts to my iPhone 10?
A: Yes, you can add multiple email accounts to your iPhone 10. Simply follow the same process for each additional email account you want to set up.
Q: What email providers are supported on the iPhone 10?
A: The iPhone 10 supports a wide range of email providers, including Gmail, Yahoo, Outlook, iCloud, and many others. If your provider is not listed, you can select "Other" and manually enter the account details.
Q: Is it possible to sync contacts and calendars along with email on my iPhone 10?
A: Yes, when you add an email account to your iPhone 10, you have the option to sync contacts and calendars associated with that account. This allows you to access all your important information in one place.
Q: Do I need to use the Mail app to access my email on the iPhone 10?
A: While the Mail app is the default option for accessing email on the iPhone 10, you can also download and use other email apps from the App Store to manage your email accounts.