
Are you looking for a fun and creative way to add words to your photos on your iPhone? If so, look no further! In this article, we will explore how to use the Over app on your iPhone to add text, quotes, captions, or any other words to your pictures. Whether you want to create stunning visuals for your social media posts, personalize your photos with meaningful text, or simply have some fun with typography, Over has got you covered. With its user-friendly interface and a wide range of customizable fonts, colors, and design elements, Over makes it easy to add professional-looking text overlays to your images. So, let’s dive in and discover how to add words to your photos with Over on your iPhone.
Inside This Article
- Why Add Words to a Photo
- How to Add Words to a Photo with Over on iPhone
- Step 1: Download and install Over from the App Store
- Step 2: Open Over and Select a Photo
- Step 3: Choose a text style and enter your desired words
- Step 4: Customize the text formatting and placement
- Step 5: Add additional elements or graphics (optional)
- Step 6: Save and share your edited photo
- Conclusion
- FAQs
Why Add Words to a Photo
Adding words to a photo is a creative way to enhance its meaning, convey a message, or tell a story. Whether you want to add a motivational quote, a caption, or simply label important details, text can greatly elevate your photographs. Here are a few reasons why adding words to a photo can be a valuable addition:
- Provide Context: Words can provide additional context or information about the photo. They can help viewers understand the location, the event, or the emotions captured in the image.
- Create a Narrative: Adding words to a photo can transform it into a storytelling medium. You can weave a narrative, share an anecdote, or express a point of view through carefully chosen words.
- Evoke Emotions: Text can evoke emotions that complement the visual elements of the photo. A thoughtful quote or a powerful statement can intensify the impact of the image and resonate with the viewer.
- Brand Promotion: For businesses and influencers, adding words to a photo can be a branding opportunity. By incorporating a logo, a tagline, or a website URL, you can increase brand recognition and drive traffic to your online presence.
- Enhance Accessibility: By adding text to your photos, you make them more accessible to individuals with visual impairments or those who rely on screen readers. Descriptive text can provide an inclusive experience for all viewers.
Adding words to a photo can be a powerful tool for self-expression, storytelling, branding, and accessibility. With the right text placement, font selection, and design elements, you can create visually appealing and engaging images that leave a lasting impression on your audience.
How to Add Words to a Photo with Over on iPhone
If you’re looking to add words or text to your photos on your iPhone, you’re in luck! With the Over app, you can easily customize and stylize your text to create stunning visuals. In this guide, we’ll walk you through the process step by step so you can start adding words to your photos with Over in no time.
Getting Started with Over
The first step is to download and install the Over app from the App Store on your iPhone. Once installed, open the app and create a new project by tapping the “+” icon. You can choose to start a new project from scratch or select a pre-existing photo from your camera roll.
Once you have your project set up, you’ll be taken to the editing screen, where you can begin to add text to your photo.
Choosing and Customizing Text Styles
Over offers a wide range of text styles and fonts to choose from. To access the text styles, tap on the “Text” icon located at the bottom of the screen. From there, you can browse through the different categories or use the search function to find a specific style.
Once you’ve selected a text style, you can further customize it by adjusting the font, size, color, alignment, and more. Simply tap on the text element on your photo and the customization options will appear at the bottom of the screen.
Adding Text to Your Photos
Adding text is as simple as tapping on the photo where you want the text to appear and typing in your desired text. You can move and resize the text by dragging and pinching, and you can also rotate it by using two fingers and twisting.
If you want to add multiple text elements, simply repeat the process by tapping on the photo and typing in your next piece of text. You can position and customize each text element individually.
Enhancing Your Text with Effects
Over also provides a range of effects and editing tools to enhance your text. You can add shadows, outlines, gradients, and even apply filters to your text to make it stand out. Simply tap on the text element and access the effects and editing options at the bottom of the screen.
Once you’re done adding and customizing your text, you can save your project or share it directly to social media platforms or messaging apps. Over makes it easy to create professional-looking images with text on your iPhone.
Now that you know how to add words to a photo with Over on iPhone, you can start unleashing your creative side and making your photos truly unique. Get creative with fonts, styles, colors, and effects, and let your images speak for themselves. Happy editing!
Step 1: Download and install Over from the App Store
If you’re looking to add some flair to your photos by adding words, captions, or quotes, then Over is the perfect app for you. Available for iPhone users, Over allows you to easily add text to your photos with a wide range of customizable options. To get started, follow these simple steps:
1. Open the App Store on your iPhone and search for “Over.”
2. Tap the “Get” button next to the Over app to begin downloading.
3. Enter your Apple ID or use Touch ID/Face ID to authenticate the download.
4. Wait for the app to download and install on your iPhone.
Once Over is installed on your iPhone, you’re ready to unleash your creativity and start adding words to your photos. Let’s move on to the next step and explore the exciting features of Over.
Step 2: Open Over and Select a Photo
Now that you have downloaded and installed the Over app on your iPhone, it’s time to get started with adding words to your photos. First, locate the Over app icon on your home screen and tap on it.
Upon opening the app, you will be greeted with a variety of options to choose from. To add words to your photo, you need to select a photo to work with. To do this, tap on the “Select a Photo” button. This will allow you to browse through your phone’s photo library and choose the image you want to add text to.
Once you have selected the photo, Over will display it on the editing screen. Here, you will have access to various tools and features to customize and enhance your image. Take a look at the toolbar located at the bottom of the screen. This is where you can find options for adding text, choosing text styles, and applying effects.
By tapping on the “Text” option in the toolbar, you can begin adding words to your photo. This will open up a text editor where you can input your desired text. Whether it’s a quote, a caption, or a message, type it in and watch it appear on your photo in real-time.
As you type, you can also change the font style, size, and color of your text. Simply select the desired text and use the formatting options available to make adjustments. Over offers a wide range of font styles to choose from, allowing you to find the perfect look for your text.
Once you are satisfied with the text placement and style, you can further enhance your words by applying effects. These effects can add a professional touch to your text and make it stand out even more. Explore the various effects available in Over to find one that complements your photo and overall aesthetic.
Remember to save your progress regularly as you work on your photo. You can do this by tapping on the “Save” button located in the top right corner of the screen. This will ensure that your changes are saved and you can continue editing later or share the final result with others.
Adding words to your photos has never been easier than with the Over app on your iPhone. Explore the different customization options and let your creativity shine through your words.
Step 3: Choose a text style and enter your desired words
Once you have selected a photo and opened it in the Over app on your iPhone, it’s time to add text to it. This step allows you to choose a text style that best matches the mood and aesthetic you want to convey. Here’s how you can do it:
1. In the Over app, locate the toolbar at the bottom of the screen. Look for the “Text” icon, which is represented by a capital “T”. Tap on it to enter the text editing mode.
2. On the top left corner of your screen, you will find a button labeled “Styles”. Tap on it to access a wide variety of pre-designed text styles. Scroll through the options until you find one that catches your eye.
3. Once you’ve chosen a text style, it’s time to enter your desired words. Tap on the text field in the center of the screen. This will activate the keyboard, allowing you to type in your text.
4. Take your time to carefully consider what you want to convey through your text. Whether it’s a catchy slogan, an inspirational quote, or a simple caption, make sure it complements your photo and grabs the viewer’s attention.
5. As you enter your text, you will notice that it automatically appears on your photo. You can adjust the size, position, and orientation of the text by using pinch and swipe gestures on the screen. Experiment with different placements until you find the perfect fit.
6. If you want to add more text, simply tap on the “+” button located on the right side of the screen. This will create a new text field for you to enter additional words.
7. To delete or modify the text, tap on the text field and use the on-screen keyboard to make changes. You can also use the backspace button to delete characters or the trash can icon to remove the entire text field.
8. Once you are satisfied with the text style and the words you have entered, you can move on to the next step to add creative effects and enhance the overall appearance of your text.
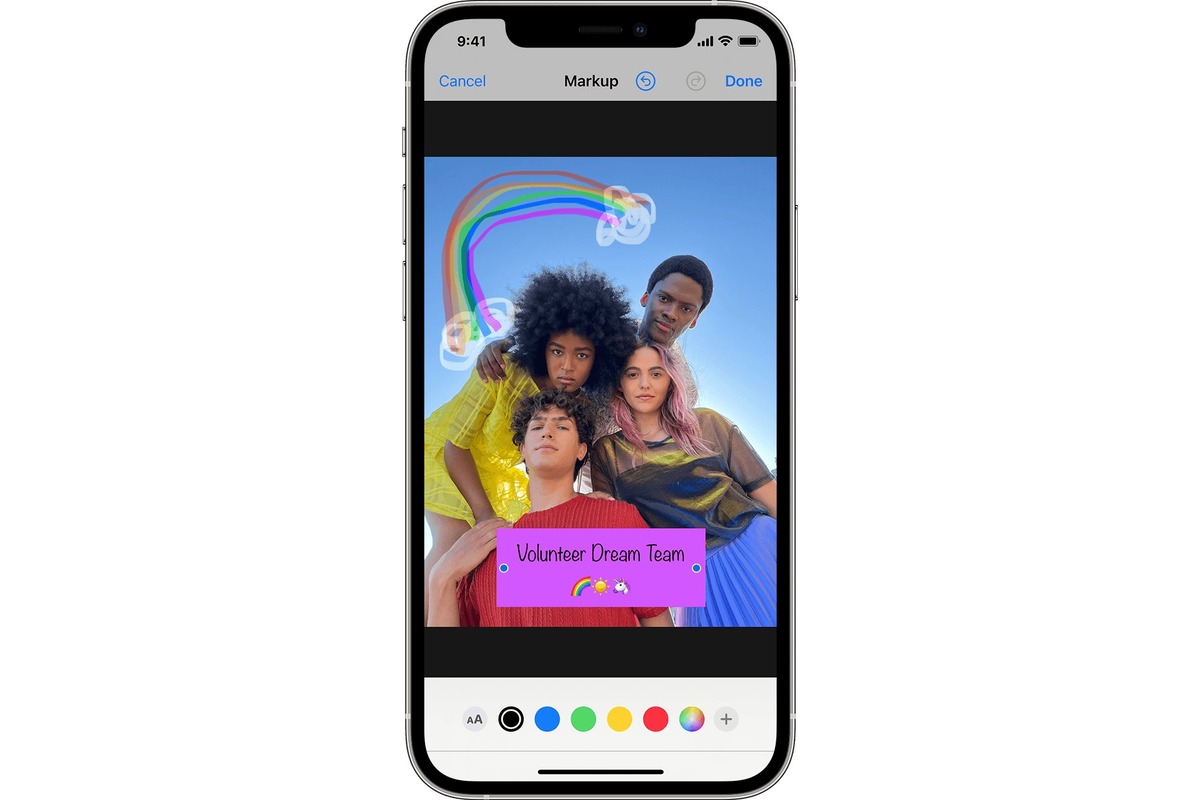
Step 4: Customize the text formatting and placement
Once you have typed the text you want to add to your photo, it’s time to customize the formatting and placement to make it standout. Over gives you a variety of options to perfectly align and enhance your text.
The first thing you can do is change the font style. Over offers a wide selection of fonts to choose from, ranging from elegant script fonts to bold and modern styles. Simply select the text you want to modify, and then use the font menu to choose your desired style. This allows you to find the perfect font that complements the mood and message of your photo.
Next, you can adjust the size of your text. By using the size slider or entering a specific numerical value, you can make your text larger or smaller, ensuring that it is easily readable and fits well within the composition of your photo. It’s important to keep in mind that readability should be a priority, so avoid using very small text that may be hard to read.
In addition to size, you can customize the color of your text to create a visually appealing contrast with the background of your photo. Over provides a color picker tool that allows you to choose from a wide range of colors or enter a specific hexadecimal value to match your branding or personal preferences. This gives you the flexibility to make your text blend in or stand out, depending on your creative vision.
Another useful feature is the ability to add effects to your text. Over offers a variety of effects such as shadows, outlines, and gradients that can give your text a unique and eye-catching look. You can experiment with different effects to find the one that best suits your photo and enhances the overall composition.
When it comes to placement, Over provides intuitive controls that allow you to precisely position your text on your photo. You can easily move, rotate, and resize the text using gesture-based controls, ensuring that it is positioned exactly where you want it. This gives you full control over the visual hierarchy of your composition and allows you to guide the viewer’s attention to the important elements in the photo.
Once you are satisfied with the formatting and placement of your text, make sure to preview it in the context of your photo before saving or sharing. This way, you can ensure that your text is visually consistent with the overall composition and effectively conveys your intended message.
With Over, customizing the text formatting and placement on your photos has never been easier. Whether you want to add a simple caption or create a visually stunning quote image, Over provides the tools and flexibility to bring your creative vision to life.
Step 5: Add additional elements or graphics (optional)
Once you have added the text to your photo using Over on your iPhone, you have the option to take it a step further by including additional elements or graphics. These elements can help enhance the overall look and feel of your photo, making it more visually appealing and engaging.
Adding elements such as shapes, icons, stickers, or even images can help convey a specific message or add a touch of personality to your photo. Over provides a wide range of pre-designed elements that you can choose from, making it easy to find the perfect one for your image.
To add an element or graphic, simply tap on the “Elements” tab within the Over app. This will bring up a library of different categories such as shapes, icons, or stickers. Browse through the options and select the one that best complements your photo.
Once you have chosen your element, you can customize it to fit your desired style. Change the color, size, and even the position of the element by using the editing tools provided in the app. This allows you to truly make the element your own and tailor it to match your creative vision.
If you want to include an image as part of your design, simply tap on the “Image” tab within Over. This will open your camera roll, where you can select the image you want to include. You can resize and position the image on your photo, and even add filters or adjust the opacity for a more seamless integration.
Remember, adding additional elements or graphics is optional. It’s up to you to decide if they will enhance your photo or if you prefer the simplicity of just the text. Play around with different elements and graphics to find the perfect combination that suits your style and the message you want to convey.
By taking advantage of Over’s extensive collection of elements and graphics, you can transform your photo into a visual masterpiece that truly stands out. Experiment, get creative, and have fun with this final step in adding words to your photos on your iPhone!
Step 6: Save and share your edited photo
After you have added words to your photo using Over on your iPhone, it’s time to save and share your masterpiece. Here’s how you can do it:
1. Make sure you are satisfied with the placement and styling of your text. Take a moment to review your photo and make any necessary tweaks.
2. Once you are ready to save the photo, tap on the checkmark icon located at the top right corner of the screen. This will bring up the save options.
3. In the save options menu, you will have the choice to save the photo to your iPhone’s camera roll or export it to various apps and platforms. Select the option that suits your needs.
4. If you choose to save the photo to your camera roll, Over will prompt you to grant access to your photos. Tap on “Allow” to give permission.
5. After granting access, Over will save your edited photo to your camera roll. You can find it in the Photos app along with your other images.
6. If you prefer to export the photo, select the desired app or platform from the save options menu. Over supports exporting to various social media platforms, cloud storage services, and messaging apps.
7. Once you have selected the app or platform, Over will present you with further options to customize how the photo is shared. Follow the prompts and make your selections accordingly.
8. After finalizing your sharing options, tap on “Share” or the appropriate button to share the edited photo. Over will handle the rest and send the photo to the selected destination.
9. Congratulations! You have successfully saved and shared your edited photo with words added using Over on your iPhone. Your friends, family, and followers will now be able to enjoy your creative and personalized masterpiece.
Remember to give yourself a pat on the back for a job well done!
Adding words to photos can greatly enhance their impact and help convey your message more effectively. With the powerful Over app available on iPhone, you have a user-friendly and versatile tool at your fingertips to accomplish this task. Whether you’re an aspiring influencer, a social media manager, or just someone who wants to add a personal touch to their pictures, Over provides an easy-to-use interface and a wide range of customizable features.
By following the steps outlined in this guide, you can unlock your creative potential and take your images to the next level. From designing captivating social media posts to creating eye-catching advertisements, Over empowers you to bring your vision to life. So, download Over, unleash your imagination, and start transforming your photos with stylish typographies, shapes, colors, and effects.
Remember to experiment, have fun, and let your creativity shine through. With Over on your iPhone, the possibilities are endless for adding impactful words to your photos.
FAQs
1. Can I add words to a photo using the Over app on my iPhone?
Yes, the Over app is available for iPhone and it allows you to easily add words or text to your photos.
2. How do I add words to a photo with the Over app?
To add words to a photo using the Over app on your iPhone, follow these steps:
1. Install the Over app from the App Store.
2. Open the Over app and choose the photo you want to edit.
3. Tap on the “Text” button. This will open a text editor where you can enter your desired words.
4. Customize the text by selecting the font, size, color, and style.
5. Move and resize the text to the desired position on your photo.
6. Tap on “Done” or “Save” to apply the changes and save the edited photo.
3. Can I choose from different fonts when adding words to a photo with the Over app?
Yes, the Over app offers a wide range of fonts to choose from. You can explore different font styles to find the one that suits your photo best.
4. Is it possible to change the color and size of the text in the Over app?
Absolutely! The Over app allows you to customize the color, size, and even style of the text. This gives you the flexibility to create visually appealing and personalized captions or messages for your photos.
5. Can I edit the words after I have added them to a photo using the Over app?
Yes, you can edit the words even after adding them to a photo in the Over app. Simply select the text and make the desired changes, such as adjusting the font, size, or color. This allows you to refine your message until it looks just right.