
Are you tired of searching for contact information when you need it the most on your iPhone? Well, fret no more! With the advancements in mobile app technology, creating and customizing contact posters on your iPhone has become easier than ever before.
Imagine having all your essential contact details neatly organized and easily accessible with just a few taps on your screen. Whether you want to create posters for personal contacts, professional connections, or even for special events like birthdays or anniversaries, your iPhone can now become your ultimate contact organization tool.
In this article, we will dive into the world of mobile apps that allow you to create and customize contact posters effortlessly. From selecting eye-catching designs to adding personalized details, we will explore the step-by-step process of transforming your iPhone into a digital contact hub. So, let’s get started and streamline your contact management in style!
Inside This Article
- How to Create and Customize Contact Posters on iPhone
- Accessing the Contact Poster Feature
- Choosing and Customizing a Template
- Adding Contact Information to the Poster
- Saving and Sharing the Contact Poster
- Conclusion
- FAQs
How to Create and Customize Contact Posters on iPhone
If you’re an iPhone user looking for a creative way to share your contact information, look no further! The Contact Poster feature on iPhone allows you to create and customize eye-catching contact posters that can be easily shared with others. In this article, we’ll guide you through the steps of accessing this feature, choosing and customizing a template, adding your contact information, and saving and sharing the final poster.
Accessing the Contact Poster feature is a breeze. Simply open the Contacts app on your iPhone and select the contact for whom you want to create the poster. Scroll down to the “Share Contact” option and tap on it. You’ll see a list of available sharing options, and one of them will be “Create and Customize Poster.” Tap on this option to enter the Contact Poster interface.
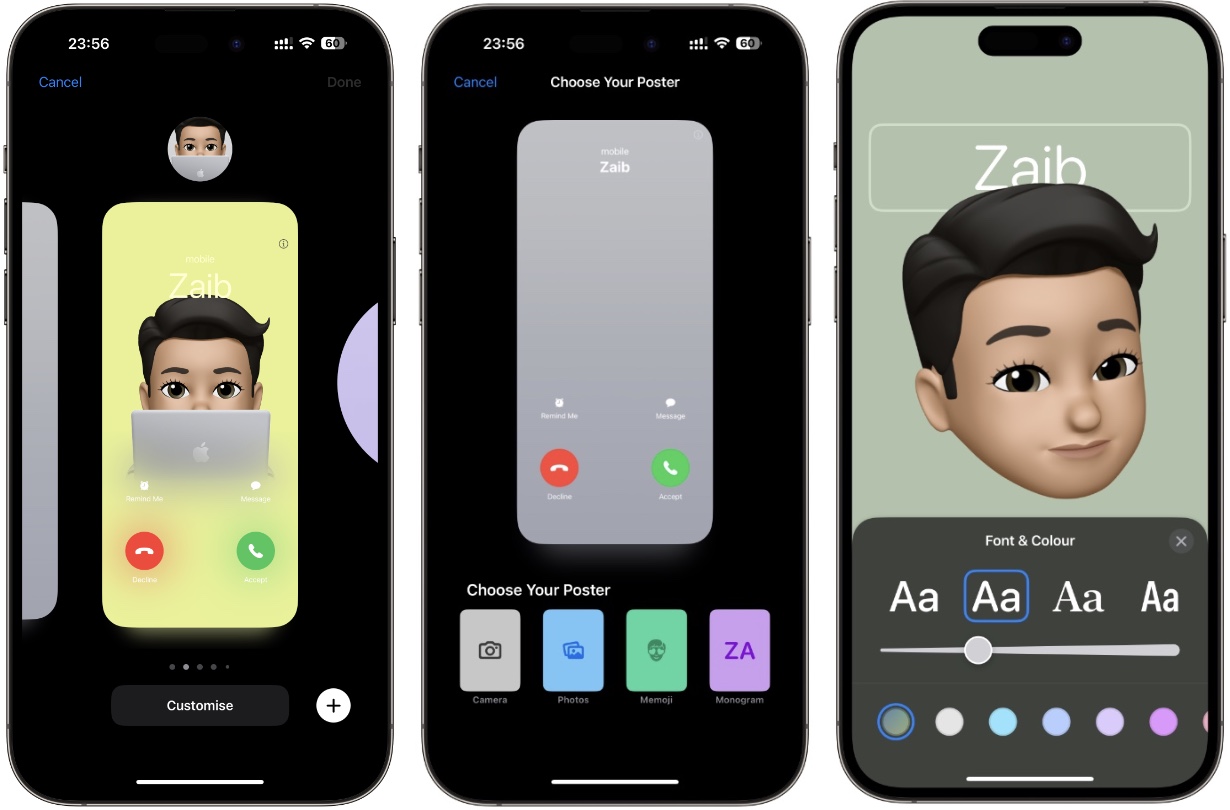
- Tap on “Choose Template” to browse through a selection of poster designs. There are various categories to choose from, including professional, casual, and fun. Pick a template that best matches your style and preferences.
- Once you’ve chosen a template, it’s time to customize it. Tap on “Customize” to access editing tools. Here, you can change the background color, add images, and adjust the layout and font styles. Get creative and make your poster truly unique to reflect your personality or brand.
- Now it’s time to add your contact information. Tap on the text fields to input your name, phone number, email, and any other details you want to include. You can also specify how you want the contact to be accessed, such as through FaceTime or WhatsApp. This ensures that recipients can easily use your contact information and reach out to you using their preferred method.
Once you’re satisfied with the customization and information input, you can save your contact poster. Tap on “Save” to store the poster in your Photos app. From there, you can easily access and share it whenever needed.
Sharing your contact poster is simple. You can send it directly through Messages or Mail by tapping on the respective icons. Alternatively, you can share it on social media platforms like Instagram or Facebook by selecting the “Share” option and choosing the desired platform. This way, you can effortlessly distribute your contact information to friends, colleagues, or potential clients.
Creating and customizing contact posters on iPhone is not only fun but also a practical way to share your contact information. Give it a try and impress others with your stylish and personalized contact posters!
Accessing the Contact Poster Feature
Creating and customizing contact posters on your iPhone is a fun and convenient way to share your contact information with others. To access this feature, simply follow the steps below:
1. Open the Contacts app on your iPhone. This app is represented by a blue icon with a silhouette of a person.
2. Navigate to the contact whose information you want to create a poster for. You can either search for the contact using the search bar at the top, or scroll through your contacts list to find them.
3. Once you have selected the contact, tap on their name to open their detailed contact page.
4. Now, look for the “Share Contact” option. This is indicated by an icon that looks like a box with an arrow pointing upwards. Tap on this icon to proceed.
5. A menu will appear with various options for sharing the contact. Scroll through the menu until you find the “Create Contact Poster” option. Tap on this option to access the contact poster feature.
6. Congratulations! You have now successfully accessed the contact poster feature on your iPhone.
By following these simple steps, you can easily access the contact poster feature on your iPhone and begin customizing contact posters to share with others.
Choosing and Customizing a Template
When it comes to creating and customizing contact posters on your iPhone, one of the first steps is to choose a template that suits your preferences. The template serves as the foundation for your contact poster and determines its overall design and layout.
To access the available templates, open the contact poster feature on your iPhone. You can do this by navigating to the Contacts app and tapping on the specific contact you wish to create a poster for. From there, look for the option to create a poster, usually located in the upper right corner of the screen.
Once you’ve accessed the contact poster feature, you’ll be presented with a variety of template options to choose from. These templates range from sleek and professional designs to more playful and eye-catching layouts.
Take your time exploring the different templates and consider the intended purpose of your contact poster. Are you creating a poster for a business contact or a personal event? The template you choose should align with the tone and style you want to convey.
After selecting a template, the next step is to customize it according to your preference. This customization allows you to add a personal touch and make the contact poster truly unique.
Depending on the template you’ve chosen, customization options may include changing the background color or image, adjusting the font style and size, and adding decorative elements such as icons or stickers.
Experiment with different combinations and see what works best for your contact poster. Remember, you want the poster to be visually appealing and easy to read, so make sure the chosen elements blend well together and enhance the overall look and feel.
Don’t hesitate to play around with different template and customization options until you’re satisfied with the end result. Remember, the goal is to create a contact poster that stands out and effectively conveys the necessary information.
Once you have chosen and customized a template to your liking, you’re ready to move on to the next step: adding contact information to your poster.
Adding Contact Information to the Poster
Once you have selected and customized a template for your contact poster, it’s time to add your contact information to the design. This will allow people to easily reach out to you or save your contact details for future reference.
To add your contact information, simply tap on the editable fields available on the template. This may include sections for your name, phone number, email address, website, social media handles, or any other relevant details.
When entering your contact information, it is essential to ensure accuracy. Double-check that your phone number and email address are properly formatted and free from any typos. This will guarantee that others can reach you without any issues.
If the template allows for customization, you can also choose the font, color, and size of the text for each contact detail. It’s a great opportunity to add a personal touch to your contact poster and make it visually appealing.
Additionally, you may want to consider including a call-to-action or a brief message indicating how you prefer to be contacted. For example, you can add a line saying “Call or text me for inquiries” or “Reach out to me via email for collaborations.”
Remember, the goal is to make it as easy as possible for others to connect with you based on the platform they prefer. By providing multiple contact options and clear instructions, you increase the chances of receiving inquiries or forming valuable connections.
Once you have inputted all the necessary contact details, take a moment to review the information for accuracy. Make any final adjustments or changes if needed, ensuring that everything is exactly how you want it to appear on your contact poster.
Now that you have added contact information to your poster, it’s time to save and share it with others. Keep reading to learn how to save and share your customized contact poster on your iPhone.
Saving and Sharing the Contact Poster
Once you have created and customized your contact poster on your iPhone, the next step is to save and share it with others. The Contact Poster feature offers convenient options to help you easily save and distribute your contact poster in various ways.
To save the contact poster, simply tap on the “Save” button located at the top right corner of the screen. This will save the poster to your iPhone’s Photos app, allowing you to access it later whenever needed. You can also rename the poster before saving it, making it easier to identify and locate in your Photos library.
Sharing the contact poster is just as simple. Tap on the “Share” button next to the “Save” button. This will present you with a variety of sharing options, such as messaging apps, social media platforms, email, and more. Choose the desired platform or contact and follow the prompts to share the contact poster instantly.
If you prefer to share the contact poster as a physical printout, you can also utilize the AirPrint feature on your iPhone. Simply tap on the “Share” button and select the AirPrint option. This will allow you to print the contact poster wirelessly on a compatible printer. You can then distribute the physical copy to those who may need it.
Additionally, the Contact Poster feature also provides the option to export the contact poster as a digital file. Tap on the “Share” button and select the “Export Poster” option. This will save the contact poster as a PDF file, which you can then share via messaging apps, email, or even cloud storage services.
Remember, when sharing the contact poster, ensure that you only share it with trusted individuals and platforms. It contains your personal contact information, so it is important to exercise caution and privacy measures when distributing it.
By saving and sharing your contact poster, you can easily provide others with your updated contact details in a visually appealing and convenient manner. Whether it’s sharing it digitally or printing it out, the Contact Poster feature on your iPhone simplifies the process and ensures that your contacts have all the necessary information they need.
Conclusion
In conclusion, creating and customizing contact posters on iPhone is a powerful way to add a personal touch to your device and make your contacts easily identifiable. Whether you want to use a photo, a design, or a unique color scheme, the built-in features and third-party apps offer a range of options to suit your preferences. With just a few taps, you can transform a generic list of contacts into a visually appealing and organized collection of posters that reflect your personal style.
By utilizing the tips and tricks outlined in this article, you can effortlessly create and customize contact posters that make your iPhone experience more enjoyable and efficient. So why settle for plain and forgettable contact lists when you can turn them into eye-catching and personalized posters? Start exploring your options today and give your contacts the attention they deserve!
FAQs
Q: What is a contact poster?
A: A contact poster is a visual representation of your contact information that can be easily shared and accessed through your iPhone. It typically includes your name, phone number, email address, and other relevant details. It can be a convenient way to share your contact information with others, especially in professional settings.
Q: How can I create a contact poster on my iPhone?
A: To create a contact poster on your iPhone, you can use various mobile apps available in the App Store. These apps provide templates and customization options to design and tailor your contact poster according to your preferences. You can add your details, select a layout, choose colors, and even add a profile picture to personalize your contact poster.
Q: Can I customize the design and layout of my contact poster?
A: Yes, most contact poster apps offer a range of customization options to help you create a unique and eye-catching design. You can choose different fonts, colors, and layouts to match your style or brand. Additionally, some apps allow you to rearrange and resize the elements on your contact poster, giving you full control over the overall look and feel.
Q: How can I share my contact poster with others?
A: Once you have created your contact poster, you can easily share it with others using various methods. Most contact poster apps provide options to share your poster via email, messaging apps, or even social media platforms. Additionally, you can save your contact poster as an image and share it through any platform or method that allows image sharing.
Q: Can I update my contact information on the contact poster?
A: Yes, you can easily update your contact information on the contact poster. Using the contact poster app, you can edit your details whenever there is a change in your phone number, email address, or any other information. This way, you can ensure that your contact poster always reflects your most up-to-date contact information.