
Keeping your iPhone organized and personalized is essential for a smooth and efficient user experience. One of the best ways to achieve this is by editing shortcuts on your iPhone. With the latest iOS 16 update, Apple has introduced new customization options that allow you to tailor your shortcuts to match your unique needs.
By editing shortcuts, you can easily access your most frequently used apps, actions, and settings with just a few taps. Whether you want to create a shortcut to call your loved ones, navigate to a specific location, or toggle your device’s settings, the possibilities are endless.
In this article, we will guide you through the process of editing shortcuts on your iPhone running iOS 16. We will explore the various customization options available and provide you with valuable tips and tricks to maximize the efficiency of your shortcuts. Let’s dive in and unlock the full potential of your iPhone’s shortcuts!
Inside This Article
- # How to Edit Shortcuts on iPhone for Quick Customization (iOS 16)
- Overview
- Step 1: Open the Shortcuts App
- Step 2: Access the Shortcuts Gallery
- Step 3: Explore Existing Shortcuts
- Step 4: Customize an Existing Shortcut
- Step 5: Create a New Shortcut
- Step 6: Add Actions to the Shortcut
- Step 7: Configure Actions and Parameters
- Step 8: Personalize the Shortcut Icon
- Step 9: Run and Test the Shortcut
- Step 10: Rearrange and Organize Shortcuts
- Step 11: Delete or Disable Shortcuts
- Step 12: Share and Import Shortcuts
- Conclusion
- FAQs
# How to Edit Shortcuts on iPhone for Quick Customization (iOS 16)
Are you tired of scrolling through endless apps on your iPhone to perform simple tasks? Look no further! With the Shortcuts app, you can create personalized shortcuts to streamline your daily routine. In this guide, we’ll walk you through the steps to edit shortcuts on your iPhone, giving you quick customization options for your iOS 16 device.
To get started, you’ll need to open the Shortcuts app on your iPhone. This app comes pre-installed with iOS 16, so you don’t need to download it separately. Simply tap on the Shortcuts icon on your home screen to launch the app.
Once you’re in the Shortcuts app, you’ll see an option called “Shortcuts Gallery” at the bottom of the screen. Tap on it to access a collection of pre-built shortcuts that you can use or customize according to your needs.
If you want to explore existing shortcuts and see how they work, simply tap on one to open it. You’ll be able to see the actions it performs and the parameters it uses. This can give you a better idea of how to customize your own shortcuts later on.
If you want to customize an existing shortcut, tap on the “Edit” button in the top-right corner of the screen. This will open the shortcut in editing mode, allowing you to modify the actions, add or remove steps, and adjust parameters as needed.
Overview
Editing shortcuts on your iPhone is a great way to streamline your daily tasks and customize your device to fit your specific needs. With the introduction of iOS 16, Apple has made it even easier to edit and personalize shortcuts on your iPhone. Whether you want to create a shortcut for sending a quick text message or automate a complex series of actions, this guide will walk you through the steps to edit shortcuts on your iPhone for quick customization.
By following these steps, you’ll be able to customize existing shortcuts, create new ones from scratch, add and configure actions, personalize shortcut icons, and even share and import shortcuts with others. Let’s dive in and discover how to make the most of shortcuts on your iPhone.
Before we get started, keep in mind that the process may vary slightly depending on your device’s operating system and settings. However, the basic steps and concepts should remain the same, providing you with a solid foundation to edit shortcuts on your iPhone.
Now, let’s dig into the details and learn how to edit shortcuts on your iPhone for quick customization!
Step 1: Open the Shortcuts App
To begin customizing your shortcuts on your iPhone, you’ll need to open the Shortcuts app. This app comes pre-installed on iOS 16, so you won’t have to download anything extra. You can find the app by swiping right on your home screen to access the App Library, or by using the search function to locate it.
Once you’ve found the Shortcuts app, tap on it to open it. The app icon features a blue background with an icon resembling a white rocket ship, making it easy to spot among your other apps.
Upon opening the Shortcuts app, you’ll be greeted with the main screen, which is where you’ll find all of your existing shortcuts and have the ability to create new ones. From here, you can start exploring the various customization options and making your shortcuts more personal and efficient.
With the Shortcuts app open and ready to go, you’re now ready to move on to the next step of customizing your shortcuts. So let’s dive in and explore the possibilities!
Step 2: Access the Shortcuts Gallery
Once you have opened the Shortcuts app, the next step is to access the Shortcuts Gallery, which is a collection of pre-built shortcuts that are ready to use. The gallery is a fantastic resource as it contains a wide range of shortcuts created by both Apple and other users. These shortcuts can help you automate tasks, save time, and enhance your iPhone experience.
To access the gallery, simply tap on the “Gallery” tab located at the bottom of the screen. This will open a page showcasing a variety of shortcuts that you can explore and utilize.
As you scroll through the gallery, you will see different categories such as Essentials, Morning Routine, Health & Fitness, and more. These categories make it easier to find shortcuts that align with your specific needs and interests.
Each shortcut in the gallery is represented by a card that provides a brief description of what it does. You can tap on a card to view more details about the shortcut, including the actions it performs and any necessary input parameters.
Furthermore, the gallery allows you to search for specific shortcuts by entering keywords in the search bar at the top of the screen. This is particularly useful if you have a particular task in mind and want to find a shortcut that can help you achieve it.
Once you have found a shortcut that you want to use, you can simply tap on it to preview its actions and parameters. From here, you have the option to customize the shortcut, add it to your library for quick access, or run it immediately.
Accessing the Shortcuts Gallery is a great way to discover new and useful shortcuts that can enhance your iPhone usage. Whether you’re looking to automate repetitive tasks or streamline your daily routine, the gallery provides a wealth of options to choose from.
Step 3: Explore Existing Shortcuts
Now that you have opened the Shortcuts app and learned how to access the Shortcuts Gallery, it’s time to dive into exploring the existing shortcuts available to you. The Shortcuts Gallery is a collection of pre-made shortcuts that cater to various needs and tasks.
When you enter the Shortcuts Gallery, you’ll be greeted with a wide array of shortcut options. These shortcuts are organized into categories such as productivity, health, entertainment, and more to make it easier for you to find what you’re looking for.
Scroll through the categories to discover the available shortcuts. Each shortcut is represented by an icon and a brief description, allowing you to quickly grasp its purpose. Take your time to explore the different options and see which pre-made shortcuts align with your preferences and requirements.
Clicking on a shortcut will provide you with more detailed information about its functionality. You’ll also have the option to preview the shortcut and see how it works before adding it to your collection.
While browsing through the existing shortcuts, keep an eye out for ones that catch your interest or could be useful in streamlining your daily tasks. Whether it’s automating a series of actions, accessing information quickly, or simplifying repetitive actions, the Shortcuts app offers an extensive library of pre-built shortcuts to support your efficiency and productivity needs.
Remember that these existing shortcuts can serve as a starting point for customization. You can modify them to suit your specific requirements or use them as inspiration to create your own unique shortcuts.
Step 4: Customize an Existing Shortcut
Customizing an existing shortcut on your iPhone is a great way to personalize your device and make it work more efficiently for you. Whether you want to tweak the actions performed by a pre-built shortcut or customize the appearance of the shortcut icon, the process is simple and user-friendly.
To get started, open the Shortcuts app on your iPhone. You can find it on your home screen or by using the search feature. Once the app is open, you’ll see a list of your existing shortcuts.
Next, locate the shortcut that you want to customize. Scroll through the list or use the search bar at the top of the screen to find the specific shortcut you want to edit. Once you’ve found it, tap on the shortcut to open its details.
Inside the shortcut details, you’ll see a screen that displays the actions performed by the shortcut. This is where you can make changes and customize the shortcut according to your preferences. To edit an action, simply tap on it and modify the settings as desired. You can change the title, adjust parameters, or add additional actions to enhance the functionality of the shortcut.
Keep in mind that some actions may require additional input or permissions. If any prompts appear, follow the on-screen instructions to grant access or provide the necessary information. This ensures that the shortcut functions correctly when you run it.
Once you have finished customizing the shortcut, don’t forget to save your changes. To do this, tap the “Done” button located in the top right corner of the screen. Your modified shortcut will now be updated with the new settings.
It’s important to note that when customizing an existing shortcut, you have the freedom to experiment and make changes as you see fit. Feel free to explore different actions, adjust parameters, or add new actions to create a shortcut that suits your specific needs and preferences.
With the ability to customize existing shortcuts, you can truly make your iPhone work the way you want it to. Take advantage of this feature to streamline your daily tasks, save time, and maximize productivity.
Step 5: Create a New Shortcut
Creating a new shortcut on your iPhone is a simple process that allows you to customize your device even further. Whether you want to automate a series of actions or create a shortcut for a specific task, this step-by-step guide will show you how to do it.
To create a new shortcut, follow these easy steps:
- Open the Shortcuts app on your iPhone. This app comes pre-installed on iOS 16, but if you don’t have it, you can download it from the App Store.
- Tap on the “+” button located in the top right corner of the screen. This will open the “New Shortcut” screen where you can start building your custom shortcut.
- Choose a name for your shortcut. This name should reflect the purpose or action the shortcut will perform.
- Tap on the “Add Action” button to select the action you want your shortcut to perform. This will open a list of available actions you can choose from.
- Select the desired action from the list. This can be anything from sending a text message to controlling your smart home devices or opening a specific app.
- Once you’ve selected an action, you can customize its parameters. For example, if you chose to send a text message, you can specify the recipient and the message content.
- Continue adding actions to your shortcut by tapping on the “Add Action” button again and repeating steps 5 and 6. You can add as many actions as you want to create a complex and multi-step shortcut.
- After you’ve added all the necessary actions, tap on the “Done” button in the top right corner of the screen to save your shortcut.
That’s it! You’ve successfully created a new shortcut on your iPhone. Now you can easily access and run this shortcut whenever you need to perform a specific task or automate a series of actions.
Remember, the shortcuts you create are highly customizable, allowing you to tailor them to your specific needs. Experiment with different actions and parameters to create shortcuts that streamline your daily routine and make your iPhone even more efficient.
Step 6: Add Actions to the Shortcut
Once you have created or selected a shortcut in the Shortcuts app, it’s time to add actions to it. Actions are the building blocks of a shortcut that allow it to perform specific tasks or functions. By adding actions to your shortcut, you can customize its behavior and make it do exactly what you want.
To add actions to your shortcut, follow these steps:
- Tap the “+” icon: Look for the plus sign icon located at the bottom right corner of the shortcut editing screen. Tap on it to bring up the action menu.
- Browse or search for actions: The action menu will display a list of actions categorized under different headings like Apps, Scripting, Media, and more. You can either browse through the categories or use the search bar at the top to find a specific action.
- Select an action: Once you find the action you want to add to your shortcut, tap on it to select it. This will add the action to your shortcut.
- Configure the action: After adding the action, you may need to configure it by providing additional information or adjusting settings. For example, if you added the action to send a text message, you would need to specify the recipient and the message content.
- Add more actions: Repeat the above steps to add more actions to your shortcut. You can add multiple actions in a sequence to create a series of tasks that the shortcut will perform.
Remember, the order of the actions in your shortcut matters. Actions are executed sequentially, from top to bottom. So make sure to arrange them in the desired order to achieve the desired outcome.
Adding actions to your shortcut gives you the flexibility to automate tasks, streamline workflows, and save time. Whether it’s sending a message, adjusting settings, or performing complex operations, the actions you choose will determine the functionality of your shortcut.
Step 7: Configure Actions and Parameters
Once you have added actions to your shortcut in the Shortcuts app, the next step is to configure them and set parameters. This allows you to customize how each action behaves and ensure that your shortcut performs exactly as you intended. Here’s how to configure actions and parameters:
1. Select the action you want to configure by tapping on it in the shortcut editor.
2. A configuration screen will appear, displaying various options and settings for the selected action. This screen will differ depending on the type of action you are configuring.
3. Adjust the parameters and settings according to your requirements. This may include entering specific values, choosing from predefined options, or setting up conditional statements.
4. Some actions may have additional options or advanced settings that can be accessed by tapping on the disclosure arrow or the “More Options” button.
5. Make sure to review each action’s configuration carefully to ensure that it aligns with your desired outcome. You can always go back and modify the configuration if needed.
6. If your shortcut includes multiple actions, repeat the above steps for each action to configure them individually.
7. Once you have finished configuring all the actions, tap on the “Done” or “Back” button to save your changes and return to the shortcut editor.
By configuring actions and setting parameters, you have complete control over how your shortcut functions. This allows you to tailor it to your specific needs and automate tasks in a way that suits you best.
Pro tip: Experiment with different parameters and settings to explore the full potential of each action. Don’t be afraid to tweak and refine your shortcut until it delivers the desired results.
Step 8: Personalize the Shortcut Icon
In this step, you have the option to add a personal touch to your shortcut by customizing its icon. By default, shortcuts use a generic icon based on the action it performs. However, you can choose to change the icon to something more visually appealing or representative of the shortcut’s purpose.
To personalize the shortcut icon, follow these simple steps:
1. In the Shortcuts app, navigate to the shortcut you want to customize.
2. Tap on the shortcut’s name to open its details page.
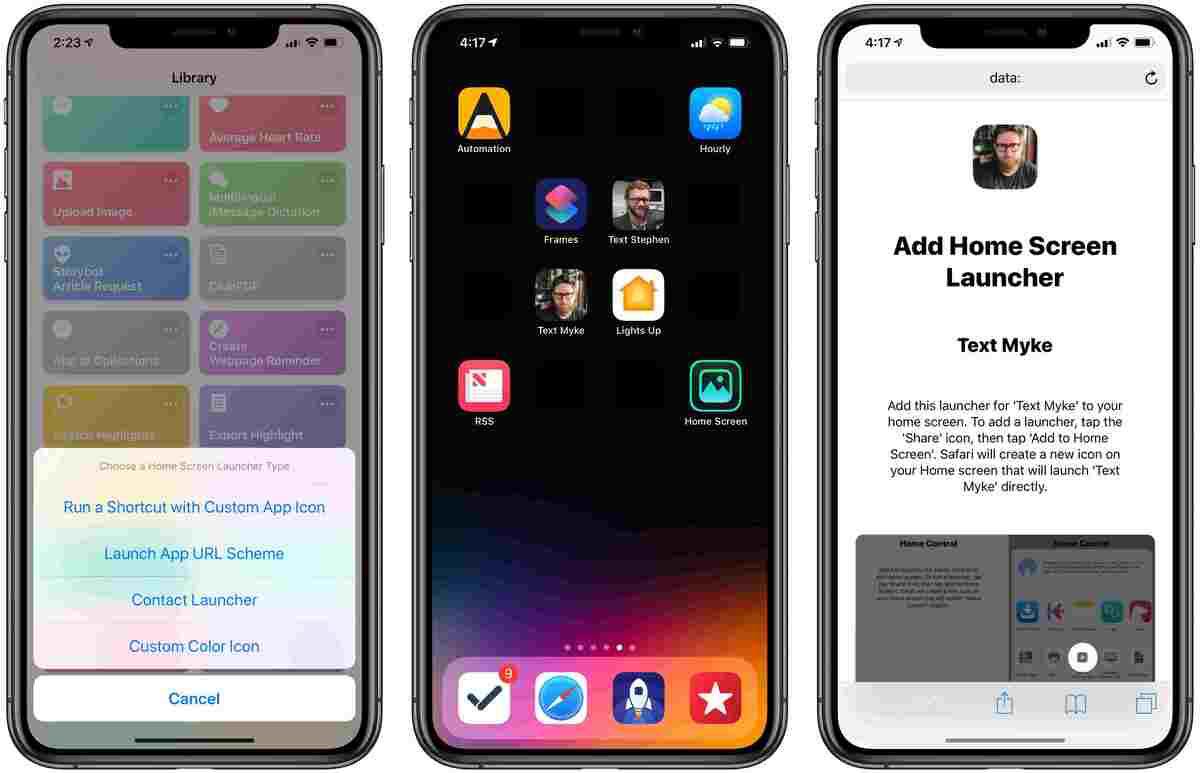
3. Next, tap on the “…” (three dots) button in the top right corner of the screen.
4. From the menu that appears, choose “Add to Home Screen.”
5. A preview of the shortcut will be displayed on the screen along with the shortcut name. Tap on the icon preview to proceed.
6. You will then be presented with three options for setting the shortcut icon:
a. Choose Photo: Select a photo from your device’s gallery to use as the icon. You can crop and adjust the photo to fit the icon size.
b. Choose File: Import an image file from your device’s storage to use as the icon.
c. Choose Glyph: Select from a wide range of pre-designed glyphs and symbols to use as the icon.
7. Once you have chosen or created your desired icon, tap on the “Choose” button to set it as the shortcut’s icon.
8. You will then be taken back to the preview screen, where you can see the updated icon. Tap on “Add” in the top right corner to add the shortcut to your home screen.
That’s it! You have successfully personalized the icon for your shortcut. Now, whenever you access the shortcut from your home screen or in the Shortcuts app, you will see the customized icon you selected.
Step 9: Run and Test the Shortcut
Once you have customized your shortcut to your liking, it’s time to run and test it to ensure it functions as intended. Testing your shortcut will allow you to identify any errors or glitches before you start relying on it for your daily tasks. Here’s how you can run and test your shortcut on your iPhone:
- Go back to the My Shortcuts tab in the Shortcuts app.
- Locate the shortcut you want to test and tap on it to open it.
- Review the actions and parameters of the shortcut to ensure everything looks correct.
- Once you are ready to test the shortcut, simply tap on the “Play” button at the bottom of the screen.
- Your shortcut will start executing the assigned actions in the order you specified.
- Observe the results of each action and make sure they align with your intended outcome.
- If any errors or unexpected behavior occur, go back to the shortcut editor and make necessary adjustments.
- Continue running and testing the shortcut until you are satisfied with its performance.
By thorough testing, you can ensure that your shortcut runs smoothly and helps streamline your tasks. This step is crucial for identifying any issues and making any necessary tweaks to perfect your customized shortcut.
Step 10: Rearrange and Organize Shortcuts
Once you have created and customized your shortcuts on your iPhone, it’s important to know how to rearrange and organize them to suit your preferences. With the Shortcuts app, you have the flexibility to easily reorder your shortcuts and group them together for easy access.
To rearrange your shortcuts, follow these simple steps:
- Open the Shortcuts app on your iPhone.
- Tap on the “My Shortcuts” tab at the bottom of the screen.
- Here, you will see a list of all your created shortcuts.
- To rearrange a shortcut, press and hold the three horizontal lines icon on the right side of the shortcut.
- Drag the shortcut up or down to the desired position in the list.
- Release your finger to drop the shortcut in its new position.
- The shortcut will now be rearranged accordingly.
In addition to rearranging shortcuts, you can also organize them into folders for better categorization. This is particularly useful if you have a large number of shortcuts and want to keep them neatly organized.
To create a folder and move shortcuts into it:
- Open the Shortcuts app on your iPhone.
- Tap on the “My Shortcuts” tab at the bottom of the screen.
- Tap on the three-dot icon in the upper right corner.
- Select “New Folder” from the options.
- Enter a name for the folder and tap “Done”.
- To move a shortcut into the folder, press and hold the shortcut you want to move.
- Drag the shortcut onto the folder and release your finger.
- The shortcut will now be moved into the folder.
With the ability to rearrange and organize your shortcuts, you can create a personalized and streamlined experience on your iPhone. Make sure to arrange them in a way that is intuitive and convenient for your needs.
Rearranging and organizing shortcuts can be a quick and easy process, allowing you to access your favorite shortcuts with just a few taps, increasing your productivity and efficiency on your iPhone.
Now that you have learned how to rearrange and organize shortcuts, you are one step closer to fully customizing your iPhone’s Shortcuts app to enhance your daily tasks and workflows.
Step 11: Delete or Disable Shortcuts
In the world of iPhone customization, it’s important to have the ability to delete or disable shortcuts that you no longer need or use. Whether you want to declutter your Shortcuts app or remove a shortcut that is no longer relevant, this step will guide you through the process of deleting or disabling shortcuts on your iPhone.
To delete a shortcut, follow these simple steps:
- Open the Shortcuts app on your iPhone.
- Navigate to the “My Shortcuts” tab.
- Find the shortcut that you want to delete.
- Swipe left on the shortcut name to reveal the delete option.
- Tap on “Delete” to confirm the deletion of the shortcut.
It’s important to note that deleting a shortcut will permanently remove it from your iPhone and you will not be able to recover it. Therefore, make sure to double-check before you delete any shortcuts.
If you don’t want to permanently delete a shortcut but simply disable it, follow these steps:
- Open the Shortcuts app on your iPhone.
- Navigate to the “My Shortcuts” tab.
- Find the shortcut that you want to disable.
- Tap on the three-dot menu icon at the top-right corner of the shortcut.
- Select “Disable Shortcut” from the menu.
By disabling a shortcut, it will be temporarily turned off and won’t be accessible through the Shortcuts app or Siri. However, you can easily enable it again whenever you need to use it.
Deleting or disabling shortcuts gives you the flexibility to refine and declutter your Shortcuts app, ensuring that you only have the shortcuts that are useful to you at any given time. It’s a great way to keep your iPhone organized and efficient.
Step 12: Share and Import Shortcuts
Sharing and importing shortcuts is a great way to expand your collection and benefit from the creativity of others. With the Shortcuts app on your iPhone, you can easily share your favorite shortcuts with friends and family or import shortcuts created by other users. Here’s how you can share and import shortcuts:
To share a shortcut, follow these simple steps:
- Open the Shortcuts app on your iPhone and navigate to the “My Shortcuts” tab.
- Find the shortcut you want to share and tap on it to open the shortcut editor.
- Tap on the three-dot menu button at the top right corner of the screen.
- From the menu options, tap on “Share” to bring up the sharing options.
- You can choose to share the shortcut via AirDrop, Messages, Mail, or any other compatible app on your iPhone.
- Select the desired method of sharing and follow the prompts to send the shortcut to the recipient.
Once the recipient receives the shared shortcut, they can import it into their Shortcuts app using the following steps:
- Open the message or email containing the shared shortcut on their iPhone.
- Tap on the shared shortcut to open the preview.
- Tap on the “Add Shortcut” button to import the shortcut into the Shortcuts app.
- The imported shortcut will now appear in the “My Shortcuts” tab of the recipient’s Shortcuts app.
Additionally, you can also download shortcuts from various online communities and websites that offer a wide range of pre-made shortcuts for different purposes. These shortcuts can be imported into your Shortcuts app by following the same import process as mentioned above.
Sharing and importing shortcuts not only saves you time and effort in creating new shortcuts from scratch, but it also allows you to explore and benefit from the creativity of other shortcut enthusiasts. So go ahead and share your favorite shortcuts or import exciting ones to enhance your iPhone experience.
Conclusion
In conclusion, editing shortcuts on your iPhone provides a quick and convenient way to customize your device and enhance your productivity. With the latest iOS 16 update, Apple has made it even easier to personalize your shortcuts and improve your overall user experience. By following the simple steps outlined in this article, you can effortlessly modify existing shortcuts or create new ones to suit your specific needs.
Whether you want to streamline common tasks, access frequently used features, or automate complex workflows, the ability to edit shortcuts empowers you to tailor your iPhone to your preferences and save valuable time. So, take advantage of this powerful feature and start customizing your shortcuts today to unlock a whole new level of efficiency and convenience on your iPhone.
FAQs
1. Can I edit shortcuts on my iPhone?
Yes, you can edit shortcuts on your iPhone. The latest iOS 16 update brings enhanced customization options for shortcuts, allowing you to personalize your device according to your needs and preferences.
2. How can I access the shortcut editing feature?
To access the shortcut editing feature on your iPhone, follow these steps:
– Open the Settings app on your device.
– Scroll down and tap on “Shortcuts”.
– In the Shortcuts menu, select “Edit Shortcuts”. This will take you to the editing screen where you can modify existing shortcuts or create new ones.
3. What can I do with the shortcut editing feature?
The shortcut editing feature offers a range of possibilities for customization. Some of the actions you can perform include:
– Changing the name and icon of a shortcut.
– Adjusting the order of shortcuts.
– Adding or removing actions within a shortcut.
– Creating new shortcuts from scratch.
By leveraging these options, you can streamline your device’s functionality and make it more efficient to use.
4. Can I share my customized shortcuts with others?
Absolutely! You can easily share your customized shortcuts with others. Once you have customized a shortcut to your liking, simply tap on the “Share” icon and select the sharing method of your choice (e.g., AirDrop, Messages, etc.). This way, you can help friends and family benefit from your personalized shortcuts too.
5. Will editing shortcuts affect my device’s performance?
In general, editing shortcuts on your iPhone should not have a significant impact on performance. However, it is important to note that highly complex or resource-intensive shortcuts may consume more battery power or take longer to execute. It’s always a good idea to optimize your shortcuts for efficiency to ensure smooth device performance.