
Welcome to our comprehensive guide on how to create a new lock screen in iOS 16! The lock screen is not just a practical security measure on your mobile device; it also serves as an opportunity for personalization and expression. With iOS 16, Apple has introduced exciting new features and customization options for the lock screen, allowing users to create a unique and engaging experience every time they unlock their device. In this article, we will walk you through the step-by-step process of creating a new lock screen in iOS 16, from choosing wallpapers and widgets to customizing notifications and shortcuts. Whether you’re looking to add a touch of style or enhance your productivity, this guide will provide you with all the information you need to make the most of your lock screen in iOS 16.
Inside This Article
- Designing a Custom Lock Screen Image
- Configuring Lock Screen Widgets
- Setting Lock Screen Notifications
- Customizing Lock Screen Passcode Options
- Conclusion
- FAQs
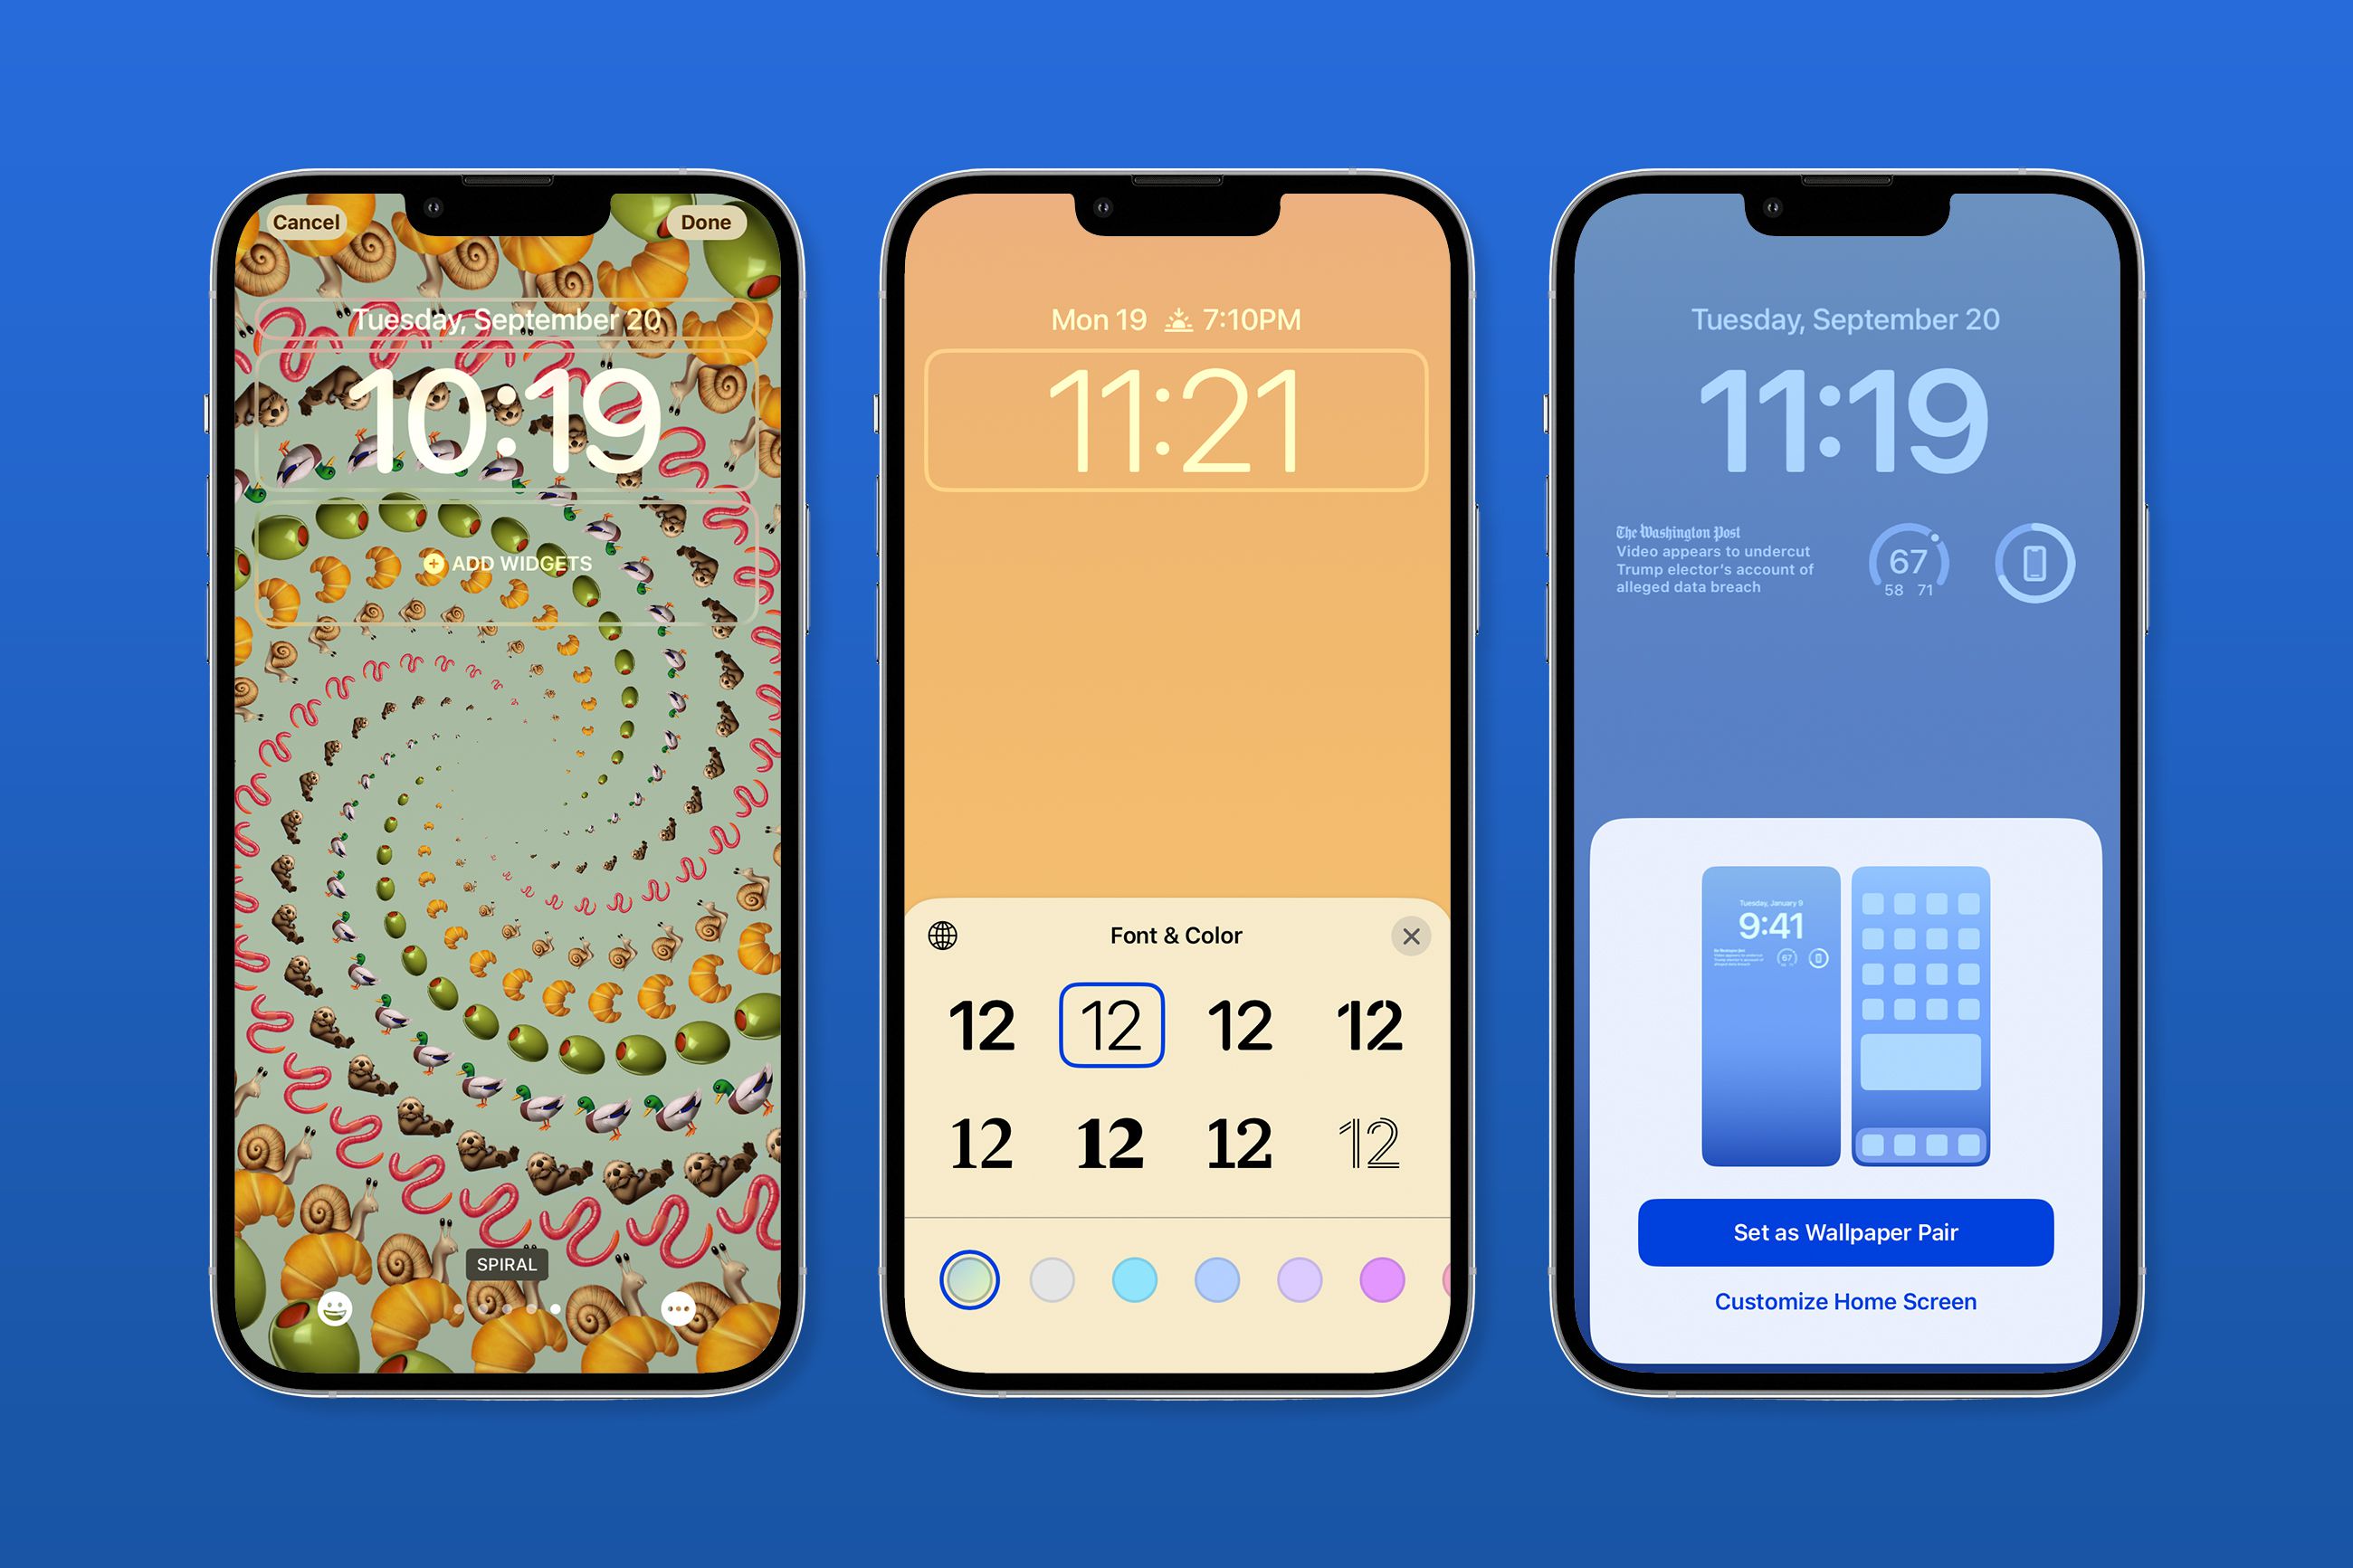
Designing a Custom Lock Screen Image
The lock screen on your iOS device is the first thing you see when you wake it up. It’s also an opportunity to express your personal style and make your device truly your own. With iOS 16, you have the ability to design a custom lock screen image that reflects your unique taste and personality.
Creating a custom lock screen image is a simple and fun process. Here’s how you can do it:
- Choose a wallpaper: Start by selecting a high-quality image or photo that you want to use as your lock screen wallpaper. It could be a breathtaking landscape, a favorite artwork, or even a family photo. Make sure the image is in a format compatible with iOS, such as JPEG or PNG.
- Resize and crop the image: Use photo editing software or online tools to resize and crop the image to fit the dimensions of your iOS device’s screen. The recommended resolution for lock screen wallpapers is 1242 x 2688 pixels for iPhones and 2388 x 1668 pixels for iPads.
- Enhance the image: If desired, you can further enhance the image by adjusting the brightness, contrast, and saturation levels. This will help ensure that the image looks vibrant and eye-catching on your lock screen.
- Save and set as lock screen wallpaper: Once you’re satisfied with the design of your custom lock screen image, save it to your device’s photo library. Then, head to the Settings app, tap on “Wallpaper,” select “Choose a New Wallpaper,” and browse for your custom lock screen image in the photo library. Finally, set it as your lock screen wallpaper.
By following these steps, you can design a custom lock screen image that will make your iOS device stand out from the crowd. Whether it’s a serene nature scene or a cherished memory captured in a photograph, your lock screen will become a reflection of your personal style.
Configuring Lock Screen Widgets
One of the great features of iOS 16 is the ability to customize and configure lock screen widgets. These widgets provide valuable information at a glance, allowing you to stay updated without even unlocking your device. Here are some steps to help you configure lock screen widgets to your preference:
1. Accessing Widget Configuration: To start, swipe right on your lock screen or home screen to access the Today View. Scroll to the bottom of the screen and tap on the “Edit” button.
2. Adding Widgets: In the edit mode, you’ll see a list of available widgets. To add a widget, tap on the green “+” button next to the desired widget. You can choose from various widgets, such as weather, calendar, stocks, and more.
3. Organizing Widgets: After adding a widget, you can rearrange them according to your preference. To do this, tap and hold on a widget, then drag it to the desired position. You can also use the handlebars on the right side of the widget to adjust its size.
4. Removing Widgets: If you no longer want a particular widget on your lock screen, you can easily remove it. In the edit mode, tap on the red “-” button next to the widget you wish to remove. Confirm the removal by tapping on the “Remove” option.
5. Customizing Widget Stacks: iOS 16 allows you to stack multiple widgets together, making efficient use of lock screen space. To create a widget stack, simply drag one widget on top of another. You can swipe up and down on the widget stack to view different widgets within the stack.
6. Controlling Widget Display: By default, lock screen widgets are set to show only when your device is unlocked. However, you can choose to always show them on the lock screen. To toggle this setting, go to Settings > Face ID & Passcode (or Touch ID & Passcode) > Allow Access When Locked, and enable the “Today View” option.
7. Personalizing Widget Content: Some widgets offer customization options to display specific information. Tap on a widget in the edit mode to reveal its configuration options. You can choose the preferred data source, adjust display settings, and even change the widget’s appearance.
8. Previewing Widgets: If you want to see how your configured widgets will appear on the lock screen, exit the edit mode and lock your device. Then, wake up your device and swipe left on the lock screen to access the widget preview.
9. Modifying Widget Order: If you have multiple widgets on the lock screen and want to change their order, swipe right on the lock screen to access the Today View. Scroll to the bottom, tap “Edit,” and use the handlebars on the right side of each widget to adjust their placement.
With these simple steps, you can easily configure lock screen widgets in iOS 16 to show the information you need and personalize the appearance according to your style and preferences. Enjoy the convenience of having relevant data at your fingertips without unlocking your device!
Setting Lock Screen Notifications
Setting up notifications on your lock screen is a great way to stay updated and informed about important events and activities on your iOS 16 device. With the ability to customize and control how notifications appear on your lock screen, you can ensure that you never miss an important message or reminder.
To get started, go to your device’s Settings and tap on “Notifications.” From there, you will see a list of all the apps installed on your device that have notification capabilities. Tap on the app for which you want to configure lock screen notifications.
Once you are in the app’s notification settings, you will see various options to customize how the notifications are displayed on your lock screen. You can choose to enable or disable lock screen notifications for that specific app by toggling the “Show on Lock Screen” option.
Furthermore, you can control the level of detail shown in the lock screen notifications. The “Notification Style” option allows you to choose between several display styles, such as banners, alerts, or None. Banners appear briefly and then disappear, while alerts require you to take action before dismissing them.
In addition to the notification style, you can also determine the number of notifications shown on the lock screen for each app. The “Notification Grouping” option lets you choose whether to group notifications by app or have them appear individually.
If you prefer a more discreet approach, you can toggle the “Previews” option to specify whether you want the content of the notification to be shown on the lock screen. By selecting “When Unlocked” or “Never,” you can keep the content hidden until you unlock your device.
Lastly, if you want to prioritize specific notifications on your lock screen, you can use the “Notification Importance” feature. This allows you to set the priority level for each app’s notifications, ensuring that important alerts are displayed prominently on your lock screen.
By customizing your lock screen notifications, you can streamline your notification experience and have important information readily accessible at a glance. Take some time to personalize the settings to suit your preferences, and enjoy the convenience of having relevant notifications conveniently displayed on your iOS 16 lock screen.
Customizing Lock Screen Passcode Options
The lock screen passcode is an essential security feature that helps protect your personal information on your iOS 16 device. But did you know that you can customize the passcode options to make them more convenient and personalized? In this section, we will explore how you can take your lock screen passcode to the next level.
1. Change Passcode: By default, iOS 16 uses a 6-digit numeric passcode to unlock your device. However, you have the option to change this to a custom alphanumeric passcode consisting of letters, numbers, and special characters. To do this, go to Settings, then tap on Face ID & Passcode or Touch ID & Passcode depending on your device, and select Change Passcode. Follow the prompts to create a new passcode using the on-screen keyboard.
2. Face ID or Touch ID: If you have a supported device with Face ID or Touch ID, you can enable these features to unlock your device without entering a passcode. This option not only makes it faster to access your device, but it also adds an extra layer of security. To enable Face ID or Touch ID, go to Settings and navigate to Face ID & Passcode or Touch ID & Passcode. Follow the on-screen instructions to set up Face ID or Touch ID on your device.
3. Require Passcode: iOS 16 allows you to control how frequently your passcode is required to unlock your device. You can choose between immediately, after 1 minute, after 5 minutes, after 15 minutes, after 1 hour, or after 4 hours. To change the passcode requirement, go to Settings, then tap on Face ID & Passcode or Touch ID & Passcode. Scroll down to find the Require Passcode option and select your preferred time interval.
4. Erase Data: For an added level of security, iOS 16 includes an option to erase all data on your device after 10 failed passcode attempts. This feature helps protect your personal information from unauthorized access. To enable this feature, go to Settings, then tap on Face ID & Passcode or Touch ID & Passcode. Scroll down to find the Erase Data option and toggle it on.
5. Custom Numeric Keypad: If you prefer a different layout for your passcode entry, iOS 16 offers a custom numeric keypad option. This keypad replaces the default alphanumeric keys with circles containing numbers. To enable this keypad style, go to Settings, then tap on Face ID & Passcode or Touch ID & Passcode. Scroll down to find the Custom Numeric Keypad option and toggle it on.
Customizing your lock screen passcode options in iOS 16 allows you to create a more personalized and secure experience on your device. Take advantage of these settings to tailor your passcode to your preferences while keeping your information safe from prying eyes.
Conclusion
In conclusion, creating a new lock screen in iOS 16 offers users the opportunity to personalize their device and enhance their overall experience. With a wide range of customization options and features, users can choose from various lock screen designs, wallpapers, widgets, and more to suit their preferences and style.
By following the steps outlined in this article, users can easily navigate the settings menu and access the lock screen settings to make the desired changes. Whether it’s adding a new clock widget, changing the wallpaper, or enabling notifications, the iOS 16 lock screen provides a seamless and intuitive interface to tailor the device to individual needs.
Unlocking the potential of the lock screen not only adds a touch of personalization but also ensures quick and convenient access to essential information, such as notifications, weather updates, and calendar events.
With iOS 16’s innovative lock screen features, users can create a unique and engaging mobile experience with just a few taps and swipes. So go ahead and explore the various customization options and make your lock screen truly your own!
FAQs
1. How can I create a new lock screen in iOS 16?
To create a new lock screen in iOS 16, follow these steps:
- Go to the Settings app on your device.
- Scroll down and tap on “Display & Brightness”.
- Under the “Lock Screen” section, tap on “Wallpaper”.
- Select “Choose a New Wallpaper” to browse through your photos or album.
- Select the image you want to set as your new lock screen wallpaper.
- Adjust the position and zoom level if necessary.
- Tap “Set” to confirm your selection.
- Your new lock screen wallpaper will now be applied.
2. Can I use a custom image as my lock screen wallpaper?
Absolutely! iOS 16 allows you to use any image from your photo library or albums as your lock screen wallpaper. Simply follow the steps mentioned above to set a custom image as your lock screen background.
3. What are the recommended image dimensions for lock screen wallpapers in iOS 16?
For optimal results, it’s best to use images with a resolution of 1125 x 2436 pixels (iPhone X or later) or 750 x 1334 pixels (iPhone 7, 8, SE). This ensures that the image fits perfectly on the screen and retains its quality.
4. Can I add widgets to the lock screen in iOS 16?
Yes, with the introduction of iOS 14, you can add widgets to your lock screen. To do this, swipe right on the lock screen or home screen to access the Today View. Scroll to the bottom, and tap on “Edit”. From there, you can add, remove, and rearrange widgets to customize your lock screen experience.
5. How do I customize the clock and notifications on the lock screen?
To customize the clock and notifications on the lock screen in iOS 16, follow these steps:
- Go to the Settings app on your device.
- Tap on “Display & Brightness”.
- Under the “Lock Screen” section, you can customize various options such as the clock style, date display, and notification privacy settings.
- Select the options that suit your preferences.
- Your lock screen will now reflect the changes you’ve made.