
Instagram has become the go-to platform for sharing and discovering captivating photos. With its save feature, you can easily bookmark photos that inspire you or catch your eye. However, as the collection of saved photos grows, it can become a challenge to keep them organized and easily accessible.
But fear not! Just like a Pinterest board, you can now organize your saved Instagram photos in a visually appealing and efficient way. In this article, we will dive into the steps you need to follow to create your own organized gallery of saved Instagram photos. Whether it’s for personal inspiration or professional purposes, this guide will help you curate your collection and find inspiration in a breeze.
Inside This Article
- # How to Organize Your Saved Instagram Photos like a Pinterest Board
- Create Theme-Based Collections
- Use Folders or Albums
- Tag and Label Your Saved Photos
- Utilize Instagram’s Archive Feature
- Conclusion
- FAQs
# How to Organize Your Saved Instagram Photos like a Pinterest Board
Welcome to the world of saved Instagram photos! As you explore the platform, you may come across countless captivating images that inspire you, make you smile, or leave you longing for more. But what if you could organize your saved Instagram photos just like a Pinterest board? Well, you’re in luck! In this article, we’ll take a look at some tips and tricks to help you turn your saved Instagram photos into a beautifully curated collection.
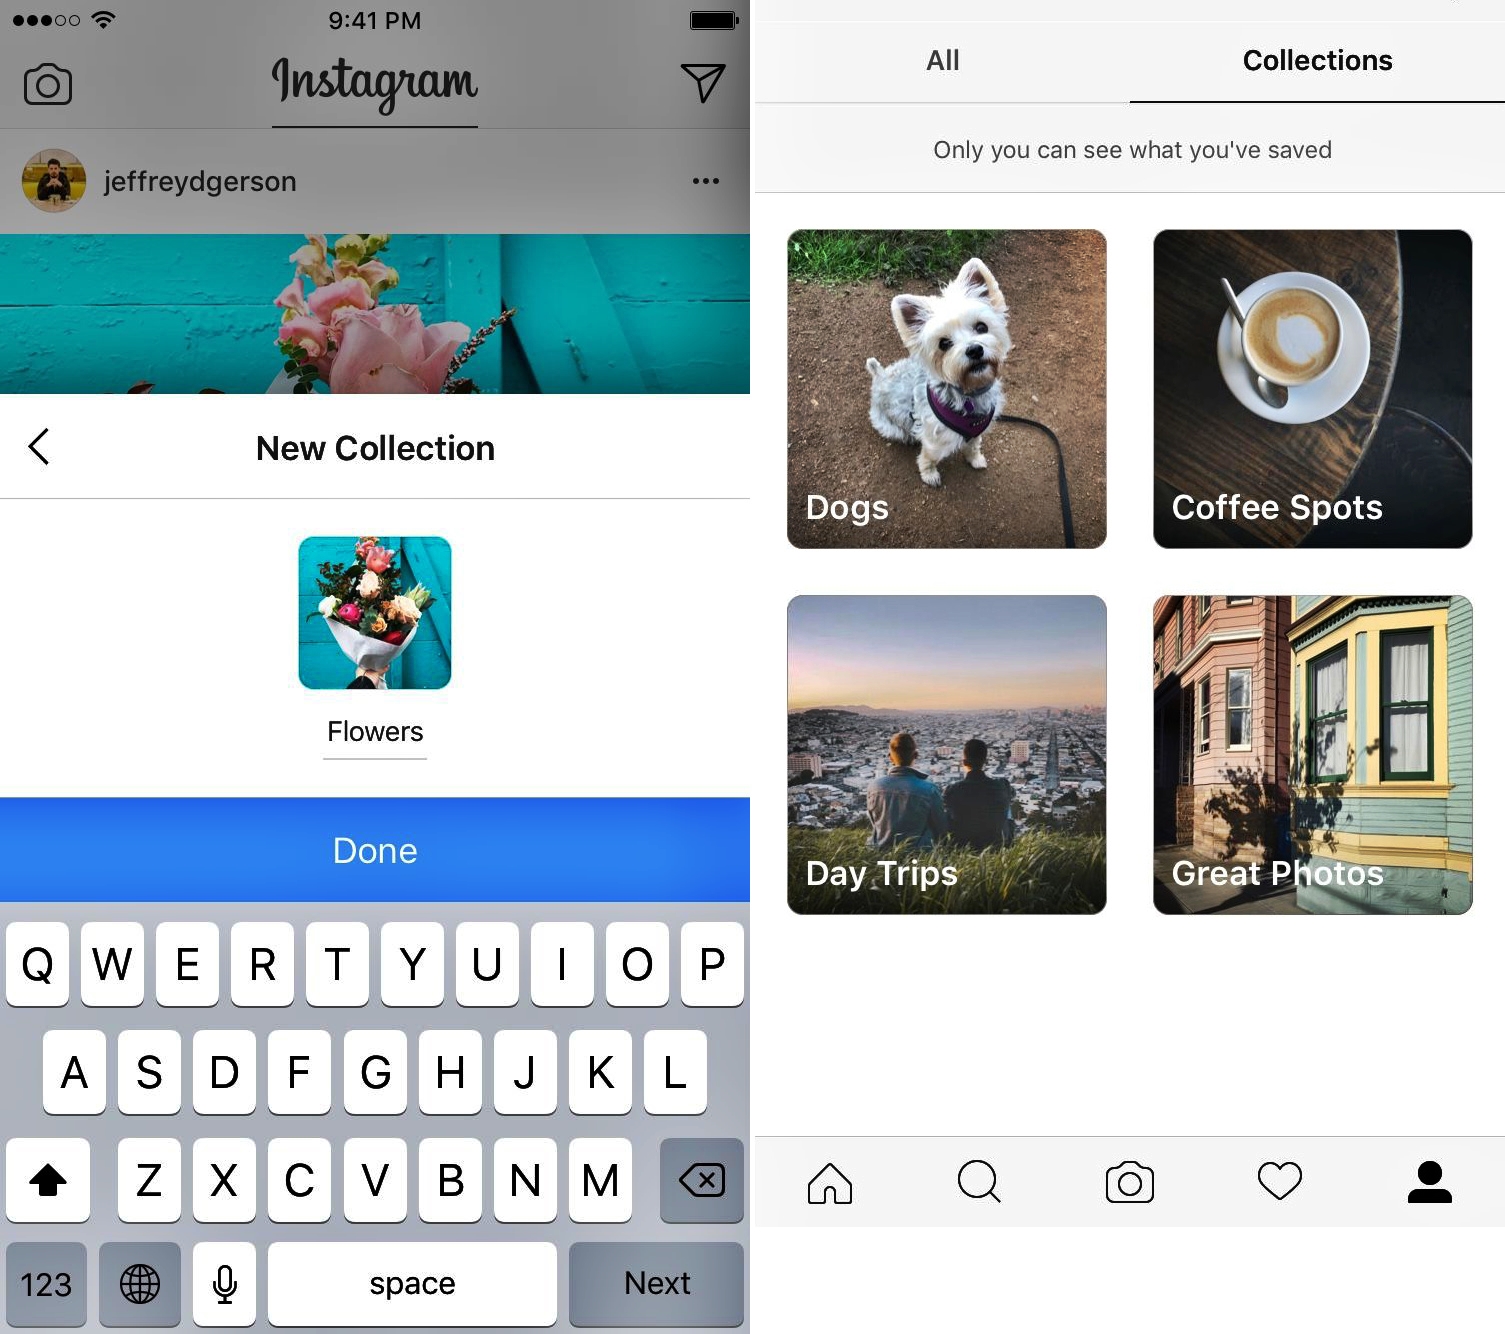
One of the first steps to organizing your saved Instagram photos is to create theme-based collections. Think of these collections as folders on your Pinterest board, each dedicated to a particular topic or interest. For example, you could have collections for travel inspiration, mouth-watering food, fashion inspiration, home decor ideas, and more. To create a collection, simply tap on the “+” button in the saved section of your Instagram profile and give it a name that represents the theme.
Once you have created your collections, it’s time to start populating them with your favorite saved Instagram photos. To do this, go to your saved section and select a photo that you want to add to a collection. Tap on the bookmark icon below the photo, and a list of your collections will appear. Select the appropriate collection, and voila! The photo will be saved to that collection, just like pinning it to a board on Pinterest.
In addition to creating collections, you can also utilize folders or albums to further organize your saved Instagram photos. Folders are an excellent way to group related collections together, allowing for easier navigation and a more organized visual display. For example, you could create a folder for all your travel-related collections, another for food and recipes, and so on. To create a folder, simply tap and hold on a collection, and then drag it on top of another collection to create a folder. You can continue adding collections to the folder by dragging and dropping them.
Tagging and labeling your saved Instagram photos is another useful technique to enhance organization. Similar to adding descriptions or tags to your Pinterest pins, you can add custom labels or tags to your saved Instagram photos. These labels can be keywords, descriptive phrases, or even emojis that help you quickly identify the content of the photo. For example, if you have a collection of outfit ideas, you can add labels like “summer fashion,” “casual outfits,” or “party-ready looks.”
Instagram’s Archive feature can be a game-changer when it comes to organizing your saved photos. Instead of cluttering up your collections with photos you no longer need or want to see, you can simply archive them. This feature allows you to remove photos from your main saved section while still keeping them accessible in a separate archive folder. To archive a photo, go to your saved section, select the photo you want to archive, and tap on the three-dot menu icon. From there, choose “Archive,” and the photo will be moved to the archive folder.
Organizing your saved Instagram photos like a Pinterest board not only provides visual appeal but also makes it easier for you to find and enjoy the content you love. By creating collections, using folders or albums, tagging your photos, and utilizing the Archive feature, you’ll be able to curate your Instagram feed in a way that truly reflects your interests and aesthetic. So go ahead, get creative, and transform your saved Instagram photos into a beautifully organized gallery!
Create Theme-Based Collections
Organizing your saved Instagram photos into theme-based collections is a great way to keep your memories and inspirations organized. By grouping your saved photos into different categories, you can easily find and browse through your favorite content.
To create theme-based collections, start by identifying the different themes or topics that resonate with you. It could be anything from travel destinations to fashion inspiration, home decor ideas to fitness motivation. Once you have a list of themes, you can begin organizing your saved photos accordingly.
One way to organize your saved photos is by using the “Collections” feature on Instagram. To create a collection, go to your profile, tap on the “Saved” icon, and choose “+ Collection.” Give your collection a name that reflects the theme, such as “Dreamy Beaches” or “Foodie Finds.”
When you come across a photo that fits a particular theme, simply tap the save icon and select the relevant collection. This way, every time you save a photo, it will automatically be sorted into the corresponding collection.
Another option is to use the “Folder” feature available on many photo organization apps. These apps allow you to create customized folders to save and categorize your photos. You can create folders with names like “Travel Adventures,” “Fitness Goals,” or “Home Decor Ideas.” Simply save the desired photos to their respective folders, and you’ll have a neatly organized library of inspiration at your fingertips.
Having theme-based collections not only helps you find specific photos easily but also gives you a visual overview of your interests and hobbies. It becomes a personalized gallery of inspiration that you can turn to whenever you need a burst of creativity or a trip down memory lane.
So, start organizing your saved Instagram photos today by creating theme-based collections. It’s a simple yet effective way to keep your favorite content organized and accessible.
Use Folders or Albums
One of the best ways to organize your saved Instagram photos like a Pinterest board is by using folders or albums. This feature allows you to group similar photos together, making it easier to browse and find specific content.
To use this feature, follow these simple steps:
- Open Instagram and go to your profile.
- Tap on the three lines menu icon in the top right corner.
- Select “Saved” from the menu options.
- Tap on the “+” icon to create a new folder or album.
- Give your folder or album a name that reflects the theme or category of the photos you want to save.
- Start adding photos to the folder or album by selecting the “Save to Collection” option when viewing a photo.
By organizing your saved Instagram photos into folders or albums, you can easily navigate through your collections and have a visual representation of your content. Whether it’s travel photos, food inspiration, or fashion trends, having organized folders or albums ensures that you can quickly access the specific content you’re looking for.
Tag and Label Your Saved Photos
One effective way to organize your saved Instagram photos like a Pinterest board is by using tags and labels. By assigning relevant tags and labels to each photo, you can easily categorize and find them later.
Start by brainstorming a list of tags and labels that align with your photo collections. For example, if you have a collection of travel photos, you can create tags like “beach,” “mountains,” or “cityscapes.” For food photos, you can use tags like “desserts,” “healthy eats,” or “international cuisine.”
Once you have your list of tags and labels, go through your saved Instagram photos one by one and assign the appropriate tags and labels to each photo. This can be done by using the built-in Instagram feature that allows you to add captions and hashtags to your saved photos.
Remember to be consistent with your tagging and labeling to ensure a seamless organization system. This will make it easier for you to search and browse through your saved photos based on specific tags or labels.
Furthermore, you can take advantage of Instagram’s search bar to quickly find photos with specific tags or labels. Simply enter the tag or label in the search bar, and Instagram will filter out the relevant photos from your saved collection.
In addition to tags and labels, you can also consider creating subcategories to further organize your saved photos. For example, if you have a tag for “travel,” you can create subcategories like “Europe,” “Asia,” or “North America” to better organize your travel photos based on geographical regions.
Tagging and labeling your saved Instagram photos allows for a more customizable and personalized organization system. It helps you easily locate and browse through specific photo collections, making it a powerful tool for those who want to curate their saved photos like a Pinterest board.
Utilize Instagram’s Archive Feature
If you’re someone who saves a lot of photos on Instagram, you may find yourself with a cluttered Saved section. Thankfully, Instagram offers an Archive feature that allows you to keep your saved photos organized and out of sight.
The Archive feature works like a virtual storage space for your saved photos. When you archive a photo, it is removed from your main Saved section but is still accessible for your personal viewing. This is particularly useful if you want to maintain a clean and organized Saved section while still being able to revisit your saved photos later.
To archive a photo on Instagram, simply open the photo you wish to archive and click on the three-dot menu icon in the top right corner. From the options that appear, select “Archive.” The photo will then be moved to your Archive folder.
Once you’ve archived a photo, you can access it anytime by going to your profile and tapping on the three-line menu icon in the top right corner. From the menu, select “Archive.” This will take you to the Archive folder where you can view all your previously archived photos.
While in the Archive folder, you have the option to either restore a photo back to your Saved section or permanently delete it. To restore a photo, simply tap on the photo and select the “Show on Profile” option. The photo will then be moved back to its original location in your Saved section.
If you want to permanently delete a photo from your Archive folder, tap on the photo and then select the “Delete” option. This will remove the photo from your Archive folder and cannot be undone, so be sure to only delete photos that you no longer wish to keep.
By utilizing Instagram’s Archive feature, you can easily keep your Saved section organized and clutter-free. Whether you’re saving photos for inspiration, recipe ideas, or travel destinations, the Archive feature ensures that you can access your saved photos whenever you need them without compromising the visual appeal of your profile.
Conclusion
In conclusion, organizing your saved Instagram photos like a Pinterest board can bring a new level of organization and inspiration to your digital life. By using the “Collections” feature or creating custom folders, you can conveniently categorize and access your favorite images with ease. Whether you’re collecting travel inspiration, fashion ideas, or recipes, this method allows you to curate your own personalized visual library.
By applying these tips and techniques, you can elevate your Instagram experience and transform it into a powerful tool for visual inspiration and organization. So go ahead, start organizing your saved Instagram photos in a way that suits your needs and interests. Let your creativity flow, and enjoy curating your own digital scrapbook!
FAQs
1. How can I organize my saved Instagram photos like a Pinterest board?
To organize your saved Instagram photos like a Pinterest board, you can make use of collections or folders within the Instagram app. Simply open the Instagram app, go to your profile, and tap on the menu icon (three horizontal lines). From there, select “Saved” and tap on the “+” icon to create a new collection. Name your collection and start adding photos to it by tapping on the bookmark icon below a photo and selecting the desired collection.
2. Can I organize my saved photos into multiple boards/categories?
Yes, you can organize your saved Instagram photos into multiple boards or categories. Instagram’s collections feature allows you to create multiple folders to categorize your saved photos. You can create different collections for various themes, such as fashion, travel, food, or inspiration. This way, you can easily find and access your saved photos based on their respective categories.
3. Is there a limit to how many collections I can create?
As of now, there doesn’t seem to be a strict limit on the number of collections you can create on Instagram. You can create as many collections as you need to organize your saved photos effectively. However, it’s important to note that too many collections might make it difficult to manage and navigate through your saved photos. It’s best to maintain a reasonable number of collections based on your needs.
4. Can I add a photo to multiple collections?
Currently, Instagram does not have a feature that allows you to add a single photo to multiple collections. Each photo can only be saved to one collection at a time. If you want to add a photo to multiple collections, you would need to save a duplicate of the photo and add each copy to the desired collections individually.
5. How can I rearrange the order of photos within a collection?
To rearrange the order of photos within a collection, you would need to manually deselect and reselect the photos in your preferred order. Unfortunately, Instagram does not provide a specific option to rearrange the order of photos within a collection automatically. You’ll need to manually adjust the order by selecting and deselecting the photos in the desired sequence.