Fighting mobs in Minecraft is a great way to earn XP and collect precious items in the game. However, since mobs really only appear during nighttime or in dark places, gaining a sizable amount of XP in this way can take ages. That’s why knowing how to make a mob farm can come in handy.
Mob farms are structures that automatically spawn Minecraft mobs en masse. These structures typically consist of two main parts: a big, dark room at the very top, where the mobs will spawn, and a mob grinder at the base, where you kill the considerably weakened mobs and collect the resulting drops.
Mob farms come in a number of styles and designs. But in this tutorial, we show you how to build a compact canal mob farm, which is easy to build and increases your chances of collecting mob drops.
Also read: 13 Best Minecraft Farm Ideas to Achieve Homesteading
Inside This Article
- Must-Haves for Making a Mob Farm in Minecraft
- How to Make a Mob Farm in Minecraft
- How to Collect XP and Items from Your Mob Farm
- FAQs
Must-Haves for Making a Mob Farm in Minecraft
These are the items to prepare or obtain, so you can build a mob farm in the Minecraft game:
- 4 chests
- 4 hoppers
- 4 slabs (any type)
- At least 25 stacks (equivalent to 1600 units) of cobblestone or any solid block
- 1 stack (equivalent to 64 units) of trapdoors
- 2 water buckets
- Torches (optional)
- Scaffolding (optional)
If you’re playing in Creative Mode, you can easily find all of these items in your inventory. In Survival Mode, though, they aren’t readily available, so you’ll have to either look for them in the Overworld or craft them from scratch. Although it can be a bit time-consuming, acquiring all of these items is fairly easy. We walk you through how to obtain each item below:
Chests
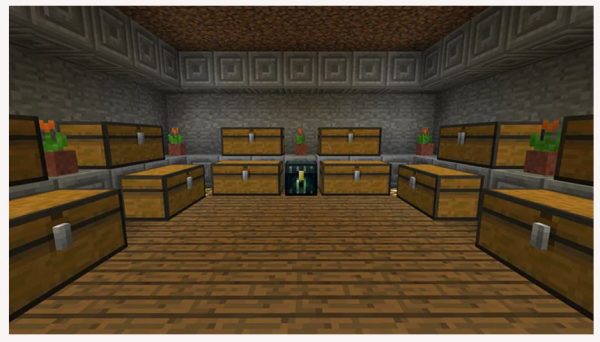
Chests naturally generate in a number of different places, including villages, dungeons, igloos, and strongholds. When you come across one, you can mine it using practically any tool. However, if you want to make things easier, use an axe.
You can also generate a chest using eight planks (any variant of wood). Once you have your planks, simply place all of them in the 3×3 crafting grid, making sure to leave the center slot empty, as in this picture:
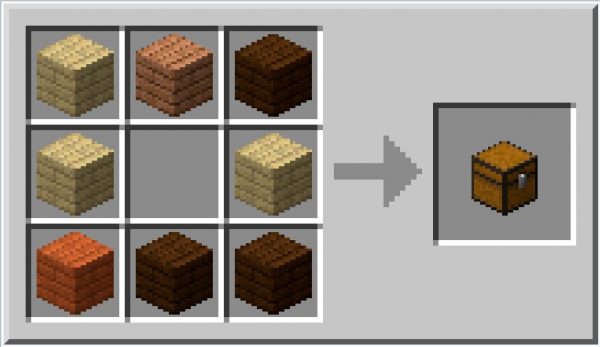
Then, when the chest appears in the output slot, drag it to your inventory. Repeat the whole process three more times since you need four chests for the base of the mob farm.
Hoppers
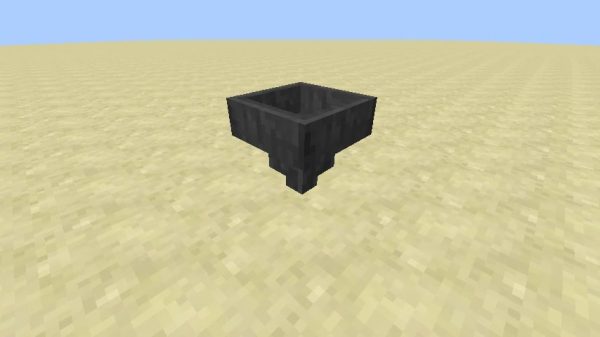
A hopper is a type of block in Minecraft that catches all sorts of items. In the mob farm you’re making, this is the part of the grinder that collects the mob drops.
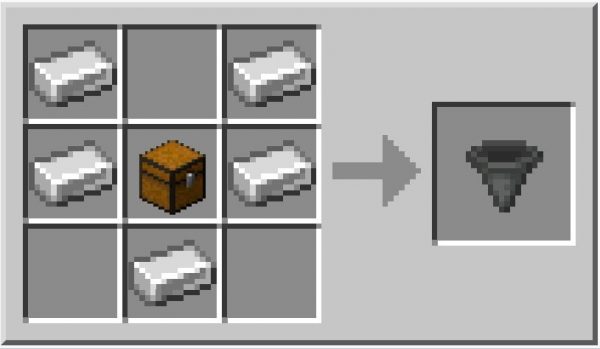
The said block is obtained by processing five iron ingots and a chest. Follow these steps:
- Launch the 3×3 crafting grid.
- Drag a chest from your storage to the interface’s middle slot.
- Place one iron ingot in the top-left corner slot, one in the top-right corner, one on either side of the chest, and one in the slot that’s directly below the chest.

Photo from Minecraft Wiki - When the hopper appears in the output box, drag it to your inventory.
Cobblestone
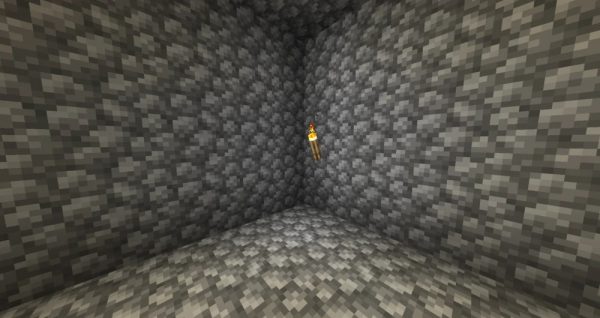
Making a mob farm doesn’t require cobblestone in particular; you can just use any solid block, as long as you have 25 full stacks of it. However, to make things much simpler, consider using cobblestone since they’re quick and easy to acquire.
To add cobblestone to your inventory, you first need to look for a cobblestone block, which you can find anywhere in the Overworld. Then, select the pickaxe in your hotbar, and tap and hold the block to mine it. You’ll know you’ve successfully mined the cobblestone block when you see a small version of it floating in its place. Quickly pick it up to add it to your inventory.
Slabs
Slabs, which are blocks cut in half, are another thing you need to make a mob farm in Minecraft. Any type of slab will do, as long as you have at least four of them in your inventory. Stone slabs are the easiest to gather resources for, so we’ll show you how to craft those in this tutorial.
You can craft six stone slabs at a time. For each batch, you’ll need three stone blocks, which you can easily find and mine in the Overworld. Once you have three stone blocks, open the crafting grid, and place all of them across the bottom of the grid, like in this picture:
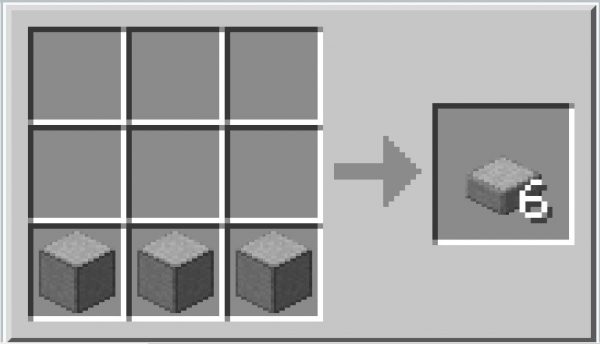
The output slot to the right will show that you’ve made six stone slabs. You can now move those to your inventory.
You can use the same crafting recipe if you want to make other types of slabs. Simply substitute the stone blocks with another type of block.
Water Buckets
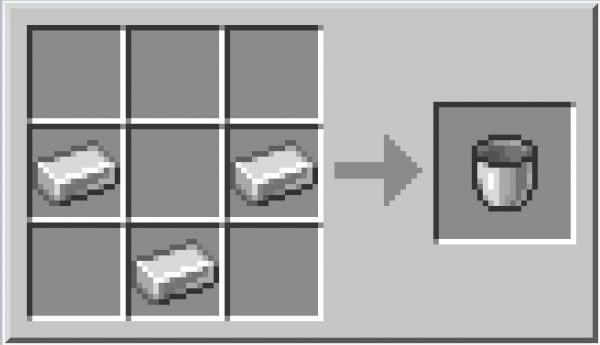
To craft a water bucket, you’ll first need a bucket, which you can get from chests found in dungeons, villages, and woodland mansions. You can also make one from scratch using three iron ingots. To do so, first open the 3×3 crafting grid, and place one iron ingot in the leftmost slot in the middle row, another iron ingot in the bottom middle slot, and the last one in the rightmost slot in the middle row.
Now that you have a bucket, the next thing you need to do is find a water source, like an ocean, a river, or a spring. You can also find sources of water in villages, strongholds, and desert wells. Once you’ve found a water source, stand in front of it, and select the bucket in the hotbar. Then, tap on the water to fill your bucket with it.
Trapdoors
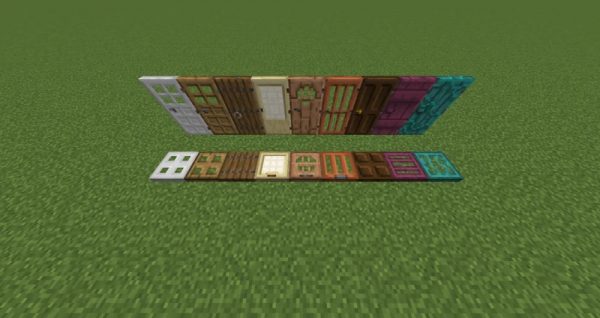
There are two types of trapdoors in Minecraft: wooden and iron. Wooden trapdoors are the more common of the two. You can find them in villages, igloos, and shipwrecks, and you can mine them using just about any item (although an axe does the job best). But if you can’t find enough for your mob farm, you can also craft them from scratch.
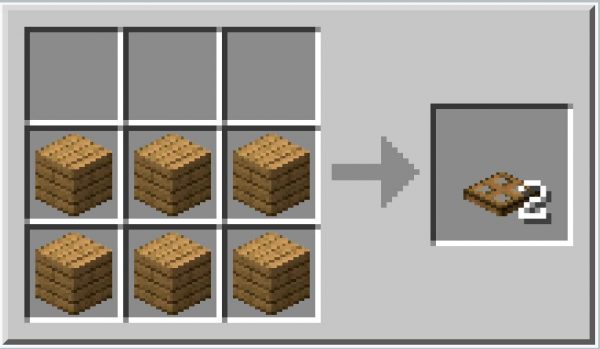
To make a batch (equivalent to two wooden trapdoors), you’ll need six matching planks. Then, place all of them in the 3×3 crafting grid, making sure that they occupy the two bottom rows of the grid, as in this example:
Afterwards, move the resulting trapdoors to your inventory.
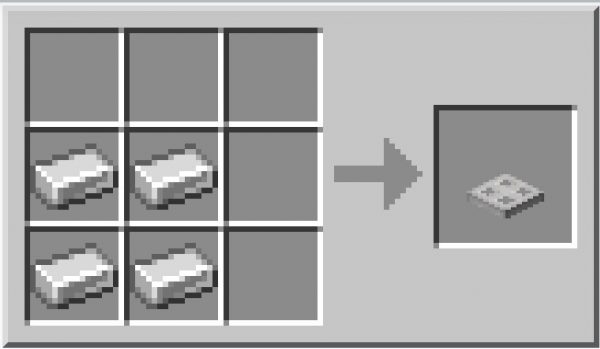
Iron trapdoors, on the other hand, can only be crafted. To make one, you’ll need to gather four iron ingots. Then, place them in the crafting grid so that two of them are occupying the first and second slots of the second row and the last two are occupying the first and second slots of the last row:
One iron trapdoor will then appear in the output box. Move it to your inventory.
Torches
Torches are only optional when making a mob farm, but they can help to ensure that the mobs spawn only in the spawning room of the structure and not on the roof. They’re easy enough to find and collect since they naturally generate in all sorts of places in the Overworld. You can find them attached to village lamp posts, along mineshaft corridors, as well as in strongholds, igloos, and woodland mansions. When you come across one, simply break it with any tool, and it will drop itself as an item.
If you want to make it from scratch, you can do so using a stick and either a piece of coal or a piece of charcoal. Once you have these two items at the ready, launch the 3×3 crafting grid. Then, place the stick in the bottom middle slot and the coal or charcoal directly above it. Here’s an example:

Then, move the torches from the output slot to your inventory. The crafting process yields four torches.
Scaffolding
Scaffoldings are another optional but helpful item you need to make a mob farm in Minecraft. These will come in handy as you’re building the AFK room and the 22-block-high walls around the mob grinder.
You can mine scaffoldings when you come across them in the Overworld. In Minecraft Pocket Edition, scaffolding takes a bit of time to break, but you can speed up the process if you use an axe.
Scaffoldings can also be crafted from scratch. To make a batch, you’ll need a piece of string and six bamboo cuttings. You’ll then need to place these items in the 3×3 crafting grid so that three of the bamboos occupy the entire first column and the last three occupy the last column. The string should be in the top center slot, right in the middle of the columns of bamboo.
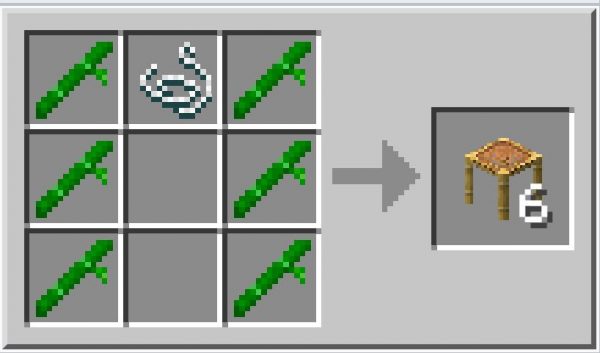
The recipe gives you six scaffoldings.
How to Make a Mob Farm in Minecraft
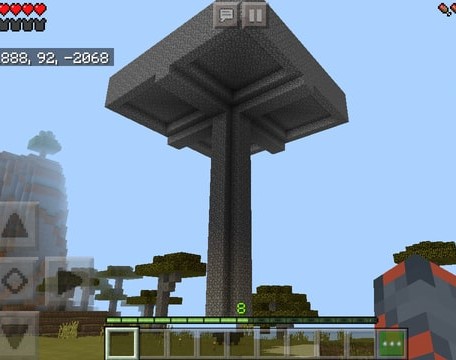
Now that you have all of the materials you need, it’s time to get building! Here’s a step-by-step guide of how to make a mob farm in Minecraft, starting from the base.
1. Make the Mob Grinder
The very first thing you need to build when making a mob farm is the mob grinder. This is the part that kills the mobs and collects the items that they drop. To build the mob grinder, follow these steps:
- Dig a ditch in the ground that’s two blocks wide and two blocks long.
*To do this, tap and hold each block until you’ve dug it. The hole should only be a layer deep. - Place the four chests in the hole you just created and make sure that they’re all facing the same way.
*You’ll know you’ve placed them correctly if you end up with two large chests instead of the four you started with. - On top of the chests, position the four hoppers so that they also form a square.
- Now, select the slabs in the hotbar. Then, position them upon the hoppers you just placed.
And that’s your mob grinder done!
2. Build a Well Around the Grinder
You’ll now build a 22-block-high well around the mob grinder. This is the part that holds the weakened mobs and allows you to kill them quickly and easily. You’ll need scaffoldings as you’re building this part if you’re playing in Survival and don’t have Fly Mode.
- Start by laying down a cobblestone block (or any solid block) right next to one of the slabs.
- Place another cobblestone block on top of the one you just put down.
- Delete the first block you placed so that the second cobblestone block looks like it’s floating.
- With the remaining cobblestone as your starting point, build a square around the grinder.
*For this, make sure that the square is wider than the mob grinder. - Build up the square base so that it ends up being 22 blocks high in total.
*An easy way to do this is to stack up 21 more solid blocks on one part of the base first. Then, using this stack as your marker, build the rest of the walls.
3. Form the Trenches and the Spawning Room Floor
Once you have your walls, you’ll form the trenches next. These will hold the buckets of water that will easily transport the mobs to the 22-block-high well and into the grinder.
- Go to the top of the well.
- Using the solid blocks you built the well with, form a platform (two blocks wide, eight blocks long) on each side.
- Add walls (two blocks high) around the edges of the platforms.
Once you’ve built the walls, you should have four trenches leading to the well in the center. You’ll now build the floor of the spawning room next:
- Pick a corner edge to start with, then, place a row of solid blocks spanning the length of the adjacent trench.
- Place another row of solid blocks starting from the edge of the adjacent trench until it meets the first row of blocks you laid down.
*Two of your trenches should now be connected. - Fill the gap in the middle of the connected trenches with solid blocks so that you form a platform.
- Follow the previous instructions for the rest of the corners.
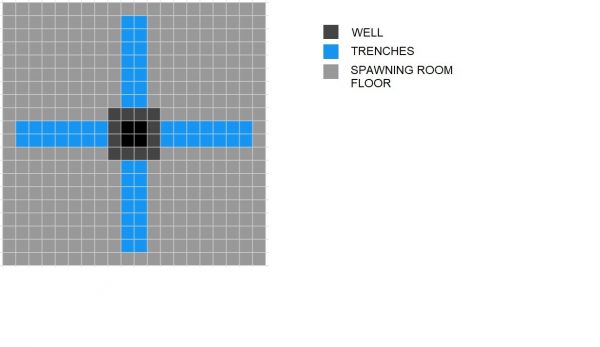
Here’s a graph that shows how your mob farm should look afterwards:
© Cellular News
4. Build the Rest of the Spawning Room
Now that you’ve built the trenches and the floor, it’s time to enclose the space so that you’ll have a full-fledged spawning room.
- Build a wall (two blocks high) around the spawning room floor.
- Select the buckets of water in the hotbar, and fill all four trenches with them.
*Make sure to pour them at the ends of the trenches so that they flow inward but not down into the well.
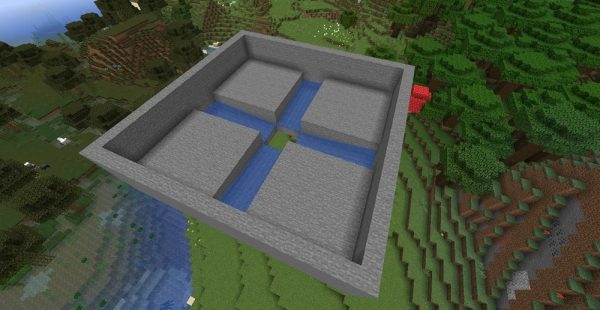
Photo by Glitchunpatched from Minecraft Wiki - Next, place the trapdoors over the trenches.
*Both sides of a trench should have 16 trapdoors in total, so you’ll use all 64 trapdoors. - Open the trapdoors so that the mobs fall right into the trenches filled with water and through the well.
- Build a roof (a block higher than the walls) over the entire room to enclose it.
- Stand on top of the roof, and place enough torches to light up the entire area (not just the edges).
*This step ensures mobs won’t spawn on top of the roof when it gets dark.
5. Build the AFK Room
Your mob farm is finally complete! Now, you need a safe place to hide and wait for mobs to appear in the spawning room and fall into the mob grinder. This is where an AFK room comes in handy. The best place to build this room is high off the ground to make sure that the mobs spawn in the spawning room.
To build this room, follow these steps:
- Select the scaffoldings in your hotbar.
- Pick a spot in the middle of your mob farm roof, and stack up around 80 scaffoldings on that spot.
- Once you’ve laid down the last scaffolding, begin making a small room around it.
While you can build the room out of any material, it’s still best to use glass blocks or anything similar for your AFK room. That’s because opaque blocks lower mobs’ spawning rates.
How to Collect XP and Items from Your Mob Farm
Now’s the time to reap the hard-earned fruits of your labor! To earn XP and items from your mob farm, wait in the AFK room first for about five minutes. That’s the time it takes for mobs to appear in the spawning room and fall down the well and into the mob grinder.
After at least five minutes have passed, climb down the scaffolding and back to the ground. You should see a few mobs stuck at the base of your mob farm’s well. Pick a weapon from your hotbar, and swing it multiple times at the visible parts of the mobs to kill them. You only need to attack each mob once or twice to kill it.
To collect more mob drops, just head back to the AFK room, and wait for another batch of mobs to be trapped inside your mob farm again.
FAQs
In this section, we provide answers to your most frequently asked questions about mob farms in Minecraft:
How high does a mob farm need to be?
A mob farm needs to be 22 blocks high. Most of the common mobs (like creepers, zombies, and skeletons) die when they fall from a height of 23.5 blocks. However, you only want the mobs to be weakened — not dead — when they fall to the base of your mob farm. That’s because you’ll only gain XP if you kill mobs yourself. A 22-block-high drop will significantly lower the HP of most mobs without killing them, making it easier to deal the final blow.
What is the best mob to farm in Minecraft?
By far, Endermen are still the best mobs to farm in Minecraft. Killing them gives you tons of XP. On top of that, they drop ender pearls, which are highly useful in the game.
How far away should you AFK from a mob farm?
The AFK distance differs depending on the mob farm you’ve built. But for spawning-based mob farms — like the one we taught you how to build in this guide — you should AFK at least 24 blocks from the spawning room but not more than 128 blocks from it. That’s because mobs only appear when they’re at least 24 blocks away from you, and they also despawn automatically if you’re more than 128 blocks from them. In other words, your mob farm won’t work if you don’t AFK at the right distance.

