
Have you ever found yourself in a situation where you need to stay reachable even if you can’t answer your Android phone? Whether you’re heading into a meeting, going on vacation, or simply want to redirect calls to another number, call forwarding on Android can be a lifesaver. By setting up call forwarding, you can ensure that important calls are never missed, even when you’re away from your phone. In this article, we will guide you through the process of call forwarding on Android, providing step-by-step instructions on how to activate, customize, and disable call forwarding. So, if you’re ready to take control of your incoming calls and stay connected wherever you are, let’s dive into the world of call forwarding on Android!
Inside This Article
- How To Call Forward On Android
- Enable Call Forwarding
- Set Up Call Forwarding Number
- Disable Call Forwarding
- Troubleshooting Call Forwarding Issues
- Conclusion
- FAQs
How To Call Forward On Android
Call forwarding is a useful feature on Android devices that allows you to redirect incoming calls to another number, ensuring that you never miss an important call. Whether you are unable to answer your phone or need to forward calls to a different device, call forwarding provides the flexibility and convenience you need. In this article, we will walk you through the steps to enable, set up, and disable call forwarding on your Android device.
1. Enable Call Forwarding
To enable call forwarding on your Android device, follow these simple steps:
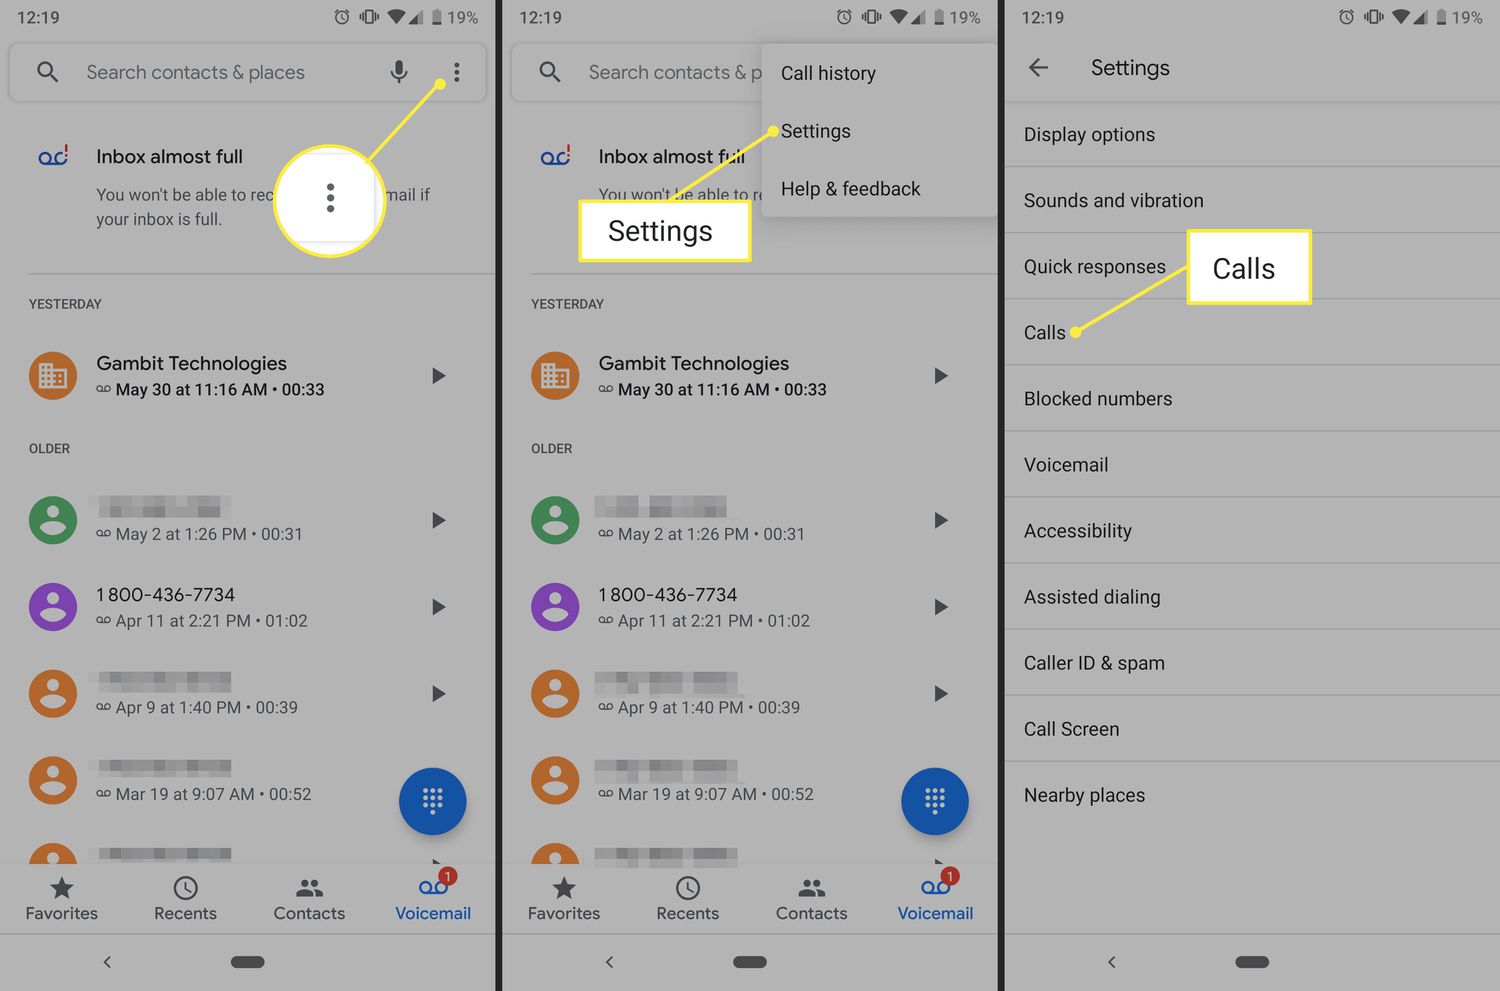
- Open your Phone app.
- Tap the Menu button (usually represented by three dots or lines) in the top-right corner of the screen.
- Select “Settings” or “Call Settings” from the dropdown menu.
- Scroll down and tap on “Call forwarding” or a similar option.
- Toggle the switch to enable call forwarding.
2. Set Up Call Forwarding Number
Once you have enabled call forwarding, you will need to set up the number to which incoming calls will be forwarded. Follow these steps:
- Tap on “Forward to” or a similar option.
- Enter the phone number to which you want your calls to be forwarded.
- Tap the “Save” or “OK” button to apply the changes.
3. Disable Call Forwarding
If you want to disable call forwarding and receive calls on your Android device again, here’s what you need to do:
- Open your Phone app.
- Tap the Menu button in the top-right corner.
- Select “Settings” or “Call Settings.”
- Scroll down and tap on “Call forwarding” or a similar option.
- Toggle the switch to disable call forwarding.
4. Troubleshooting Call Forwarding Issues
If you encounter any issues with call forwarding on your Android device, try the following troubleshooting steps:
- Ensure that your network provider supports call forwarding.
- Double-check the destination phone number for any errors.
- Restart your device and try enabling call forwarding again.
- Contact your network provider for assistance if the issue persists.
Call forwarding is a valuable feature that can greatly enhance your communication experience on Android. Whether you need to redirect calls to another device or ensure that calls are never missed, call forwarding provides the flexibility and convenience you need. Follow the steps outlined above to enable, set up, and disable call forwarding on your Android device.
Enable Call Forwarding
Call forwarding is a handy feature that allows you to redirect incoming calls from your Android device to another number. Whether you want to forward calls to your office phone during work hours or to another mobile number when you’re unavailable, enabling call forwarding on your Android device is simple and straightforward.
Here’s how you can enable call forwarding on your Android:
- Open the Phone app on your Android device.
- Tap the menu icon (usually three dots or lines) in the top-right corner of the screen to open the options menu.
- Select “Settings” or “Call Settings” from the menu.
- Scroll down and find the “Call Forwarding” or “Forwarding” option. Tap on it.
- You may have multiple call forwarding options, such as “Forward all calls” or “Forward when busy.” Choose the option that suits your needs.
- Enter the phone number to which you want your calls to be forwarded. Make sure to include the country code if it’s an international number.
- Tap the “Enable” or “Save” button to activate call forwarding.
Once you have enabled call forwarding on your Android device, incoming calls will be redirected to the specified number. You can now enjoy the convenience of receiving calls on a different device, ensuring you never miss an important call, even when you’re away from your Android device.
Set Up Call Forwarding Number
Setting up call forwarding on your Android device allows you to redirect incoming calls to another number. Whether you need to forward calls to your office line, a secondary phone, or voicemail, the process is simple. Follow these steps to easily set up call forwarding on your Android device:
1. Open the Phone app: Locate and open the Phone app on your Android device. You can typically find it on your home screen or in the app drawer. It is represented by an icon that resembles an old-school telephone receiver.
2. Access the Phone Settings: Once you have the Phone app open, look for the three-dot menu icon in the top-right corner of the screen. Tap on it to access a drop-down menu.
3. Select “Settings”: From the drop-down menu, tap on the “Settings” option. This will take you to the settings menu for your phone app.
4. Find and select “Call Forwarding”: In the phone settings menu, scroll down until you find the “Call Forwarding” option. Tap on it to proceed.
5. Enable call forwarding: On the call forwarding screen, you will see a toggle switch or checkbox. Toggle or check the box to enable call forwarding.
6. Enter the forwarding number: Once call forwarding is enabled, you will be prompted to enter the forwarding number. Type in the phone number to which you want your calls to be forwarded.
7. Save the changes: After entering the forwarding number, tap on the “Save” or “OK” button to save the changes and activate call forwarding on your Android device.
8. Test call forwarding: To ensure that call forwarding is set up correctly, you can test it by asking a friend or family member to call your original phone number. If the call is successfully redirected to the forwarding number, then call forwarding is working as expected.
Remember, call forwarding settings may vary slightly based on the manufacturer and Android version of your device. If you cannot find the exact terminology or location of the call forwarding settings on your device, refer to the instruction manual or consult the manufacturer’s website for more information.
Now that you know how to set up call forwarding on your Android device, you can easily redirect calls to another number whenever you need to. Whether you’re in a meeting, traveling, or simply prefer to have calls forwarded to a different device, this feature ensures you never miss an important call.
Disable Call Forwarding
Disabling call forwarding on your Android device is just as easy as enabling it. Follow the steps below to turn off call forwarding:
- Open the Phone app on your Android device.
- Tap the three-dot menu icon in the top-right corner of the screen.
- Select “Settings” from the dropdown menu.
- Scroll down and tap on “Calling accounts” or a similar option, depending on your device.
- Tap on “Call forwarding” or a similar option.
- Under “Call forwarding,” you will see the different options for call forwarding, including “Always forward” and “Forward when busy.” Tap on the option you want to disable.
- Finally, toggle the switch to the off position, or select “Disable” or a similar option.
Once you have completed these steps, call forwarding will be disabled on your Android device. It’s important to note that the exact steps and menu options may vary slightly, depending on the make and model of your Android device and the version of the operating system you are using.
If you encounter any difficulties or have trouble finding the call forwarding settings on your Android device, refer to the user manual or support documentation provided by the manufacturer for specific instructions.
It’s also worth mentioning that if you have multiple SIM cards or accounts on your Android device, you may need to repeat the above steps for each account individually to disable call forwarding.
Now that you know how to disable call forwarding on your Android device, you can easily turn it on or off as needed. Whether you want to forward calls to another number or prefer to have all calls directed to your own device, call forwarding gives you the flexibility and convenience to manage your calls effectively.
Troubleshooting Call Forwarding Issues
Call forwarding is a valuable feature that allows you to redirect your incoming calls to another number. However, like any technology, it can sometimes encounter problems. If you are experiencing issues with call forwarding on your Android device, here are some troubleshooting steps you can take:
- Check your network connection: Poor network signal or unstable internet connectivity can affect call forwarding. Ensure that you have a strong and stable network connection before attempting to enable or disable call forwarding.
- Verify call forwarding settings: Double-check the call forwarding settings on your Android device. Make sure you have entered the correct forwarding number and that the forwarding options are enabled as desired.
- Restart your device: A simple restart can often resolve minor software glitches or conflicts that may be affecting call forwarding. Power off your Android device, wait for a few seconds, and then power it back on.
- Update your device software: Outdated software can sometimes cause compatibility issues with certain features, including call forwarding. Check for any available software updates for your Android device and ensure that you are running the latest version.
- Disable third-party apps: Some third-party apps, particularly those related to call management or messaging, can interfere with call forwarding functionality. Try disabling any recently installed apps and check if the call forwarding issue persists.
- Contact your service provider: If the above steps do not resolve the call forwarding problem, it is recommended to contact your service provider. They can provide further assistance and troubleshoot any network-related issues that may be causing the problem.
- Factory reset: As a last resort, you may consider performing a factory reset on your Android device. This will erase all data and settings, so make sure to back up your important information before proceeding. Keep in mind that a factory reset should only be done after exhausting all other troubleshooting options and with caution.
By following these troubleshooting steps, you can hopefully resolve any call forwarding issues you encounter on your Android device. However, if the problem persists, it is advisable to seek professional help or contact the customer support team of your device manufacturer or service provider for further assistance.
Conclusion
In conclusion, Android phones offer a convenient and user-friendly way to set up call forwarding. Whether you want to forward calls to another number, to voicemail, or to a specific contact, Android provides a range of options to suit your needs. By accessing the Call Forwarding settings on your Android device, you can easily enable, disable, or customize call forwarding settings.
Remember to consult your phone service provider for any specific requirements or charges associated with call forwarding. With the flexibility and functionality of Android, you can stay connected and ensure you never miss an important call, no matter where you are.
So, next time you need to forward calls on your Android device, simply follow the steps outlined in this article, and you’ll be able to manage your call forwarding settings with ease. Stay connected, even when you’re on the go!
FAQs
Q: How do I enable call forwarding on my Android device?
A: To enable call forwarding on your Android device, follow these steps:
- Open the Phone app on your Android device.
- Tap the Menu icon (usually three dots or lines) in the top-right corner of the screen.
- Select “Settings” or “Call settings” from the menu.
- Scroll down and tap on “Call forwarding” or “Forwarding” option.
- Tap on “Voice call” or “Voice” to select the type of calls you want to forward.
- Enter the phone number to which you want to forward your calls. You can enter the number manually, or choose it from your contacts.
- Tap “Enable” or “Turn on” to activate call forwarding.
Q: Can I forward my calls to multiple numbers simultaneously on Android?
A: Unfortunately, the call forwarding feature on Android does not natively support forwarding calls to multiple numbers simultaneously. However, you can achieve this by using third-party call forwarding apps available on the Google Play Store. These apps provide additional functionality and allow you to forward calls to multiple numbers or even create call forwarding schedules.
Q: How do I check if call forwarding is enabled on my Android device?
A: To check if call forwarding is enabled on your Android device, you can follow these steps:
- Open the Phone app on your Android device.
- Tap the Menu icon (usually three dots or lines) in the top-right corner of the screen.
- Select “Settings” or “Call settings” from the menu.
- Scroll down and tap on “Call forwarding” or “Forwarding” option.
- Here, you will see the current status of call forwarding. If it is enabled, you will see the forwarded number listed.
Q: How do I disable call forwarding on my Android device?
A: To disable call forwarding on your Android device, follow these steps:
- Open the Phone app on your Android device.
- Tap the Menu icon (usually three dots or lines) in the top-right corner of the screen.
- Select “Settings” or “Call settings” from the menu.
- Scroll down and tap on “Call forwarding” or “Forwarding” option.
- Toggle off or tap “Disable” to deactivate call forwarding.
Q: Can I set up call forwarding for specific contacts on Android?
A: Yes, you can set up call forwarding for specific contacts on your Android device by following these steps:
- Open the Contacts app on your Android device.
- Select the contact for which you want to set up call forwarding.
- Tap the Edit or Modify option (pencil icon) to edit the contact.
- Scroll down and tap on “Additional settings” or “More options.”
- Select “Call forwarding” or “Forward to” option.
- Enter the phone number to which you want to forward calls for this contact.
- Save the changes.