
Have you ever found yourself in a situation where you need to forward calls from your cell phone to another phone? Whether you’re going out of town and want to ensure you don’t miss any important calls, need to divide your work and personal phone calls, or simply want to have a backup phone line, forwarding calls can be a lifesaver. In this article, we will guide you through the process of forwarding cell phone calls to another phone. We’ll provide step-by-step instructions for several popular cell phone brands and operating systems. From iPhone to Android, we’ve got you covered. Say goodbye to missed calls and hello to seamless call forwarding. Let’s jump right in!
Inside This Article
- Setting Up Call Forwarding on Android Devices
- Setting Up Call Forwarding on iOS Devices
- Setting Up Call Forwarding on Windows Phone Devices
- Troubleshooting Common Issues with Call Forwarding
- Conclusion
- FAQs
Setting Up Call Forwarding on Android Devices
Call forwarding is a convenient feature that allows you to redirect incoming calls from your Android device to another phone number. Whether you want to divert calls to a different device while you’re traveling or ensuring important calls reach you even if your primary device is unavailable, call forwarding provides flexibility and accessibility. Here’s how you can set up call forwarding on your Android device:
Step 1: Open the Phone app on your Android device. This app is typically represented by a phone icon and can be found on your device’s home screen or app drawer.
Step 2: Locate and tap the three dots (menu) icon in the top-right corner of the screen. This will open a dropdown menu with various options.
Step 3: From the dropdown menu, select “Settings” or “Call Settings” (the exact wording may vary depending on your device and Android version).
Step 4: In the Settings menu, scroll down and look for the “Call forwarding” or “Forwarding” option. Tap on it to proceed.
Step 5: You should now see different call forwarding options, such as “Always forward,” “Forward when busy,” “Forward when unanswered,” and “Forward when unreachable.” Choose the desired option based on your needs.
Step 6: After selecting your preferred call forwarding option, you will be prompted to enter the phone number to which you want the calls to be forwarded. Enter the number and ensure it is correct.
Step 7: Once you have entered the forwarding number, tap the “Enable” or “Turn On” button to activate call forwarding. Your Android device will now forward incoming calls to the specified number.
Step 8: To disable call forwarding, go back to the call forwarding settings menu and select the “Disable” or “Turn Off” option.
It’s worth noting that the exact steps and options may vary slightly depending on your specific Android device and the version of the operating system you are running. If you’re unable to find the call forwarding settings or encounter any difficulties, consult your device’s user manual or contact your device manufacturer for further assistance.
Now that you know how to set up call forwarding on your Android device, you can enjoy the convenience and flexibility it provides. Whether you’re on the go or in need of a backup plan, call forwarding ensures that you never miss those important calls.
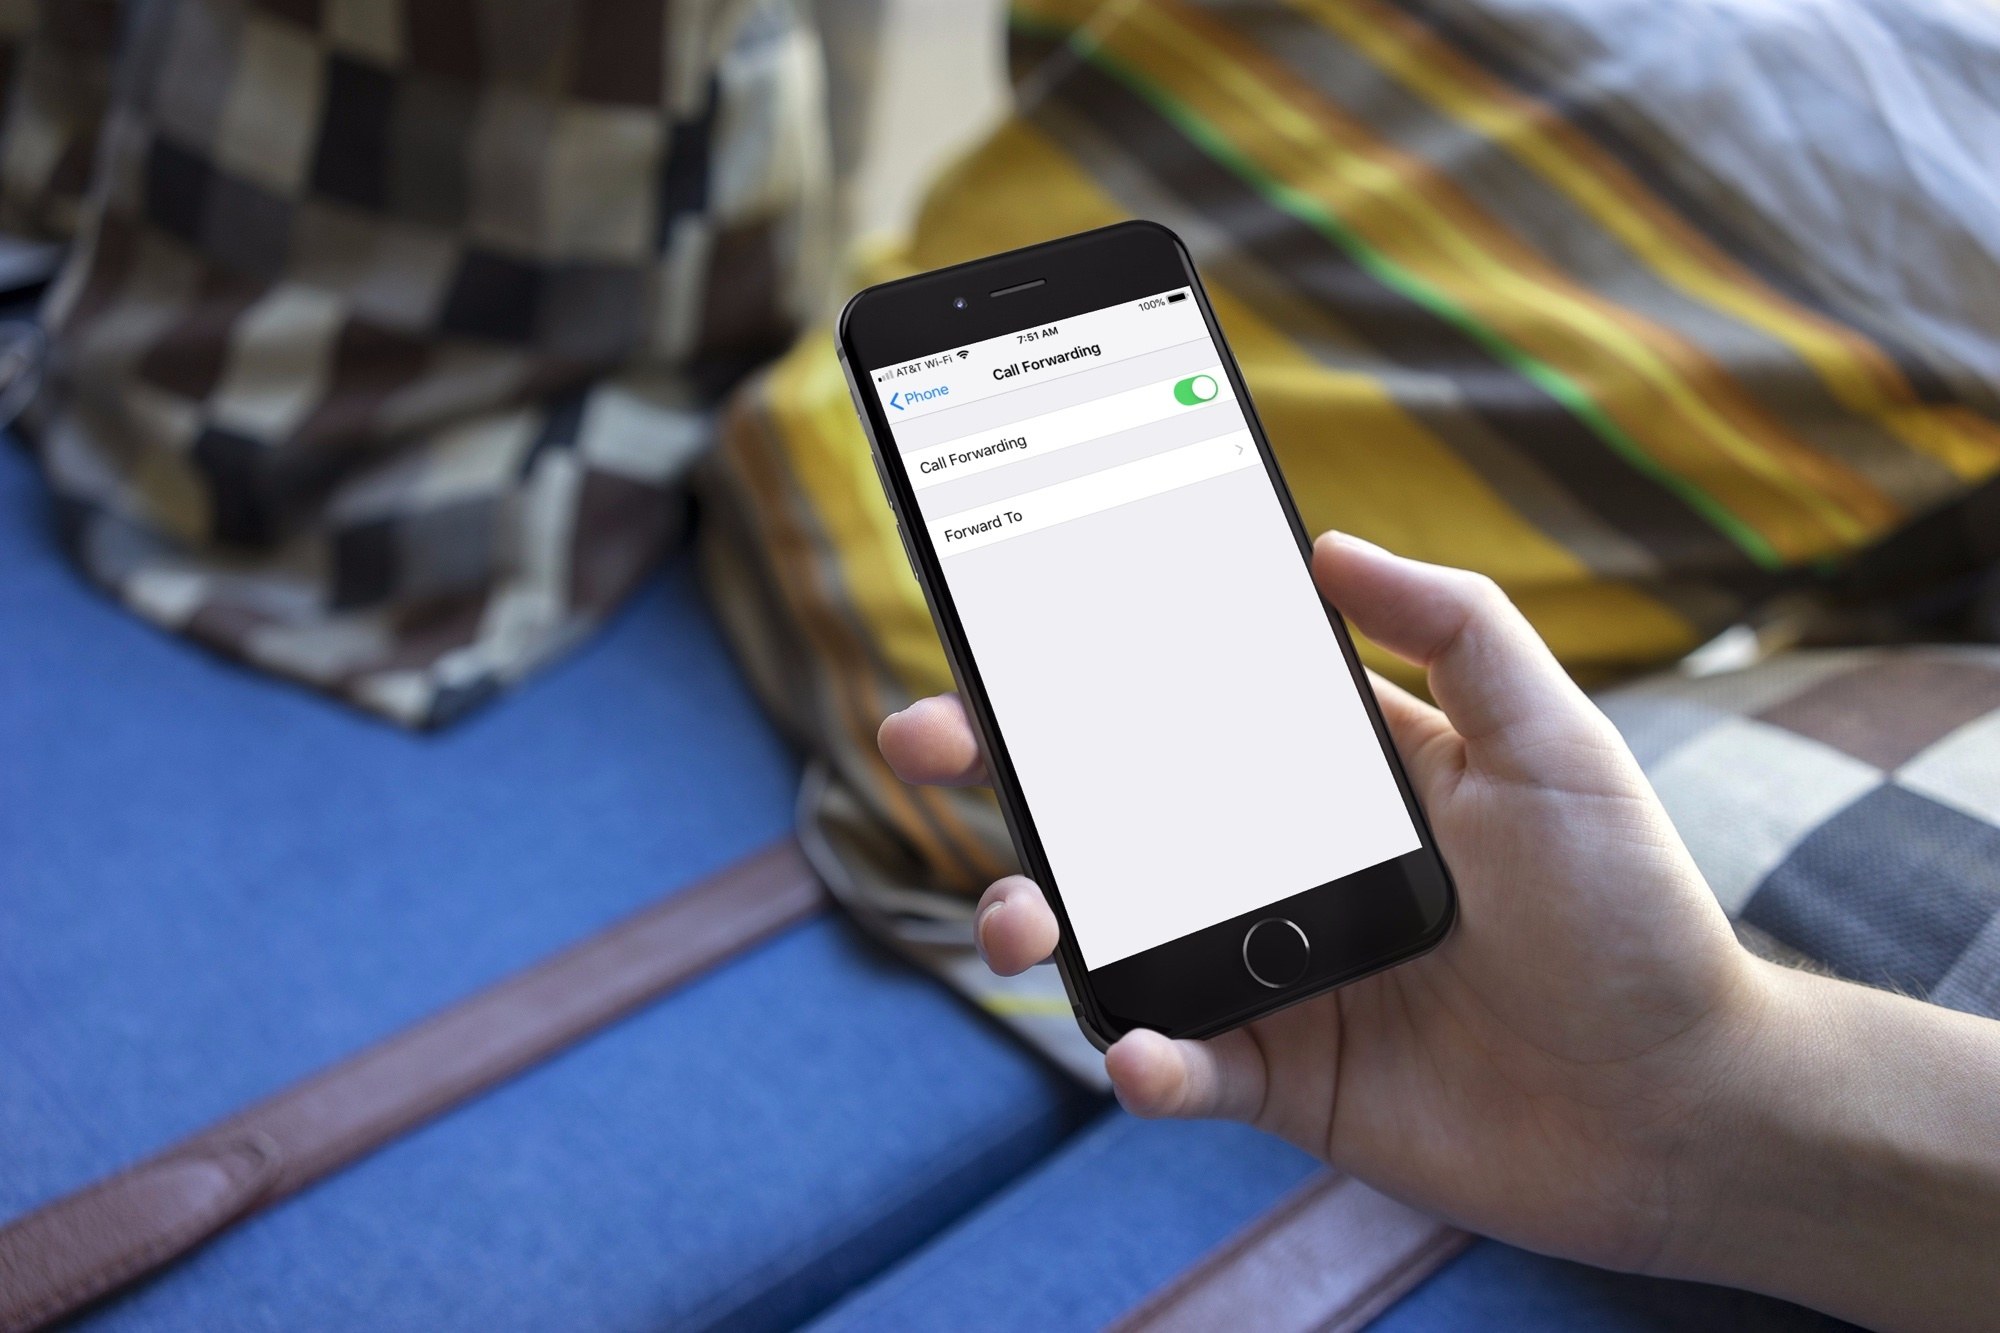
Setting Up Call Forwarding on iOS Devices
Call forwarding is a useful feature that allows you to redirect incoming calls from your iPhone to another phone number. Whether you want to forward calls to your office phone, a secondary device, or even a friend’s phone, iOS devices offer a straightforward process to set up call forwarding. Follow these simple steps to get started:
Step 1: Access the Settings
To begin, unlock your iPhone and tap on the “Settings” app icon. This will open the settings menu, where you can customize various aspects of your device.
Step 2: Navigate to the Phone Settings
From the Settings menu, scroll down and tap on the “Phone” option. This will open the Phone settings, which include options related to calls and call forwarding.
Step 3: Select Call Forwarding
In the Phone settings, locate the “Call Forwarding” option and tap on it. This will bring you to a new screen where you can configure your call forwarding settings.
Step 4: Enable Call Forwarding
On the Call Forwarding screen, you will see a toggle switch. Tap on the switch to enable call forwarding. Once enabled, you can enter the number you want your calls to be forwarded to.
Step 5: Enter the Forwarding Phone Number
Tap on the “Forward To” field and enter the phone number where you want your calls forwarded. Make sure to include the country code and area code if necessary.
Step 6: Save and Verify
After entering the forwarding phone number, tap on the “Back” button to return to the previous screen. The call forwarding settings will be automatically saved and activated. To ensure that call forwarding is set up correctly, test it by placing a call to your iPhone from another phone.
Note: Depending on your cellular carrier and plan, call forwarding may incur additional charges. It is advisable to check with your carrier to understand the associated costs before enabling call forwarding.
By following these steps, you can easily set up call forwarding on your iOS device and ensure that you never miss an important call, even when you are away from your iPhone. Enjoy the convenience and flexibility that call forwarding offers!
Setting Up Call Forwarding on Windows Phone Devices
Call forwarding is a useful feature that allows you to redirect incoming calls from your Windows Phone device to another phone number. Whether you want to ensure you never miss an important call or simply want to forward calls to a different device, setting up call forwarding on your Windows Phone is a straightforward process. Here’s a step-by-step guide to help you get started:
Step 1: Open the Phone app on your Windows Phone device.
Step 2: Tap the ellipsis (…) at the bottom right corner of the screen to access additional options.
Step 3: Select “Settings” from the menu.
Step 4: Scroll down and tap “Call forwarding.”
Step 5: In the Call forwarding section, tap “Forward all calls.”
Step 6: Enter the phone number you want to forward your calls to. Make sure to include the country code and area code if necessary.
Step 7: Tap the checkbox next to “Notify me when calls are forwarded” if you want to receive notifications when calls are redirected.
Step 8: Tap the “Save” button to save your settings.
Step 9: You will be prompted with a notification indicating that call forwarding has been successfully set up.
That’s it! Your Windows Phone device is now set up to forward all incoming calls to the specified phone number. Any calls made to your Windows Phone will be redirected to the forwarding number.
If you ever need to disable call forwarding, simply follow the same steps and select the “Turn off” option in the call forwarding settings.
Note that call forwarding may incur additional charges depending on your phone plan and carrier. It’s always best to check with your service provider to understand any associated fees.
Now that you know how to set up call forwarding on your Windows Phone device, you can ensure that you never miss a call, even if you’re away from your device. This feature can be particularly useful during vacations, business trips, or when you need to use a different phone temporarily.
Remember, call forwarding is just one of the many useful features that Windows Phone offers to enhance your overall smartphone experience.
Troubleshooting Common Issues with Call Forwarding
Call forwarding is a convenient feature that allows you to redirect incoming calls from one phone number to another. However, as with any technology, it’s not uncommon to encounter some issues along the way. In this section, we’ll discuss some common problems that users may face when setting up and using call forwarding, as well as troubleshooting tips to help you resolve them.
1. Call forwarding not working: If you’ve set up call forwarding but calls are still not being redirected to the desired phone, there are a few things you can check. First, ensure that call forwarding is enabled on your device by going to the settings menu. Double-check that you’ve entered the correct forwarding number and that there are no additional restrictions or settings that could be blocking the forwarding process.
2. Poor call quality: Sometimes, when calls are forwarded to another phone, the quality may deteriorate. This can be caused by network issues or compatibility problems between the devices. To address this, check your network connection and try forwarding calls to a different phone to see if the issue persists. If the problem persists, you may need to contact your service provider for further assistance.
3. Calls not forwarding to voicemail: If your intention is to forward incoming calls to voicemail but they are not reaching your voicemail box, there could be several reasons. First, ensure that your voicemail settings are properly configured and that your mailbox is set up correctly. Additionally, make sure that your call forwarding settings explicitly specify forwarding to voicemail rather than another phone number.
4. Unable to disable call forwarding: In some cases, users may find it difficult to deactivate call forwarding once it’s been set up. This can occur due to software glitches or network-related issues. To resolve this, try restarting your device or contacting your service provider for assistance. They may need to reset your call forwarding settings on their end.
5. Incorrect call forwarding settings: It’s essential to double-check your call forwarding settings to ensure they are accurate. Sometimes, a simple typo or incorrect number entry can cause the forwarding feature not to work correctly. Take the time to review your settings and verify that the correct phone number is entered for forwarding.
6. Compatibility issues: Not all devices or service providers support call forwarding. If you’re experiencing issues, check with your service provider to confirm if call forwarding is available on your plan and compatible with your device. They can provide guidance on any specific settings or limitations that may be affecting call forwarding functionality.
By following these troubleshooting tips, you can overcome common issues with call forwarding and ensure that your calls are redirected smoothly. If you are still experiencing difficulties, don’t hesitate to reach out to your service provider or device manufacturer for further assistance. With a little troubleshooting, you can make the most of this handy feature and ensure that your calls are always routed to the right place.
Conclusion
In today’s world, the ability to forward cell phone calls to another phone has become an essential feature for many individuals. Whether you need to stay connected while traveling, consolidate your phone numbers, or manage calls for your business, call forwarding provides a convenient solution. By following the simple steps outlined in this article, you can easily set up call forwarding on your cell phone.
Remember to check with your mobile service provider to verify if call forwarding is included in your plan and if any additional charges may apply. With call forwarding, you can ensure that you never miss an important phone call, no matter where you are or which device you are using. Take advantage of this useful feature to enhance your mobile communications and stay connected at all times.
So, don’t let calls go unanswered. Forward your cell phone calls and enjoy seamless connectivity wherever you go!
FAQs
Q: How can I forward my cell phone calls to another phone?
A: To forward your cell phone calls to another phone, you can follow these steps:
- Open your phone’s settings.
- Go to the “Call settings” or “Phone settings” section.
- Look for the “Call forwarding” or “Forwarding” option.
- Select the option to forward calls.
- Enter the phone number you want to forward calls to.
- Save the settings and your calls will be forwarded to the specified phone number.
Q: Can I forward calls from a landline phone to a cell phone?
A: Yes, it is possible to forward calls from a landline phone to a cell phone. Many landline phone providers offer call forwarding services that allow you to redirect incoming calls to your cell phone. You can set up call forwarding on your landline phone by following the instructions provided by your service provider.
Q: Are there any charges associated with call forwarding?
A: The charges for call forwarding may vary depending on your cell phone carrier and the type of forwarding you choose. Some carriers may offer call forwarding as part of their service plans, while others may charge an additional fee. It is recommended to check with your cell phone carrier to understand any potential charges or fees associated with call forwarding.
Q: Can I forward calls to an international phone number?
A: Yes, in most cases, you can forward calls to an international phone number. However, it is important to check with your cell phone carrier to confirm if they support call forwarding to international numbers. Additionally, keep in mind that forwarding calls to international numbers may incur additional charges or international calling rates.
Q: What happens to my voicemail when I forward calls to another phone?
A: When you forward calls to another phone, the handling of voicemail can vary depending on your cell phone carrier. In some cases, voicemail messages may be forwarded along with the calls to the designated phone number. However, in other instances, the voicemail may remain on the original phone and not be forwarded. It is recommended to check with your carrier to understand how they handle voicemail when call forwarding is enabled.