
Are you eager to get your hands on the latest and greatest version of Android? If you’re a Samsung device owner, we’ve got good news for you! In this article, we’ll guide you through the process of installing Android 11 on your Samsung device. Android 11 brings a multitude of new features and improvements, including enhanced privacy settings, improved notifications, new chat bubbles, and much more. By upgrading to Android 11, you’ll experience the latest advancements in performance, security, and functionality on your Samsung device. So, if you’re ready to take your Android experience to the next level, let’s dive into the steps of installing Android 11 on your Samsung device.
Inside This Article
- Compatibility Check
- Enable Developer Options
- Unlock Bootloader
- Install Android 11 Custom ROM
- Conclusion
- FAQs
Compatibility Check
Before proceeding with the installation of Android 11 on your Samsung device, it is essential to ensure that your device is compatible with the latest firmware. Here are a few things to consider:
1. Device Model: Check if your specific Samsung device model is compatible with Android 11. You can usually find this information on the Samsung website or by searching online.
2. System Requirements: Verify that your device meets the minimum system requirements for Android 11. These requirements may include a certain amount of RAM, internal storage space, and processor specifications. Review the official Android 11 documentation for the specific requirements.
3. Carrier Restrictions: Some carriers may have restrictions on certain software updates. It’s important to verify if your carrier allows the installation of Android 11 on your Samsung device. Contact your carrier’s customer support or check their website for information regarding software updates.
4. Current Software Version: Check the current software version on your Samsung device. If you are already using a custom ROM or a beta version of Android, you may need to revert to the official software version before proceeding with the Android 11 installation.
5. Backup Your Data: It is crucial to back up all your important data before installing Android 11. While the installation process doesn’t typically erase data, it is always better to be safe than sorry. Backing up your data ensures that you can restore it in case of any unexpected issues during the installation process.
By performing these compatibility checks, you can ensure a smooth and successful installation of Android 11 on your Samsung device. Once you have verified the compatibility, you can proceed with the installation process.
Enable Developer Options
Developer Options is a hidden menu in Android devices that provides advanced settings and debugging options. By enabling Developer Options on your Samsung device, you can unlock various features and customization options. Here’s how to do it:
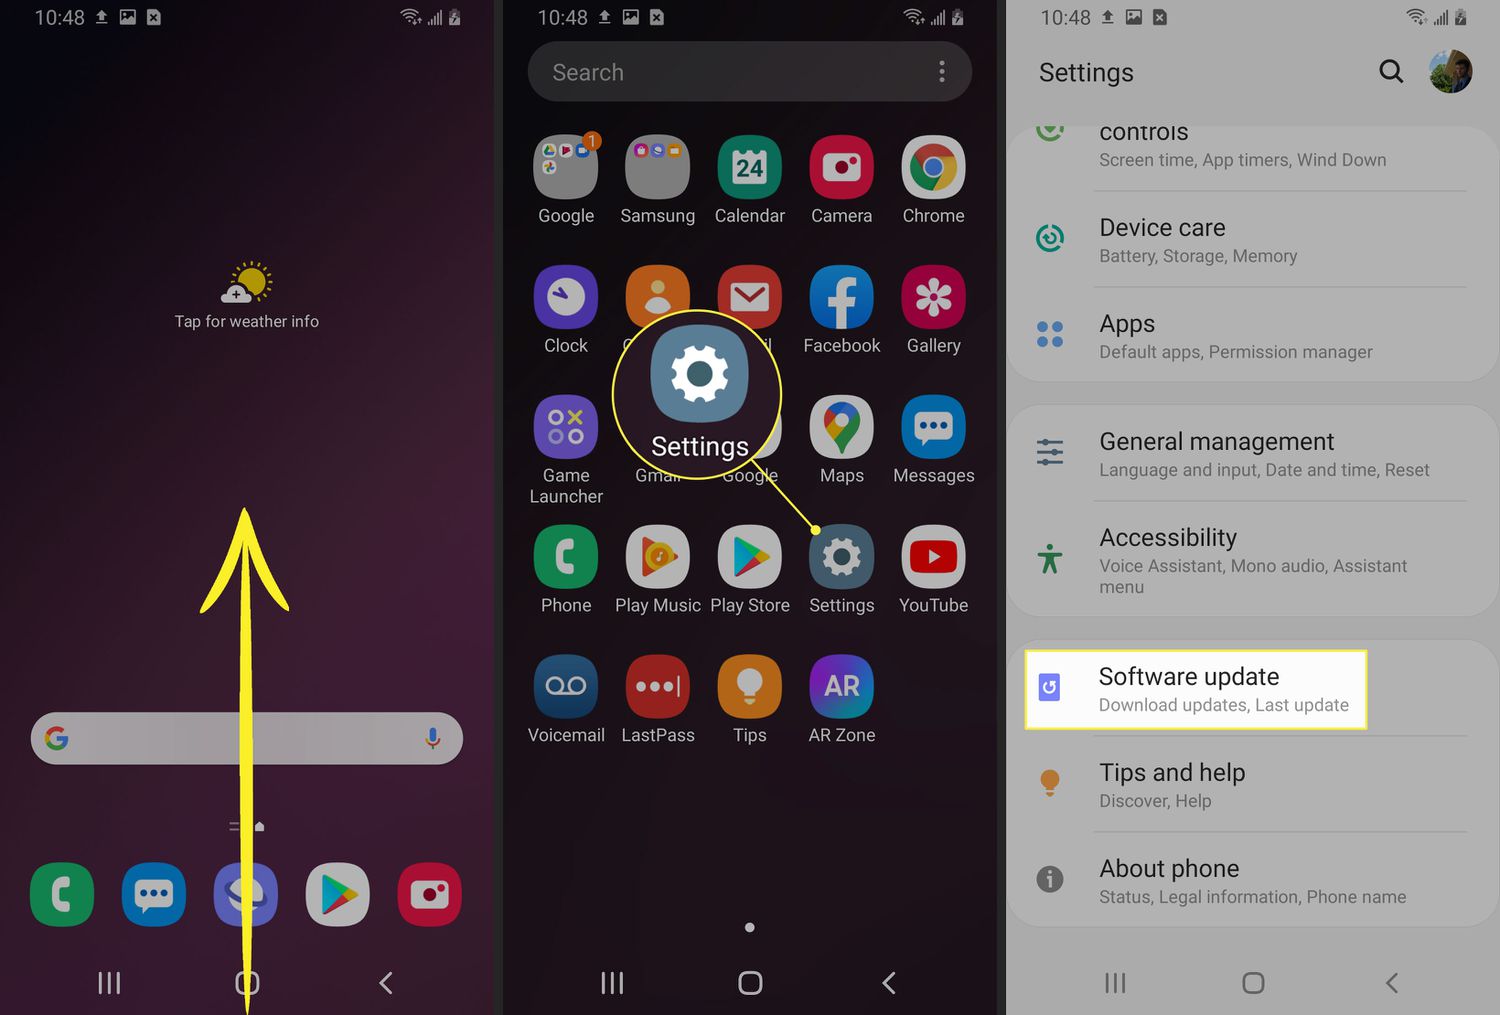
1. Open the Settings app on your Samsung device. You can find the Settings app in your app drawer or by swiping down from the top of the screen and tapping the gear icon.
2. Scroll down and tap on “About phone” or “About device” at the bottom of the Settings menu.
3. Look for the “Software information” or “Software info” option and tap on it. This might be located under the “System” or “Software” section.
4. Find the “Build number” or “Build version” entry on the screen. This option may have a different name depending on your device model and Android version.
5. Tap on the “Build number” or “Build version” entry multiple times quickly. You’ll see a message indicating that you are now a developer.
6. After tapping multiple times, a notification will appear saying “You are now a developer!” or “Developer mode has been enabled.” This means that you have successfully enabled Developer Options on your Samsung device.
7. Go back to the main Settings menu, and you’ll find the “Developer options” entry listed above or below the “About phone” or “About device” option.
8. Tap on “Developer options” to access a wide range of advanced settings and options. From here, you can customize the device’s animation scale, enable USB debugging, tweak performance settings, and much more.
Remember, enabling Developer Options gives you access to powerful settings that can potentially affect the stability and performance of your device. It’s important to understand the implications of any changes you make and use these options responsibly.
Unlock Bootloader
Unlocking the bootloader is a crucial step in the process of installing Android 11 on your Samsung device. The bootloader acts as a security measure and prevents unauthorized modifications to the device’s software. By unlocking the bootloader, you gain the freedom to install custom ROMs and modify system files.
Before proceeding with bootloader unlock, it’s important to note that this process will void the warranty of your Samsung device. Additionally, unlocking the bootloader may lead to data loss, so make sure to back up your important data beforehand.
To unlock the bootloader, follow these steps:
- Enable Developer Options: Go to the device’s settings and tap on “About phone.” Scroll down and find the “Build number” option. Tap on it seven times to enable Developer Options.
- Enable OEM Unlocking: In Developer Options, look for the “OEM unlocking” toggle and turn it on.
- Boot the Device into Download Mode: Power off your device. Press and hold the volume down, Bixby, and power buttons simultaneously until the device vibrates and enters Download Mode.
- Connect the Device to the Computer: Use a USB cable to connect your Samsung device to your computer.
- Open the Command Prompt or Terminal: Open the Command Prompt (Windows) or Terminal (Mac and Linux) on your computer and navigate to the folder where you have ADB and Fastboot installed.
- Unlock the Bootloader: In the Command Prompt or Terminal, enter the command “
adb devices” to ensure that your device is connected. Then, enter the command “adb reboot bootloader” to reboot your device into bootloader mode. Finally, enter the command “fastboot oem unlock” to unlock the bootloader. You may need to confirm the unlocking process on your device. - Reboot Your Device: Once the bootloader is unlocked, enter the command “
fastboot reboot” to reboot your device.
After unlocking the bootloader, your Samsung device is ready for the next step of installing Android 11. It’s important to note that unlocking the bootloader may vary depending on the device model and manufacturer. Therefore, it’s recommended to refer to specific device documentation or online resources for detailed instructions.
Remember that unlocking the bootloader is an advanced procedure and should only be done by users who are familiar with the risks involved. Proceed with caution and ensure you have a thorough understanding of the process before proceeding.
Install Android 11 Custom ROM
If you’re looking to experience the latest features and improvements of Android 11 on your device, installing a custom ROM is a great option. Custom ROMs are aftermarket firmware that replace the stock Android operating system on your device. They offer a range of customization options and often provide faster performance and access to exclusive features.
Before you proceed with installing an Android 11 custom ROM, it’s important to note that the process varies depending on your device manufacturer and model. Additionally, installing a custom ROM typically requires unlocking the bootloader, which can void your device’s warranty and may have risks associated with it. Make sure to follow the instructions provided by reputable sources and understand the risks involved.
Here’s a general guide to installing an Android 11 custom ROM:
- Research and Download: Look for a compatible custom ROM for your device. Visit reputable custom ROM websites and forums to find one that suits your preferences. Download the custom ROM and transfer it to your device’s internal storage.
- Backup Your Data: Before proceeding with the installation, it’s essential to backup your data, as flashing a custom ROM will wipe your device clean. Make sure to backup your contacts, photos, videos, and any other important data to an external storage device or a cloud storage service.
- Unlock the Bootloader: Most devices require the bootloader to be unlocked before installing a custom ROM. The process of unlocking the bootloader varies depending on the device. Search for instructions specific to your device to ensure the proper unlocking process.
- Install a Custom Recovery: A custom recovery is necessary for flashing the custom ROM. Install a custom recovery like TWRP (Team Win Recovery Project) by following the instructions provided by the custom recovery’s developer.
- Wipe and Flash the Custom ROM: Boot into the custom recovery mode. From the custom recovery menu, choose the option to wipe the system, data, cache, and dalvik cache. Then, navigate to the option to flash the custom ROM. Select the downloaded custom ROM file from your device’s internal storage and confirm the installation.
- Clear Cache and Reboot: After the installation process is complete, go back to the custom recovery main menu and choose the option to clear the cache and dalvik cache once again. Once done, reboot your device.
- Set Up Your Device: Upon reboot, you will be greeted with the setup wizard of the custom ROM. Follow the on-screen instructions to set up your device with the newly installed Android 11 custom ROM.
Keep in mind that the process of installing a custom ROM can be complex and may have risks associated with it. If you’re not confident in your technical skills or unsure about the risks involved, it’s advisable to seek assistance from experienced users or consider alternative methods to enjoy Android 11 on your device. Make sure to read user reviews and feedback on the custom ROM you choose to ensure compatibility and stability.
By following these steps and taking necessary precautions, you can install the Android 11 custom ROM on your device and enjoy the latest features and optimizations offered by the new operating system.
Please note that installing a custom ROM may void your device’s warranty, and the exact steps and requirements may vary depending on your device model. Always refer to reliable sources and forums for device-specific instructions and proceed with caution.
Conclusion
Installing Android 11 on your Samsung device is a straightforward process that can enhance your overall mobile experience. With its new features and improvements, Android 11 offers a seamless and optimized user interface, improved privacy controls, and enhanced device performance.
By following the step-by-step guide outlined in this article, you can easily upgrade your Samsung device to the latest Android version. Remember to back up your data before proceeding with the installation to avoid any potential data loss.
Keep in mind that the availability of Android 11 may vary depending on your device model and carrier. If your Samsung device is not eligible for an official update, you can explore custom ROM options to experience Android 11’s benefits.
With Android 11, you can stay at the forefront of technology and enjoy a faster, more secure, and feature-rich Android experience on your Samsung device.
FAQs
1. Can I install Android 11 on any Samsung device?
Android 11 is available for a wide range of Samsung devices, but it’s important to note that not all models are eligible for the update. To check if your Samsung device is compatible with Android 11, you can visit the Samsung website or check for system updates in your device’s settings.
2. How do I check if my Samsung device is running Android 11?
To check if your Samsung device is running Android 11, go to the Settings menu, scroll down to “About Phone,” and tap on it. From there, you should see information about your device, including the Android version. If it says “Android 11,” then you have successfully installed the latest version.
3. Can I install Android 11 on my Samsung device manually?
Yes, it is possible to manually install Android 11 on your Samsung device, but it requires some technical knowledge and comes with certain risks. It is recommended to wait for the official OTA (Over-the-Air) update from Samsung, as this ensures a smoother and more secure installation process. However, if you are an advanced user and are comfortable with the risks associated with manual installation, you can find instructions and the necessary files from reliable sources online.
4. Will installing Android 11 on my Samsung device affect my data?
When you upgrade to a new Android version, it is always a good practice to back up your data before proceeding. While the Android 11 installation process should not erase your data, unexpected issues can occur, and it’s better to be safe than sorry. Make sure to back up your important files, contacts, and apps before installing Android 11 on your Samsung device.
5. How long does it take to install Android 11 on a Samsung device?
The time it takes to install Android 11 on your Samsung device can vary depending on several factors, including the device model, internet connection speed, and the overall size of the update. Typically, the installation process can take anywhere from 15 minutes to an hour. During the installation, it is important to keep your device connected to a stable Wi-Fi network and ensure it has enough battery power to complete the process without any interruptions.