
Do Not Disturb is a handy feature that allows you to stay focused and uninterrupted on your MacBook. With just a few simple steps, you can easily activate Do Not Disturb mode and enjoy a distraction-free experience. Whether you’re working on an important project or simply want some peace and quiet, knowing how to enable Do Not Disturb on your MacBook is essential. In this article, we will guide you through the process of turning on Do Not Disturb and explore some useful tips and tricks to make the most of this feature. So, let’s get started and ensure that nothing comes between you and your productivity while using your MacBook!
Inside This Article
- How Do You Turn on Do Not Disturb on Your MacBook?
- Method 1: Using the Notification Center
- Method 2: Using System Preferences
- Method 3: Using Siri
- Conclusion
- FAQs
How Do You Turn on Do Not Disturb on Your MacBook?
Do Not Disturb is a handy feature on MacBook that allows you to silence notifications and interruptions, ensuring a distraction-free working environment. In this article, we will explore different methods to turn on Do Not Disturb on your MacBook.
Method 1: Using the Notification Center
To quickly activate Do Not Disturb on your MacBook, you can utilize the Notification Center. Here’s how:
- Click on the Notification Center icon located at the top-right corner of the menu bar. It looks like three horizontal lines.
- Scroll upwards to reveal the Notification Center panel.
- Locate the “Do Not Disturb” toggle switch at the top of the panel.
- Click on the toggle switch to enable Do Not Disturb mode. The switch will turn gray when it is activated.
Method 2: Using System Preferences
If you prefer a more comprehensive approach to configure your Do Not Disturb settings, you can use the System Preferences. Follow these steps:
- Click on the Apple menu located at the top-left corner of the screen.
- Select “System Preferences” from the dropdown menu.
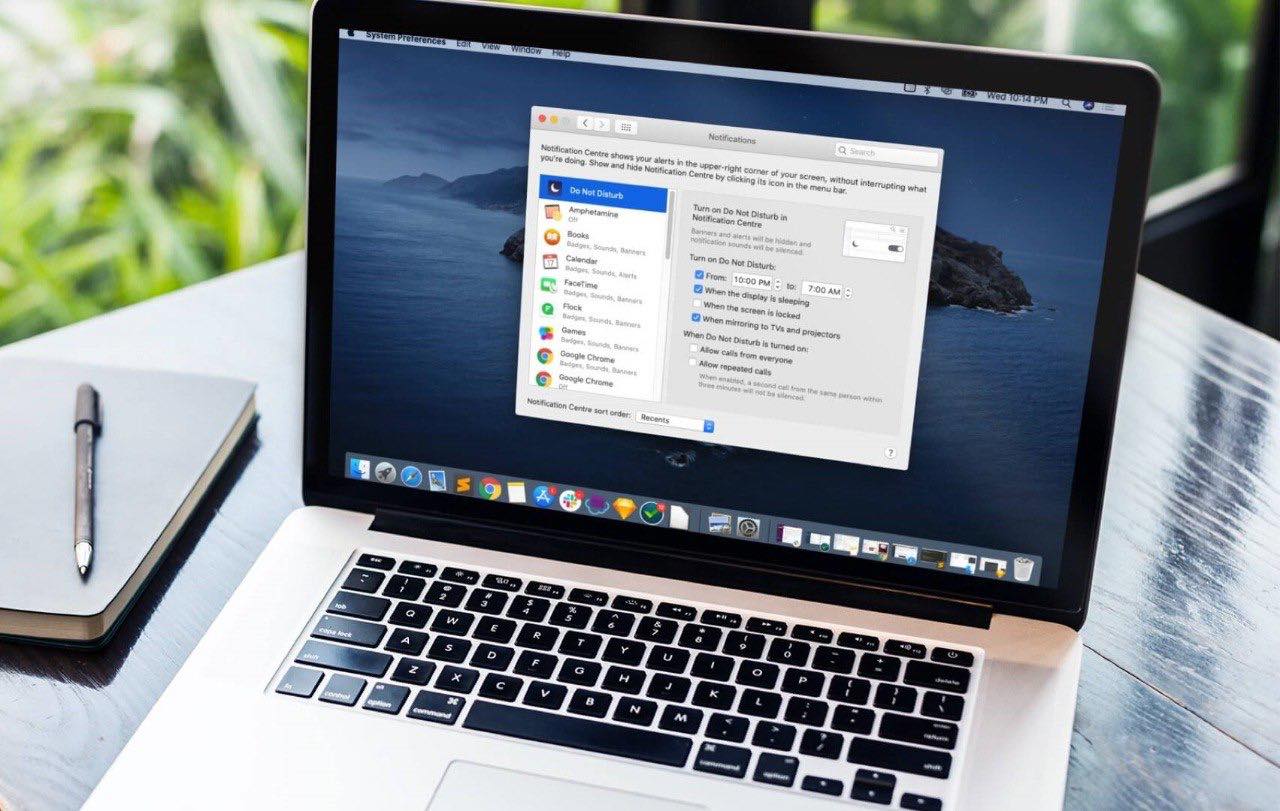
- In the System Preferences window, click on “Notifications.”
- In the left sidebar, select “Do Not Disturb.”
- Tick the “Turn on Do Not Disturb” checkbox to activate the feature.
- Customize the Do Not Disturb settings according to your preferences, such as setting specific times or allowing calls from certain contacts.
Method 3: Using Siri
If you have Siri enabled on your MacBook, you can simply ask Siri to turn on Do Not Disturb. Here’s how:
- Click on the Siri icon located in the menu bar or use the keyboard shortcut (if enabled).
- Ask Siri to “Turn on Do Not Disturb.”
- Siri will confirm the activation, and your MacBook will enter Do Not Disturb mode.
Remember, Do Not Disturb mode temporarily disables notifications and alerts, allowing you to focus on your work without any interruptions. Make sure to disable Do Not Disturb when you no longer need it, so you can stay connected and receive important notifications on your MacBook.
Method 1: Using the Notification Center
If you want to easily activate the Do Not Disturb mode on your MacBook, the Notification Center is a convenient and quick option. The Notification Center allows you to manage all your notifications, including enabling and disabling the Do Not Disturb feature.
Here’s a step-by-step guide on how to turn on Do Not Disturb using the Notification Center:
- First, locate and click on the Notification Center icon in the top-right corner of your MacBook’s screen. You can also access the Notification Center by swiping left with two fingers from the right edge of your trackpad.
- Once the Notification Center is open, scroll up to reveal the “Do Not Disturb” toggle switch. It is positioned below the “Notifications” section.
- Click on the toggle switch to enable Do Not Disturb. When activated, the switch will turn from gray to blue, indicating that the feature is now active.
Once you have enabled Do Not Disturb, you will no longer receive any notifications on your MacBook. This includes alerts, banners, and sounds from various apps and notifications.
Keep in mind that while Do Not Disturb is enabled, all incoming notifications will be silenced. However, these notifications will still be available in the Notification Center, allowing you to review them whenever you’re ready.
To disable Do Not Disturb and resume receiving notifications, simply repeat the above steps and click on the toggle switch again. Once turned off, the switch will return to its original gray color.
Using the Notification Center to enable and disable Do Not Disturb on your MacBook provides a quick and hassle-free way to control interruptions and stay focused without being disturbed by constant notifications.
Method 2: Using System Preferences
If you prefer a more direct approach to enable the Do Not Disturb feature on your MacBook, you can use System Preferences. System Preferences is a powerful tool that allows you to customize various settings on your MacBook, including the Do Not Disturb feature.
To access System Preferences, simply click on the Apple icon in the top-left corner of your screen, and then select “System Preferences” from the drop-down menu.
Once System Preferences opens, you will see a grid of different settings options. Look for the “Notifications” icon, which resembles a speech bubble. Click on it to open the Notifications settings.
Within the Notifications settings, you will find a list of different applications and their notification preferences. Scroll through the list and locate the “Do Not Disturb” option, which should be towards the top.
Toggle the “Do Not Disturb” switch to enable the feature. You can also customize the specific hours during which you want the Do Not Disturb feature to be active. This can be useful if you want to automatically block notifications during specific times, such as during meetings or while you sleep.
In addition to turning on the Do Not Disturb feature, System Preferences also allows you to configure other notification settings, such as the type of alerts you receive and how notifications are displayed on your MacBook.
Once you have made your desired changes, simply close the System Preferences window, and the Do Not Disturb feature will be enabled on your MacBook. You can easily disable it by following the same steps and toggling the switch back to the off position.
Using System Preferences to enable the Do Not Disturb feature on your MacBook provides a convenient and straightforward way to manage and control your notifications. Whether you need some uninterrupted work time or a peaceful evening without distractions, this method gives you the power to customize your notification preferences to suit your needs.
Method 3: Using Siri
If you’re a fan of using voice commands and have Siri enabled on your MacBook, you’ll be pleased to know that you can also use Siri to turn on Do Not Disturb. Siri is the virtual assistant developed by Apple that allows you to perform various tasks on your device using just your voice.
Here’s how you can use Siri to turn on Do Not Disturb on your MacBook:
1. Make sure Siri is enabled on your MacBook. To enable Siri, go to the Apple menu in the top-left corner of your screen, select “System Preferences,” then click on “Siri.” Enable the “Enable Ask Siri” option if it’s not already enabled.
2. Once Siri is enabled, you can activate it by either saying “Hey Siri” or by clicking on the Siri icon in the menu bar or Dock.
3. When Siri is activated, simply say, “Turn on Do Not Disturb.”
Siri will then enable Do Not Disturb on your MacBook, allowing you to focus on your work or enjoy some uninterrupted time without being bothered by notifications.
To turn off Do Not Disturb using Siri, simply say, “Turn off Do Not Disturb.”
Note that in order to use Siri, you need to have an internet connection as it relies on Apple’s servers for processing your voice commands.
Using Siri to turn on Do Not Disturb on your MacBook is a convenient and hands-free method, especially when you’re busy with your tasks and need to quickly enable Do Not Disturb mode without navigating through menus and settings.
However, keep in mind that Siri may not always accurately interpret your voice commands or may have difficulty understanding certain accents or pronunciations. If you encounter any issues with Siri, you can try enunciating your commands more clearly or using the on-screen methods described in the previous methods.
With Siri’s assistance, managing Do Not Disturb on your MacBook becomes effortless, allowing you to maintain your productivity and focus.
Conclusion
Turning on Do Not Disturb on your MacBook is a simple and effective way to minimize distractions and maintain focus on your work or leisure activities. By enabling this feature, you can ensure that notifications, alerts, and incoming calls do not interrupt your flow.
Whether you’re in a meeting, working on an important project, or just need some uninterrupted time, Do Not Disturb provides the peace and quiet you need. With just a few clicks, you can easily activate and customize this feature to suit your preferences.
Remember to take advantage of the flexibility Do Not Disturb offers, allowing you to schedule quiet hours and set exceptions for important contacts or apps. This ensures that you can stay connected when necessary while still controlling the interruptions that can affect your productivity.
So, go ahead and explore the Do Not Disturb feature on your MacBook and enjoy a more focused and undisturbed user experience!
FAQs
1. How do I turn on Do Not Disturb on my MacBook?
To turn on Do Not Disturb on your MacBook, you can follow these steps:
- Click on the Apple menu in the top-left corner of the screen.
- Select “System Preferences” from the drop-down menu.
- Choose the “Notifications” option.
- In the Do Not Disturb section, check the box next to “Turn on Do Not Disturb.”
- You can also set specific time periods for Do Not Disturb to automatically activate if desired.
2. Can I customize the settings for Do Not Disturb on my MacBook?
Yes, you can customize the settings for Do Not Disturb on your MacBook. In the “Notifications” section of System Preferences, you can adjust various options such as allowing calls from certain contacts, allowing repeated calls to go through, and choosing whether to receive notifications when the display is sleeping. You can also set scheduled times for Do Not Disturb to activate automatically.
3. Will I still receive phone calls and messages when Do Not Disturb is turned on?
When Do Not Disturb is turned on, notifications and alerts will be silenced on your MacBook, but calls and messages will still come through. However, you can customize the settings to allow calls from specific contacts or allow repeat calls to come through in case of emergencies.
4. Can I turn on Do Not Disturb for a specific application only?
No, the Do Not Disturb feature on MacBook is system-wide, meaning it will apply to all applications and notifications on your device. It is not possible to turn on Do Not Disturb for a specific application only.
5. Can I schedule Do Not Disturb to automatically turn on and off at specific times?
Yes, you can schedule Do Not Disturb to automatically turn on and off at specific times on your MacBook. In the “Notifications” section of System Preferences, you can set the start and end times for Do Not Disturb to ensure uninterrupted focus during certain hours or while you’re sleeping.