
With the release of iOS 13 and iPadOS, Apple has introduced a new feature that allows users to easily add accessibility features to the Control Center on their iPhones and iPads. This update aims to make it more convenient for individuals with disabilities or specific accessibility needs to access and adjust important settings on their devices.
By customizing the Control Center, users can quickly enable or disable a variety of accessibility features, such as VoiceOver, Magnifier, AssistiveTouch, and more. Whether it’s adjusting font sizes, enabling visual or auditory enhancements, or activating voice commands, these options provide users with a seamless way to tailor their iPhone or iPad to their specific needs.
In this article, we will guide you through the process of adding accessibility features to the Control Center on your iPhone or iPad, ensuring that your device is optimized for a more inclusive and user-friendly experience.
Inside This Article
- Customizing the Control Center on iOS 13 & iPadOS
- Adding Accessibility Features to the Control Center
- Enabling Voice Control on the iPhone & iPad
- Configuring AssistiveTouch for Easier Device Navigation
- Conclusion
- FAQs
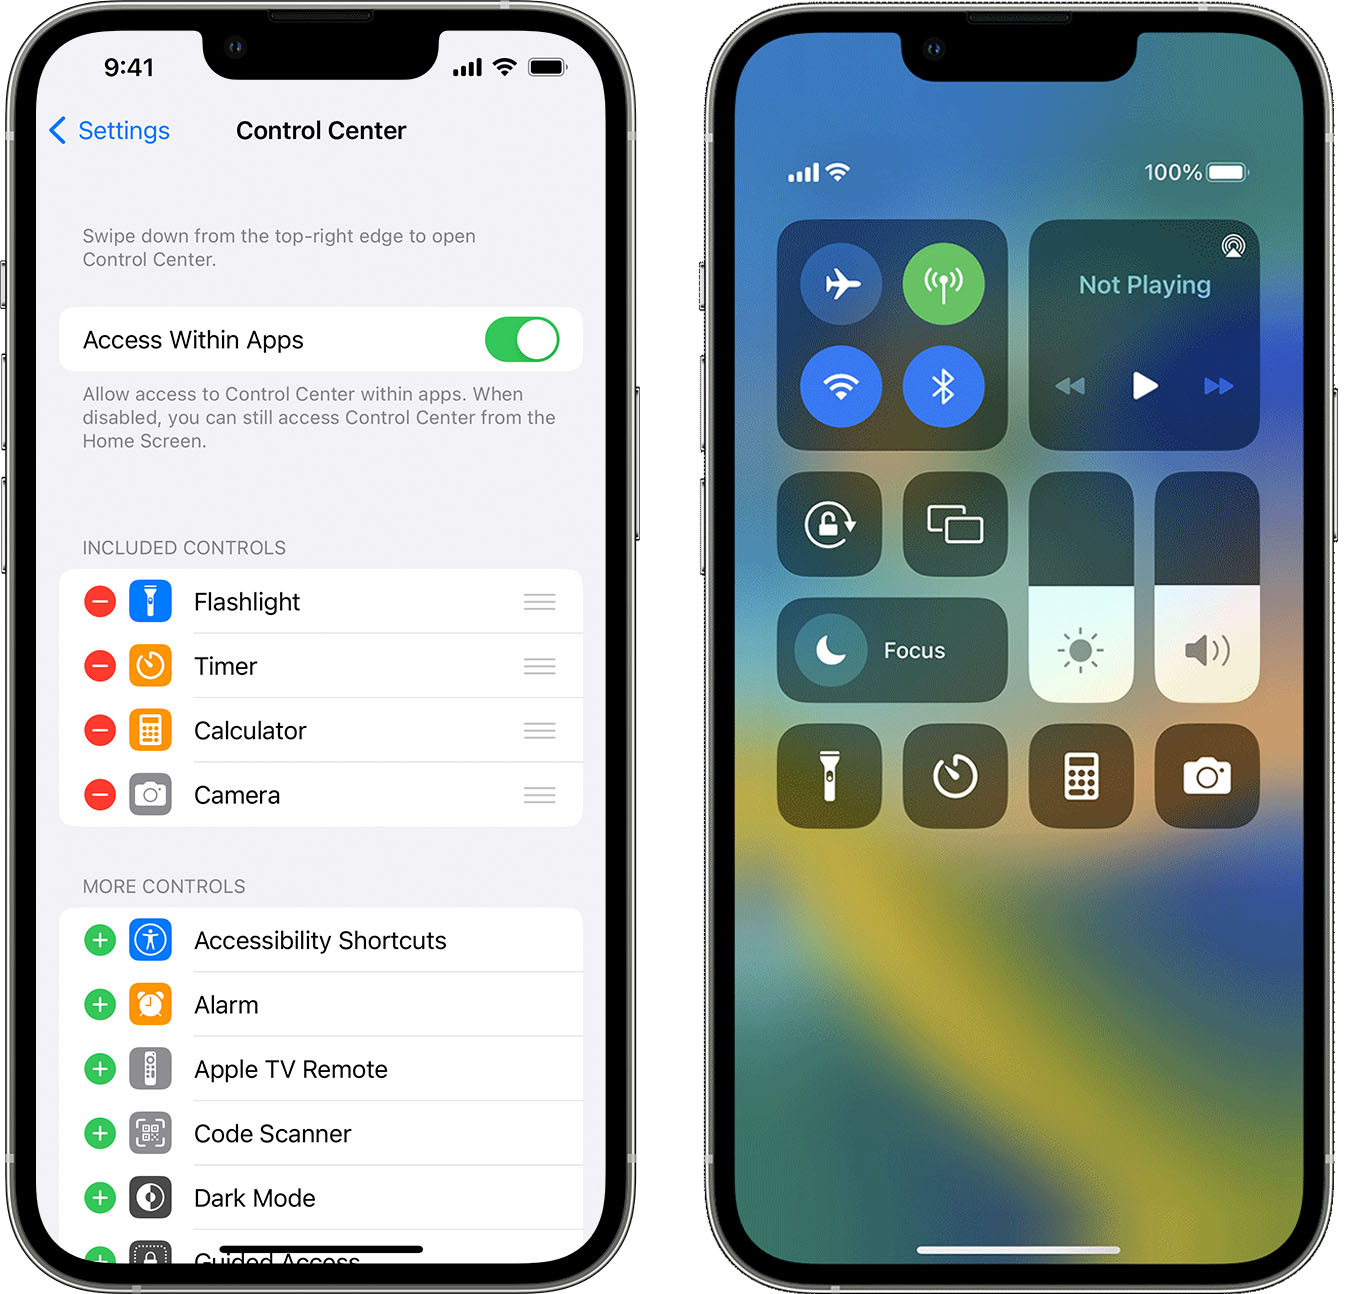
Customizing the Control Center on iOS 13 & iPadOS
The Control Center is a convenient feature on iOS devices that allows you to quickly access various settings and functions. With iOS 13 and iPadOS, Apple has made it even easier to customize the Control Center according to your preferences. Whether you want to add or remove certain features, rearrange the layout, or even include accessibility options, you have the flexibility to tailor the Control Center to your specific needs.
Here’s how you can customize the Control Center on your iPhone or iPad running iOS 13 or iPadOS:
- Open the Settings app on your device.
- Scroll down and tap on “Control Center.”
- Here, you will see a list of available controls that can be added to the Control Center.
- To add a control, simply tap the green “+”” button next to it.
- To remove a control, tap the red “-” button next to it.
- You can also rearrange the order of controls by tapping and holding the three horizontal lines next to a control and dragging it to your desired position.
- In addition to the default controls, you can also add accessibility features to the Control Center.
By customizing the Control Center, you can ensure that the features you use frequently are easily accessible with just a swipe and a tap, making your iPhone or iPad even more convenient to use. So go ahead, take a few moments to personalize your Control Center and streamline your device’s functionality.
Adding Accessibility Features to the Control Center
The Control Center on your iPhone or iPad is a convenient hub that gives you quick access to various settings and features. With the introduction of iOS 13 and iPadOS, Apple has expanded the capabilities of the Control Center, allowing you to add accessibility features for easy access and customization.
To add accessibility features to the Control Center, follow these simple steps:
- Open the “Settings” app on your iPhone or iPad.
- Tap on “Control Center.”
- Scroll down and select “Customize Controls.”
- Under the “More Controls” section, you will find a list of additional features that can be added to the Control Center.
- Look for the accessibility features you want to include, such as “Voice Control” or “AssistiveTouch,” and tap the green “+” button next to each feature to add it to the Control Center.
- Once you have added the desired accessibility features, swipe up from the bottom of your screen (or from the top right corner on iPhone X and newer models) to open the Control Center. You will now see the new accessibility controls conveniently located for easy access.
By adding accessibility features to the Control Center, you can quickly enable or disable important settings without navigating through multiple menus. This makes it more efficient and convenient for users with disabilities or those who require additional assistance with their devices.
Additionally, customizing the Control Center allows you to personalize your device by putting your most frequently used accessibility features front and center. Whether it’s adjusting screen brightness, activating VoiceOver, or using magnification, having quick access to these features can greatly enhance your overall user experience.
Moreover, the ability to add accessibility features to the Control Center demonstrates Apple’s commitment to making their products inclusive and accessible to all users. They continue to prioritize accessibility, ensuring that individuals with disabilities can fully utilize their devices and enjoy the benefits of modern technology.
So go ahead and take advantage of the enhanced functionality of the Control Center by adding accessibility features. It’s just another way Apple is making it easier for everyone to use their iPhones and iPads.
Enabling Voice Control on the iPhone & iPad
Voice Control is a powerful accessibility feature available on iOS 13 and iPadOS that allows users to control their iPhone or iPad using just their voice. It opens up a whole new level of accessibility for individuals with motor disabilities or those who prefer hands-free interaction with their devices. Enabling Voice Control is easy and straightforward, and this article will guide you through the process.
To enable Voice Control on your iPhone or iPad, follow these simple steps:
- Open the Settings app on your device.
- Scroll down and tap on “Accessibility”.
- Tap on “Voice Control” under the “Physical and Motor” section.
- Toggle the switch next to “Voice Control” to turn it on.
- Upon enabling Voice Control, you will see a pop-up message explaining the basic voice commands. Take a moment to familiarize yourself with these commands as they will be your primary means of controlling your device.
With Voice Control enabled, you can perform a wide range of tasks using just your voice. Here are a few examples:
- Open apps: Simply say “Open [app name]” to launch any app installed on your device.
- Navigate through menus: Use commands like “Swipe left”, “Tap home”, or “Scroll down” to interact with different elements on the screen.
- Compose messages: Dictate your messages by saying “Compose message” followed by the recipient’s name and the content of the message.
- Control media playback: Say commands like “Play”, “Pause”, “Next track”, or “Volume up” to control media playback on your device.
Additionally, you can customize voice commands and create custom labels for buttons and controls to make Voice Control even more tailored to your specific needs. The advanced settings for Voice Control allow you to refine its behavior and adapt it to your preferences.
It’s important to note that Voice Control requires an internet connection to process your voice commands in real-time. So, ensure that you have a stable internet connection for the best experience.
Voice Control is a remarkable feature that empowers users with accessibility needs to fully interact with their iPhone or iPad using just their voice. It breaks down barriers and offers a more inclusive user experience. Give Voice Control a try and discover a whole new level of accessibility on your device.
html
Configuring AssistiveTouch for Easier Device Navigation
AssistiveTouch is a useful accessibility feature that allows individuals with motor skill impairments to navigate their iPhone or iPad more easily. By configuring AssistiveTouch, users can perform various actions using customizable gestures and on-screen buttons. Here’s how to set up and customize AssistiveTouch for easier device navigation:
1. Open the Settings app on your iPhone or iPad.
2. Tap on “Accessibility.”
3. Scroll down and tap on “Touch.”
4. Tap on “AssistiveTouch.”
5. Toggle the switch to enable AssistiveTouch.
6. Once enabled, you can customize the settings for AssistiveTouch to suit your needs. This includes:
- Customizing the top-level menu: You can choose which actions or features to include in the AssistiveTouch menu.
- Creating custom gestures: You can create your own gestures to perform specific actions, such as pinching or swiping.
- Adding virtual buttons: You can add virtual buttons to the AssistiveTouch menu, making it easier to access commonly used functions.
- Adjusting the idle opacity: You can adjust the transparency of the AssistiveTouch menu when it is inactive.
7. To customize the top-level menu, tap on “Customize Top-Level Menu.”
8. Tap on the “+” button to add actions or features to the menu, or tap on the “-” button to remove them.
9. To create a custom gesture, tap on “Customize Gestures.”
10. Tap on “Create New Gesture.”
11. Follow the on-screen instructions to record your gesture.
12. To add virtual buttons, tap on “Customize Top-Level Menu” and then tap on the “+” button to select “Custom.” You can choose from a range of virtual button options.
13. To adjust the idle opacity, go back to the main AssistiveTouch settings and tap on “Idle Opacity.”
By configuring AssistiveTouch to your preferences, you can navigate your iPhone or iPad more comfortably, making it easier to interact with your device’s functions and features. Experiment with different customization options to find what works best for you.
Conclusion
The Control Center in iOS 13 and iPadOS brings a whole new level of accessibility to the iPhone and iPad. With the ability to customize and add accessibility features to the Control Center, users can easily access and enable important accessibility options with just a swipe and a tap.
From quick access to features like VoiceOver, Magnifier, and Smart Invert, to toggling on/off AssistiveTouch and Switch Control, the Control Center puts these capabilities right at your fingertips. This makes it incredibly convenient for individuals with visual impairments, hearing impairments, motor difficulties, and other accessibility needs to customize their device to best suit their requirements.
Whether you’re a user who benefits from these features or someone who wants to make their iPhone or iPad more accessible for others, take advantage of the Control Center customization options and unlock the true potential of your iOS 13 or iPadOS device.
FAQs
FAQs are commonly asked questions about adding accessibility features to the iPhone and iPad Control Center with iOS 13 and iPadOS. Here are some answers to help you out:
1. How do I access the Control Center on my iPhone or iPad?
To access the Control Center on your iPhone or iPad, simply swipe down from the top-right corner of the screen on iPhone X or later models, or swipe up from the bottom of the screen on earlier iPhone models and iPad devices.
2. How can I customize the Control Center on my device?
To customize the Control Center on your device, go to Settings, then tap on Control Center. From there, you can add or remove controls as per your preference.
3. Can I add accessibility features to the Control Center?
Yes, with iOS 13 and iPadOS, you can add accessibility features to the Control Center. This makes it convenient to access important features like VoiceOver, Magnifier, and AssistiveTouch with just a swipe or tap.
4. How do I add accessibility features to the Control Center?
To add accessibility features to the Control Center, go to Settings, then tap on Control Center, and choose “Customize Controls.” From there, scroll down to “Accessibility Shortcuts” and tap on the green “+” button next to the features you want to add. These features will then appear in the Control Center for easy access.
5. Can I rearrange the order of the accessibility features in the Control Center?
Yes, you can rearrange the order of the accessibility features in the Control Center. To do this, go to Settings, then tap on Control Center, and choose “Customize Controls.” From there, touch and hold the three horizontal lines next to the feature you want to move, then drag it to the desired position.
These are just a few of the frequently asked questions about adding accessibility features to the iPhone and iPad Control Center. If you have any other questions, feel free to reach out for further assistance.