
Are you tired of printing out documents just to sign them and then scan or fax them back? Well, there’s a simpler and more efficient solution available for Mac users – using your iPhone or iPad to sign email attachments directly on your Mac! With the seamless integration of Apple devices, signing documents has never been easier. In this comprehensive guide, we will walk you through the step-by-step process of using your iOS device to sign email attachments on your Mac. Whether you’re a business professional, student, or just someone who needs to sign documents regularly, this method will save you time and effort. So, let’s dive in and harness the power of your iPhone or iPad to streamline your document signing process on your Mac!
Inside This Article
- Step 1: Enable iCloud Keychain on your iPhone or iPad
- Step 2: Sign the document using Markup on your iPhone or iPad
- Step 3: Send the signed document as an email attachment
- Step 4: Open the email on your Mac and save the signed document
- Conclusion
- FAQs
Step 1: Enable iCloud Keychain on your iPhone or iPad
To begin the process of signing an email attachment on your Mac using your iPhone or iPad, you’ll need to first enable iCloud Keychain on your iOS device. iCloud Keychain is a secure and convenient way to store and sync your passwords, credit card information, and other sensitive data across all your Apple devices.
To enable iCloud Keychain, follow these steps:
- Open the Settings app on your iPhone or iPad.
- Tap on your Apple ID at the top of the screen.
- Select “iCloud” from the list of options.
- Scroll down and tap on “Keychain”.
- Toggle the switch next to “Keychain” to enable it. You may be prompted to enter your Apple ID password.
Once iCloud Keychain is enabled, your passwords and other sensitive information will be securely stored and accessible across all your devices. This will allow you to seamlessly sign documents and attachments on your Mac using your iPhone or iPad.
Step 2: Sign the document using Markup on your iPhone or iPad
Once you have opened the document you want to sign on your iPhone or iPad, it’s time to use the Markup feature to add your signature. Markup is a built-in tool that allows you to annotate and make changes to PDFs, images, and documents on iOS devices. Here’s how you can use Markup to sign your document:
1. With the document open, tap on the Markup icon. This is usually represented by a pencil icon or a toolbox icon, depending on the app you’re using.
2. Look for the option to add your signature. In some apps, you may need to tap on the “+” button and select “Signature” from the menu.
3. If you have previously created a signature, you can select it from the list. Otherwise, you can choose to create a new signature by tapping on “Add or Remove Signature”.
4. To create a new signature, use your finger or a stylus to write your signature on the screen. You can adjust the size and position of your signature to fit the document.
5. Once you are satisfied with your signature, tap on “Done” or a similar button to save it.
6. You can now place your signature on the document by tapping on the location where you want it to appear. You can resize and move the signature as needed.
7. If you need to add any additional text or annotations to the document, you can use the available tools in Markup.
8. Once you have finished signing the document, make sure to save your changes. Some apps automatically save the document, while others may require you to explicitly save it. Check the app’s instructions for saving the document.
That’s it! You have successfully signed the document using Markup on your iPhone or iPad. Now, let’s move on to the next step of sending it as an email attachment.
Step 3: Send the signed document as an email attachment
Once you have signed the document using Markup on your iPhone or iPad, the next step is to send it as an email attachment to the intended recipient. Here’s how you can do it:
1. Open the Mail app on your iPhone or iPad. You can find the Mail app on your home screen or in the app drawer.
2. Tap on the compose button, which is usually represented by a pencil and paper icon. This will open a new email composition window.
3. Enter the recipient’s email address in the “To” field. You can also add other recipients if needed.
4. In the subject line, enter a brief and descriptive title for the email. This will help the recipient understand the purpose of the email.
5. Tap on the body of the email to start composing your message. You can add any additional information or instructions along with the signed document.
6. To attach the signed document, tap on the attachment icon, which is usually represented by a paperclip. This will open the file picker on your device.
7. Navigate to the location where the signed document is saved on your iPhone or iPad. This could be in the Files app or in a specific folder.
8. Once you find the signed document, tap on it to select it. You may be prompted to confirm the attachment before proceeding.
9. Once the attachment is selected, it will be added to your email. You may also see a preview of the attachment, depending on the file type.
10. Double-check the recipient’s email address, the subject line, the body of the email, and the attached document to ensure everything is accurate and complete.
11. Finally, when you are ready to send the email, tap on the send button. This is usually represented by an arrow pointing upwards. Your email, along with the signed document attachment, will be sent to the recipient’s email inbox.
By following these steps, you can easily send the signed document as an email attachment from your iPhone or iPad. This method allows you to conveniently share important documents with others without the need for printing, signing manually, or scanning.
Step 4: Open the email on your Mac and save the signed document
After sending the signed document as an email attachment from your iPhone or iPad, it’s time to open the email on your Mac and save the signed document. Here’s how you can do it:
1. Launch the Mail app on your Mac. You can find it in the Dock or by searching for “Mail” in Spotlight.
2. Navigate to the inbox or the folder where the email with the signed document is located.
3. Locate the email with the signed document attachment and double-click on it to open it.
4. Once the email is open, you will see the attached document. To save the signed document to your Mac, click on the “Save” button or use the keyboard shortcut “Command + S”.
5. Choose the desired location on your Mac where you want to save the signed document. You can select an existing folder or create a new one.
6. After selecting the location, click “Save” to save the signed document to your Mac.
7. Once the document is saved, you can access it anytime by going to the designated location on your Mac.
That’s it! You have successfully opened the email on your Mac and saved the signed document. Now you can use the signed document for your desired purpose, whether it’s submitting a form, sending it to someone else, or keeping it for your records.
Remember to delete the email with the attached signed document from your inbox or any other folder to ensure the security and confidentiality of the document.
By following these simple steps, you can seamlessly transfer the signed document from your iPhone or iPad to your Mac, making it convenient and efficient to handle important paperwork without the need for printing or scanning. Embrace the power of Apple’s ecosystem and enjoy the seamless integration between your devices!
After exploring and understanding how to use your iPhone or iPad to sign email attachments on your Mac, you can now enjoy the convenience and efficiency it brings to your workflow. Gone are the days of printing, signing, and scanning documents. With the simple steps outlined in this article, you can quickly and easily sign attachments directly from your iOS device, saving time and effort.
By leveraging the power of Apple’s ecosystem and seamless integration between devices, you can streamline your document signing process and go paperless. Whether you’re a business professional, student, or anyone who frequently deals with email attachments, this feature helps you stay productive and organized. Now, you can confidently send signed documents directly from your iPhone or iPad, ensuring a smooth and hassle-free experience.
So, grab your iPhone or iPad, follow the steps we’ve discussed, and take advantage of this valuable feature to sign email attachments on your Mac. Embrace the digital age and unlock the potential of your iOS device to simplify your document signing process.
FAQs
1. Can I use my iPhone or iPad to sign email attachments on Mac?
Yes, you can use your iPhone or iPad to sign email attachments on your Mac. With the built-in Continuity feature, you can seamlessly connect your Apple devices and sign documents using your iPhone or iPad while working on your Mac.
2. What do I need to sign email attachments on Mac using my iPhone or iPad?
To sign email attachments on your Mac using your iPhone or iPad, you need to ensure that both devices are using the same iCloud account and are connected to the same Wi-Fi network. You also need to have the latest versions of macOS and iOS/iPadOS installed on your devices.
3. How do I sign email attachments on Mac using my iPhone or iPad?
To sign email attachments on your Mac using your iPhone or iPad, follow these steps:
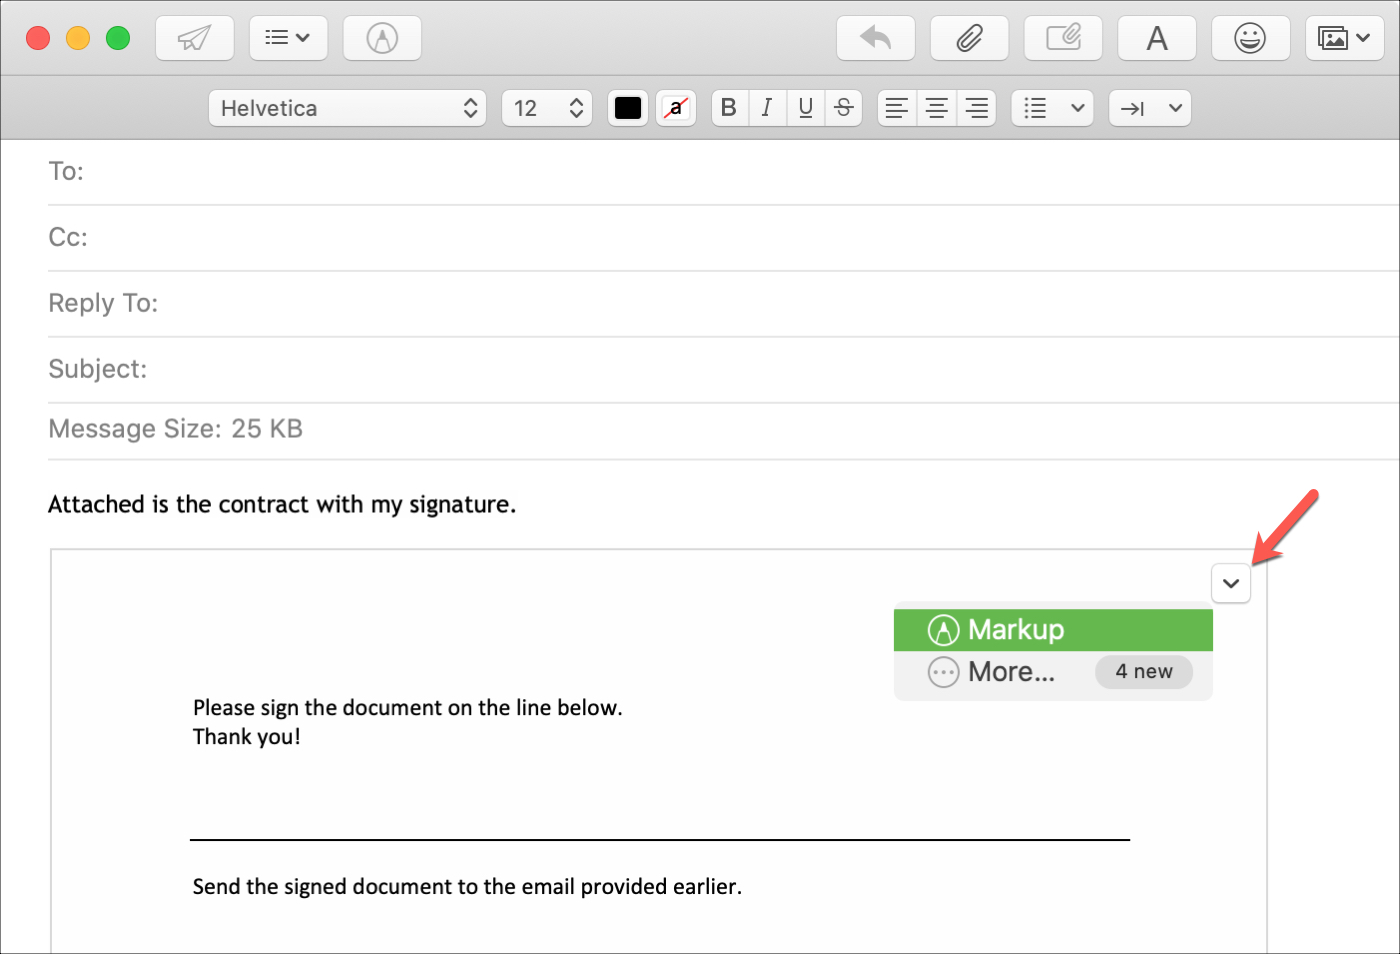
- Open the email on your Mac that contains the attachment you want to sign.
- Click the attachment to open it.
- On your iPhone or iPad, a notification will appear on the Lock screen or in the notification center. Tap the notification to open the document.
- Sign the document using the Markup feature on your iPhone or iPad.
- Once you’re done signing, the document will automatically sync back to your Mac with the signature applied.
4. Can I add additional text or annotations to email attachments using my iPhone or iPad?
Yes, you can add additional text or annotations to email attachments using your iPhone or iPad. The Markup feature allows you to draw, write, or type on the document, providing you with the flexibility to add any necessary comments or annotations before signing.
5. Are there any limitations to signing email attachments on Mac using my iPhone or iPad?
While signing email attachments on Mac using your iPhone or iPad is a convenient feature, there are a few limitations you should be aware of. Firstly, this method only works for attachments that are compatible with Markup, such as PDFs or image files. Additionally, your iOS or iPadOS device needs to have a supported version to ensure compatibility with the Mac. Lastly, both the Mac and the iPhone/iPad need to be connected to a Wi-Fi network to establish a secure connection for transferring the signed document.