
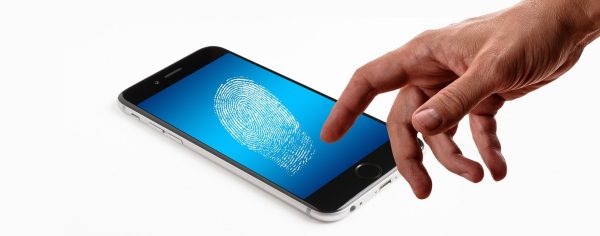
Touch ID, supported by the iPhone 8, the iPad Air (2020), and versions that came before those, is not just for gadget access and security. Besides the fingerprint recognition feature being a reliable unlocking method if you forgot your iPhone passcode, it can be used for approving your transactions. It safeguards your payments whether in the App Store, iTunes, or Apple Pay. That is why when the Touch ID is not working, it causes inconvenience in many ways and must be fixed as soon as possible.
Still using mobile devices relying on Touch ID instead of Face ID and the former feature is malfunctioning? There is no need to fret. Instead of resorting to an iPad or iPhone repair near you and waiting too long for service center repairs, learn how you can troubleshoot the problem easily via this handy guide.
Also Read: 6 Best Fixes When Face ID is Not Working
Why Touch ID is Not Working
Before you jump into the fixes, check our rundown of the usual causes so you can pick wisely the solutions to try later on. Below are the possible scenarios leading to the Touch ID issue:
1. Fingerprint Positioning Is Misaligned
Just like many Android gadgets, an Apple device has a biometric sensor that is sensitive. Even if the finger position is just slightly off the gadget’s fingerprint reader, that can already result in Touch ID not working. The problem can occur even during the first time you are registering your fingerprint.
2. Touch ID Sensor Is Blocked by Screen Protector
Screen protectors are not made equal. Some are too thick, not made to optimize the display’s responsiveness, or not precisely cut to match the screen and Touch ID or home button sizes. That makes it difficult for your iPhone or iPad’s Touch ID sensor to read your full fingerprint.
3. Touch ID Sensor Is Dirty
Sweat, oil, smudges, and lint that accumulate as you use your Touch ID sensor button prevent your Apple device from detecting your fingerprint completely. As a result, your registered iPad or iPhone fingerprint is not working.
4. Touch ID Settings Are Toggled or Missing
The settings for the Touch ID are convenient to change thanks to the slider buttons; however, that means those are also easy to toggle accidentally. You might have hit the sliders or turned on a restriction as you were exiting the menu, and that is why the Touch ID won’t work.
5. iOS or iPadOS Has Errors
Sometimes, the underlying problem is in Apple’s operating system (OS) and not with the Touch ID sensor and settings. That is not surprising because any software, be it iOS or iPadOS, can have bugs even if it has just been rolled out on the App Store.
Solutions for Touch ID When It is Not Working
With you now being familiar with the possible reasons why your Touch ID is not working, you can already choose a solution. There are eight fixes below, and all should be easy to try even if you are not a technician or expert in troubleshooting Apple devices.
1. Clean Touch ID Sensor Button

When the Touch ID is not working due to dirt, the solution is to clean the fingerprint reader. The sensor button can be made dust-, lint-, oil- or smudge-free once again by wiping it with a smooth cloth. There is no need to use alcohol or chemicals that might be harmful to the gadget.
2. Remove Screen Protector
If Touch ID was more responsive and accurate when you were using it without a device screen protector, better remove the said accessory. Either buy a replacement that does not compromise touchscreen sensitivity or invest in the best flip phone cases. The latter can protect your gadget’s display even without a screen guard.
3. Hard Restart iPhone or iPad

If the Touch ID was set as the primary method to unlock your iPhone or iPad and it won’t work, you might have to input your passcode instead after a few attempts. Sometimes, even the passcode input prompt might not be triggered by Touch ID. Given that, it is better to restart the device via the shortcut buttons to unlock it and try the other fixes. There is also a chance that the problem will be fixed by the hard restart, so follow the instructions below:
iPhone 8 Series
1. Press and release the Volume Up button.
2. Do the same for the Volume Down button.
3. Long-press the side button and let go once you see the Apple logo on the display.
iPhone 7 Series
1. Long-press the Sleep/Wake and Volume Down buttons at the same time.
2. Wait for the Apple logo to be shown on the device’s screen before releasing the buttons.
iPhone 6 Series
1. Long press the Sleep/Wake and Home buttons at the same time.
2. Wait for the device to shut down and wake up.
3. Once you see the Apple logo, release the buttons.
iPads with Home Button
1. Long press the Home and top buttons at the same time.
2. Wait for the Apple logo to be shown on the gadget’s screen.
3. Release the two buttons afterward.
iPads without Home Button
1. Press and release the Volume Up button on the side of the gadget, then the Volume Down button.
2. Hold the top button.
3. Let go of the top button as soon as you see the Apple logo.
4. Turn Touch ID Off and On
Whether you accidentally deactivated the fingerprint-recognition feature or not, switching it on or off then on usually solves the problem. As regards the latter, there is no exact reason why that works, but the effectiveness is like that of shaking a person to get him back into his senses.
Here is how to toggle on/off settings for Touch ID:
1. Tap your iPhone or iPad’s Settings icon via the app dashboard.
2. Select Touch ID & Passcode from the menu options.
3. Toggle the slider buttons for specific Touch ID functions indicated on the interface.

If you cannot find the Touch ID settings anywhere like what other Apple users report online, restart your gadget or toggle parental controls if the settings for that are on. You are already familiar with how to do the former, so below are instructions for the latter.
Here is how to turn on or off all parental control settings in Apple devices:
1. Go to your gadget’s Settings menu from the home screen.
2. Pick Screen Time from the interface options.
3. Select Content & Privacy Restrictions from the menu afterward.
4. Tap on the slider button of Content & Privacy Restrictions to switch off all restrictions temporarily.
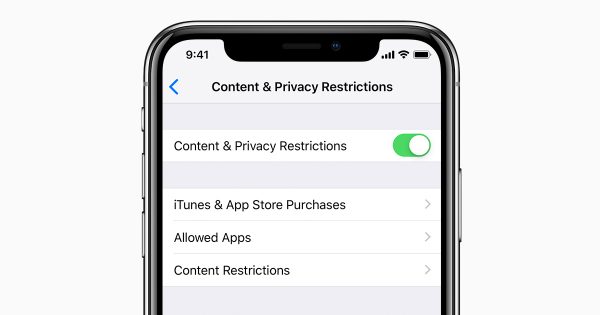
5. Tap on the slider button again to activate all restrictions, then check if the Touch ID settings are back.
5. Reposition Finger or Re-Register Fingerprints
When the Touch ID is not working, there could be a problem with the way you placed your finger or registered your fingerprint. To make the feature work again, try touching the sensor through different finger positions. Alternatively, you can remove the registered fingerprint, then add a new one to the device.
In terms of fingerprint enrolment, you know for sure how to do it via the Touch ID sensor but the question is whether you are doing it the right way. To help you with that, here is a refresher on making your iPhone or iPad get an accurate fingerprint scan.
Do the following when re-registering a fingerprint:
1. Select the Settings icon from your Apple device’s app dashboard.
2. Tap Touch ID & Passcode from the available options.
3. Input your passcode when requested by the gadget.
4. Choose the name of your previously registered fingerprint (e.g. Finger 1), then tap Delete Fingerprint.
5. Look for and pick Add a Fingerprint from the list of options.
6. Once the fingerprint scan interface is onscreen, follow the prompts.
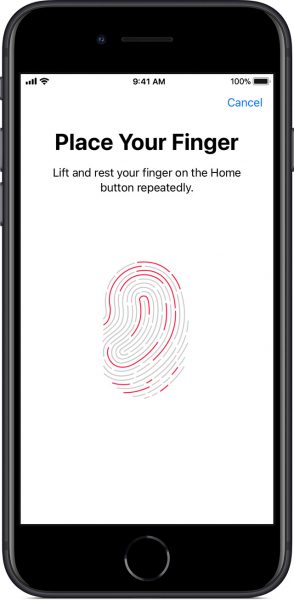
7. When placing your finger, cover the entire sensor or button but do not touch it too lightly or strongly.
8. After a few presses, wait for the prompt that instructs you to scan the sides of your finger.
9. When registering the sides of your finger, do not lift your finger too fast.
10. Wait for the device to confirm that registration is successful.
Register more than one fingerprint, so that you can use an alternative finger when one is not recognized by the device. Also, rename your fingerprints instead of settling with the default “Finger 1, 2, and 3” labels. That helps you avoid the accidental deletion of a working fingerprint.
6. Update iOS or iPadOS
When the solutions that work on the Touch ID sensor and its settings are not effective on your end, you can try the methods that fix the device’s system. The first of those is to switch to the latest version of your iPhone or iPad’s software.
Upgrading to the latest software often fixes some, if not all, bugs on Apple gadgets. That includes the error that leads to an iPad or iPhone fingerprint not working because device security is a priority in most software patches.
Here is how to update iOS or iPadOS:
1. Make sure your device is online by connecting it to a stable Wi-Fi network.
2. Launch your device’s settings menu via its app on the home screen.
3. Tap General from the available options.
4. Click Software Update from the menu options.
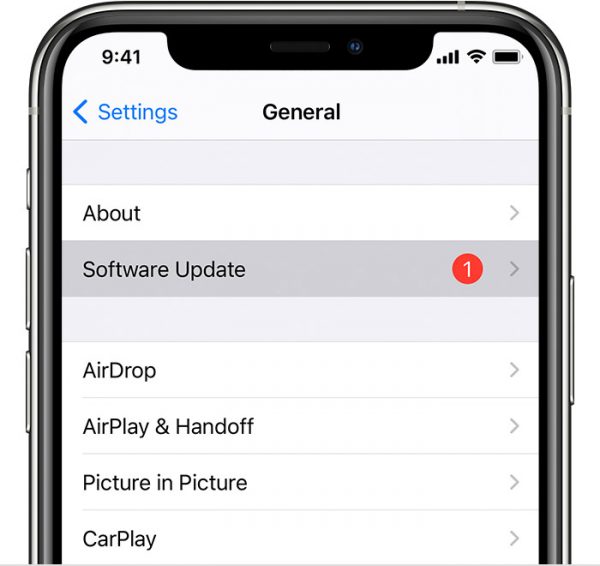
5. Hit Download and Install afterward.
6. Tap Install to update the software now.
7. Input your passcode if requested by the device.
7. Factory Reset iPhone or iPad
One more troubleshooting method you can try when most fixes fail is a factory reset. You will have to let go and create an iCloud backup of your iPhone or iPad’s existing settings, credentials, and information, though, if you decide to push through with the said solution.
The factory reset, although risky, is among the most effective solutions to every error imaginable. All that is needed is a few clicks here and there, and your device’s system will go back exactly to how it was when you first took it out of its box.
Follow these instructions to factory reset your Apple devices:
1. Access the Settings app from the home interface of your iPhone or iPad.
2. Select General from the Settings menu.
3. Once you are in the General menu, tap Reset.
4. Hit Erase All Content and Settings afterward.
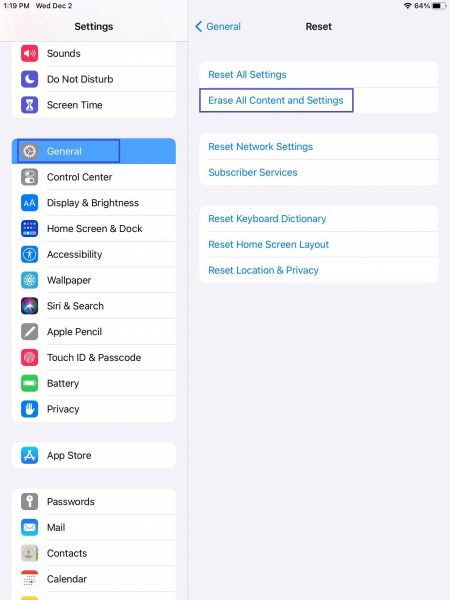
5. Type your passcode in the input field if requested by the iPhone or iPad.
6. Wait for the Apple device to restart into a clean default state.
The method above is the easiest way to make your gadget revert to its factory state to solve the Touch ID issue. In case it does not work, you can use iTunes and a computer or your device’s physical buttons, which we have discussed in detail in our iPhone factory reset guide.
8. Reach Out to Apple Support
In most scenarios, the solutions listed above should work. The only exception is when your Touch ID sensor or button has its internal parts damaged. If you accidentally dropped your iPhone or iPad and hear detached or broken internal components when you shake it, have the gadget checked by an Apple technician. Visit the Apple Support website or use its official app to reach out to an expert. The customer support team will aid you in getting a ticket and schedule for device repair.
Get Touch ID Working in a Few Taps
The Touch ID is loved by Apple fans because of its usefulness, whether for securing devices or transactions. In fact, when it got replaced by Face ID in the latest Apple releases, many users expressed their dismay and chose to stick to their old devices. Moreover, Touch ID is deemed safer than face detection that might be tricked by photos. It does not mean Touch ID does not have flaws, though, as you already know. The good thing is that you can now fix the feature whenever it malfunctions. Get your Touch ID working again in a few taps through the easy solutions we have shared here!