
The iPhone 13 has revolutionized the way we interact with our smartphones, and one of its standout features is the Face ID technology. Face ID allows users to unlock their iPhone, make secure payments, and access sensitive information with just a glance. But what if you want to add another face to your iPhone 13’s Face ID? Fortunately, Apple has made it incredibly simple to do so. In this article, we will guide you through the steps to seamlessly add another face ID to your iPhone 13. Whether you want to give access to a family member, a trusted friend, or even set up a secondary face ID for yourself, we’ve got you covered. So, let’s dive in and explore how to add another face ID to your iPhone 13!
Inside This Article
- How To Add Another Face ID To iPhone 13
- Face ID Overview
- Step 1: Setting Up Face ID for the First User
- Step 2: Enrolling Another Face ID
- Step 3: Testing and Verifying the Additional Face ID
- Conclusion
- FAQs
How To Add Another Face ID To iPhone 13
Face ID is a convenient and secure way to unlock your iPhone 13, but did you know that you can also add another person’s face to unlock it? It’s a useful feature that allows you to share your device with a family member or trusted friend. In this article, we’ll guide you through the steps to add another Face ID to your iPhone 13.
Enabling Face ID on iPhone 13
Before you can add another Face ID, make sure you have Face ID enabled on your iPhone 13. Here’s how to do it:
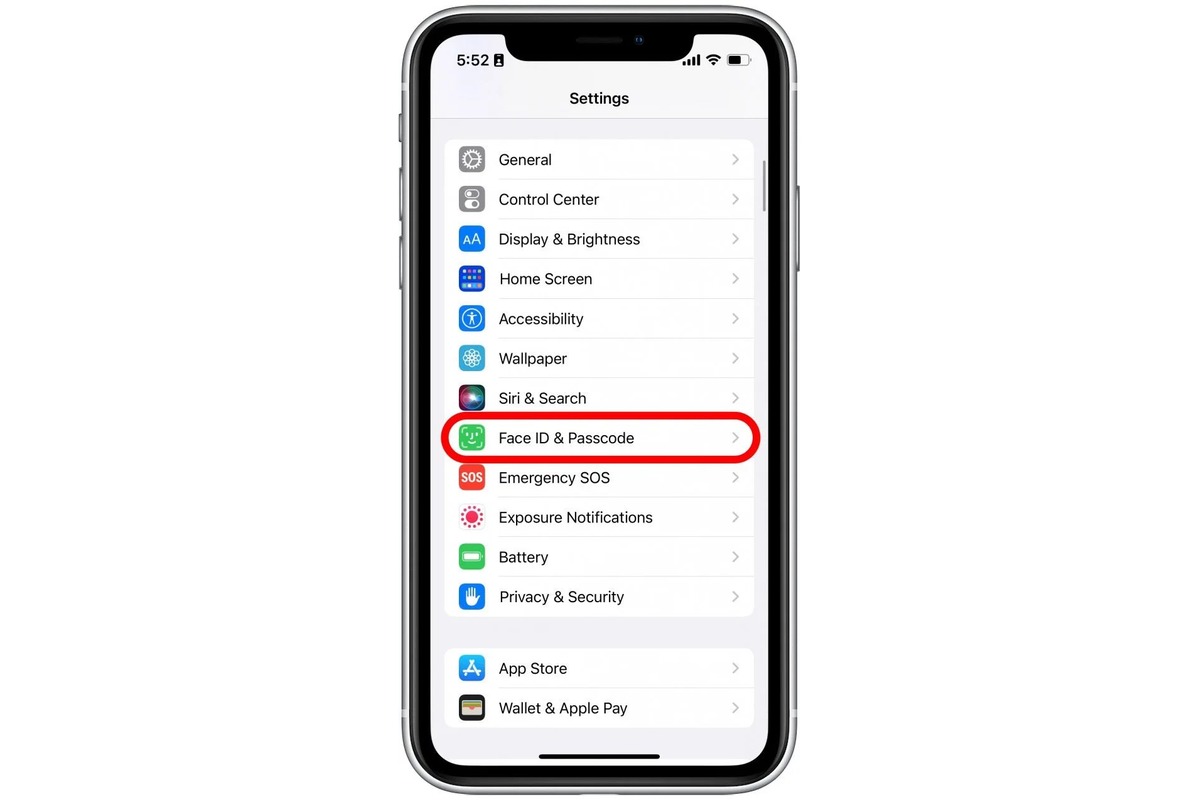
- Go to “Settings” on your iPhone 13.
- Scroll down and tap on “Face ID & Passcode”.
- Enter your passcode when prompted.
- Toggle the “iPhone Unlock” option to enable Face ID.
Registering a Second Face ID on iPhone 13
Once you have Face ID enabled, follow these steps to add another person’s face to your iPhone 13:
- Open “Settings” and go to “Face ID & Passcode”.
- Enter your passcode when prompted.
- Under the “Face ID” section, tap on “Set Up an Alternate Appearance”.
- Position the person’s face within the frame on the screen.
- Follow the on-screen instructions to complete the setup process.
It’s important to note that the second face will be recognized as an alternate appearance and not as the primary Face ID. This means that in some cases, the primary user’s face may still be recognized as the main Face ID.
Switching Between Face IDs on iPhone 13
With multiple Face IDs registered on your iPhone 13, you can easily switch between them. Here’s how:
- Unlock your iPhone 13 using the current Face ID.
- Swipe up from the bottom of the screen to access the Control Center.
- Tap on the Face ID icon.
- Select the Face ID you want to use from the list.
By switching between Face IDs, you can quickly and seamlessly have multiple people use the same iPhone 13 without having to manually add and remove Face IDs each time.
Troubleshooting Face ID on iPhone 13
If you encounter any issues with Face ID on your iPhone 13, here are a few troubleshooting steps you can try:
- Make sure there are no obstructions on your face or the TrueDepth camera.
- Ensure you are holding the iPhone at a proper distance and angle.
- Restart your iPhone and try setting up Face ID again.
- If all else fails, contact Apple Support for further assistance.
Adding another Face ID to your iPhone 13 provides an added level of convenience and accessibility for multiple users. Follow the steps outlined in this article to enable, register, and switch between Face IDs with ease. Now you can share your device with a trusted individual without compromising security.
Face ID Overview
Face ID is a revolutionary facial recognition technology that allows you to unlock your iPhone 13 and authenticate secure content with just a glance. It replaces the traditional Touch ID system with a more seamless and effortless experience. With Face ID, all you need to do is look at your device, and it will automatically recognize your unique facial features.
Face ID utilizes a sophisticated TrueDepth camera system, consisting of an infrared camera, flood illuminator, and dot projector. Together, these components create a detailed depth map of your face, capturing over 30,000 invisible dots and creating a unique facial data map. This data is securely stored in the iPhone’s Secure Enclave to ensure the privacy and protection of your personal information.
One of the key advantages of Face ID is its ability to adapt and recognize changes in your appearance over time. It can account for variations in facial hair, accessories, and even aging, making it a reliable and convenient authentication method. Additionally, Face ID is designed to work seamlessly in various lighting conditions, so you can unlock your iPhone 13 in bright sunlight or low-light environments.
Another noteworthy feature of Face ID is its ability to support multiple faces. This means you can register additional people, such as family members or close friends, to use their faces to unlock the device or access secured applications. Adding another Face ID to your iPhone 13 is a simple process that offers enhanced convenience for multiple users.
Overall, Face ID offers a secure, fast, and intuitive way to unlock your iPhone 13 and protect your private information. It combines cutting-edge technology with user-friendly functionality, providing a seamless and convenient authentication experience.
Step 1: Setting Up Face ID for the First User
Setting up Face ID on your iPhone 13 is a simple process that enhances the security and convenience of unlocking your device. To get started with Face ID, follow these steps:
- Open the Settings app on your iPhone 13.
- Scroll down and tap on Face ID & Passcode.
- Enter your passcode when prompted to continue.
- Tap on Enroll Face and follow the on-screen instructions.
- Position your face within the frame and gently move your head in a circular motion.
- Once the scan is complete, you can choose to set up an alternate appearance if desired.
- Continue the enrollment process by tapping on Continue.
- Face ID will now be set up for the first user on your iPhone 13.
By completing these steps, you have successfully set up Face ID for the first user on your iPhone 13. This user will now be able to unlock the device and authenticate various actions by simply looking at the screen.
Step 2: Enrolling Another Face ID
If you are looking to add an additional Face ID to your iPhone 13, you’re in luck! Apple allows you to register multiple faces on your device, making it convenient for you and your loved ones to unlock the phone using Face ID. Follow these simple steps to enroll another Face ID on your iPhone 13:
1. Start by unlocking your iPhone and accessing the Home screen.
2. Open the “Settings” app, which can be identified by the gear icon.
3. Scroll down and tap on “Face ID & Passcode”. You will be prompted to enter your passcode for authentication.
4. Once you have successfully entered your passcode, you will see the “Face ID” section on the screen.
5. Tap on “Set Up an Alternate Appearance” to initiate the process of enrolling another Face ID.
6. Follow the on-screen instructions that guide you through the process of positioning your face within the frame. Make sure to rotate your face slightly to capture different angles.
7. Once you have completed the enrollment, tap on “Continue” to finalize the process.
8. The new Face ID will be added to your iPhone 13, and you will have the option to use either Face ID when unlocking your device or authorizing purchases.
That’s it! You have successfully enrolled another Face ID on your iPhone 13. Now you can easily switch between the different Face IDs registered on your device depending on who is using it.
Note: Enrolling multiple Face IDs can be beneficial when multiple people share the same iPhone or when you want to have a backup Face ID in case one fails to recognize your face.
Step 3: Testing and Verifying the Additional Face ID
Once you have successfully registered the second Face ID on your iPhone 13, it’s time to test and verify its functionality. Follow the easy steps below to ensure that both Face IDs are working seamlessly:
1. Lock your iPhone 13 by pressing the side button or letting it automatically lock.
2. Wake up your device by tapping the screen, picking it up, or using the side button.
3. Look at the iPhone 13 screen, ensuring that your face is well-positioned to be recognized by the Face ID sensors.
4. If the iPhone 13 successfully recognizes your face and unlocks, this means that the primary Face ID is functioning correctly. You can verify this by checking if the lock icon on the screen animates and the device unlocks promptly.
5. To test the additional Face ID, simply repeat the process mentioned above. Instead of using your face, position the device in a way that the registered second face is facing the Face ID sensors.
6. If the additional Face ID is working as intended, your iPhone 13 should unlock effortlessly. Again, verify this by checking if the lock icon animates and the device unlocks promptly.
By performing these simple tests, you can ensure that both Face IDs on your iPhone 13 are set up correctly and functioning accurately. This provides you with the convenience of unlocking your device with any of the registered faces effortlessly.
Conclusion
In conclusion, adding another Face ID to your iPhone 13 is a convenient and secure way to protect your device and enhance your user experience. With the advancements in facial recognition technology, Apple has made it easier than ever to set up multiple Face IDs on your device, thereby allowing multiple users to access the device seamlessly.
Whether you want to share your device with a family member or simply want the option of using different Face IDs for different purposes, the iPhone 13 offers flexibility and convenience. The process of adding another Face ID is simple and intuitive, ensuring that anyone can set it up without any hassle.
By utilizing the Face ID feature on your iPhone 13, you can ensure that only authorized individuals are able to unlock your device, providing an added layer of security to protect your personal information. With the ability to easily switch between different Face IDs, you can personalize your device to meet your specific needs and preferences.
So, go ahead and explore the options to add another Face ID to your iPhone 13. Enjoy the convenience, security, and personalization that multiple Face IDs can bring to your device.
FAQs
FAQ 1: Can I add another Face ID to my iPhone 13?
Yes, you can add another Face ID to your iPhone 13. Apple’s Face ID technology allows you to set up multiple faces to unlock your device and authenticate app purchases. This feature is especially useful for shared devices or if you want to grant access to someone else, such as a family member or trusted friend.
FAQ 2: How do I add another face to Face ID on iPhone 13?
To add another face to Face ID on your iPhone 13, follow these steps:
- Open the Settings app on your iPhone 13.
- Scroll down and tap on “Face ID & Passcode.”
- Enter your passcode to continue.
- Select “Set Up an Alternate Appearance.”
- Follow the on-screen instructions to scan your face from different angles.
- Once the scanning process is complete, your alternate appearance will be added to Face ID.
You can now unlock your iPhone 13 using either your original Face ID or the newly added face.
FAQ 3: How many faces can I add to Face ID on iPhone 13?
With the iPhone 13, you can add up to two faces to Face ID. This means you can have your own face registered, along with an additional face of another person. It’s a convenient feature for those who share their device or want to grant access to someone else.
FAQ 4: Can I remove a face from Face ID on my iPhone 13?
Yes, you can remove a face from Face ID on your iPhone 13. To do this, follow these steps:
- Open the Settings app on your iPhone 13.
- Scroll down and tap on “Face ID & Passcode.”
- Enter your passcode to continue.
- Select “Reset Face ID.”
- Choose the face you want to remove from the list.
- Confirm the action by tapping on “Delete Face.”
By removing a face, it will no longer be recognized by Face ID on your iPhone 13.
FAQ 5: Can Face ID recognize faces with accessories?
Face ID on the iPhone 13 is designed to work with accessories such as glasses, hats, and scarves, as long as they don’t obstruct a significant portion of your face. Accessories such as masks might affect Face ID’s accuracy as they can cover a large area of your face. In such cases, you might need to enter your passcode manually to unlock your device.