
Are you looking for a way to keep your photos and videos on your iPhone secure and private? Creating a locked album on your iPhone is a great solution. With a locked album, you can store your sensitive or personal media without worry, knowing that only you can access them.
In this article, we will guide you through the process of creating a locked album on your iPhone, step by step. We will also provide some useful tips and tricks to optimize the security of your album, ensuring that your private media remains safe from prying eyes.
Whether you want to protect your personal memories, sensitive documents, or anything that you don’t want others to see, this article will provide you with the necessary instructions and insights to accomplish your goal. So, let’s get started and learn how to make a locked album on your iPhone.
Inside This Article
- Setting Up a Password-Protected Folder
- Importing Photos to the Locked Album – Selecting and Importing Photos from Camera Roll – Moving Photos from Existing Albums to the Locked Album
- Managing and Accessing the Locked Album- Adding and Removing Photos from the Locked Album- Viewing and Editing the Locked Album
- Additional Security Measures
- Conclusion
- FAQs
Setting Up a Password-Protected Folder
Protecting your personal information and sensitive files on your iPhone is essential. One way to safeguard your data is by setting up a password-protected folder. Here, we will explore three different methods to achieve this:
- Enabling “Notes” App Password Lock: The “Notes” app on your iPhone offers a built-in password lock feature. To enable it, go to the Settings app, select “Notes,” and then tap “Password.” Follow the on-screen instructions to set a password for your notes. Now, any notes you create within the app will require the password to access.
- Creating a Locked Folder on “Files” App: If you prefer to store other files besides notes in a password-protected folder, you can use the “Files” app. Open the app, go to the location where you want to create the folder (either locally on the device or in a cloud storage service), and tap the “Select” button. Then, tap the “New Folder” button, name the folder, and tap “Done.” Finally, select the folder, tap the three-dot menu icon, select “Encrypt,” and set a password for the folder.
- Using Third-Party Apps for Security: In addition to the built-in options, there are several third-party apps available on the App Store that offer advanced security features and password protection for your files and folders. Some popular ones include “Secure Folder,” “Folder Lock,” and “Private Photo Vault.” Install and configure one of these apps according to your preference, and start securing your sensitive files.
By following these methods, you can create password-protected folders on your iPhone and ensure that your personal data remains protected from unauthorized access.
Importing Photos to the Locked Album – Selecting and Importing Photos from Camera Roll – Moving Photos from Existing Albums to the Locked Album
Once you have successfully set up a password-protected folder on your iPhone, it’s time to populate it with the photos you want to keep secure. There are two main ways to import photos into the locked album: selecting and importing photos from the camera roll and moving photos from existing albums.
To select and import photos from the camera roll, follow these steps:
- Open the locked album app or the app associated with the password-protected folder you created.
- Navigate to the camera roll or photo gallery within the app.
- Tap on the photos you want to import into the locked album. You can select multiple photos by tapping on each photo individually or using the select option to choose multiple photos at once.
- Once you have selected the photos, look for an option to import or move them to the locked album. This option may vary depending on the app you are using, but it is typically represented by an icon resembling a folder with an arrow pointing into it.
- Tap on the import/move option, and the selected photos will be transferred to the locked album.
If you already have existing albums on your iPhone and want to move specific photos to the locked album, here’s what you need to do:
- Open the app that contains the existing album where the desired photos are located.
- Navigate to the album and tap on it to open it.
- Look for an option to select photos within the album. This can usually be done by tapping on the select button, which will allow you to choose multiple photos.
- Select the photos you want to move to the locked album.
- After selecting the desired photos, look for an option to move or transfer them to another album. This option is usually represented by an icon resembling a folder with an arrow pointing out of it.
- Tap on the move/transfer option and choose the locked album as the destination.
- The selected photos will now be moved to the locked album, ensuring their protection.
These methods provide a straightforward way to import photos into a locked album, allowing you to keep your sensitive or private pictures secure.
Managing and Accessing the Locked Album- Adding and Removing Photos from the Locked Album- Viewing and Editing the Locked Album
Once you have set up a locked album on your iPhone, managing and accessing it becomes a breeze. Whether you want to add or remove photos or simply view and edit the contents, you have full control over your locked album’s content.
To add photos to your locked album, you can follow a straightforward process. Open the photo app on your iPhone and navigate to the desired album or camera roll. Select the photos you want to add to the locked album by tapping on them. Look for the share icon (usually represented by a box with an arrow pointing upward) and tap on it. From the options that appear, select the “Add to Notes” or “Save to Files” feature.
If you choose the “Add to Notes” option, you will be prompted to choose a note to add the photos to. Select your locked folder that you created using the Notes app’s password lock feature. The selected photos will be added to the locked album, keeping them secure and hidden from prying eyes.
On the other hand, if you prefer to save the photos to the “Files” app, follow a similar process. When prompted to choose a location to save the photos, select the locked folder you created within the “Files” app. The photos will be added to the locked album, ensuring their privacy and protection.
When it comes to removing photos from the locked album, the process is just as simple. Open the locked album, select the photos you want to remove, and look for the delete option. This option is usually represented by a trash bin icon or the word “Delete.” Once you confirm the deletion, the selected photos will be permanently removed from the locked album.
Viewing and editing the contents of your locked album can be done with ease. To view the photos, open the locked album by unlocking it using the password or biometric authentication set up for the Notes or Files app. Once inside the album, you can browse through the photos, zoom in or out, and even create a slideshow to enjoy the moments captured.
If you wish to make edits to the photos within the locked album, you can use the editing tools provided by the photo app. These tools allow you to crop, adjust brightness and contrast, apply filters, and much more. Once you have made the desired changes, the edited photos will remain securely stored in the locked album.
Managing and accessing your locked album on an iPhone provides you with the peace of mind that your private photos are protected. By following these simple steps, you can add or remove photos, view and edit the contents, and maintain the utmost privacy for your personal memories.
Additional Security Measures
When it comes to securing your locked album on iPhone, there are several additional security measures you can take to further safeguard your personal photos and data. These measures include enabling two-factor authentication, using Touch ID or Face ID for extra protection, and regularly updating iOS for security enhancements.
1. Enabling Two-Factor Authentication:
Two-factor authentication (2FA) adds an extra layer of security to your iPhone. Once enabled, you will be required to enter a verification code in addition to your password when signing in to your Apple ID or iCloud account. This ensures that even if someone manages to obtain your password, they still won’t be able to access your account or the locked album without the verification code.
2. Using Touch ID or Face ID for Extra Protection:
If your iPhone supports Touch ID or Face ID, you can use these biometric authentication methods to unlock your device and provide an extra layer of protection for your locked album. With Touch ID, you can use your fingerprint to authenticate, while with Face ID, your device scans your face for authentication. This adds an additional security measure as it requires your unique fingerprint or facial features to unlock the device and access the locked album.
3. Regularly Updating iOS for Security Enhancements:
Apple regularly releases updates to iOS to enhance the security of its devices. It is crucial to keep your iPhone’s operating system up to date by installing the latest iOS updates as soon as they become available. These updates often include important security patches and fixes that can help protect your device from potential vulnerabilities and threats. By keeping your iOS updated, you are ensuring that your locked album and other sensitive data on your iPhone remain secure.
By implementing these additional security measures, you can strengthen the protection of your locked album on iPhone. Enabling two-factor authentication, using biometric authentication methods like Touch ID or Face ID, and regularly updating iOS will help ensure that only authorized users can access your locked album and that your personal photos remain safeguarded.
Conclusion
Creating a locked album on your iPhone is a great way to keep sensitive and private photos secure. With the help of the built-in features or third-party apps, you can easily set up a password-protected album to ensure that only authorized users can access your confidential images.
By following the simple steps outlined in this article, you can enjoy the peace of mind knowing that your personal photos are safe from prying eyes. Whether you want to protect intimate moments, confidential documents, or any other sensitive content, having a locked album on your iPhone is a reliable solution.
Remember to choose a strong password and consider using additional security measures like Face ID or Touch ID for added protection. With these precautions in place, you can confidently store and share your private photos without worrying about privacy breaches or unauthorized access.
So, take control of your privacy today and create a locked album on your iPhone. Keep your cherished memories and sensitive content safe with this simple yet effective security feature.
FAQs
1. Can I make a locked album on my iPhone?
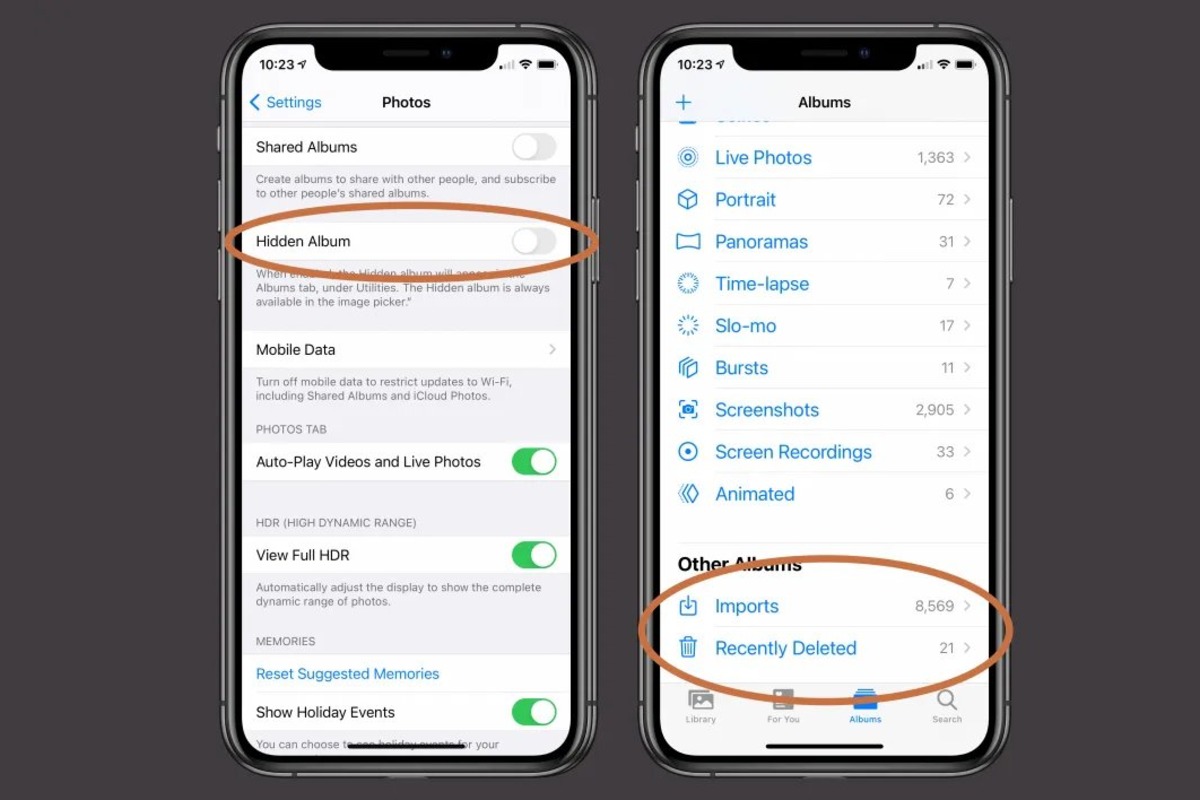
Yes, you can make a locked album on your iPhone. With the iOS operating system, Apple provides a built-in feature known as “Hidden Album” that allows you to lock and hide specific photos from the main camera roll.
2. How do I create a locked album on my iPhone?
To create a locked album on your iPhone, follow these steps:
- Open the Photos app on your iPhone.
- Navigate to the “Albums” tab.
- Scroll down and find the “Hidden” album.
- Select the photos that you want to hide by tapping on them.
- Tap on the “Share” icon, which looks like a square with an arrow pointing upward.
- In the sharing options, select “Hide.”
- Confirm by tapping on “Hide Photo.”
Once you’ve completed these steps, the selected photos will be moved to the Hidden album and will no longer be visible in your main camera roll.
3. Can I access the locked album on another device?
The Hidden album is specific to your iPhone and isn’t synced or accessible on other devices using the same Apple ID. Therefore, if you want to access the locked album with the hidden photos on another device, you won’t be able to do so.
4. How do I unlock the hidden album on my iPhone?
To unlock the hidden album and make the photos visible again in your camera roll, follow these steps:
- Open the Photos app on your iPhone.
- Navigate to the “Albums” tab.
- Scroll down and find the “Hidden” album.
- Select the photos that you want to unhide by tapping on them.
- Tap on the “Share” icon, which looks like a square with an arrow pointing upward.
- In the sharing options, select “Unhide.”
After performing these steps, the selected photos will be unhidden and will appear back in your main camera roll.
5. Can someone else access my hidden photos on my iPhone?
If you have set up a passcode or Face ID/Fingerprint lock for your iPhone, no one else will be able to access your hidden photos without knowing the passcode or your biometric authentication. However, it’s important to remember that if someone knows your passcode or has access to your unlocked iPhone, they will be able to see the hidden photos within the Hidden album.