
Are you struggling to open HEIC files on your iPhone or share them with others who don’t have compatible devices? Well, you’re not alone! HEIC (High-Efficiency Image Format) is the default image format used by iPhones since iOS 11. While it offers superior quality and smaller file sizes, it can be inconvenient if you need to convert it to a more widely supported format like JPEG (JPG).
In this article, I will guide you through the process of converting HEIC to JPG on your iPhone. Whether you want to convert a single image or a batch of photos, I’ll provide you with easy-to-follow steps and useful tips to ensure a seamless conversion process.
So, if you’re ready to learn how to change HEIC to JPG on your iPhone and enhance compatibility with other devices, let’s dive right in!
Inside This Article
- Why Convert HEIC to JPG on iPhone
- Method 1: Using the Photos App
- Method 2: Using a Third-Party App
- Method 3: Using Online Conversion Tools
- Conclusion
- FAQs
Why Convert HEIC to JPG on iPhone
HEIC (High Efficiency Image Format) is a relatively new image format that Apple introduced with the release of iOS 11. HEIC offers significant benefits such as smaller file sizes and better image quality compared to the traditional JPG format. However, despite its advantages, HEIC is not yet widely supported by all devices and platforms.
Converting HEIC to JPG on your iPhone provides compatibility with a broader range of devices and applications. By converting your HEIC files to the universally supported JPG format, you ensure that you can easily share and view your photos on different devices, without worrying about compatibility issues.
JPG is a highly compatible and widely supported image format that can be opened and viewed on almost any device, operating system, or photo editing software. By converting HEIC to JPG, you can ensure that your images will be accessible to anyone who wants to view or work with them.
Another reason to convert HEIC to JPG is to save storage space on your iPhone. HEIC files tend to be smaller in size compared to JPG, but still, over time, they can consume a significant amount of storage space, especially if you take a lot of photos or videos. By converting HEIC to JPG, you can reduce the file sizes and free up valuable space on your device.
One more advantage of converting HEIC to JPG is the ease of editing and processing the images. While some image editing software supports HEIC, others may not offer the same level of compatibility or functionality. By converting your HEIC files to JPG, you can ensure that you can use your preferred editing software or online tools without any limitations or compatibility issues.
Converting HEIC to JPG on your iPhone is a straightforward process that can be done using the built-in Photos app or third-party apps available on the App Store. Additionally, you can also use online conversion tools that allow you to convert HEIC files to JPG format conveniently.
In the next sections, we will explore different methods to convert HEIC to JPG on your iPhone, providing you with step-by-step instructions to help you get the job done effortlessly.
Method 1: Using the Photos App
If you’re looking to convert HEIC to JPG on your iPhone, you’ll be pleased to know that the Photos app offers a simple and convenient solution. Apple introduced the HEIC (High-Efficiency Image Format) with iOS 11 to save storage space and maintain image quality. However, if you want to share your photos with others or use them on devices that don’t support HEIC, converting them to JPG is a practical option.
Here’s a step-by-step guide on how to convert HEIC to JPG using the Photos app on your iPhone:
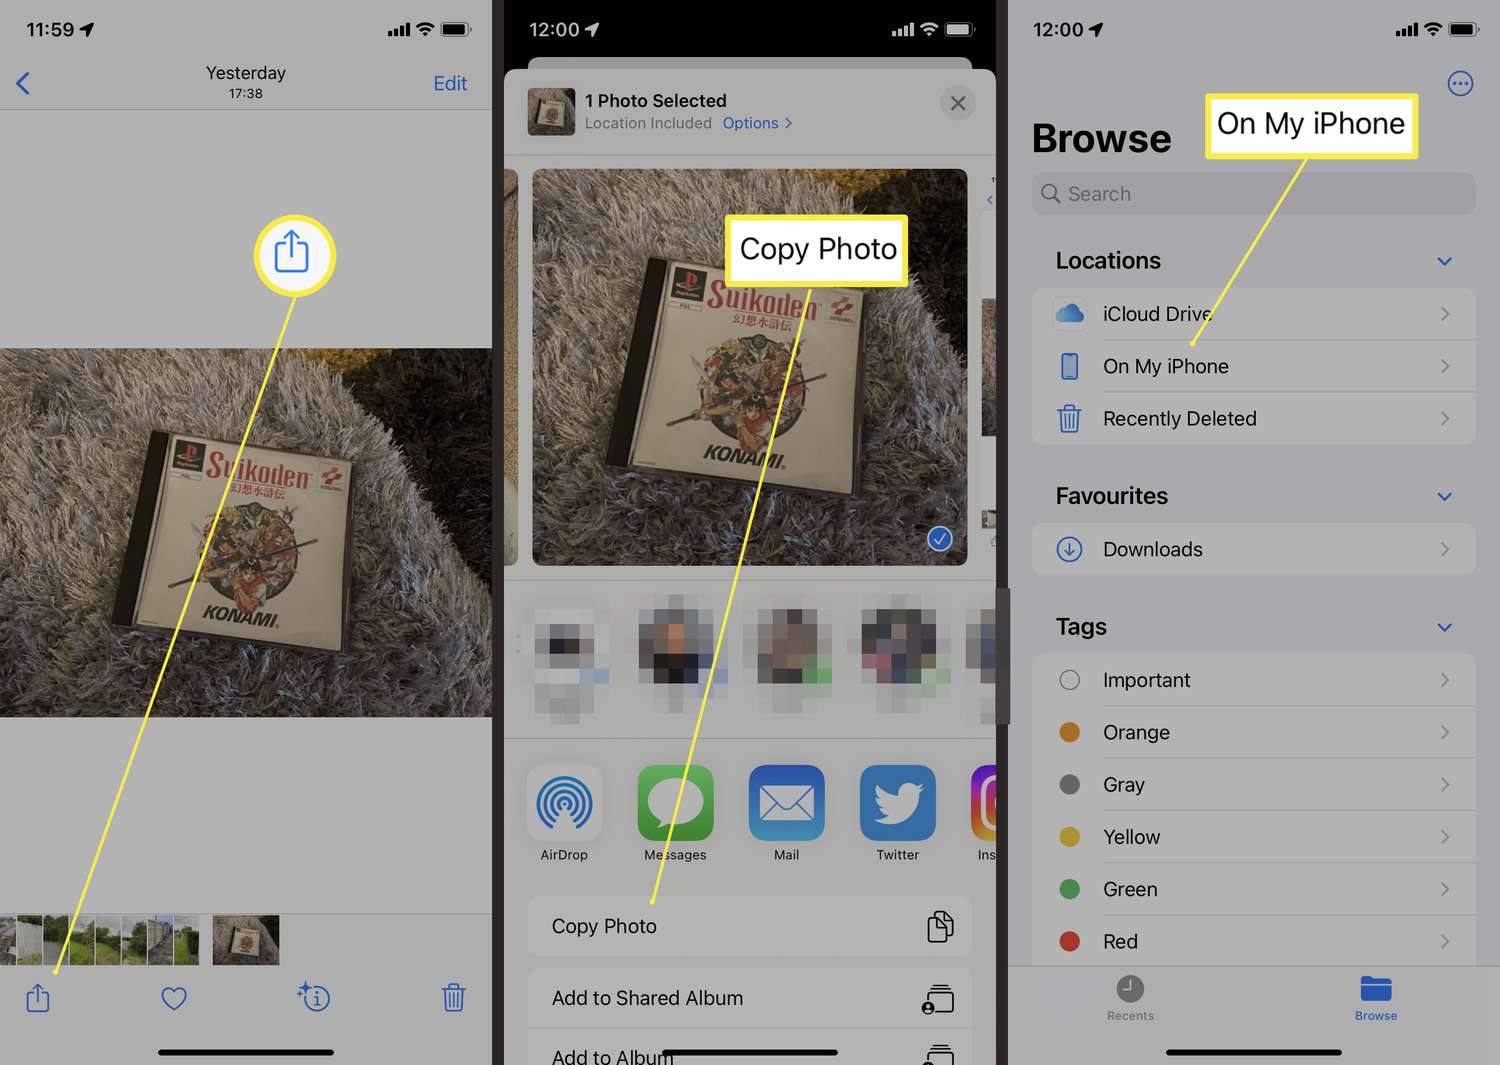
- Open the Photos app on your iPhone and select the HEIC photo you want to convert.
- Tap on the “Share” button located at the bottom left corner of the screen. It looks like a square with an arrow pointing upwards.
- Scroll down and find the “Save as File” option. Tap on it to save the photo as a file.
- If you have an option to customize the format, select “JPEG” as the output format.
- Choose the location where you want to save the converted JPG photo, either in the Photos app or in a specific folder.
- Tap on the “Save” button to start the conversion process.
Once the conversion is complete, you will have a JPG version of your HEIC photo, which you can easily share, upload, or use on any device without compatibility issues.
It’s important to note that while the Photos app provides a convenient method to convert HEIC to JPG, it is a one-by-one conversion process. If you have multiple HEIC photos that need conversion, you may want to consider using a third-party app or online conversion tools for efficiency.
Method 2: Using a Third-Party App
If you’re looking for an alternative way to convert HEIC to JPG on your iPhone, using a third-party app can be a convenient and efficient option. There are several apps available on the App Store that specialize in file conversion, and many of them offer a seamless HEIC to JPG conversion process.
One popular third-party app for converting HEIC to JPG is “HEIC Converter.” This app allows you to easily convert HEIC files to various formats, including JPG, PNG, and PDF. Simply download and install the app from the App Store, and you’re ready to begin the conversion process.
Once you have the “HEIC Converter” app installed on your iPhone, follow these simple steps to convert your HEIC files to JPG:
- Launch the “HEIC Converter” app on your iPhone.
- Tap the “Import” button to select the HEIC files you want to convert.
- Choose the JPG format as the output format.
- Tap the “Convert” button to start the conversion process.
- Wait for the app to convert your HEIC files to JPG.
- Once the conversion is complete, you can save the converted JPG files to your iPhone’s photo library or share them directly to other apps or platforms.
Using a third-party app like “HEIC Converter” provides a straightforward and efficient way to convert HEIC to JPG on your iPhone. It eliminates the need for complex settings or technical knowledge, allowing anyone to easily perform the conversion process with just a few simple taps.
Keep in mind that there are other third-party apps available on the App Store that offer similar conversion functionalities. Be sure to read reviews and compare the features of different apps to find the one that best suits your needs.
Now that you’ve learned about using a third-party app to convert HEIC to JPG on your iPhone, you have multiple methods at your disposal. Whether you prefer using the built-in Photos app or opt for a third-party app, you can effortlessly convert your HEIC files to JPG and enjoy greater compatibility and versatility with your images.
Method 3: Using Online Conversion Tools
If you’re looking for a quick and hassle-free way to convert HEIC files to JPG on your iPhone, online conversion tools can be a convenient option. These tools allow you to convert your photos without the need to install any additional software on your device. Simply upload the HEIC file, choose the desired output format (JPG), and let the tool handle the conversion for you.
One popular online conversion tool for iPhone users is CloudConvert. It supports a wide range of file formats, including HEIC and JPG, and offers a simple and intuitive interface. To convert your HEIC files to JPG, follow these steps:
- Visit the CloudConvert website on your iPhone’s web browser.
- Click on the “Select files” button and choose the HEIC file you want to convert.
- From the “Select format” drop-down menu, choose “JPG” as the desired output format.
- Click on the “Start Conversion” button to begin the conversion process.
- Once the conversion is complete, you will be prompted to download the converted JPG file to your device.
Another popular online converter is Zamzar. It offers a similar process to convert HEIC files to JPG:
- Go to the Zamzar website on your iPhone.
- Click on the “Add Files” button and select the HEIC file you want to convert.
- Choose “JPG” as the output format from the drop-down menu.
- Enter your email address to receive the converted file.
- Click on the “Convert” button to start the conversion process.
- Once the conversion is finished, you will receive an email with a link to download the converted JPG file.
Using online conversion tools is a convenient and straightforward method to convert HEIC files to JPG on your iPhone. However, keep in mind that you’ll need a stable internet connection for the conversion process to run smoothly. Additionally, be cautious when using online tools and ensure that you choose reputable websites that prioritize security and privacy.
Now that you’re aware of the various methods to convert HEIC to JPG on your iPhone, you can select the one that suits your preferences and needs. Whether you opt for the Photos app, third-party apps, or online conversion tools, you’ll be able to easily convert and share your HEIC files in the widely compatible JPG format.
Conclusion
In conclusion, being able to change HEIC to JPG on an iPhone is a valuable skill for anyone who wants to have more flexibility and compatibility with their photos. This format conversion allows you to easily share your images with others, upload them to various platforms, and edit them using a wide range of software applications.
With the simple methods outlined in this guide, you can effortlessly convert HEIC files to JPG without the need for any third-party apps or complex procedures. Whether you prefer to use the built-in Photos app, online converters, or desktop software, the process is relatively straightforward and can be done quickly.
By following the steps provided, you can ensure that your photos are accessible and viewable on any device or platform, enhancing your ability to share and enjoy your memories with friends and family.
FAQs
Q: How do I change HEIC to JPG on my iPhone?
A: Changing HEIC to JPG on your iPhone is a simple process. Follow these steps:
- Open the “Settings” app on your iPhone.
- Scroll down and tap on “Camera”.
- Under the “Camera” settings, select “Formats”.
- Tap on “Most Compatible” to change the format from HEIC to JPG.
Once you have changed the format to JPG, all the photos you capture on your iPhone will be saved in the JPG file format.
Q: Why should I change HEIC to JPG on my iPhone?
A: Changing HEIC to JPG on your iPhone has several advantages.
Firstly, the JPG format is widely supported across various platforms and devices, making it easier to share and view your photos on different devices and applications.
Secondly, the JPG format is more compatible with certain software and editing tools, allowing you to edit and manipulate your photos with ease.
Lastly, the JPG format generally takes up less storage space compared to HEIC, giving you more room on your device for capturing and storing photos.
Q: Will changing HEIC to JPG affect the quality of my photos?
A: Converting HEIC to JPG does involve a compression process, which may result in a slight loss of image quality. However, the difference is often negligible and not noticeable to the average viewer. If you have specific concerns about preserving image quality, you can explore third-party apps or software that offer more advanced conversion options.
Q: Can I change HEIC to JPG for existing photos on my iPhone?
A: By default, existing photos captured in HEIC format cannot be directly converted to JPG on your iPhone. However, you can achieve this by following these steps:
- Open the “Photos” app on your iPhone.
- Select the HEIC photos you want to convert to JPG.
- Tap on the share icon, usually represented by an arrow pointing upwards.
- Choose the “Save [X] Images” option to save a copy of each selected photo in JPG format.
Q: Are there any third-party apps that can help me change HEIC to JPG on my iPhone?
A: Yes, there are several third-party apps available on the App Store that can assist you in converting HEIC to JPG on your iPhone. One such app is “HEIC to JPG Converter”, which allows you to batch convert your photos with ease. Simply search for “HEIC to JPG converter” in the App Store and choose one that suits your needs.