
Are you looking for a convenient way to convert HEIC files to JPG format? Look no further! In this article, we will guide you through the simple process of converting HEIC files to JPG using Google Drive. HEIC (High Efficiency Image Format) is a newer image format that offers higher image quality and smaller file sizes. However, some devices and applications may not support HEIC, which is where converting to JPG becomes essential. With Google Drive, you can easily convert your HEIC files to the widely supported JPG format, making them accessible on a wider range of devices and applications. So, if you’re ready to unlock the compatibility of your HEIC files, let’s dive into the step-by-step process of converting HEIC to JPG in Google Drive.
Inside This Article
- Overview of HEIC and JPG file formats
- Method 1: Using Google Drive’s built-in conversion feature
- Method 2: Using third-party online conversion tools
- Method 3: Converting HEIC to JPG using desktop software
- Conclusion
- FAQs
Overview of HEIC and JPG file formats
When it comes to digital images, the file format plays a crucial role in determining the quality, size, and versatility of the image. Two commonly used file formats for images are HEIC and JPG. In this section, we will provide an overview of these two formats and discuss their differences and characteristics.
HEIC, which stands for High Efficiency Image Format, is a relatively new file format that was introduced by Apple. It is designed to offer better image quality while significantly reducing the file size. HEIC files use advanced compression algorithms, allowing for more efficient storage of images on devices, without compromising their quality. This makes HEIC a preferred choice for devices with limited storage capacity.
On the other hand, JPG, also known as JPEG (Joint Photographic Experts Group), is one of the most widely used file formats for images. It has been around for decades and is supported by virtually all devices and software applications. JPG files offer good image quality and are highly compatible, making them ideal for sharing and displaying images on various platforms.
One of the key differences between HEIC and JPG is the file size. HEIC files are more compact and can contain more image data in a smaller file size compared to JPG files. This means that you can store more HEIC images on your device or cloud storage without taking up as much space.
In terms of image quality, HEIC files typically provide better clarity and color accuracy compared to JPG files. This is because HEIC supports a wider color gamut and a higher bit depth, allowing for more detailed and realistic images. However, the difference in image quality may not be noticeable on all devices, especially those with lower resolution displays.
Another factor to consider is the compatibility of the file format. While JPG is universally supported and can be opened on any device or image viewing software, HEIC files may not be compatible with all platforms. HEIC is primarily used by Apple devices and may require additional software or conversions to be viewed on non-Apple devices.
Overall, the choice between HEIC and JPG depends on your specific needs and preferences. If you prioritize image quality and storage efficiency, HEIC may be the better option. However, if compatibility and ease of use are more important, JPG is a reliable and widely supported choice.
Method 1: Using Google Drive’s built-in conversion feature
Google Drive provides a simple and convenient solution to convert HEIC files to JPG format. This built-in conversion feature can be accessed directly from your Google Drive account. Here’s how you can convert your HEIC files to JPG using Google Drive:
1. Sign in to your Google Drive account.
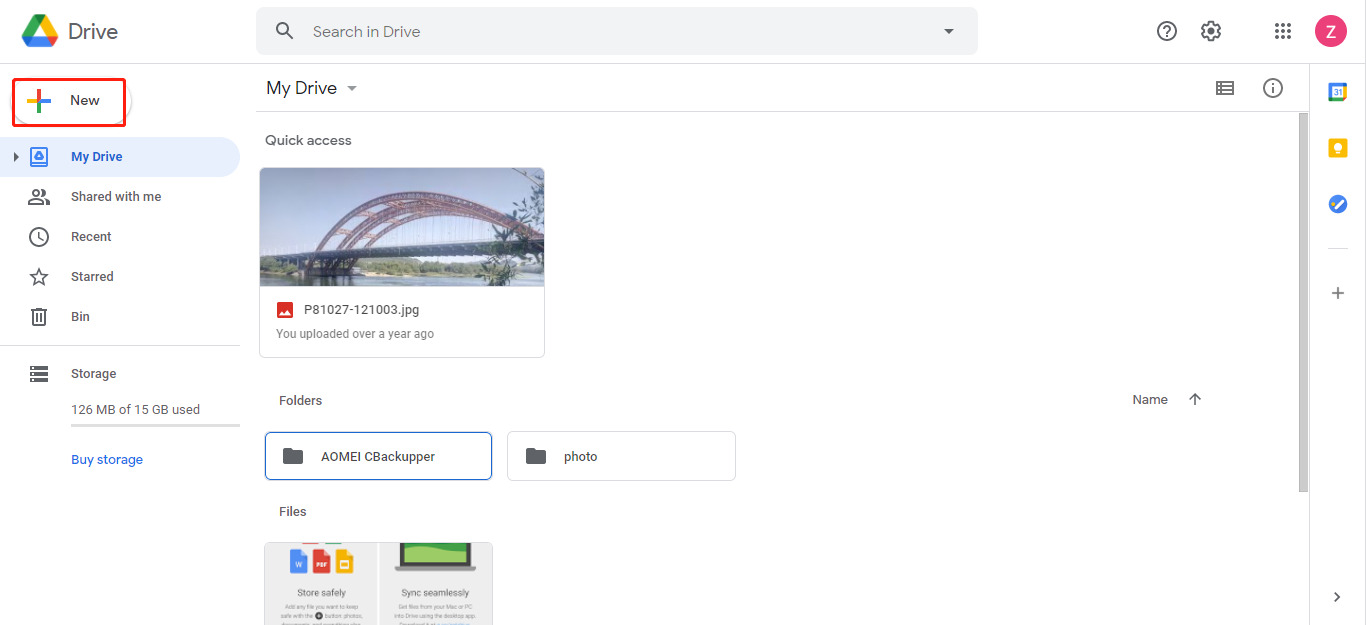
2. Click on the “+” button to create a new folder or navigate to the existing folder where your HEIC file is stored.
3. Open the folder and click on the “New” button, then select “File upload” from the drop-down menu.
4. Locate and select the HEIC file that you want to convert to JPG and click on the “Open” button. The file will be uploaded to your Google Drive.
5. Once the file is uploaded, right-click on it and select “Open with” from the context menu. In the submenu, choose “Google Docs” to open the file in Google Docs.
6. When the file opens in Google Docs, go to the “File” menu and select “Download” from the drop-down menu.
7. In the download options, choose “JPEG” as the file format. You can also specify the desired quality if needed.
8. Click on the “Download” button to convert your HEIC file to JPG format. The converted file will be saved to your computer’s default download folder.
9. You can now access and use the converted JPG file for your needs, whether it’s sharing, editing, or printing.
Using Google Drive’s built-in conversion feature is a quick and hassle-free way to convert HEIC files to JPG format. However, keep in mind that the file conversion process may slightly affect the quality of the image. It’s recommended to make a backup of the original HEIC file before converting it.
Method 2: Using third-party online conversion tools
If you don’t want to rely on Google Drive’s built-in conversion feature or prefer using online tools for converting your HEIC files to JPG, there are several third-party options available.
One popular online conversion tool for transforming HEIC files to JPG is OnlineConvert.com. This website offers a simple and straightforward interface, allowing you to convert your files in just a few clicks.
To convert your HEIC files to JPG using OnlineConvert.com, follow these steps:
- Visit the OnlineConvert.com website.
- Select the HEIC file you want to convert by clicking on the “Choose File” button.
- Once you’ve selected your file, choose “JPG” as the output format.
- Click on the “Convert” button to start the conversion process.
- After the conversion is complete, you will be able to download the converted JPG file to your device.
Another reliable option for converting HEIC files to JPG online is Zamzar.com. This platform supports a wide range of file conversions, including HEIC to JPG.
Here’s how you can use Zamzar.com to convert your HEIC files:
- Go to the Zamzar.com website.
- Click on the “Add Files” button to upload your HEIC file.
- In the “Convert To” section, choose “JPG” as the desired output format.
- Enter your email address in the designated field to receive the converted file.
- Click on the “Convert Now” button to begin the conversion process.
- Once the conversion is finished, you will receive an email with a download link to retrieve your JPG file.
It’s important to note that when using third-party online conversion tools, you should exercise caution and consider the privacy and security implications. Make sure to review the terms of service and privacy policy of the tool you choose to ensure the protection of your files.
With the availability of various third-party online conversion tools, converting HEIC files to JPG has become quick and hassle-free. Choose the tool that suits your needs best and proceed with the conversion to enjoy compatibility and easy sharing of your image files.
Method 3: Converting HEIC to JPG using desktop software
If you prefer a more versatile and feature-rich solution for converting HEIC to JPG, using desktop software is a great option. There are several reliable and user-friendly software programs available that can easily perform this conversion for you.
One popular choice is a software called “iMazing HEIC Converter”. This software is available for both Windows and Mac operating systems and offers a straightforward and efficient way to convert HEIC files to JPG.
To convert HEIC to JPG using iMazing HEIC Converter, follow these steps:
- Download and install iMazing HEIC Converter from the official website.
- Open the software and click on the “Select HEIC Photos” button to choose the HEIC files you want to convert.
- Choose the output format as “JPEG” from the drop-down menu.
- Select the destination folder where you want to save the converted JPG files.
- Click on the “Convert” button to start the conversion process.
- Once the conversion is complete, you can locate the converted JPG files in the specified destination folder.
Another reputable software option for converting HEIC to JPG is “Apowersoft HEIC Converter”. This software provides a simple and intuitive interface, allowing for quick and hassle-free conversions.
Here’s how you can use Apowersoft HEIC Converter to convert HEIC to JPG:
- Download and install Apowersoft HEIC Converter from the official website.
- Launch the software and click on the “Add Files” button to select the HEIC files you wish to convert.
- Choose the output format as “JPEG” and specify the destination folder for the converted files.
- Click on the “Convert” button to initiate the conversion process.
- Once the conversion is done, you can find the converted JPG files in the specified folder.
These are just two examples of desktop software that can efficiently convert HEIC to JPG. There are various other options available in the market with their own unique features and functionalities.
Converting HEIC to JPG using desktop software provides you with more control over the conversion process and allows you to perform batch conversions, making it a suitable choice for users dealing with large numbers of HEIC files.
However, it is important to note that desktop software may require installation and may not be as convenient as online solutions when it comes to accessibility.
Overall, using desktop software is an excellent option if you need to convert HEIC to JPG frequently and want advanced features and flexibility in the conversion process.
Conclusion
Converting HEIC to JPG files is a simple and straightforward process that can be done seamlessly in Google Drive. By following the steps mentioned in this article, you can easily convert your HEIC images to the widely compatible JPG format, which can be viewed and shared on any device or platform. Whether you are an iPhone user looking to share your photos with non-iPhone users or simply need to convert HEIC files for easier storage or editing, Google Drive provides a reliable and convenient solution. With its user-friendly interface and robust features, Google Drive makes it effortless to convert your HEIC images to JPG and enjoy greater flexibility and compatibility. Give it a try today and unlock the full potential of your image library!
FAQs
Q: Can I convert HEIC to JPG in Google Drive?
A: Yes, Google Drive allows you to convert HEIC (High Efficiency Image Format) files to JPG (Joint Photographic Experts Group) format, making it easier to view and share the images across different platforms and devices.
Q: How do I convert HEIC to JPG in Google Drive?
A: To convert HEIC to JPG in Google Drive, follow these steps:
- Upload the HEIC file to your Google Drive account.
- Right-click on the HEIC file and select “Open with” and then choose “Google Photos” or “Google Drive Viewer”.
- In the Google Photos or Google Drive Viewer, click on the “More” option (represented by three dots).
- Select “Download” or “Save to Drive” to save the HEIC file as a JPG in your desired location.
Q: Are there any limitations or file size restrictions when converting HEIC to JPG in Google Drive?
A: Google Drive imposes file size limitations depending on your storage quota. However, for most users, converting HEIC to JPG in Google Drive should not be an issue, as long as the file size remains within the allowable limit.
Q: Can I convert multiple HEIC files to JPG in one go?
A: Unfortunately, Google Drive currently does not offer the option of converting multiple HEIC files to JPG simultaneously. You will need to convert each HEIC file individually using the method mentioned above.
Q: What are the advantages of converting HEIC to JPG?
A: Converting HEIC to JPG offers several advantages. JPG is a widely supported image format that can be easily opened and viewed on various devices and platforms. It also allows for smaller file sizes, making it easier to share and store images. Converting HEIC to JPG ensures compatibility and accessibility of your image files across different devices and software.