
Are you a photography enthusiast and considering getting your hands on the latest iPhone 14 Pro? Well, you’re in for a treat! The iPhone 14 Pro comes packed with an exciting feature called ProRAW, which takes your photography game to a whole new level. ProRAW is a revolutionary format that combines the benefits of Apple’s computational photography with the flexibility of traditional RAW files. In this article, we will explore how to use ProRAW on the iPhone 14 Pro and unleash the full potential of your camera. From capturing stunning landscapes to preserving intricate details in low-light conditions, ProRAW empowers you to capture professional-grade photos with ease. Let’s dive in and discover how you can make the most out of ProRAW on your iPhone 14 Pro!
Inside This Article
- What is ProRAW?
- Compatibility and Requirements
- Enabling ProRAW mode
- Adjusting ProRAW settings
- Capturing ProRAW Photos
- Editing ProRAW photos
- Saving and Exporting ProRAW Photos
- Tips and tricks for using ProRAW mode
- Frequently Asked Questions
- Conclusion
- FAQs
What is ProRAW?
ProRAW is a new feature introduced in the iPhone 14 Pro that allows users to capture photos with an unprecedented level of control and flexibility. ProRAW combines the benefits of raw photography with the advances in computational photography, resulting in high-quality images with impressive dynamic range and detail.
Traditionally, when you capture a photo with your iPhone, the device processes the image using its built-in algorithms to adjust parameters such as exposure, white balance, and noise reduction. While this approach works well in most cases, it limits the amount of control you have over the final image. With ProRAW, you have direct access to the unprocessed, raw sensor data captured by the iPhone’s camera.
In essence, ProRAW allows you to capture photos with the highest level of fidelity, giving you the ability to make precise adjustments during the editing process. It provides photographers and enthusiasts with the freedom to fine-tune aspects such as exposure, shadows, highlights, and color temperature, resulting in stunning images with a professional touch.
One of the standout features of ProRAW is its ability to retain a wide dynamic range. This means you can capture scenes with bright highlights and dark shadows without losing detail. ProRAW also preserves more information, allowing you to push the boundaries of editing without sacrificing image quality.
It is important to note that ProRAW files are larger in size compared to standard JPEG or HEIC files since they contain more data. This means you will need ample storage space on your iPhone or an external storage device to accommodate ProRAW photos.
Compatibility and Requirements
Before utilizing the ProRAW feature on your iPhone 14 Pro, it’s essential to understand its compatibility and requirements. While ProRAW was introduced in the iPhone 12 Pro models, there may be some variations in compatibility with the iPhone 14 Pro. Ensure that you have the latest software updates installed on your device to access this feature.
The ProRAW feature utilizes the advanced imaging capabilities of the iPhone 14 Pro’s camera system. So, it’s crucial to have this specific model to take advantage of ProRAW. Make sure your device meets the following requirements:
- iPhone 14 Pro: ProRAW is exclusively available on this particular iPhone model. It utilizes the advanced camera technologies to capture images with incredible detail and flexibility.
- Software Updates: Ensure that your iPhone 14 Pro is running on the latest iOS version. Apple frequently releases updates to optimize performance and introduce new features, which may include improvements to the ProRAW capabilities.
- Storage Space: ProRAW files are considerably larger than standard JPEG images due to the additional data captured. Make sure your iPhone has sufficient storage space available to accommodate these larger files.
Once you have confirmed that your iPhone 14 Pro meets the above requirements, you can proceed to explore and leverage the ProRAW feature to capture stunning images with enhanced control and flexibility.
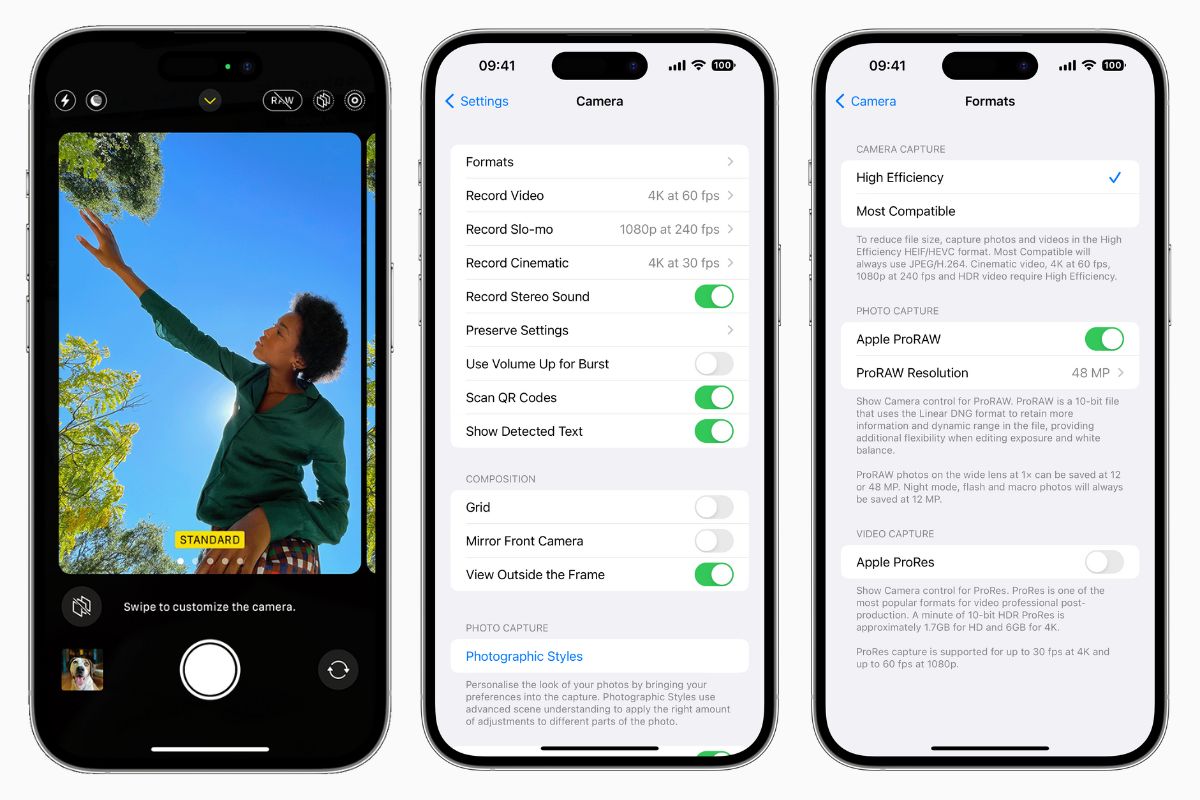
Enabling ProRAW mode
The ProRAW mode on the iPhone 14 Pro allows you to capture photos with a higher level of control and flexibility. To enable ProRAW mode on your iPhone 14 Pro, follow these simple steps:
Step 1: Open the Camera app on your iPhone 14 Pro.
Step 2: Swipe left or right to select the “Photo” mode.
Step 3: Tap on the “Pro” icon located at the top right corner of the screen. This will activate the ProRAW mode.
Step 4: Once the ProRAW mode is enabled, you will notice a RAW indicator at the top center of the screen, indicating that you are now capturing photos in ProRAW format.
That’s it! You have successfully enabled ProRAW mode on your iPhone 14 Pro. Now, you can take advantage of the advanced features and editing capabilities that ProRAW offers.
It is important to note that enabling ProRAW mode will result in larger file sizes for your photos. However, the benefits of capturing photos in ProRAW format, such as greater control over editing and preserving more image information, make it well worth the extra storage space.
Adjusting ProRAW settings
When capturing photos in ProRAW mode on your iPhone 14 Pro, you have the option to adjust various settings to suit your preferences. These settings allow you to have more control over the final output of your ProRAW photos.
1. Exposure: Adjusting the exposure setting allows you to control the brightness level of your ProRAW photos. Increase the exposure to make the photo brighter, or decrease it for a darker look.
2. White Balance: White balance determines the overall color temperature of your photo. You can choose from predefined white balance settings such as Auto, Daylight, Cloudy, and more. Alternatively, you can use the custom white balance tool to manually adjust the color temperature.
3. Noise Reduction: ProRAW images can sometimes have noticeable noise in certain conditions. If you find that your photos have unwanted noise, you can adjust the noise reduction setting to reduce the graininess.
4. Sharpening: Sharpening enhances the details and edges in your ProRAW photos, giving them a crisper look. You can increase or decrease the sharpening level to achieve your desired outcome.
5. Contrast: Adjusting the contrast level allows you to control the difference between the lightest and darkest parts of your photo. Increasing the contrast can make the image more dramatic, while reducing it can create a softer and more subtle look.
6. Saturation: Saturation determines the intensity of the colors in your ProRAW photos. Increase the saturation to make the colors more vibrant and punchy, or decrease it for a more muted and subdued look.
7. Highlights and Shadows: The highlights and shadows settings give you the ability to recover details in the brightest and darkest parts of your ProRAW photos. Increase the highlights to bring out details in bright areas, and adjust the shadows to reveal details in the darker areas.
8. Vignette: Adding a vignette can help draw attention to the subject of your photo by darkening the edges. You can adjust the vignette strength and size to achieve the desired effect.
By adjusting these settings, you can fine-tune your ProRAW photos to match your artistic vision and create stunning, professional-looking images.
Capturing ProRAW Photos
Once you have enabled ProRAW mode on your iPhone 14 Pro, capturing ProRAW photos becomes a breeze. With the ProRAW feature, you can now take stunning, high-quality photos with all the benefits of shooting in RAW, including greater control over editing and preserving more detail in your final image.
To capture ProRAW photos, follow these simple steps:
- Open the camera app on your iPhone 14 Pro.
- Select the desired shooting mode, such as Portrait, Night, or Landscape.
- Ensure that the ProRAW symbol is displayed in the top right corner of the screen, indicating that you are in ProRAW mode.
- Compose your shot and tap the shutter button to take the photo.
It’s important to note that capturing ProRAW photos may result in larger file sizes compared to standard JPEG images. However, the increased file size is a trade-off for the superior image quality and editing capabilities you gain with ProRAW.
When shooting in ProRAW mode, the iPhone 14 Pro utilizes its powerful image processing capabilities to capture the maximum amount of image data. This ensures that you have the flexibility to adjust various parameters, such as exposure, white balance, and sharpness, during the editing process without sacrificing image quality.
Whether you’re a professional photographer or an avid mobile photography enthusiast, capturing ProRAW photos with the iPhone 14 Pro elevates your photography game to new heights. With the ability to fine-tune every aspect of your image, you can unleash your creativity and achieve truly stunning results.
Now that you know how to capture ProRAW photos on your iPhone 14 Pro, it’s time to explore the next step: editing ProRAW photos using the built-in ProRAW editing tools. Let’s dive in!
Editing ProRAW photos
Once you have captured stunning ProRAW photos with your iPhone 14 Pro, you can take it to the next level by editing them with the powerful ProRAW editing tools. These tools provide you with a range of options to enhance the details, colors, and overall look of your ProRAW images.
When it comes to editing ProRAW photos, Apple’s Photos app offers a comprehensive set of editing capabilities. Here’s how you can make the most out of it:
- Open the Photos app: Launch the Photos app on your iPhone 14 Pro and select the ProRAW photo you want to edit.
- Tap on the Edit button: Once you have selected the ProRAW photo, tap on the Edit button located at the bottom of the screen. This will bring up the editing interface.
- Adjust exposure and tone: The Photos app allows you to tweak the exposure and tone of your ProRAW photo. You can adjust the brightness, contrast, highlights, shadows, and more to achieve the desired look.
- Enhance colors: If you want to make the colors in your ProRAW photo pop, you can use the various color editing tools available. You can adjust the vibrance, saturation, and white balance to achieve the perfect color balance.
- Sharpen and refine: The details in ProRAW photos are preserved at their highest quality. To make those details stand out even more, you can use the sharpening and noise reduction tools in the Photos app. This allows you to fine-tune the sharpness and reduce any unwanted noise.
- Apply filters: If you want to experiment with different looks, you can apply filters to your ProRAW photo. The Photos app offers a variety of filters to choose from, allowing you to add a creative touch to your image.
- Save and share: Once you are satisfied with the edits, tap on the Done button to save your edited ProRAW photo. You can then easily share it with friends and family or upload it to social media platforms directly from the Photos app.
With the ProRAW editing tools available in the Photos app, you have the power to transform your ProRAW photos into stunning works of art. Get creative and experiment with different adjustments to bring out the best in your ProRAW captures.
Saving and Exporting ProRAW Photos
Once you have captured stunning ProRAW photos on your iPhone 14 Pro, you will want to save and export them so you can access and use them on different devices or share them with others. Here are the steps to save and export ProRAW photos:
-
Open the Photos app on your iPhone 14 Pro.
-
Navigate to the ProRAW photo you want to save and export.
-
Tap on the photo to open it.
-
Tap on the share icon, located at the bottom left of the screen. It looks like a square with an arrow pointing upward.
-
A share sheet will appear. Scroll through the options and select the desired method of export, such as AirDrop, Messages, Email, or Save to Files.
-
Follow the on-screen instructions to complete the export process based on the selected method. For example, if you choose AirDrop, you will need to select the device or contact to send the photo to.
-
For saving to Files, you can choose a location or create a new folder to save the ProRAW photo.
-
If you select Messages or Email, you can enter the recipient’s details and any accompanying message before sending the ProRAW photo.
By following these steps, you can easily save and export your ProRAW photos to facilitate seamless sharing and access across various platforms and devices. Remember that ProRAW photos retain all the high-quality, uncompressed data, ensuring that you can edit and manipulate them later without any loss in image quality.
Tips and tricks for using ProRAW mode
ProRAW mode on the iPhone 14 Pro allows you to capture photos with enhanced control and flexibility. To make the most out of this advanced feature, here are some valuable tips and tricks:
1. Understand the benefits: ProRAW mode combines the benefits of RAW and computational photography. It gives you greater control over editing while preserving the computational enhancements provided by the iPhone’s camera system.
2. Use a tripod or stabilize your phone: ProRAW mode captures more data, which means it is more sensitive to camera shake. To ensure sharp and detailed ProRAW photos, use a tripod or stabilize your phone, especially in low-light situations.
3. Experiment with exposure settings: ProRAW allows you to adjust exposure settings during editing. However, it’s a good practice to get the exposure as close as possible to your desired result while capturing the photo. This will give you a stronger starting point for editing.
4. Utilize third-party editing apps: While the built-in Photos app provides ProRAW editing tools, you can also explore third-party editing apps for more robust options. Apps like Adobe Lightroom and Snapseed offer additional advanced editing features specifically designed for RAW files.
5. Take advantage of the increased dynamic range: ProRAW mode captures a wider dynamic range compared to standard JPEG photos. This means you’ll have more latitude in post-processing to recover details in highlights and shadows. Use this to your advantage when editing ProRAW photos.
6. Pay attention to noise: ProRAW mode captures more detail, including noise. While noise reduction can be applied during editing, it’s worth keeping an eye on noise levels, especially in low-light situations. Adjusting the noise reduction settings can help strike the right balance between detail and noise reduction.
7. Explore different white balance options: ProRAW mode allows you to fine-tune the white balance during editing. Take advantage of this flexibility to achieve the desired color temperature and overall look of your photo.
8. Back up your ProRAW files: ProRAW files can be larger in size compared to standard JPEG photos. Make sure to back up your ProRAW files regularly to prevent any loss of the high-quality data captured by the ProRAW mode.
By following these tips and tricks, you’ll be able to make the most out of ProRAW mode on your iPhone 14 Pro. Let your creativity flow as you capture and edit stunning ProRAW photos.
Frequently Asked Questions
Here are some frequently asked questions about using ProRAW on iPhone 14 Pro:
Q: What is ProRAW?
A: ProRAW is a new feature introduced by Apple that allows users to capture photos in a raw format with additional control and flexibility during editing.
Q: How do I enable ProRAW mode on my iPhone 14 Pro?
A: To enable ProRAW mode, open the Camera app on your iPhone 14 Pro. Tap on the “Pro” button near the top of the screen. From there, swipe left until you see the “RAW” option. Tap on it to turn on ProRAW mode.
Q: Can I use ProRAW for all types of photos?
A: ProRAW is primarily designed for capturing highly detailed and professional-quality photos. It is best suited for situations where you want maximum control in editing, such as landscape photography, portraits, or any other scenario where you want to fine-tune the image in post-processing.
Q: Are ProRAW photos larger in file size compared to regular JPEGs?
A: Yes, ProRAW photos are typically larger in file size compared to regular JPEGs. Since ProRAW captures more information and detail, it requires more storage space. It is recommended to have ample storage available on your iPhone 14 Pro when using ProRAW mode.
Q: Can I edit ProRAW photos directly on my iPhone 14 Pro?
A: Yes, you can edit ProRAW photos directly on your iPhone 14 Pro using the built-in ProRAW editing tools in the Photos app. These tools allow you to make adjustments to exposure, white balance, tone mapping, and more, giving you greater control over the final image.
Q: Can I shoot in ProRAW and also use other camera features like Night Mode or Deep Fusion?
A: Yes, you can use ProRAW in conjunction with other camera features like Night Mode or Deep Fusion. However, keep in mind that certain features may not be available or may have limited functionality when shooting in ProRAW mode. Experiment with different settings to find the best combination for your desired outcome.
Q: Does ProRAW support third-party photo editing apps?
A: Yes, ProRAW files can be imported into third-party photo editing apps that support raw file formats. This gives you the flexibility to use your preferred editing tools and unleash the full potential of ProRAW photos.
Q: What is the advantage of using ProRAW over regular JPEG or HEIC formats?
A: The main advantage of using ProRAW is the ability to capture and preserve more data from the sensor, resulting in higher-quality images with greater control over the final outcome during editing. ProRAW files retain more dynamic range, detail, and color information, allowing for more extensive adjustments without loss of quality.
Q: Can I convert a ProRAW photo to JPEG or HEIC format?
A: Yes, you can convert a ProRAW photo to JPEG or HEIC format using the editing tools in the Photos app. Keep in mind that once converted, the image will no longer have the same level of flexibility for editing as the original ProRAW file.
Q: Does ProRAW work with the front-facing camera on the iPhone 14 Pro?
A: As of now, ProRAW mode is only available for the rear-facing camera on the iPhone 14 Pro. It does not support the front-facing camera.
Hopefully, these FAQs have provided you with a better understanding of ProRAW on iPhone 14 Pro. Explore this powerful feature and take your photography to the next level!
Conclusion
In conclusion, the introduction of ProRAW on the iPhone 14 Pro has taken mobile photography to new heights. This feature provides photographers and enthusiasts with unprecedented control and flexibility in capturing and editing photos. With its ability to capture images in a lossless format, ProRAW opens up a world of possibilities for post-processing and enhancing the quality of your shots. Whether you’re a professional photographer or someone who loves to capture memories on the go, ProRAW allows you to unleash your creativity and capture stunning details, vibrant colors, and impressive dynamic range. So, if you’re someone who wants to take your iPhone photography to the next level, be sure to explore the immense potential of ProRAW on the iPhone 14 Pro. Get ready to captivate your audience with breathtaking images that truly showcase your artistic vision and technical prowess.
FAQs
Q: What is ProRAW and how does it work on iPhone 14 Pro?
ProRAW is a new feature introduced on the iPhone 14 Pro that allows users to capture photos in a format that combines the benefits of Apple’s computational photography with the flexibility and control of a RAW file. It captures and preserves more details and dynamic range in your images, providing you with greater editing possibilities. ProRAW works by combining multiple exposures and applying Apple’s computational photography algorithms to create a high-quality, RAW-like image.
Q: How do I enable ProRAW on my iPhone 14 Pro?
To enable ProRAW on your iPhone 14 Pro, go to the Camera app and tap on the “Pro” mode. Then, tap on the RAW icon displayed on the top right of the screen. When enabled, the RAW icon will turn yellow, indicating that ProRAW is active. You can now capture photos in ProRAW format.
Q: Can I edit ProRAW photos on my iPhone?
Yes, you can edit ProRAW photos directly on your iPhone. After capturing an image in ProRAW format, it will be saved in the Photos app as a DNG file. You can use various photo editing apps, including Apple’s Photos app, to adjust the exposure, white balance, sharpness, and other parameters of the ProRAW photo. Keep in mind that ProRAW files are larger in size compared to standard JPEGs, so make sure you have enough storage space on your device.
Q: Are there any limitations or requirements for using ProRAW on iPhone 14 Pro?
Yes, there are a few limitations and requirements when using ProRAW on the iPhone 14 Pro. Firstly, ProRAW is only available on the iPhone 14 Pro and iPhone 14 Pro Max models. It is not supported on other iPhone models. Secondly, ProRAW requires ample storage space as the files are larger in size compared to standard JPEGs. Lastly, keep in mind that ProRAW is only available in certain shooting modes, such as Photo, Portrait, and Night mode.
Q: Can I shoot in ProRAW and JPEG simultaneously?
Yes, you have the option to capture photos in both ProRAW and JPEG formats simultaneously on your iPhone 14 Pro. This is useful if you want to have a high-quality ProRAW file for editing purposes and a smaller, easily shareable JPEG version. To enable this feature, go to the Settings app, select “Camera,” and then toggle on the “Capture ProRAW and JPEG” option.
Q: Is ProRAW suitable for all photography scenarios?
While ProRAW can be beneficial for capturing and editing photos with a higher level of flexibility and control, it may not be necessary for all photography scenarios. ProRAW is particularly useful in situations where you’re dealing with challenging lighting conditions, high dynamic range scenes, or when you want to have more control over the editing process. For everyday casual photography, the standard JPEG format may be more than sufficient.