
In the vast world of smartphones, the iPhone stands out as a true pioneer and leader. With its sleek design, powerful features, and user-friendly interface, it has become a beloved device among millions of users worldwide. One of the neat customization options that iPhone offers is the ability to change the device name. Whether you want to add a personal touch or simply differentiate your iPhone from others, changing the device name can be a fun and practical way to do so. In this article, we will guide you through the step-by-step process of changing the name of your iPhone, helping you make it truly your own. So, grab your iPhone and let’s get started on this exciting journey of personalization!
Inside This Article
Steps to Change iPhone Name
Changing the name of your iPhone might seem like a simple task, but it can be quite useful in personalizing your device and differentiating it from others. Whether you want to give your iPhone a unique name or simply update it with your initials, follow the steps below to change the name:
- Step 1: Open the Settings App
- Step 2: Access General Settings
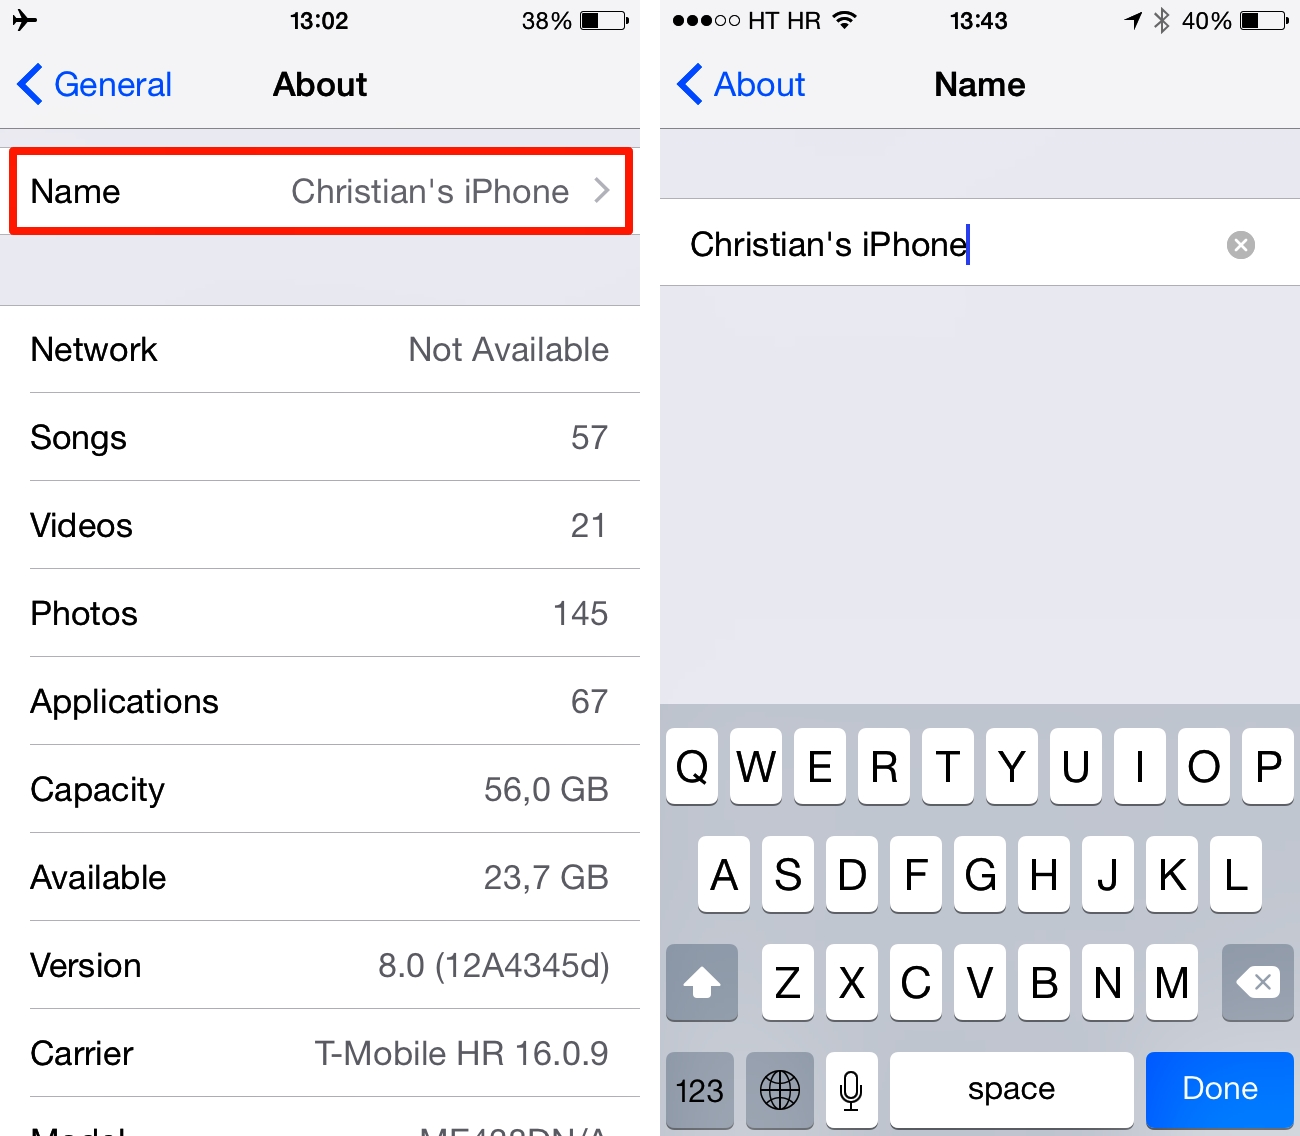
- Step 3: Tap on About
- Step 4: Locate the Name Field
- Step 5: Edit the Name
- Step 6: Save the New Name
On your iPhone’s home screen, locate and tap the “Settings” app. It is represented by a gear icon and can usually be found on the first page of the home screen.
Once you are in the Settings app, scroll down and tap “General”. This will open the general settings options for your iPhone.
In the General settings menu, scroll down until you see “About” and tap on it. This will display information about your iPhone, such as the model, serial number, and more.
Within the “About” section, you will see a field labeled “Name”. Tap on it to proceed to the next step.
A text field will appear where you can enter a new name for your iPhone. Use the on-screen keyboard to type in the desired name. You can use a combination of letters, numbers, and special characters.
After entering the new name, tap on “Done” or “Save” (depending on your iPhone model) to save the changes. Your iPhone’s name will be updated immediately.
Congratulations! You have successfully changed the name of your iPhone. The new name will now appear in various places such as the iCloud settings, AirDrop, and more.
Additional Tips for Changing iPhone Name
When it comes to changing the name of your iPhone, there are a few additional tips that can help you make the process smoother and more efficient. Whether you’re doing it for personalization or to make it easier to identify your device in a list, these tips will come in handy.
1. Avoid using special characters: When renaming your iPhone, it’s best to stick to alphanumeric characters only. Special characters like symbols or emojis may cause compatibility issues with certain apps or services.
2. Keep it simple and distinct: Choose a name that is simple, memorable, and easy to identify. Avoid using generic names or words that may be associated with other devices. This will help differentiate your iPhone from others in a crowded Wi-Fi or Bluetooth network.
3. Test it out: Before finalizing the new name, make sure to test it out by connecting to other devices or services. This will help you ensure that there are no conflicts or errors when using the new name.
4. Consider privacy: Be cautious when choosing a name that reveals personal information. Avoid using your full name or any other sensitive details that can be easily accessed by others.
5. Sync across devices: If you have multiple Apple devices, such as an iPad or Mac, consider keeping the device names consistent across all devices. This will make it easier to manage and locate your devices in the Apple ecosystem.
6. Document the original name: Before changing the name, it’s a good idea to take note of the original name somewhere, such as in a password manager or a secure note. This will come in handy if you need to reference the original name in the future.
7. Update connected services: After changing the name, don’t forget to update any connected services or devices that rely on the previous name to avoid any connectivity or compatibility issues.
By following these additional tips, you can confidently change the name of your iPhone and personalize it to suit your preferences while ensuring smooth and seamless device management. Remember to experiment with different names and find the one that reflects your style and identity.
Changing the name of your iPhone can be a simple yet effective way to personalize your device and make it truly yours. By following the step-by-step instructions mentioned earlier in this article, you can easily change the name of your iPhone to reflect your personality or preferences.
With just a few taps, you can update the name of your iPhone and give it a unique identity. Whether you want to use your own name, a witty phrase, or something that holds sentimental value, the process is quick and straightforward.
So go ahead and make your iPhone truly yours by customizing its name. It’s a small tweak that can make a big difference!
FAQs
1. Why would I want to change the name of my iPhone?
There are several reasons why you might want to change the name of your iPhone. One common reason is to personalize your device and make it easily identifiable, especially if you have multiple Apple devices. Changing the name can also help differentiate your iPhone when connecting to Bluetooth devices or AirDrop. Additionally, customizing the name of your iPhone can be a fun and creative way to express your individuality.
2. How do I change the name of my iPhone?
To change the name of your iPhone, simply follow these steps:
- Open the “Settings” app on your iPhone.
- Scroll down and tap on “General”.
- Tap on “About”.
- Next to “Name”, tap on the current name of your iPhone.
- Enter the new name you want to assign to your device.
- Tap “Done” to save the changes.
Once you’ve completed these steps, the new name you’ve chosen will appear as the identifier for your iPhone on various platforms and devices.
3. Can I change the name of my iPhone from iCloud?
No, you cannot change the name of your iPhone directly from iCloud. The name of your iPhone is a local setting and can only be changed on the device itself. However, once you change the name on your iPhone, it will reflect across all your connected iCloud devices.
4. Will changing the name of my iPhone affect its functionality?
No, changing the name of your iPhone will not affect its functionality. It is simply a cosmetic change that allows you to personalize your device. All the features and functions of your iPhone will continue to work as usual.
5. Can I change the name of my iPhone back to its original name?
Yes, you can change the name of your iPhone back to its original name if you wish. Simply follow the same steps mentioned earlier to access the “Name” setting and enter the original name of your iPhone. Once you save the changes, your iPhone will revert to its original name.