
Are you looking to change your name on your iPhone? Whether you’ve recently changed your legal name or simply want to update the display name on your device, it is possible to customize this information on your iPhone. Changing your name on your iPhone can be a straightforward process, allowing you to ensure that your device reflects your current preferred name. In this article, we will guide you through the steps to change your name on your iPhone. From updating your Apple ID details to modifying the name displayed on your device, we will cover everything you need to know. So, let’s jump in and discover how you can personalize your iPhone by changing your name!
Inside This Article
- Overview
- Step 1: Accessing the Settings
- Step 2: Changing Your Device Name
- Step 3: Applying the New Name
- Troubleshooting Tips
- Conclusion
- FAQs
Overview
Do you want to personalize your iPhone by changing its name? Whether you’re looking to add a touch of individuality or simply want to update the device’s name to reflect its new owner, changing the name of your iPhone is a simple and straightforward process. By customizing the name, you can make your device stand out among others when it appears in Bluetooth devices or on your home network. In this article, we will guide you through the steps to change your name on your iPhone, ensuring that you can personalize your device to your liking.
Changing the name on your iPhone allows you to make it unique and easily identifiable. It’s a simple way to add a personal touch to your device, especially if you frequently connect to Bluetooth devices or networks where your iPhone is listed. Additionally, if you’ve recently purchased a second-hand iPhone, changing the name can help to indicate that it now belongs to you.
Fortunately, the process of changing your name on your iPhone is quick and hassle-free. With just a few taps in the device’s settings, you’ll be able to give your iPhone a brand-new identity in no time. In the following sections, we’ll walk you through the step-by-step process to change the name on your iPhone.
Step 1: Accessing the Settings
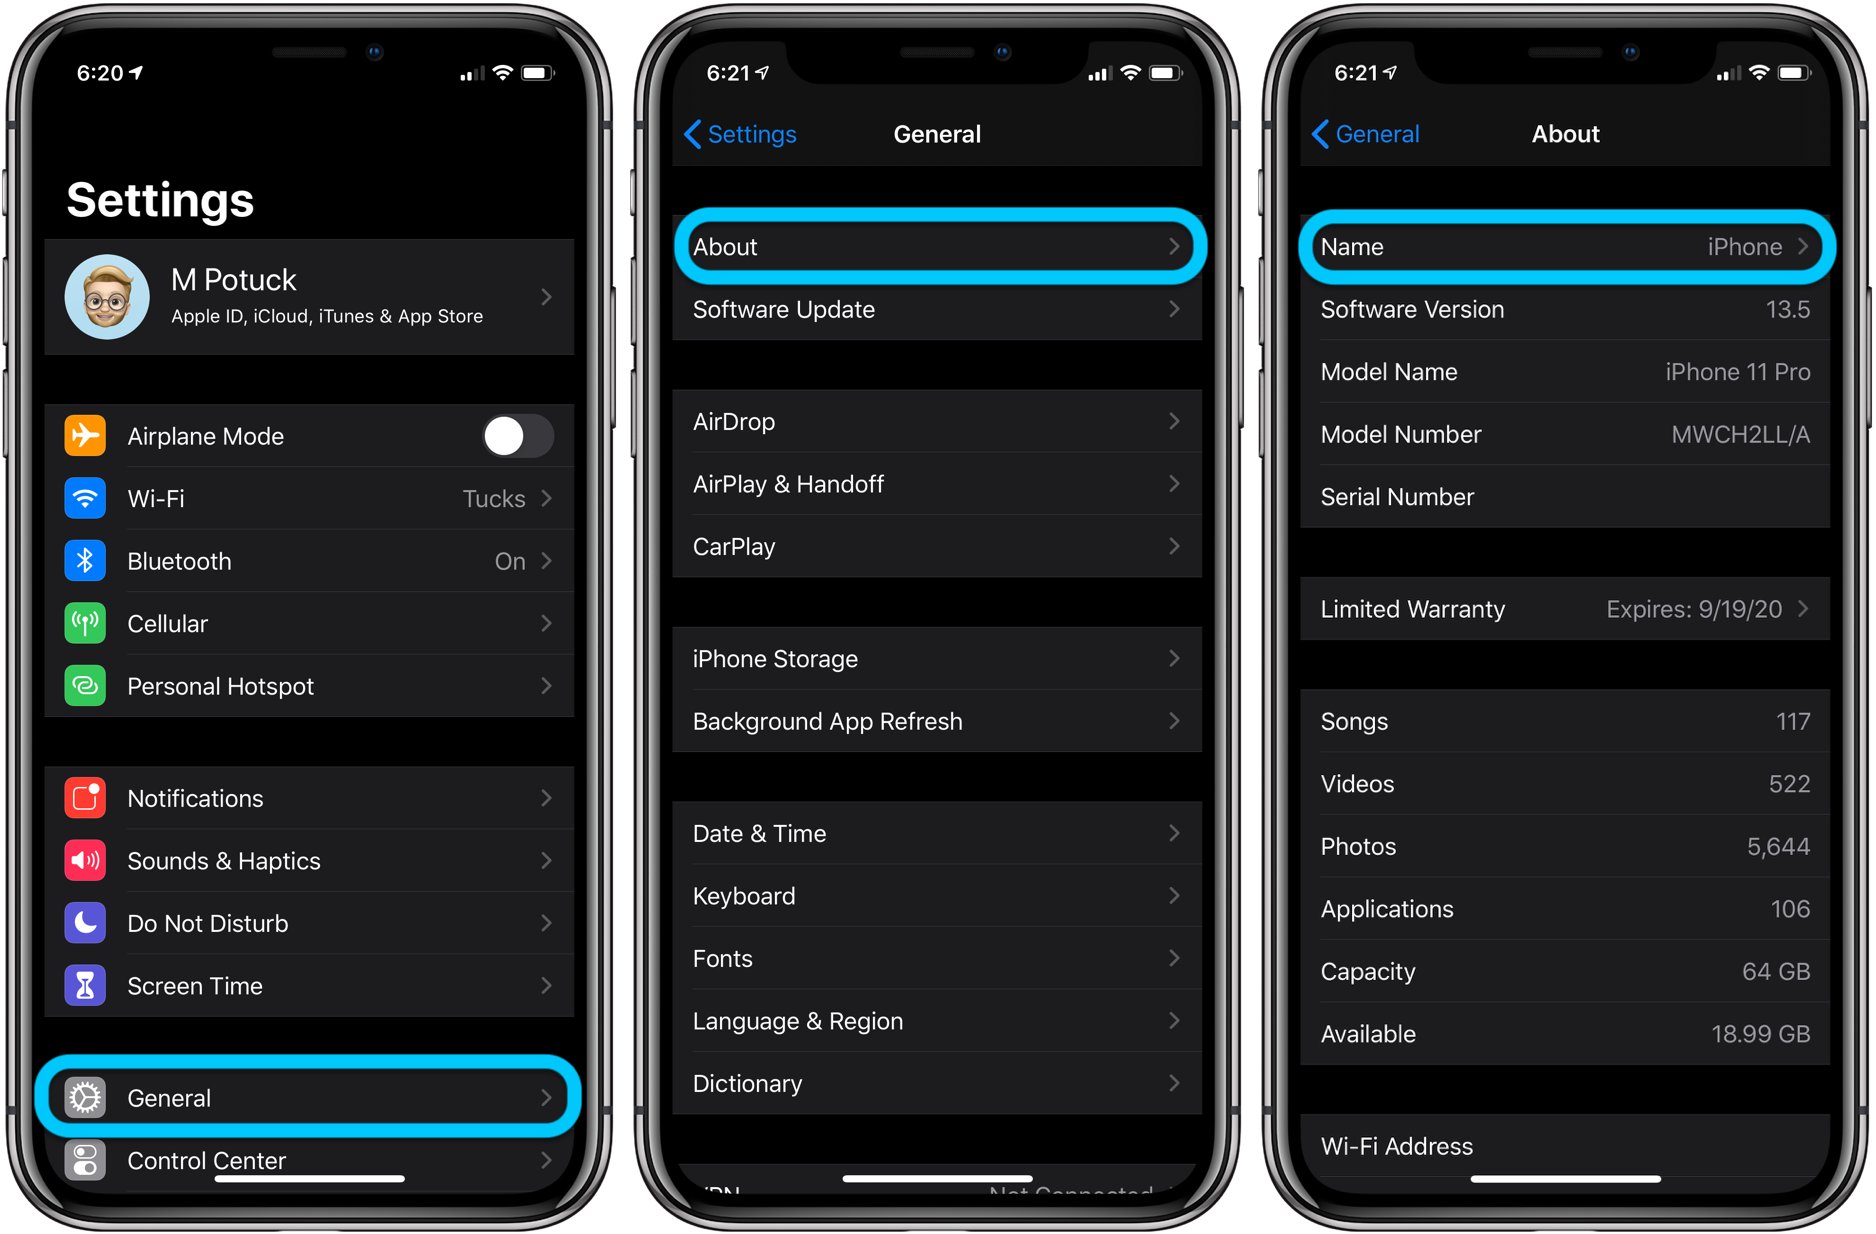
To change your name on your iPhone, the first step is to access the settings. To do this, unlock your iPhone and locate the “Settings” app on your home screen. The Settings app is represented by a gear icon and is usually located towards the top of the screen.
Once you have found the Settings app, tap on it to open it. This will take you to the main settings menu, where you can customize various aspects of your iPhone.
Within the Settings menu, you will find a list of different options. Scroll through the list until you see the option labeled “General”. Tap on “General” to access the general settings of your iPhone.
Inside the General settings, you will find a range of options related to your device’s performance and functionality. Scroll down the list until you see the option called “About”. Tap on “About” to continue.
In the About section, you will find detailed information about your iPhone, such as its model, software version, and capacity. Towards the top of the screen, you will see the current name of your iPhone listed under “Name”. Tap on the current name to proceed with changing it.
After tapping on the current name, a text field will appear, allowing you to edit the name. Use the keyboard to enter your desired new name for your iPhone. Make sure to choose a name that reflects your personal style or helps you easily identify your device.
Once you have entered the new name, tap on the “Done” button on the keyboard to save your changes. Your iPhone will automatically apply the new name, and you will see it displayed in the About section of the settings.
That’s it! You have successfully accessed the settings and changed the name on your iPhone. Next, let’s move on to step two to learn how to apply the new name.
Step 2: Changing Your Device Name
Now that you have accessed the settings on your iPhone, it’s time to proceed with the process of changing your device’s name. Follow the simple steps below to personalize your iPhone’s identity:
1. After opening the settings menu, you will see various options displayed. Scroll down and look for the “General” option. Tap on it to continue.
2. Within the General menu, you will find a list of sub-options. Look for “About” and tap on it to access additional settings related to your device.
3. Once you are in the About menu, you will see various pieces of information about your iPhone, such as the serial number and software version. Look for the “Name” option and tap on it.
4. A text box will appear, displaying your current device name. To change it, simply tap on the existing name and use the virtual keyboard to input your desired new name. Be creative and choose something that reflects your personality or makes you smile whenever you see it on your home screen.
5. After typing your new device name, tap on the “Done” button or simply click outside the text box to save the changes.
6. Congratulations! You have successfully changed the name of your iPhone. The new name will now be displayed on your device’s home screen, in iTunes, and when connected to other devices.
Note: Keep in mind that changing your device name will not affect any of your personal files or settings. It is purely a cosmetic change to customize your device.
Now that you have completed this step, you can move on to Step 3 to ensure that the new name is applied correctly.
Step 3: Applying the New Name
After you have successfully changed your iPhone’s name, the final step is to apply the new name and make it visible throughout the system. Here’s how you can do it:
1. Once you have entered the desired name in the “Name” field, tap on the “Done” button located on the keyboard. This will save the changes you made.
2. Now, navigate back to the main settings page by tapping the arrow in the top-left corner or using the back button at the top of the screen.
3. You will notice that the new name you entered will now be displayed below your device’s image and at the top of the page in the “General” settings section.
4. To ensure that the new name is applied throughout the system, restart your iPhone. You can do this by holding down the power button until the “slide to power off” option appears. Slide it to power off, then press and hold the power button again to turn it back on.
5. Once your iPhone has restarted, go back to the “Settings” and confirm that the new name is still displayed correctly. It should now be updated and visible in all areas of your device.
By applying these steps, you have successfully changed your iPhone’s name and ensured that it is reflected consistently across the system.
Troubleshooting Tips
Changing the name on your iPhone is a relatively straightforward process. However, there may be instances where you encounter some issues or face unexpected obstacles. Don’t worry, though! Here are some troubleshooting tips to help you navigate through any challenges you may encounter:
1. Check your internet connection: Before attempting to change your device name, ensure that you have a stable internet connection. Sometimes, an unstable or no internet connection can cause the name change to fail or prevent the new name from applying properly.
2. Restart your device: If you are experiencing any glitches or inconsistencies after changing your iPhone’s name, try restarting your device. Restarting can help resolve minor software or connectivity issues and ensure that the new name is applied correctly.
3. Update your iOS: Ensure that your iPhone is running the latest version of iOS. Outdated software can sometimes cause compatibility issues and prevent the name change from taking effect. Go to Settings > General > Software Update to check for any available iOS updates.
4. Reset network settings: If you’re still having trouble applying the new name, resetting your network settings may help. Keep in mind that this will also remove any saved Wi-Fi passwords, so be prepared to reconnect to your networks. Go to Settings > General > Reset > Reset Network Settings to perform this action.
5. Restore from backup: If none of the above steps work, you can try restoring your iPhone from a backup. This can help resolve any underlying software issues that may be hindering the name change. Before doing this, make sure you have a recent backup of your device so you don’t lose any important data.
6. Contact Apple Support: If all else fails, it may be time to reach out to Apple Support for assistance. They have the expertise to troubleshoot any persistent issues you are experiencing and can guide you through the process of changing your device name.
Remember, changing the name on your iPhone should be a simple process, but if you encounter any challenges, these troubleshooting tips should help you resolve them. Stay patient, follow the steps carefully, and soon you’ll have a personalized name that reflects your unique style and personality!
Conclusion
Changing your name on your iPhone is a simple process that can be done in just a few steps. Whether you want to personalize your device or update your information, the ability to change your name allows you to make your iPhone truly your own.
By following the steps outlined in this guide, you can easily modify the name associated with your iPhone. Whether it’s updating your contact information or personalizing your device with a fun nickname, the flexibility and customization options of the iPhone make it a versatile and user-friendly mobile phone.
Take advantage of this feature to make your iPhone uniquely yours and reflect your personality. So go ahead and change your name on your iPhone today!
FAQs
Q: Can I change my name on my iPhone?
A: Yes, you can change your name on your iPhone. Apple devices allow you to customize your personal information, including your name, to make it reflect your preferences or correct any inaccuracies.
Q: How do I change my name on my iPhone?
A: To change your name on your iPhone, follow these steps:
1. Go to the Settings app on your iPhone.
2. Scroll down and tap on “Contacts” or “Mail, Contacts, Calendars,” depending on your iOS version.
3. Tap on “My Info” or “Name, Phone Numbers, Email.”
4. Select or enter your desired name in the provided field.
5. Tap “Done” to save the changes.
Please note that the exact steps may vary slightly depending on your iPhone model and iOS version.
Q: Why should I change my name on my iPhone?
A: Changing your name on your iPhone can help personalize your device, make it feel more personal and tailored to your preferences. Additionally, having the correct name associated with your account can ensure that your contacts and other apps display your name accurately when communicating with others.
Q: Will changing my name on my iPhone affect my contacts?
A: No, changing your name on your iPhone will not affect your contacts. Your contacts are stored separately from your device’s personal information. The change you make to your name on your iPhone will only be reflected in your device settings and used in certain apps associated with your Apple ID.
Q: Can I change my name on my iPhone without changing it everywhere?
A: Yes, you can change your name on your iPhone without it being automatically changed everywhere. The change you make to your name on your iPhone is specific to your device settings and certain apps associated with your Apple ID. It will not automatically update your name anywhere else, such as social media profiles, email accounts, or other accounts linked to your name.