
Are you tired of your iPhone’s automatic brightness constantly adjusting and not staying at the level you desire? It can be frustrating when you want to control the brightness yourself but the device has a mind of its own. The good news is, there are steps you can take to stop the auto brightness feature on your iPhone. In this article, we will guide you through the process of disabling auto brightness, allowing you to have complete control over the brightness settings on your iPhone. So, if you’re ready to take charge and have your iPhone display just the way you want it, read on to learn how to disable the auto brightness feature on your iPhone.
Inside This Article
- Disabling Auto-Brightness on iPhone
- Adjusting Display Brightness Manually
- Enabling True Tone Display
- Using Night Shift Mode to Reduce Brightness
- Conclusion
- FAQs
Disabling Auto-Brightness on iPhone
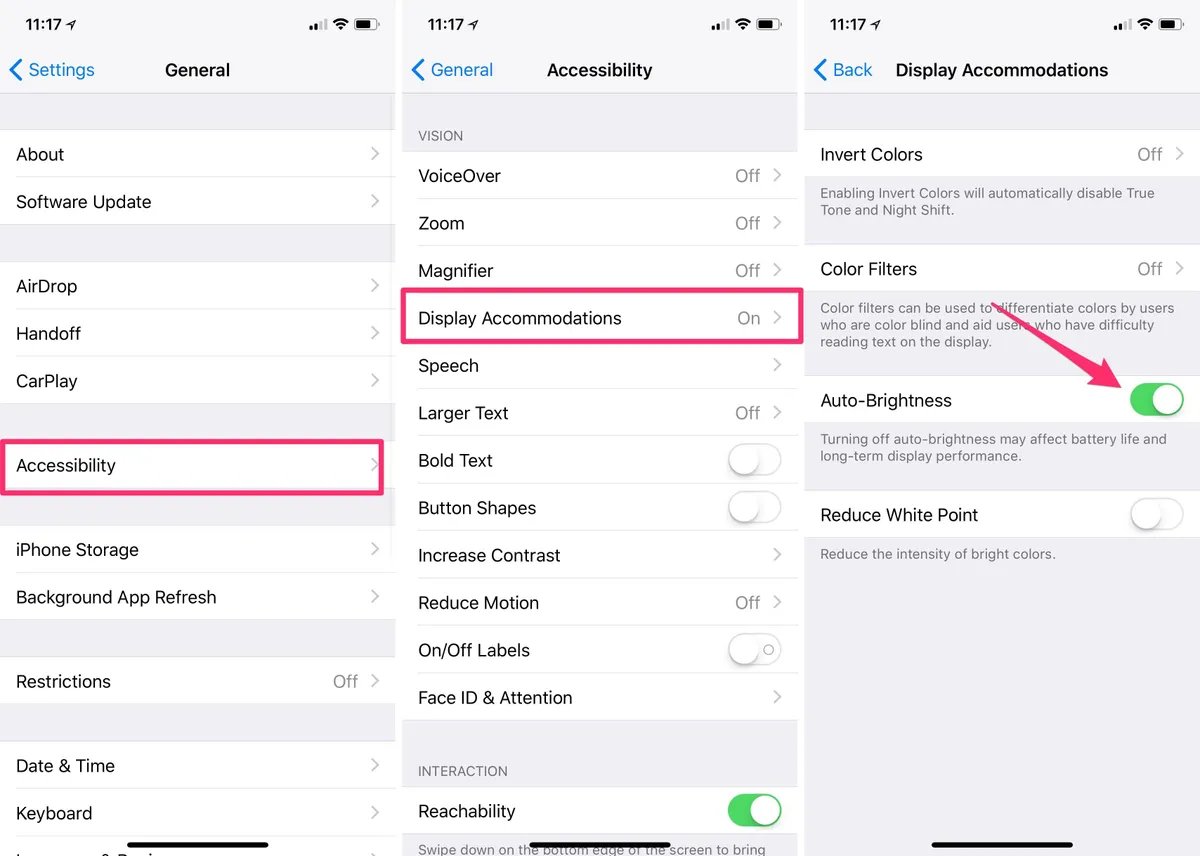
The Auto-Brightness feature on your iPhone adjusts the display brightness based on the surrounding lighting conditions. While this can be convenient, it may not always provide the desired brightness level. If you find that the Auto-Brightness feature is constantly making adjustments that you find inconvenient or distracting, you can easily disable it. Here’s how:
- Start by opening the “Settings” app on your iPhone. This can be found on your home screen, represented by the gear icon.
- Scroll down and tap on “Display & Brightness.
- In the “Display & Brightness” settings, you will see the option for “Auto-Brightness”. Simply toggle the switch to turn it off. When the switch is in the off position, the Auto-Brightness feature will no longer adjust the display brightness automatically.
Disabling Auto-Brightness gives you full control over the brightness level of your iPhone’s display. You can now manually adjust the brightness according to your preferences or the specific lighting conditions you are in.
It’s worth noting that disabling the Auto-Brightness feature may impact your iPhone’s battery life slightly, as the display brightness will remain static unless manually adjusted. However, the difference is typically negligible.
If you ever wish to re-enable Auto-Brightness, simply follow the same steps outlined above and toggle the switch to the on position.
Adjusting Display Brightness Manually
Your iPhone provides you with the flexibility to manually adjust the display brightness according to your preference. By customizing the brightness level, you can optimize your viewing experience and conserve battery life. Here’s how you can do it:
Step 1: Locate the “Settings” app on your iPhone’s home screen and tap on it.
Step 2: In the settings menu, scroll down and tap on “Display & Brightness.”
Step 3: On the next screen, you will find the “Brightness” slider. Drag the slider left or right to decrease or increase the brightness level, respectively. The changes in brightness are instantly reflected on the screen, allowing you to find the perfect balance between clarity and battery optimization.
Step 4: Alternatively, you can also access the brightness settings by swiping down from the top-right corner of the screen to open the Control Center. From there, you will see a brightness slider that you can adjust by dragging your finger up or down.
Step 5: To enhance your display experience further, you can enable “Auto-Brightness” by toggling the switch next to it. When enabled, your iPhone will automatically adjust the brightness based on the ambient light conditions, providing you with optimal visibility in various lighting environments.
Note: Keep in mind that manually adjusting the brightness can help you customize the display to your liking, but it may impact your battery life. Consider finding a balance between an ideal display and battery optimization.
Pro Tip: If you frequently switch between different lighting environments, you can make use of the Control Center’s “Night Shift” mode or enable the “True Tone” display feature, as mentioned in the next sections, to automatically adjust the color temperature and brightness for a more comfortable viewing experience.
Enabling True Tone Display
If you are looking for a way to improve the display experience on your iPhone and reduce eye strain, enabling True Tone Display is a great solution. True Tone technology, available on newer iPhone models, automatically adjusts the color temperature and intensity of the display to match the ambient lighting conditions around you. This creates a more natural and accurate viewing experience, regardless of the lighting environment.
To enable True Tone on your iPhone, follow these steps:
- Open the Settings app on your iPhone.
- Scroll down and tap on “Display & Brightness”.
- Toggle the switch next to “True Tone” to enable it.
Once you enable True Tone, your iPhone will continuously monitor the ambient light using sensors and adjust the display’s white balance accordingly. This results in a more comfortable viewing experience, as the screen adapts to the surrounding lighting conditions.
It’s worth noting that enabling True Tone might affect the way colors appear on your iPhone display. However, the adjustment is subtle and is designed to provide a more natural and accurate representation of colors.
True Tone is especially beneficial when using your iPhone in changing lighting environments, such as moving from indoor to outdoor settings. It ensures that the display remains comfortable to view and minimizes the strain on your eyes.
While True Tone is a fantastic feature, it’s important to note that it’s only available on newer iPhone models, including iPhone 8 and later, as well as the iPhone X series. If you are using an older iPhone model, you may not have the option to enable True Tone display.
Pro Tip: If you have already enabled Auto-Brightness on your iPhone, keep in mind that it works in conjunction with True Tone. Auto-Brightness adjusts the overall brightness of the display, while True Tone adjusts the color temperature. This combination ensures the best possible viewing experience.
By enabling True Tone display on your iPhone, you can enjoy a more comfortable and accurate visual experience, with the screen adapting to different lighting conditions. It’s a small but significant feature that enhances the overall usability of your iPhone.
Using Night Shift Mode to Reduce Brightness
Night Shift mode is a feature available on iPhones that can help reduce the brightness of the screen. It works by adjusting the color temperature of your device’s display, making it warmer in the evenings and reducing the amount of blue light emitted. By using Night Shift mode, you can make your screen easier on your eyes, especially in low-light environments.
To enable Night Shift mode, follow these steps:
- Open the Settings app on your iPhone.
- Scroll down and tap on “Display & Brightness”.
- Under the Display & Brightness settings, you’ll find the “Night Shift” option. Tap on it.
- You can choose to manually enable Night Shift mode by tapping on “Manually Enable Until Tomorrow”. This will keep Night Shift mode on until the next day.
- If you prefer to schedule Night Shift mode to automatically turn on and off at specific times, tap on “Scheduled”. From there, you can set the start and end times for Night Shift mode.
Once Night Shift mode is activated, you will notice that the screen color becomes warmer, with a slight yellow tint. This helps to reduce the harshness of the brightness, making it easier on your eyes, especially during nighttime or in dark environments.
It’s important to note that Night Shift mode may slightly affect the accuracy of color representation on your screen. However, for most users, the benefits of reducing eye strain and improving sleep quality outweigh this minor trade-off.
If you find that the screen is still too bright even with Night Shift mode enabled, you can also manually adjust the display brightness to a lower level for further customization.
By utilizing Night Shift mode on your iPhone, you can reduce the overall brightness and improve your viewing experience in low-light conditions.
Conclusion
In conclusion, learning how to stop auto brightness on your iPhone can greatly enhance your user experience. By taking control over the brightness settings, you can customize the display to your preferences, whether it’s to conserve battery life, reduce eye strain, or simply have more control over your device’s appearance.
By following the steps outlined in this guide, you can easily disable the auto brightness feature on your iPhone and manually adjust the brightness level according to your needs. Remember, it’s important to find the balance that works best for you — a brightness level that is comfortable for your eyes and suitable for the surrounding lighting conditions.
So, go ahead and take charge of your iPhone’s display settings. Enjoy a more personalized and tailored experience by managing the brightness manually. Embrace the freedom to choose the perfect brightness level that suits your needs and preferences.
FAQs
1. How do I disable auto brightness on my iPhone?
2. Why would I want to turn off auto brightness on my iPhone?
3. Can I adjust the brightness manually after disabling auto brightness?
4. Will disabling auto brightness improve battery life on my iPhone?
5. How do I enable auto brightness again if I decide to re-enable it later?