
Are you tired of your iPhone constantly auto-joining any Wi-Fi network it encounters? This feature, designed to automatically connect to known networks, can become quite annoying when you’re constantly bombarded with Wi-Fi login pages or experiencing slow and unstable connections.
In this article, we will show you how to stop auto-joining Wi-Fi on your iPhone. Whether you want to regain control over which networks you connect to or simply prevent your device from constantly seeking out networks, we have you covered.
By following our step-by-step guide, you’ll be able to customize your iPhone’s Wi-Fi connection preferences, ensuring a smoother and more enjoyable internet browsing experience. Let’s dive in and take back control of your Wi-Fi settings!
Inside This Article
- Overview
- Reasons to Stop Auto-Joining Wi-Fi
- How to Disable Auto-Joining Wi-Fi on iPhone
- Managing Preferred Wi-Fi Networks
- Conclusion
- FAQs
Overview
Auto-joining Wi-Fi networks on your iPhone can be a convenient feature, as it automatically connects you to known networks without requiring manual intervention. However, there may be situations where you want more control over which networks your iPhone automatically joins. Whether you want to prioritize network security, avoid unreliable connections, or simply limit data usage, disabling auto-joining Wi-Fi can be a helpful solution.
Fortunately, disabling auto-joining Wi-Fi on your iPhone is a straightforward process that can be done through the device’s settings. By following a few simple steps, you can regain control over your Wi-Fi connections and decide which networks your iPhone joins automatically.
In this article, we will explore the reasons why you might want to stop auto-joining Wi-Fi networks on your iPhone, as well as guide you through the process of disabling this feature. We will also discuss how you can manage your preferred Wi-Fi networks to ensure seamless connectivity while maintaining control over your device’s network connections.
Reasons to Stop Auto-Joining Wi-Fi
Auto-joining Wi-Fi networks on your iPhone can be convenient, as it allows your device to automatically connect to known networks without any manual effort. However, there are several reasons why you might want to disable this feature:
1. Security concerns: Auto-joining can potentially expose you to security risks. When your iPhone connects to public Wi-Fi networks without your knowledge, it could be vulnerable to hackers and cyberattacks.
2. Network congestion: Automatic Wi-Fi connection might seem helpful, but it can also lead to network congestion. If your iPhone keeps connecting to different Wi-Fi networks, it can affect your internet speed and disrupt your overall browsing experience.
3. Privacy implications: Joining random public Wi-Fi networks exposes your online activities to the network provider. They can potentially monitor your internet usage, track your location, and collect personal information without your consent.
4. Unreliable connections: Sometimes, your iPhone may connect to weak or unstable Wi-Fi signals due to auto-joining. This can result in frequent disconnections, slow browsing, and a frustrating user experience.
5. Battery drain: Constantly searching for and connecting to Wi-Fi networks consumes battery power. Disabling auto-joining can help conserve battery life and extend the usage time of your iPhone.
Considering these reasons, it is important to evaluate whether auto-joining Wi-Fi networks aligns with your preferences and prioritizes your security, privacy, and overall browsing experience.
How to Disable Auto-Joining Wi-Fi on iPhone
If you are tired of your iPhone constantly connecting to Wi-Fi networks without your consent, there is a simple solution – disable the auto-joining feature. By default, your iPhone is set to automatically connect to known Wi-Fi networks, which can be convenient in some situations but frustrating in others. To regain control over your Wi-Fi connections, follow these steps to disable auto-joining on your iPhone.
Before we dive into the steps, it is important to note that disabling auto-joining Wi-Fi will prevent your iPhone from automatically connecting to saved networks. You will still be able to manually connect to Wi-Fi networks when desired.
1. Open the Settings app on your iPhone. It can be identified by the gear icon.
2. Scroll down and tap on “Wi-Fi”.
3. On the Wi-Fi page, you will see a switch for “Auto-Join”. This switch allows your iPhone to automatically connect to known Wi-Fi networks. To disable auto-joining, simply toggle off the switch.
4. After turning off the “Auto-Join” switch, your iPhone will no longer connect to Wi-Fi networks automatically.
It is worth noting that disabling auto-joining will not remove or forget any saved Wi-Fi networks on your iPhone. If you want to remove or forget a specific network, you can do so by following these steps:
1. Open the Settings app and tap on “Wi-Fi”.
2. Find the Wi-Fi network that you want to remove or forget from the list of available networks.
3. Tap on the (i) icon next to the network name.
4. On the network details page, tap on “Forget This Network”. Confirm your choice by tapping “Forget” when prompted.
By following these steps, you can regain control over your Wi-Fi connections and prevent your iPhone from automatically joining networks without your permission. This is particularly useful in situations where you want to prioritize cellular data or when you are in a location with unreliable or insecure Wi-Fi networks.
Managing Preferred Wi-Fi Networks
When it comes to managing the preferred Wi-Fi networks on your iPhone, you have the flexibility to add, remove, and prioritize the networks based on your preferences. This can be especially helpful when you frequently connect to multiple Wi-Fi networks, such as your home, workplace, or favorite coffee shop. Here are some tips on how to effectively manage your preferred Wi-Fi networks:
Add a Preferred Wi-Fi Network: To add a new network to your preferred list, simply go to the Settings app on your iPhone and tap on Wi-Fi. From there, you’ll see a list of available networks. Select the one you want to add, enter the password if required, and tap on the “Join” button. Once connected, the network will be automatically added to your preferred networks list.
Remove a Preferred Wi-Fi Network: If you no longer want a specific Wi-Fi network to be in your preferred list, you can easily remove it. Navigate to the Settings app, tap on Wi-Fi, and you’ll see the list of preferred networks. Swipe left on the network you wish to remove and tap on the “Forget” button. This will remove the network from your preferred list, and your iPhone will no longer automatically connect to it.
Change the Priority of Preferred Wi-Fi Networks: Sometimes, you may prefer one Wi-Fi network over another, and you want your iPhone to prioritize it when both networks are available. In such cases, you can adjust the priority of your preferred networks. To do this, go to the Settings app, tap on Wi-Fi, and then tap on the “i” icon next to the network you want to prioritize. From there, you can drag the network up or down to change its position in the list. Your iPhone will connect to the networks in the order they appear on the list.
Disable Auto-Join for a Preferred Wi-Fi Network: If you want to keep a Wi-Fi network in your preferred list but don’t want your iPhone to automatically join it, you can disable the auto-join feature. To do this, go to the Settings app, tap on Wi-Fi, and then tap on the “i” icon next to the network you want to modify. Toggle off the “Auto-Join” option. This will prevent your iPhone from automatically connecting to the network, but it will still be listed as a preferred network for manual connection.
By effectively managing your preferred Wi-Fi networks on your iPhone, you can ensure seamless connectivity and prioritize the networks that matter to you the most. Whether you’re at home, work, or on the go, having control over your iPhone’s Wi-Fi settings allows you to stay connected with ease.
Conclusion
In conclusion, knowing how to stop your iPhone from automatically joining Wi-Fi networks can greatly improve your mobile experience. By implementing these steps, you can avoid unwanted internet connections and potentially save on battery life and data usage.
First, make sure to disable the Auto-Join feature in your Wi-Fi settings to prevent your iPhone from connecting to unrecognized networks. Additionally, carefully manage your network settings and prioritize trusted networks to ensure a secure and seamless connection.
Remember, controlling your Wi-Fi network connections allows you to have more control over your browsing experience and enhances your device’s performance. So take the time to customize your settings and enjoy a hassle-free mobile experience.
FAQs
1. Can I stop my iPhone from automatically joining Wi-Fi networks?
Yes, you can prevent your iPhone from automatically joining Wi-Fi networks. You can do this by adjusting the Wi-Fi settings on your device. Let me guide you through the process.
2. How do I disable auto-join for Wi-Fi networks on my iPhone?
To disable auto-join for Wi-Fi networks on your iPhone, follow these steps:
- Open the Settings app on your iPhone.
- Scroll down and tap on Wi-Fi.
- Tap on the Wi-Fi network you want to change the settings for.
- Toggle off the “Auto-Join” switch.
This will prevent your iPhone from automatically joining that specific Wi-Fi network.
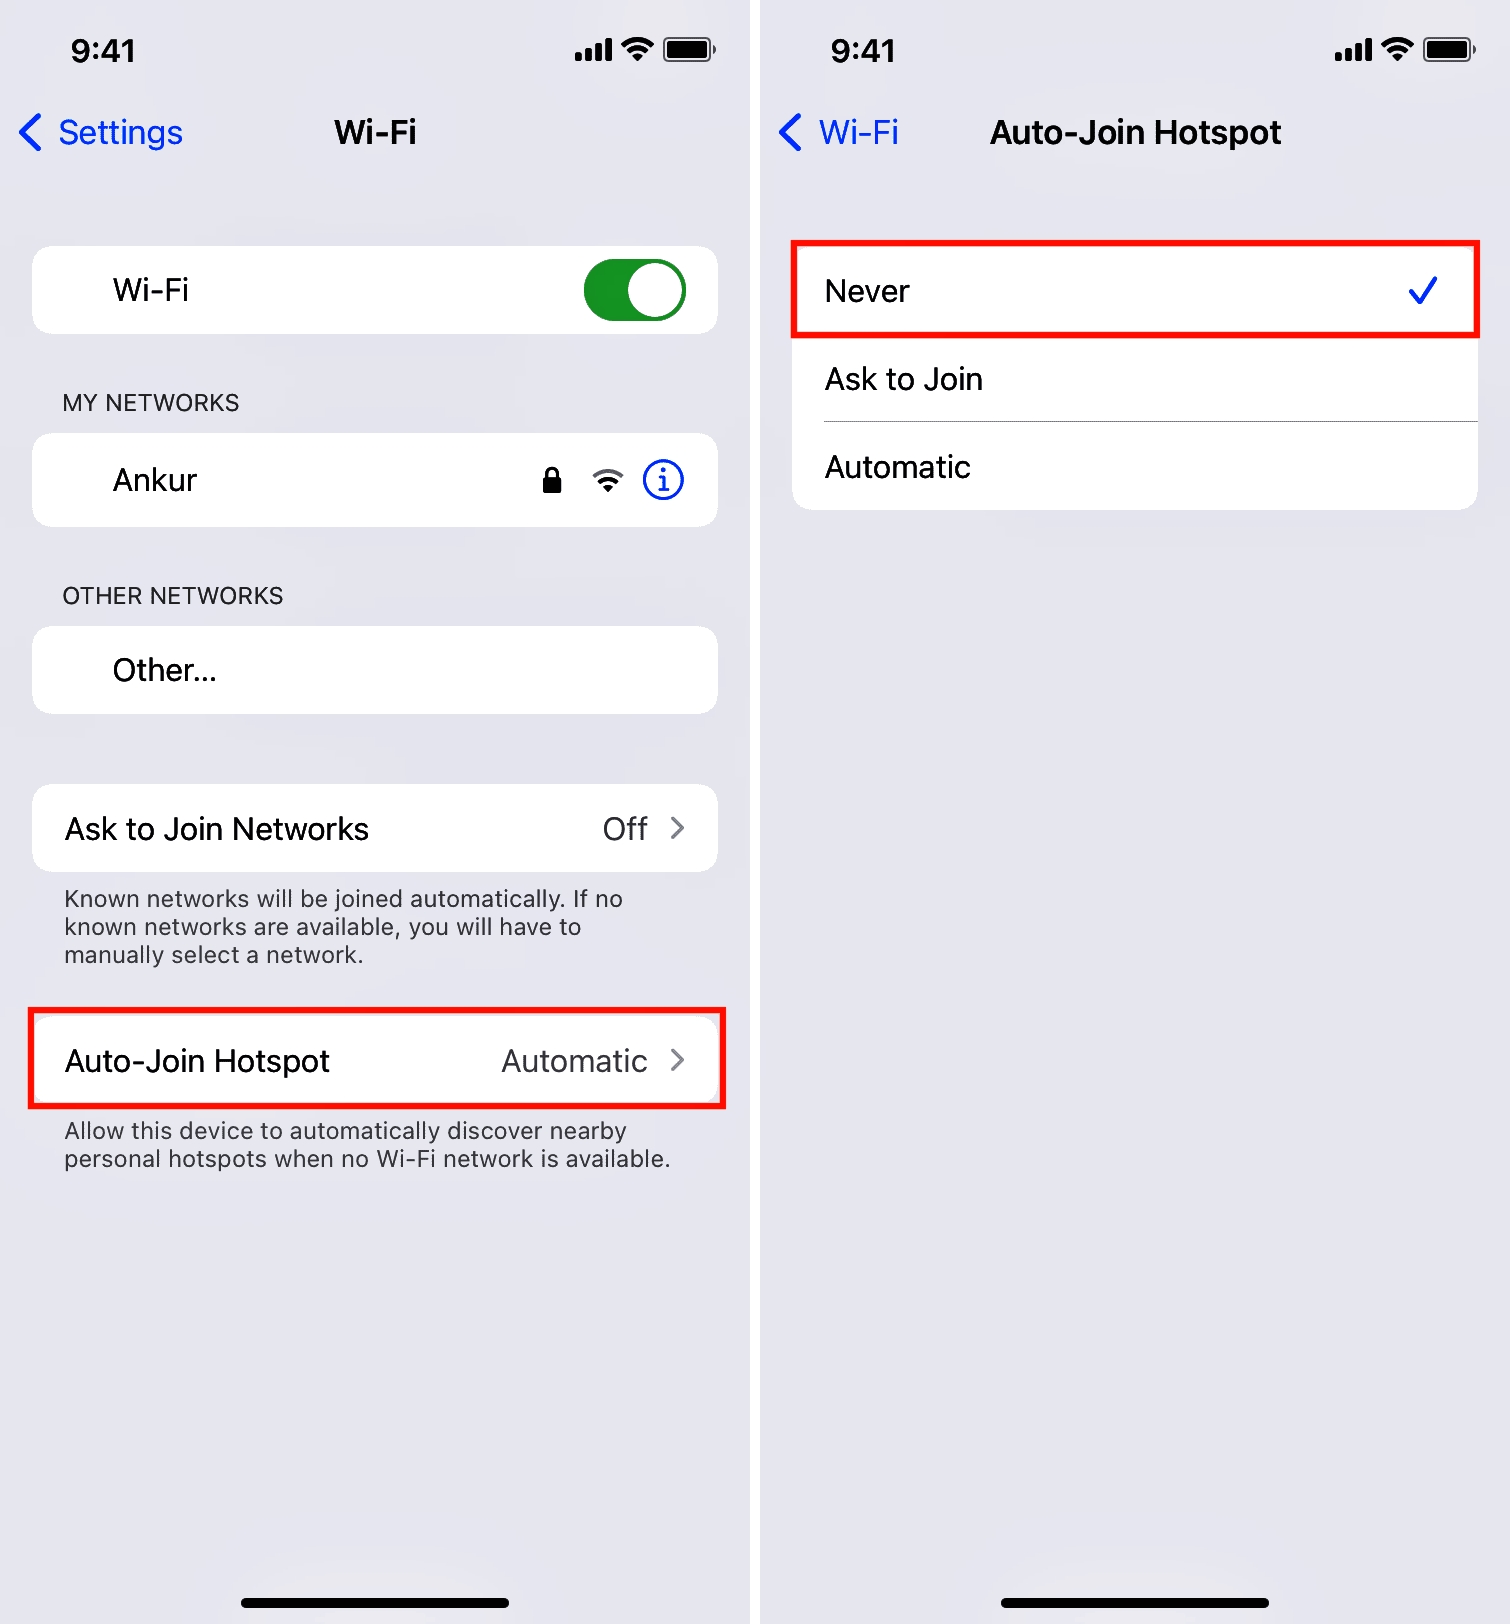
3. Can I disable auto-join for all Wi-Fi networks on my iPhone?
Yes, you can disable auto-join for all Wi-Fi networks on your iPhone by following these steps:
- Open the Settings app on your iPhone.
- Scroll down and tap on Wi-Fi.
- Toggle off the “Auto-Join Hotspots” switch.
Once you disable auto-join for all Wi-Fi networks, your iPhone will no longer automatically connect to any Wi-Fi networks.
4. Will disabling auto-join for Wi-Fi networks affect my ability to connect to Wi-Fi?
No, disabling auto-join for Wi-Fi networks will not affect your ability to connect to Wi-Fi networks. You can still manually connect to Wi-Fi networks by going to the Wi-Fi settings on your iPhone and selecting the network you want to join.
5. How can I reconnect to a Wi-Fi network after disabling auto-join?
If you have disabled auto-join for a Wi-Fi network and want to reconnect to it, follow these steps:
- Open the Settings app on your iPhone.
- Scroll down and tap on Wi-Fi.
- Select the Wi-Fi network you want to join.
- Enter the password for the network if prompted.
Your iPhone will now connect to the selected Wi-Fi network.