
Are you tired of having to unlock your iPhone every time you want to use it? You’re not alone. The lock screen on an iPhone can be quite bothersome, especially if you have a habit of constantly checking your device. Thankfully, there is a way to disable the lock screen on your iPhone and eliminate that extra step. By following a few simple steps, you can bypass the lock screen and have instant access to your phone’s features. In this article, we will guide you through the process of disabling the lock screen on your iPhone, allowing you to save time and enjoy a more streamlined user experience. So, let’s get started and discover how to regain control of your iPhone without the hassle of the lock screen.
Inside This Article
- Why Disable Lock Screen on iPhone
- Method 1: Disable Lock Screen via Settings
- Method 2: Disable Lock Screen via Siri
- Method 3: Disable Lock Screen via Guided Access
- Method 4: Disable Lock Screen via Find My iPhone
- Conclusion
- FAQs
Why Disable Lock Screen on iPhone
The lock screen on an iPhone serves as a security measure to prevent unauthorized access to your device. It requires a passcode, fingerprint, or Face ID to unlock the iPhone and access its contents. However, there may be situations where disabling the lock screen can be convenient or necessary. Here are a few reasons why you might want to disable the lock screen on your iPhone:
- Convenience: Disabling the lock screen can save you the hassle of constantly entering your passcode or using biometric authentication methods. It allows for quick access to your device without any extra steps.
- Customization: Some users prefer to personalize their iPhone with a unique aesthetic or custom interface. Disabling the lock screen can provide a seamless transition between the device’s screen-off and screen-on states, enhancing the overall user experience.
- Accessibility: For individuals with physical disabilities or impairments, constantly interacting with the lock screen can be challenging. By disabling it, users can access their iPhone more easily using alternative assistive technologies like VoiceOver or Switch Control.
- Continuity: In certain situations, such as when using your iPhone as a media player or digital photo frame, it may be more convenient to keep the screen on without having to unlock it repeatedly. Disabling the lock screen allows for uninterrupted viewing and saves battery life by preventing the screen from turning off automatically.
Method 1: Disable Lock Screen via Settings
If you want to disable the lock screen on your iPhone, you can do so easily by following a few simple steps in the Settings app. Turning off the lock screen can be beneficial if you find it unnecessary or if you want to bypass it for convenience. Here’s how you can disable the lock screen via Settings:
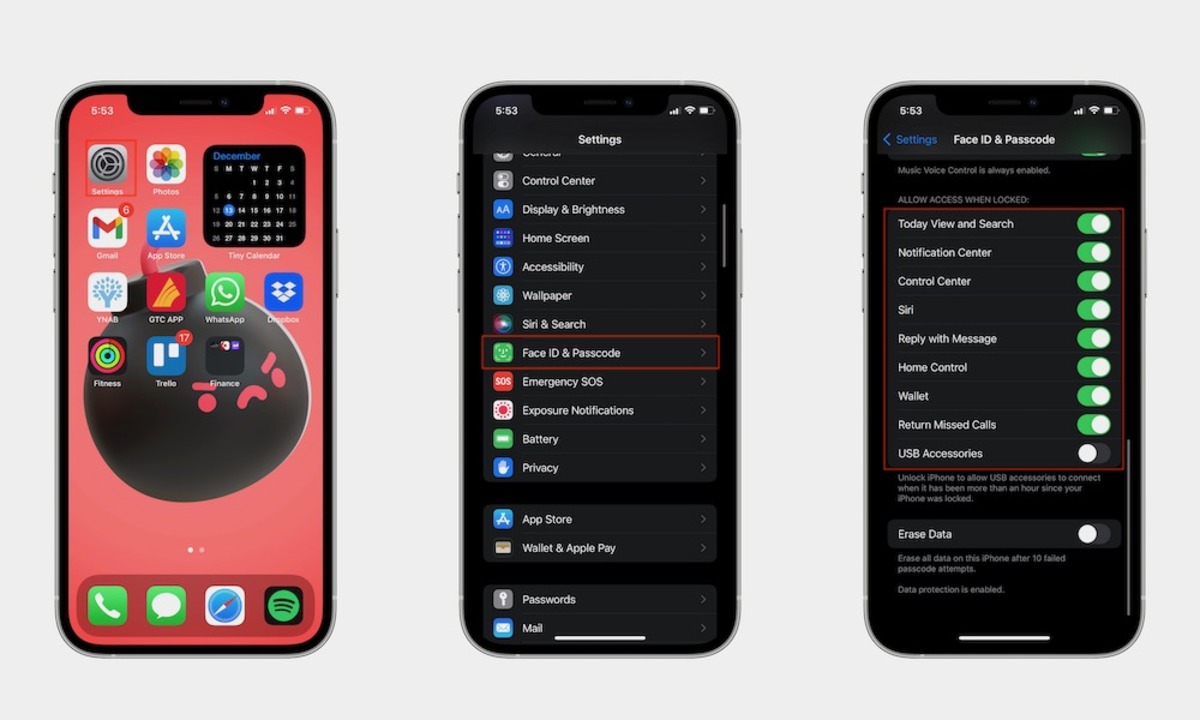
1. Open the “Settings” app on your iPhone by tapping on the gear icon.
2. Scroll down and tap on “Display & Brightness.”
3. On the next screen, look for the “Auto-Lock” option and tap on it.
4. You will now see different time intervals for auto-lock ranging from 30 seconds to 5 minutes. Tap on the desired time interval or select “Never” to disable the lock screen entirely.
5. Once you have selected the desired option, exit the settings. Your lock screen will now be disabled or set to the chosen time interval.
It’s important to note that disabling the lock screen can have security implications. Without a lock screen, anyone can access your iPhone without authorization. Therefore, it’s crucial to consider the potential risks and ensure that you have appropriate security measures in place, such as a strong passcode.
If you ever change your mind and want to re-enable the lock screen, simply follow the same steps and select a time interval for auto-lock, or choose a different option that suits your preferences.
Disabling the lock screen can be a convenient option for those who do not wish to go through the process of unlocking their iPhone every time they use it. However, it’s important to assess the risks and ensure that you have other security measures in place to protect your device and personal data.
Method 2: Disable Lock Screen via Siri
If you’re looking for a quick and convenient way to disable the lock screen on your iPhone, using Siri might just be the solution for you. By utilizing Siri’s voice command capabilities, you can bypass the lock screen and gain immediate access to your device without having to enter a passcode or use biometrics. Here’s how you can do it:
1. Activate Siri by either pressing and holding the Home button (on older iPhone models) or the side button (on newer iPhone models) or by saying “Hey Siri” if you have enabled that feature.
2. Once Siri is activated, simply ask it to perform a task that requires unlocking your iPhone. For example, you can say “Open Messages” or “Open Photos.”
3. Siri will then prompt you to unlock your iPhone by saying “To do that, I’ll need you to unlock your iPhone first.”
4. At this point, instead of unlocking your iPhone, simply press the Home or side button to put your device to sleep.
5. Now, wake up your iPhone by pressing the Home or side button again, and voila! You will find yourself bypassing the lock screen and directly accessing the app or function you asked Siri to open.
It’s important to note that using Siri to disable the lock screen provides temporary access to your device. Once you close the app or function that Siri opened, your iPhone will return to a locked state. Additionally, be aware that anyone who has access to your voice or can mimic your voice might also be able to use Siri to bypass the lock screen. Thus, it’s crucial to exercise caution and only use this method in trusted environments.
Method 3: Disable Lock Screen via Guided Access
Guided Access is a feature in iOS that allows you to restrict your iPhone to a specific app and disable certain functionalities, including the lock screen. This method is particularly useful if you want to lend your iPhone to someone temporarily without giving them access to your personal information.
To disable the lock screen using Guided Access, follow these steps:
- Go to the “Settings” app on your iPhone.
- Scroll down and tap on “Accessibility”.
- Tap on “Guided Access”.
- Toggle the switch to turn on Guided Access.
- Tap on “Passcode Settings” to set a passcode for Guided Access.
- Choose a passcode that will be easy for you to remember.
- Once you have set the passcode, go back to the main Settings screen.
- Now open the app you want to use in Guided Access mode.
- Triple-click the side button or the Home button (depending on your iPhone model) to enable Guided Access.
- You will see a menu with options to disable specific features. Tap on “Options”.
- Disable the “Sleep/Wake Button” by toggling the switch next to it.
- Tap on “Resume” to enter Guided Access mode.
Your iPhone will now be locked into the selected app, and the lock screen will be disabled. To exit Guided Access mode and re-enable the lock screen, simply triple-click the side button or the Home button and enter your passcode.
Note that Guided Access will only work for the app you were using when you activated it. If you switch to another app or close the current app, Guided Access will be disabled, and the lock screen will function normally.
This method provides a temporary solution for disabling the lock screen and can be helpful in certain situations. However, if you want a more permanent solution, consider using the first two methods mentioned in the article.
Method 4: Disable Lock Screen via Find My iPhone
If you’ve lost your iPhone or suspect that it has been stolen, one of the first actions you should take is to enable the “Lost Mode” via Find My iPhone. An added benefit of enabling Lost Mode is that it automatically disables the lock screen on your iPhone, making it inaccessible to unauthorized users.
To use this method, you need to have previously set up and activated the Find My iPhone feature on your device. If you haven’t done so, you can do it through the iCloud settings on your iPhone.
Once you have activated Find My iPhone, follow these steps to disable the lock screen:
- Open the Find My iPhone app on another iOS device or go to the iCloud website on a computer.
- Log in using your Apple ID and password.
- Select your iPhone from the list of devices.
- Click on the “Lost Mode” option.
- Enter a phone number where you can be reached and a message to display on the lock screen.
- Click on “Enable” or “OK” to confirm your selection.
By enabling Lost Mode, your iPhone will be locked remotely, and a custom message will appear on the lock screen, providing a contact number for anyone who finds it to return it to you. It also disables access to your personal data, ensuring that your information remains secure.
Keep in mind that once you have disabled the lock screen using Find My iPhone, you won’t be able to use your iPhone until you regain physical access to it. It’s important not to lose sight of the fact that disabling the lock screen is a security measure to protect your personal data in case your iPhone is lost or stolen.
If you recover your iPhone or deactivate Lost Mode, you can re-enable the lock screen by following the steps mentioned earlier.
Remember to keep your Apple ID and password secure and avoid sharing them with anyone to prevent unauthorized access to your device and personal information.
Conclusion
Disabling the lock screen on your iPhone can offer convenience and enhance your user experience. Whether you prefer quick access to your device or want to bypass the additional step of unlocking your phone, there are several methods you can use to disable the lock screen.
By exploring the settings menu, you can adjust the auto-lock time, turn off passcode lock, or enable Face ID or Touch ID for seamless unlocking. Additionally, you can utilize AssistiveTouch or Siri to bypass the lock screen. However, it’s important to consider the trade-off between security and convenience when choosing to disable the lock screen.
Remember to evaluate your personal needs and usage patterns before deciding which method works best for you. Ultimately, the goal is to strike a balance between accessibility and protecting the sensitive information stored on your iPhone.
FAQs
1. Can I disable the lock screen on my iPhone?
Yes, you can disable the lock screen on your iPhone. By doing so, you can access your device without having to enter a passcode or use Touch ID or Face ID.
2. Why would I want to disable the lock screen?
There could be various reasons why you may want to disable the lock screen on your iPhone. Some people find it inconvenient to enter a passcode or use biometrics every time they want to use their device. By disabling the lock screen, you can quickly access your iPhone and save time.
3. How can I disable the lock screen on my iPhone?
To disable the lock screen on your iPhone, go to Settings, then tap on “Touch ID & Passcode” or “Face ID & Passcode”, depending on your device model. Enter your passcode if prompted, then scroll down to the “Unlock with Home Button” or “Unlock with Side Button” section. Toggle off the “Rest Finger to Open” or “Rest Finger to Unlock” setting.
4. What if I want to enable the lock screen again?
If you change your mind and want to enable the lock screen again on your iPhone, you can follow the same steps mentioned earlier. Instead of toggling off the “Rest Finger to Open” or “Rest Finger to Unlock” setting, you need to toggle it on to enable the lock screen.
5. Will disabling the lock screen affect the security of my iPhone?
Disabling the lock screen may make it more convenient to access your iPhone, but it also reduces the security of your device. Without the lock screen, anyone can have access to your personal information and apps. It is important to weigh the convenience factor against the potential risks before deciding to disable the lock screen.