
In this digital age, capturing and sharing screenshots has become an integral part of our daily lives. Whether it’s for showcasing an achievement in a game, saving important information, or sharing funny moments with friends, screenshots play a vital role. But what if you want to take screenshots of your Nintendo Switch games and share them directly from your phone? In this article, we will explore different methods to get Switch screenshots on your phone. We’ll guide you through the process, step by step, so you can effortlessly capture and share your favorite moments from your Nintendo Switch games via your mobile device. So, if you’re ready to learn how to bridge the gap between your Nintendo Switch and your smartphone, let’s get started!
Inside This Article
- Why Switch Screenshots are Important
- Methods to Get Switch Screenshots on Phone
- Method 1: Capture Screenshots with Joy-Con Buttons
- Method 2: Use the Capture Button on the Pro Controller
- Method 3: Utilize the Nintendo Switch Online App
- Method 4: Transfer Screenshots via MicroSD Card
- Conclusion
- FAQs
Why Switch Screenshots are Important
In the world of gaming, capturing screenshots has become an integral part of the experience, and the Nintendo Switch is no exception. Switch screenshots allow players to capture memorable moments, showcase their achievements, and share their gaming experiences with friends and fellow gamers.
One of the main reasons why Switch screenshots are important is for personal enjoyment and nostalgia. By capturing and preserving screenshots, players can relive their favorite gaming moments. Whether it’s a stunning in-game landscape, a satisfying victory, or an amusing glitch, screenshots help to immortalize these experiences.
Switch screenshots also serve as a way to document and track progress in games. Players can capture screenshots of their achievements, high scores, and completed quests as a visual reminder of their accomplishments. This can be particularly useful for competitive gamers who want to keep a record of their successes.
Besides personal enjoyment, Switch screenshots are also valuable for social sharing. With the rise of social media platforms and online gaming communities, players can easily share their screenshots with others. Whether it’s on Twitter, Instagram, or gaming forums, sharing screenshots allows players to connect with other gamers, engage in discussions, and build a sense of community.
In addition to personal enjoyment and social sharing, Switch screenshots can also serve practical purposes. For instance, players may need to capture screenshots as evidence to report bugs or glitches to game developers. Screenshots can provide visual proof of issues encountered in the game, helping developers identify and fix these problems.
Furthermore, players can use Switch screenshots as a reference tool. For example, screenshots can be taken of puzzle solutions, game hints, or important information that players want to remember for later. By capturing these screenshots, players have a convenient way to refer back to specific details without having to rely on their memory alone.
Methods to Get Switch Screenshots on Phone
The Nintendo Switch is a fantastic gaming console that lets you capture and share your favorite gaming moments through screenshots. While the Switch itself has limited storage for screenshots, you can easily transfer these screenshots to your phone for easy access and sharing. In this article, we will discuss four methods to get Switch screenshots on your phone.
1. Capture Screenshots with Joy-Con Buttons: The easiest and most convenient way to capture screenshots on your Switch is by using the Joy-Con buttons. While playing a game, simply press the dedicated screenshot button on the left Joy-Con or the right Joy-Con. The screenshot will be saved to the Switch’s internal storage. To transfer the screenshot to your phone, follow the steps mentioned in Method 4.
2. Use the Capture Button on the Pro Controller: If you prefer using the Pro Controller instead of the Joy-Con, you can still capture screenshots with ease. The Pro Controller features a capture button located at the bottom of the controller, between the – and + buttons. Pressing this button will save the screenshot to the Switch’s internal storage. Again, follow the steps mentioned in Method 4 to transfer the screenshot to your phone.
3. Utilize the Nintendo Switch Online App: The Nintendo Switch Online app, available for both iOS and Android devices, allows you to access various features to enhance your gaming experience. One of these features is the ability to view and save screenshots to your phone directly. Simply download the app, sign in with your Nintendo account, and navigate to the “Album” section. From there, you can select and save screenshots to your phone.
4. Transfer Screenshots via MicroSD Card: If you have a microSD card inserted in your Nintendo Switch, you can easily transfer the screenshots to your phone using this method. First, insert the microSD card into your phone. Then, navigate to the “Album” section on your Switch and select the screenshots you want to transfer. Choose the option to “Copy to microSD card” and your screenshots will be saved onto the card. Remove the microSD card from the Switch and insert it into your phone to access your Switch screenshots.
Method 1: Capture Screenshots with Joy-Con Buttons
The Joy-Con controllers on the Nintendo Switch offer a convenient and straightforward way to capture screenshots while playing your favorite games. With just a few simple steps, you can easily capture epic gaming moments and share them with your friends. Here’s how to do it:
1. While playing a game on your Nintendo Switch, find a moment that you want to capture as a screenshot. It could be an impressive victory, a stunning in-game landscape, or a hilarious in-game moment.
2. On your Joy-Con controller, locate the capture button. It is the small square button with a camera icon on it, located on the left side of the controller. It’s usually below the directional buttons.
3. When you’re ready to capture the screenshot, press the capture button. You will hear a sound indicating that the screenshot was taken successfully. The screen will briefly flash as well.
4. To view your captured screenshots, go to the “Album” section on your Nintendo Switch home screen. You can access it by clicking the small square icon with mountains and a sun on it.
5. In the “Album” section, you can view all the screenshots you have captured. You can even edit them by cropping, adding text, or applying filters.
6. To share your screenshots with others, you can upload them to social media platforms like Twitter or Facebook directly from your Nintendo Switch. Simply select the screenshot you want to share, click on the “Share” button, and choose the platform you want to post it on.
Capturing screenshots with the Joy-Con buttons is a quick and convenient way to preserve your gaming moments and share them with others. So, the next time you come across an amazing gaming moment on your Nintendo Switch, don’t forget to use the Joy-Con capture button to capture and cherish the memory!
Method 2: Use the Capture Button on the Pro Controller
If you have a Nintendo Switch Pro Controller, capturing screenshots is even easier. The Pro Controller features a dedicated capture button that allows you to quickly capture screenshots during gameplay without having to reach for your Switch console.
To use the capture button on the Pro Controller, simply press the square-shaped capture button located in the center of the controller. It’s conveniently placed between the “+” and “-” buttons, making it easily accessible during your gaming sessions.
When you press the capture button, the Switch will save a screenshot of the current gameplay moment. You can then view and manage your captured screenshots in the Album section of the Switch’s home menu. From there, you can edit, share, or delete the screenshots as desired.
One of the advantages of using the Pro Controller’s capture button is that it allows for quick and seamless screenshot capturing. Whether you’re in the middle of an intense battle or exploring a beautiful in-game landscape, the capture button ensures that you never miss a memorable gaming moment.
Furthermore, the Pro Controller’s ergonomic design and comfortable grip make it a preferred choice for many players. With the capture button located conveniently on the controller, you can capture screenshots with ease and without interrupting your gameplay.
It’s important to note that the Pro Controller’s capture button works similarly to the Joy-Con buttons, allowing you to capture screenshots only. If you want to record gameplay videos, you will still need to use the built-in capture function of the Switch console or utilize other external recording devices.
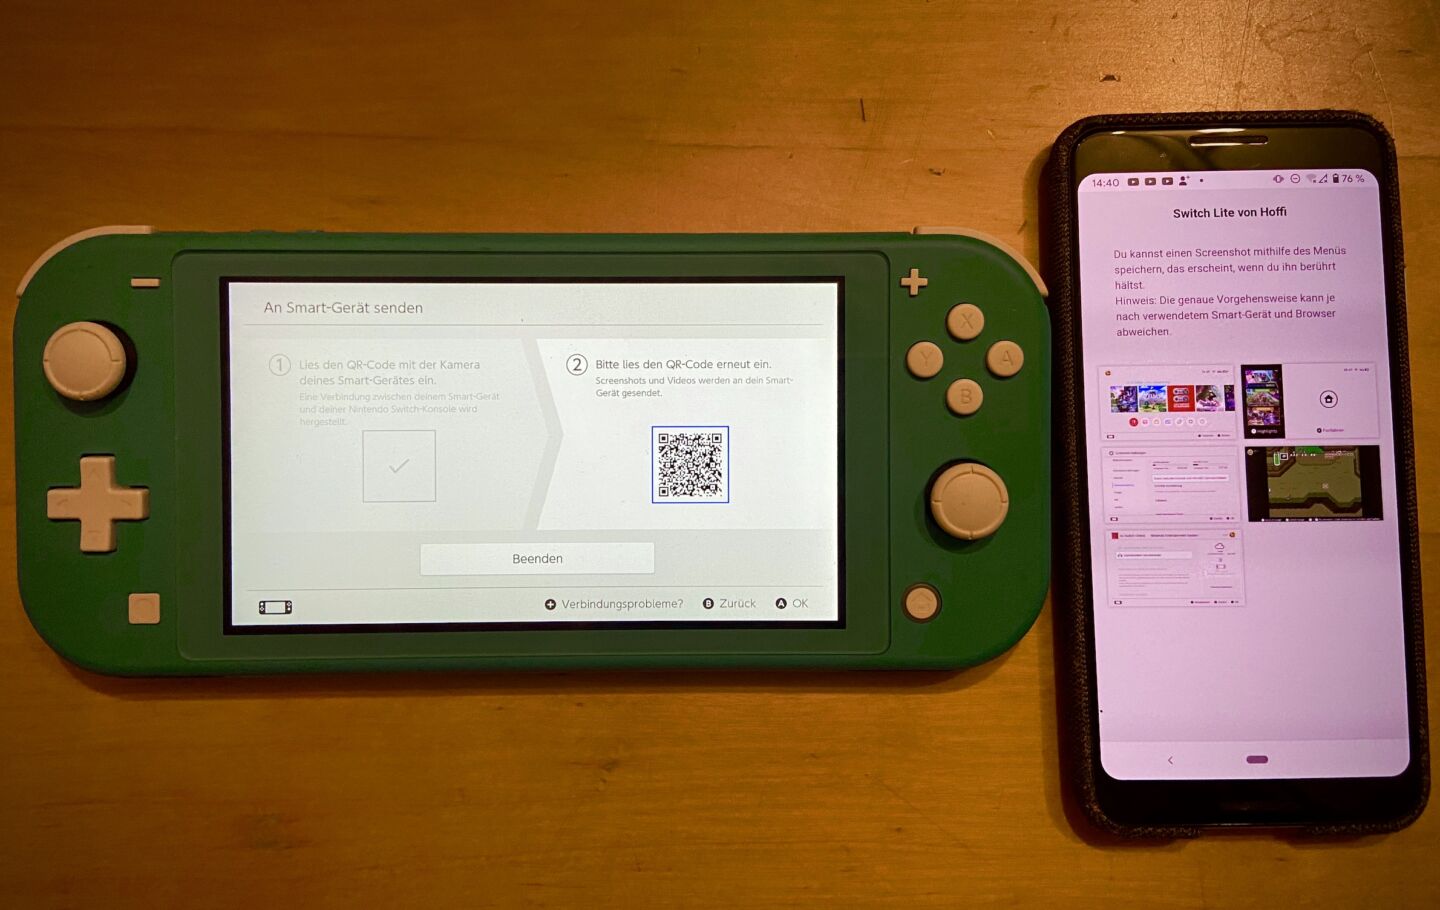
Method 3: Utilize the Nintendo Switch Online App
If you’re a proud owner of a Nintendo Switch, you’ll be delighted to know that there’s a convenient way to get Switch screenshots on your phone. The solution lies in the Nintendo Switch Online app, which offers a seamless and user-friendly experience for capturing and saving your favorite memories from your Switch games.
The Nintendo Switch Online app is available for both iOS and Android devices and can be easily downloaded from their respective app stores. Once you’ve installed the app, follow these steps to get your Switch screenshots on your phone:
- Open the Nintendo Switch Online app on your phone and sign in with your Nintendo account. If you don’t have an account, you can create one for free.
- Ensure that your Nintendo Switch console is connected to the internet and that your phone is connected to the same Wi-Fi network as your console.
- Launch any game on your Nintendo Switch that supports the capture feature.
- Within the Nintendo Switch Online app, tap on the ‘Game Specific Services’ option from the menu.
- Select the game you’re currently playing from the list of available games.
- Now, you’ll see a ‘Screen Shot’ button within the app. Tap on it to capture a screenshot of your Switch game.
- Once you’ve captured the screenshot, it will be saved directly to your phone’s camera roll or gallery, depending on your device.
The Nintendo Switch Online app not only allows you to capture screenshots but also provides additional features like voice chat, online multiplayer, and access to exclusive in-game content. It’s a must-have for die-hard Nintendo fans who want to enhance their gaming experience and share their favorite moments with friends and fellow gamers.
So, if you’re craving those perfect Switch screenshots to show off your gaming prowess, look no further than the Nintendo Switch Online app. It’s a convenient and efficient way to capture and save your most cherished Switch gaming memories right on your phone.
Method 4: Transfer Screenshots via MicroSD Card
Another convenient method to get Switch screenshots on your phone is by transferring them via a MicroSD card. The Nintendo Switch allows you to save screenshots directly onto a MicroSD card, which can then be easily transferred to your mobile device.
To transfer screenshots via MicroSD card, follow these steps:
- Locate the MicroSD card slot on your Nintendo Switch. It is situated under the kickstand on the back of the console.
- Using a small tool, such as a paperclip or the included Nintendo Switch ejector tool, gently push the MicroSD card into the slot until it clicks into place.
- Turn on your Nintendo Switch and navigate to the Album application, which can be found on the home screen.
- Select the screenshots you want to transfer. You can do this by hovering over the desired screenshot and pressing the A button.
- Once you have chosen all the screenshots you want to transfer, select the “Move” option from the menu.
- Choose the MicroSD card as the destination for the screenshots.
- After the transfer is complete, remove the MicroSD card from your Nintendo Switch.
- Insert the MicroSD card into your phone or connect it via a MicroSD card reader.
- Open the files on your mobile device and locate the folder containing the transferred screenshots. You can then easily view and share them as desired.
Transferring screenshots via MicroSD card provides a quick and straightforward way to access your Switch captures on your phone. It allows you to keep the images stored on a physical medium that you can easily carry around and use on multiple devices.
Note that you will need a MicroSD card with sufficient storage capacity to hold your screenshots. Additionally, make sure your phone supports MicroSD cards or has a compatible card reader.
With this method, you can quickly and easily transfer screenshots from your Nintendo Switch to your mobile phone, enabling you to share your favorite gaming moments with friends and family, or even post them on social media platforms.
Switch screenshots on your phone are a great way to capture and share your gaming moments, whether it’s epic victories or hilarious fails. With the right tools and a little know-how, you can easily transfer your Nintendo Switch screenshots to your phone and show them off to your friends and followers.
By following the step-by-step guide outlined in this article, you can choose to transfer screenshots through email, social media, or cloud storage solutions. Remember to optimize your screenshots for sharing by cropping, editing, and adding captions if necessary.
With the ability to conveniently access and share your Switch screenshots right from your phone, you can keep your gaming memories close at hand and engage with the gaming community on a whole new level. So, don’t miss out on the opportunity to showcase your gaming skills and memorable moments – get those Switch screenshots on your phone today!
FAQs
1. Can I take screenshots on my phone?
Yes, most mobile phones have a built-in feature that allows you to take screenshots. You can usually take a screenshot by pressing a combination of buttons, such as the power button and volume down button.
2. How can I take screenshots on an iPhone?
On an iPhone, you can take a screenshot by simultaneously pressing the power button and the volume up button. Once you press both buttons, you will see a flash on the screen and hear a camera shutter sound, indicating that the screenshot has been taken.
3. How can I take screenshots on an Android phone?
The process of taking screenshots may vary slightly depending on the brand and model of your Android phone. However, most Android phones allow you to take screenshots by pressing the power button and the volume down button at the same time. Once the screenshot is captured, you will receive a notification and can access it from the screenshots folder in your gallery.
4. Can I edit the screenshots on my phone?
Yes, you can easily edit the screenshots on your phone. After capturing a screenshot, you can open it in the gallery app and use the built-in editing tools to crop, annotate, or make any necessary adjustments. Additionally, there are many third-party apps available that offer more advanced editing features for screenshots.
5. How can I share the screenshots taken on my phone?
You have multiple options for sharing the screenshots taken on your phone. After capturing a screenshot, you can directly share it from the notification panel or open the screenshot in the gallery app and use the share button to send it via various platforms, such as messaging apps, social media, email, or cloud storage services.