
In today’s digital age, having a landline phone may seem somewhat outdated. However, there are still instances where having a phone jack can be essential, such as in a home office or for a reliable backup during power outages. If you’re looking to install a phone jack in your home or office, this comprehensive guide will walk you through the process step by step. From gathering the necessary tools to connecting the wires, we’ll cover everything you need to know. Whether you’re a DIY enthusiast or someone who prefers to tackle home improvement projects on their own, this article will provide you with the knowledge and confidence to install a phone jack with ease. Let’s get started!
Inside This Article
Summary
Installing a phone jack is a relatively simple task that allows you to connect your landline phone to the telephone network. Whether you’re setting up a new line or replacing an existing jack, this step-by-step guide will walk you through the installation process. By following these instructions and using the necessary materials, you’ll have a functioning phone jack in no time.
Before you begin, gather all the materials you’ll need for the installation. This includes a phone jack, telephone wire, a screwdriver, wire strippers, and a utility knife. Once you have everything ready, you can start by locating the desired location for your phone jack.
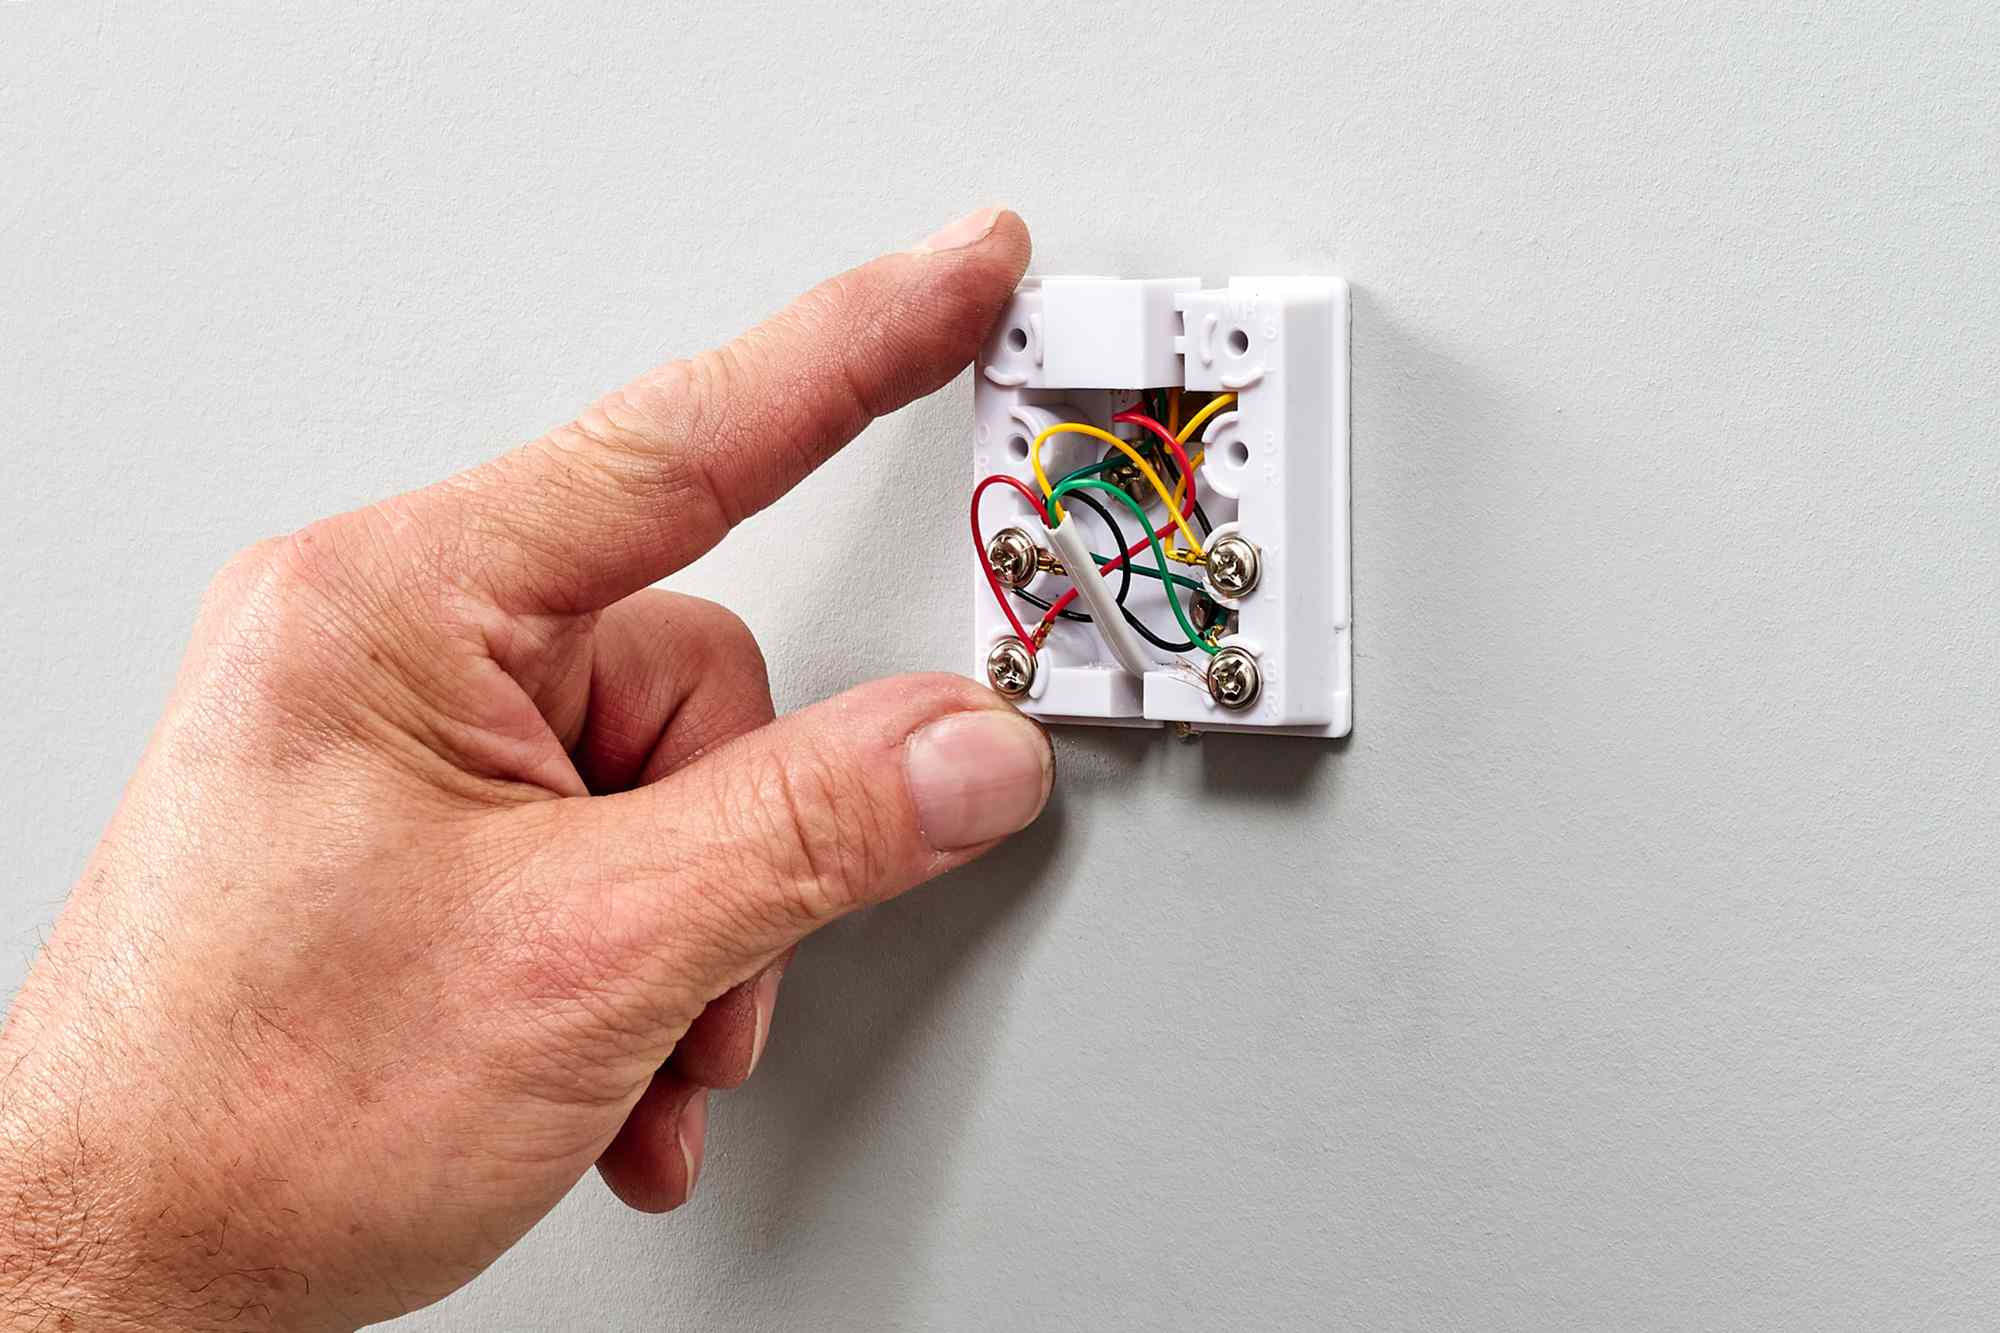
Next, you’ll need to remove the cover plate from an existing electrical outlet. This will allow you to access the wiring behind it. Once the cover plate is removed, you’ll see a box with several wires inside. Identify the telephone wire among the cables and separate it from the others.
To connect the phone jack, start by stripping the outer insulation from the telephone wire using wire strippers. This will expose the individual colored wires inside. Carefully strip about an inch of insulation from the end of each wire.
Now, you’ll need to connect the colored wires to the corresponding terminals on the phone jack. Typically, these terminals are labeled with colors or numbers to indicate the proper connection. Use a screwdriver to secure each wire to its respective terminal.
Once all the wires are securely connected, you can carefully tuck them back into the electrical box. Make sure that no wires are exposed and that they are neatly arranged. This will help prevent any interference or accidental disconnections.
Finally, reattach the cover plate to the electrical outlet, ensuring that it is securely fastened. Plug a phone into the new phone jack and test the line to ensure it is working properly. If everything is working as expected, congratulations! You have successfully installed a new phone jack.
If you encounter any issues during the installation process or the phone line doesn’t work after installation, consult the troubleshooting section for guidance on common problems and how to resolve them.
Materials Needed
When it comes to installing a phone jack, you will need a few essential materials to get the job done properly. Here’s a list of the items you will need:
- Phone Jack: This is the main component that allows you to connect your phone line to the wall. You can find phone jacks at your local hardware store or online.
- Screwdriver: A standard flathead screwdriver is typically required to remove the cover plate and screws from the existing telephone jack, as well as to secure the new phone jack onto the wall.
- Wire Cutters: Wire cutters are essential for splicing and trimming the phone wires. It’s important to have a clean and precise cut to ensure proper connection.
- Wire Strippers: These tools are designed to strip the insulation from the phone wires, allowing you to connect them to the phone jack terminals.
- Telephone Wire: You will need a new telephone wire to connect from the phone jack to the telephone device. Make sure to choose the appropriate wire type (such as CAT5e or CAT6) based on your requirements.
- Mounting Bracket: If you are installing a phone jack on drywall, a mounting bracket may be necessary to provide stability and support for the jack.
- Wall Plate: A wall plate is used to cover the phone jack and provide a clean, finished look. Choose a wall plate that matches your room’s decor.
- Screws: Depending on the type of mounting bracket and wall plate you are using, you may need screws to secure them onto the wall.
- Wire Connectors: Wire connectors, also known as wire nuts, are used to securely connect and insulate the phone wires during the installation process.
- Marker or Label Maker: To keep your phone jacks organized, it’s helpful to label each connection. You can use a marker or a label maker to mark the wires and the corresponding phone jack terminals.
Having these materials ready before you begin the installation process will ensure that you have everything you need to successfully install a phone jack in your home or office.
Step-by-Step Instructions
Installing a phone jack may seem daunting, but with the right tools and guidance, it can be a simple and rewarding DIY project. Follow these step-by-step instructions to install a phone jack in your home:
1. Gather the necessary materials: Before you begin, make sure you have all the required materials. This includes a new phone jack, a screwdriver, a utility knife, a wire stripper, a punch-down tool, and telephone wires.
2. Determine the location: Choose a suitable location for the phone jack. It is typically placed near a baseboard or wall stud, and away from sources of interference such as electrical outlets or appliances.
3. Prepare the installation area: Use a utility knife to carefully remove the baseboard if necessary. You may also need to remove a small section of the drywall to access the wall stud.
4. Connect the phone jack: Strip the insulation off the telephone wires, exposing approximately an inch of bare wire. Use the wire stripper to do this. Once the wires are exposed, use the punch-down tool to connect the wires to the corresponding color-coded terminals on the phone jack.
5. Mount the phone jack: Carefully screw the phone jack onto the wall or baseboard using a screwdriver. Ensure that it is securely attached and level.
6. Test the phone jack: Plug in a telephone cable into the newly installed phone jack and connect it to a telephone device. Pick up the phone and check for a dial tone. If you hear a dial tone, congratulations! Your phone jack installation is successful.
7. Secure the wires: Once you have confirmed that the phone jack is working, use cable clips or staples to secure the wire to the wall or baseboard, keeping it neat and tidy.
8. Replace the baseboard: If you had to remove the baseboard, carefully reinstall it using a hammer and nails or a suitable adhesive. Ensure that it is flush against the wall and securely in place.
9. Clean up: Dispose of any debris and clean up the work area, leaving it neat and tidy.
Congratulations, you have successfully installed a phone jack in your home! Now you can enjoy the convenience of having additional telephone lines at your disposal.
Troubleshooting
When installing a phone jack, it’s possible to encounter some issues along the way. Here are a few common troubleshooting scenarios and their solutions:
No dial tone: If you’ve completed the installation but there’s no dial tone when you pick up the phone, there could be a few reasons for this. First, check that all the connections are securely tightened and properly wired. Ensure that the wires are stripped and inserted into the correct terminals. If the problem still persists, try replacing the phone cord or testing the phone on a different line to rule out any issues with your phone.
Static or noise on the line: If you’re experiencing static, crackling, or other noise on the line, it can be frustrating. One common cause of this problem is improper grounding. Make sure that the grounding wire is properly connected to the jack and the electrical system. Additionally, check that there are no loose connections or damaged wires. If the issue persists, you may need to contact your service provider for further assistance.
Interference from other devices: Sometimes, your phone connection may be affected by interference from other electronic devices. Appliances like microwaves, routers, or cordless phones can cause disturbances. To troubleshoot this issue, try relocating the phone jack away from these devices. You can also consider using shielded cables or investing in a cordless phone system that operates on a different frequency.
Incompatible wiring: In some cases, the wiring in your home may not be compatible with the phone system you’re trying to install. This can lead to problems with signal quality or connectivity. If you suspect wiring compatibility issues, it’s best to consult a professional electrician or telecommunications specialist who can assess the situation and suggest appropriate solutions.
Other connection issues: If you’re still experiencing problems with your phone jack installation, it’s worth checking other components of your telephone system. Ensure that your phones are in proper working order and that all cords and cables are undamaged. If the issue persists, you might want to consider contacting your phone service provider for further assistance.
Troubleshooting the installation of a phone jack can be a bit challenging, but with a little patience and persistence, most issues can be resolved. Follow these troubleshooting tips, and you’ll be making and receiving calls in no time.
Conclusion
Installing a phone jack is a relatively simple process that can greatly improve the functionality of your home or office phone system. By following the step-by-step instructions outlined in this guide, you can successfully install a phone jack and enjoy the convenience of having multiple phone lines or extensions.
Remember to take safety precautions while working with electrical wiring and ensure that you have the necessary tools and materials before starting the installation. If you are unsure about any step or encounter any difficulties, it is always best to consult a professional electrician.
With a properly installed phone jack, you can connect multiple devices, such as landline phones, fax machines, or modems, to your phone system without the need for messy and unreliable extension cords. So, go ahead and start enjoying the benefits of a well-connected home or office telecommunications network!
FAQs
1. What is a phone jack?
A phone jack is a small device that allows you to connect your telephone to a telephone line. It is a standardized connector that provides a connection interface between your telephone and the telephone network, enabling you to make and receive phone calls.
2. How do I install a phone jack?
To install a phone jack, you will need to follow these steps:
- Choose the location: Decide where you want to install the phone jack. It is usually installed on a wall or baseboard near a power outlet.
- Prepare the materials: Gather the necessary tools and materials including a phone jack kit, screwdriver, wires, and wire stripper.
- Disconnect the telephone line: Make sure to disconnect the main telephone line before starting the installation process.
- Connect the wires: Use the wire stripper to remove the outer insulation of the telephone cable and then connect the wires to the phone jack following the color-coded instructions.
- Mount the phone jack: Securely mount the phone jack to the wall or baseboard using screws.
- Test the connection: Once the installation is complete, reconnect the telephone line and test the connection to ensure it is working properly.
3. Can I install a phone jack myself, or do I need a professional?
Installing a phone jack can be done by both professionals and individuals with basic DIY skills. If you are comfortable working with electrical connections and have the necessary tools, you can install a phone jack yourself. However, if you are not confident in your abilities or have any doubts, it is always recommended to seek the assistance of a professional to ensure a safe and proper installation.
4. What are the benefits of installing a phone jack?
Installing a phone jack can provide several benefits, including:
- Convenience: Having a phone jack in a desired location allows you to easily connect your telephone without the need for cord extensions.
- Improved signal quality: A dedicated phone jack provides a stronger and clearer signal compared to using cord extensions or adapters.
- Separate phone line: Installing a phone jack allows you to have a dedicated line for your telephone, ensuring uninterrupted communication.
- Enhanced aesthetics: Phone jacks can be installed discreetly and blend seamlessly with your home decor, giving your space a neater appearance.
5. Can I use a phone jack for other devices?
Yes, besides telephones, phone jacks can also be used to connect other devices such as fax machines, modems, and DSL routers. However, it is important to note that the wiring and configuration might differ depending on the specific device. Always refer to the device’s manual or consult a professional if you are unsure about the compatibility and installation process.