
In today’s digital age, our cell phones have become more than just devices for communication. They have become our personal assistants, entertainment centers, and storage hubs. One crucial component in our phones that allows us to expand our storage capacity is the SD card. Whether it’s for transferring files, storing photos and videos, or installing apps, an SD card plays a crucial role in enhancing our mobile experience. However, there are times when we need to remove the SD card from our phone. Maybe we want to upgrade to a larger capacity card, transfer files to another device, or troubleshoot a technical issue. In this article, we will guide you on how to remove an SD card from your phone, ensuring a smooth process without any data loss or damage.
Inside This Article
- Overview
- Step 1: Turn off the phone
- Step 2: Locate the SD card slot
- Step 3: Eject the SD card
- Step 4: Remove the SD card from the phone safely
- Additional tips and precautions
- Conclusion
- FAQs
Overview
Removing an SD card from your phone is a simple process that allows you to transfer data, upgrade storage capacity, or troubleshoot any issues related to the card. Whether you want to switch to a new SD card or remove it temporarily, this article will guide you through the step-by-step process to safely remove your SD card from your phone.
Before proceeding with the removal, it’s important to ensure that you have backed up any important data stored on the SD card. This will prevent any data loss during the removal process. Once you have made a backup, follow the steps below to safely remove your SD card.
If you are uncertain whether your phone has an SD card slot or where it is located, consult the user manual or the manufacturer’s website for your specific phone model. Different phone models may have different locations for the SD card slot.
Once you have located the SD card slot, it’s important to turn off your phone before attempting to remove the SD card. Turning off your phone ensures that all processes involving the SD card are properly halted, preventing any potential data corruption.
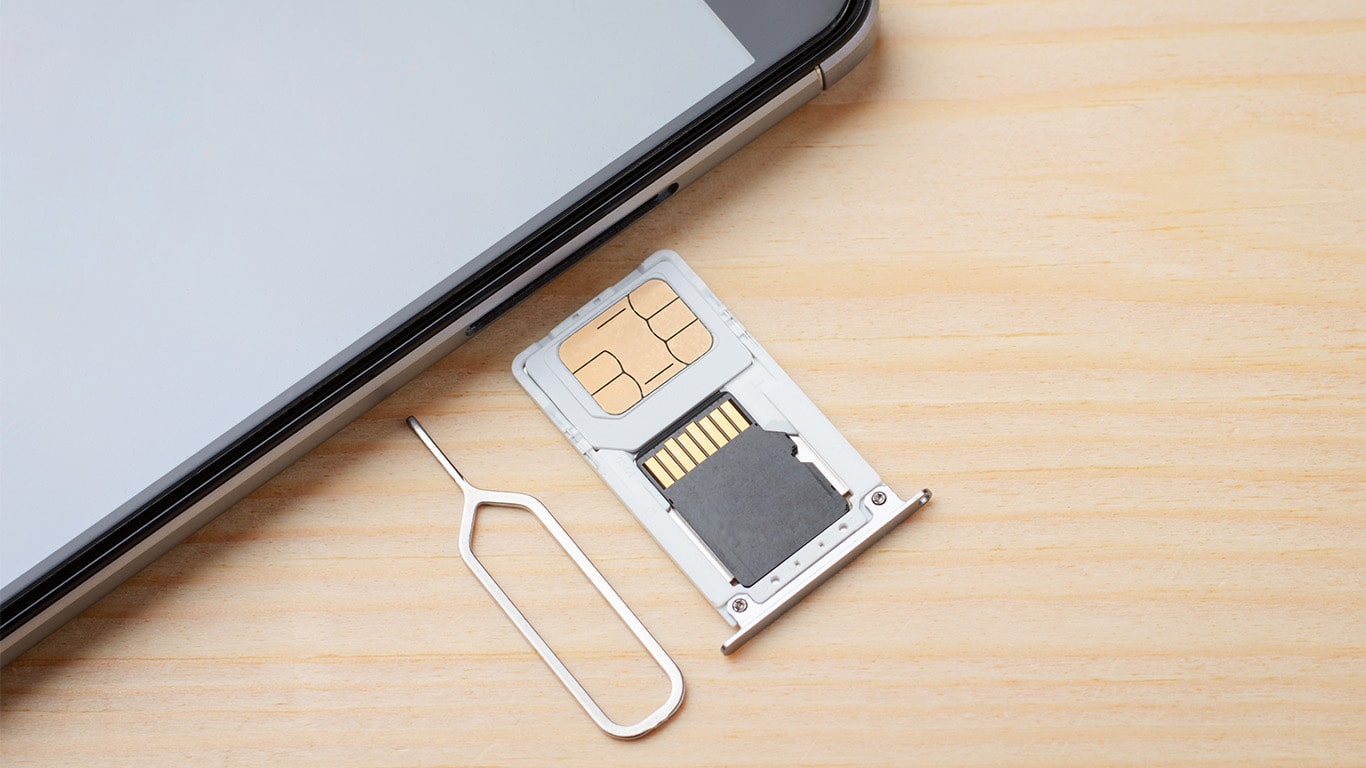
Ejecting the SD card is the next step. Most phones have a small tray or slot where the SD card is inserted. Look for a small pinhole near the SD card slot. Using a SIM card ejector tool or a small paperclip, insert it into the pinhole and gently push. This will release the latch and eject the tray holding the SD card.
Now that the SD card tray is ejected, carefully remove it from the phone. Hold the tray with your fingers and gently slide it out of the slot. Be cautious not to apply too much force or bend the tray, as this could damage the SD card or the slot itself.
Once you have successfully removed the SD card, handle it with care. Avoid touching the gold contacts, as any smudges or dirt could interfere with the card’s performance. Place the SD card in a safe location, such as a protective case or an anti-static bag, to prevent damage or loss.
It is important to note that some phones may require you to format the new SD card before using it. Check the user manual or the manufacturer’s website for instructions on how to format an SD card on your specific phone model.
Remember to turn your phone back on once the SD card has been safely removed. If you need to insert a new SD card or reinsert the same one, follow the manufacturer’s instructions to ensure proper insertion.
By following these steps, you can safely remove an SD card from your phone without risking any data loss or damage to the card or the phone itself.
Step 1: Turn off the phone
Before removing the SD card from your phone, it is important to ensure that it is powered off. This step is crucial to prevent any potential damage to the SD card or the phone itself.
To turn off your phone, press and hold the power button until the power options menu appears on the screen. From the menu, select the “Power Off” or “Shut Down” option to completely power down your phone.
Alternatively, if your phone has a removable battery, you can simply remove the battery to power off the device. However, many modern smartphones have sealed batteries, so the power button method is more common.
Make sure to give your phone a few moments to completely shut down before proceeding to the next step. This will ensure that the SD card is not being accessed by any running apps or system processes.
Once your phone is powered off, you can move on to the next step and safely remove the SD card from your device.
Step 2: Locate the SD card slot
Now that you have turned off your phone, it’s time to locate the SD card slot. The exact location of the slot can vary depending on the make and model of your mobile phone, but in most cases, it is located either on the side or at the back of the device.
To find the SD card slot, look for a small cover or flap on the side or back of your phone. This cover is usually marked with a symbol representing an SD card or simply labeled “SD”.
Once you have identified the cover, gently press on it and it should pop open, revealing the SD card slot underneath. Some phones may require a tool, such as a SIM card ejector tool or a small pin, to open the cover.
If you are unsure about the location of the SD card slot on your specific phone model, you can refer to the user manual or search for instructions online. Most manufacturers provide detailed guides on how to find and access the SD card slot for their devices.
Step 3: Eject the SD card
Now that you have located the SD card slot in your phone, it’s time to carefully eject the card. Ejecting the SD card properly will prevent any potential damage to the card or your device.
First, ensure that your phone is powered off. This is an important step to avoid any data corruption or accidental removal of the SD card while it is still in use.
Once your phone is turned off, locate the eject mechanism or tray. This can usually be found on the side or top of your phone, depending on the model. Some devices may have a small pinhole where you need to insert a SIM card eject tool or a paperclip to access the SD card slot.
If your phone has a tray-based design, gently insert the SIM card eject tool or a paperclip into the small hole, and push until the tray pops out slightly. Carefully pull the tray out using your fingers.
If your phone has a built-in SD card slot, look for a small latch or button near the slot. Press or slide the latch/button to release the SD card from its locked position.
With the tray or latch released, you can now proceed to remove the SD card. Hold the card with your thumb and forefinger and gently pull it out from the slot. Take care not to apply excessive force or bend the card.
Remember, SD cards can be small and delicate, so it’s important to handle them with care. Always grip the card by the edges to avoid touching the metal connectors on the bottom.
Once the SD card is disconnected from the phone, place it in a safe location, away from dust, moisture, and extreme temperatures. You may also choose to insert a new SD card into the slot or reinsert the same card if needed.
With the SD card successfully ejected from your phone, you are now ready to move on to the next step: removing the SD card from the phone safely, which will be covered in the next section.
Step 4: Remove the SD card from the phone safely
After successfully ejecting the SD card from your phone, it’s important to follow the proper procedure to safely remove it. This will help prevent any potential damage and ensure that your data is protected.
Here are the steps to safely remove the SD card from your phone:
- Make sure the phone is powered off: Before removing the SD card, it’s crucial to turn off your phone completely. This will prevent any potential data corruption or damage to the card.
- Locate the SD card slot: Different phones have different locations for their SD card slots. Typically, you can find it by removing the back cover of your phone or by accessing a dedicated slot on the side. Consult your phone’s user manual to determine the exact location.
- Use a tool or your fingers: Depending on your phone’s design, you may require a small tool, such as a SIM card ejection tool or a paperclip, to remove the SD card. Alternatively, some models allow you to remove it by simply using your fingers. Follow the instructions provided by the manufacturer to safely remove the card.
- Handle the SD card with care: When removing the SD card, it’s important to handle it with caution. Hold the card gently and avoid touching the metal connectors. This will help prevent static electricity or smudges from damaging the card.
- Store the SD card safely: Once you have removed the SD card from your phone, it’s essential to store it in a safe place. You can use a protective case or a small container specifically designed for SD cards. This will help prevent any physical damage or loss of the card.
By following these steps, you can safely remove the SD card from your phone and ensure the integrity of your data. Remember to always power off your phone before removing the card and handle it with care to avoid any potential issues.
Additional tips and precautions
When removing an SD card from your phone, it’s essential to take certain precautions to ensure the safety of both the card and your phone. Here are some additional tips to keep in mind:
- Power off the phone: Before removing the SD card, always make sure to turn off your phone. This will prevent any potential data loss or damage to the card during the removal process.
- Handle with care: SD cards are fragile and can be easily damaged if mishandled. When removing the card, be gentle and avoid applying excessive force. It’s a good practice to hold the card by its edges, rather than touching the metal contacts.
- Keep the card clean: Dust, dirt, and debris can accumulate on the surface of the SD card and interfere with its performance. Prior to removing the card, ensure that it is clean by using a soft, lint-free cloth to wipe away any particles.
- Do not remove during file transfer: If you are currently transferring files to or from the SD card, it is important to wait until the transfer is complete before removing the card. Removing the card during a file transfer can result in data corruption or loss.
- Protect from static electricity: Static electricity can cause damage to electronic components, including SD cards. To reduce the risk of static discharge, avoid touching the metal contacts of the card. If possible, work on a static-free surface or use an anti-static wristband.
- Store the SD card properly: When not in use, it is recommended to store the SD card in a protective case or container. This will help prevent physical damage and keep it safe from dust and moisture.
- Avoid exposing to extreme temperatures: SD cards are sensitive to temperature fluctuations. Avoid exposing the card to extreme heat or cold, as it may lead to data corruption or even permanent damage.
- Format the card if necessary: If you have transferred all the data from the card and no longer need it, consider formatting it before removing it from your phone. Formatting will erase all the data on the card and prepare it for future use.
- Follow the manufacturer’s guidelines: Finally, it is always wise to refer to your phone’s user manual or the SD card manufacturer’s guidelines for specific instructions on safely removing the SD card. Different phones and card types may have variations in the removal process.
By following these additional tips and precautions, you can ensure the safe removal of your SD card and prolong its lifespan. Taking care of your SD card will also help maintain the optimal performance of your phone, allowing you to continue enjoying an uninterrupted mobile experience.
Conclusion
In conclusion, removing an SD card from your phone is a simple process that can be done in a few easy steps. By following the instructions provided by your phone’s manufacturer or the specific guidelines outlined in this article, you can safely remove the SD card without causing any damage to your device or losing any important data.
Remember to always power off your device before removing the SD card, and handle the card with care to avoid any physical damage. Additionally, make sure to properly eject the card from your phone to avoid any potential data corruption issues. By following these best practices, you can confidently remove and insert SD cards whenever needed, expanding your phone’s storage capacity or transferring files as required.
Now that you have a clear understanding of how to remove an SD card from your phone, you can confidently manage your device’s storage without any hassle. Whether you’re upgrading your memory or simply need to access files stored on your SD card, you can now carry out the process efficiently and effortlessly.
FAQs
FAQ 1: Why would I need to remove the SD card from my phone?
There can be several reasons why you may need to remove the SD card from your phone. Some common situations include transferring files or data to another device, troubleshooting issues with the SD card, upgrading to a higher capacity SD card, or simply needing to eject the SD card before performing a factory reset on your phone.
FAQ 2: How do I know if my phone has an SD card slot?
Not all smartphones have an SD card slot, so it’s important to check if your phone has one before attempting to remove or insert an SD card. You can refer to your phone’s user manual or search online for your specific phone model to find out if it supports expandable storage via an SD card.
FAQ 3: Can I remove the SD card while my phone is powered on?
It is generally recommended to power off your phone before removing the SD card to minimize the risk of data corruption or damage to the card. However, some phones have a hot-swappable SD card slot, which means you can safely remove the SD card without turning off the phone. It’s best to consult your phone’s user manual or do some research to determine if your phone supports hot-swapping SD cards.
FAQ 4: How do I remove the SD card from my phone?
The process of removing an SD card from a phone may vary depending on the phone model. In general, you’ll need to locate the SD card slot, which is usually located on the side or back of the phone. Once you find the slot, use a SIM card removal tool (or a small paperclip) to gently push the ejector mechanism and release the SD card from its slot. Make sure to handle the card with care to avoid damage.
FAQ 5: Is it necessary to unmount the SD card before removing it?
It is highly recommended to unmount or eject the SD card before physically removing it from your phone. This ensures that all data has been safely written to the card and reduces the risk of data corruption. To unmount the SD card, go to your phone’s settings, find the storage or SD card section, and select the option to unmount or eject the card. Once you receive a notification that it is safe to remove the card, proceed with physically removing it from your phone.