
Are you looking to restore your Google backup to your Android phone? Whether you’ve recently purchased a new device, performed a factory reset, or simply want to retrieve your data, restoring your Google backup is a straightforward process that can save you time and effort. By syncing your data with your Google account, you can easily access your contacts, app data, photos, and more, ensuring a seamless transition between devices. In this article, we will guide you through the steps of restoring your Google backup to your Android phone, ensuring that all your important information is safely transferred to your new or reset device. So, let’s dive in and get your Android phone up and running with your Google backup!
Inside This Article
- Why Restore Google Backup to Android Phone?
- Step 1: Connect Your Android Phone to Wi-Fi
- Step 2: Sign in to Your Google Account
- Step 3: Access Google Backup and Restore Settings
- Step 4: Select the Backup to Restore
- Step 5: Start the Restore Process
- Step 6: Wait for the Restore to Complete
- Step 7: Verify Restored Data on Your Android Phone
- Conclusion
- FAQs
Why Restore Google Backup to Android Phone?
Restoring Google Backup to your Android phone is crucial for several reasons. Whether you’re switching to a new device, performing a factory reset, or simply want to recover lost data, utilizing Google Backup can help ensure a seamless and convenient experience. By restoring your Google Backup, you can effortlessly retrieve your contacts, photos, app data, settings, and more.
Here are some key reasons why restoring Google Backup to your Android phone is highly recommended:
- Easy Data Recovery: Google Backup simplifies the process of retrieving your data. Rather than manually transferring each file or reconfiguring settings, you can restore a backup and have all your important information available in a few simple steps.
- Time-Saving Solution: Manually reconfiguring your Android phone can be time-consuming, especially when you have numerous contacts, app data, and personal settings. With Google Backup, you can save time by efficiently restoring all your data with just a few taps.
- Seamless Device Transition: When switching to a new Android phone, you don’t want to go through the hassle of setting up everything from scratch. By restoring your Google Backup, you can seamlessly transfer all your data and settings to the new device, ensuring a smooth transition process.
- Protect Against Data Loss: Accidents happen, and losing important data can be devastating. By regularly backing up your Android phone to Google, you can rest assured that your data is safe and secure. In the event of device damage, loss, or unexpected data deletion, you can easily restore your backup and retrieve your valuable information.
- Preserve App Settings and Customizations: If you’ve spent hours customizing your apps, changing settings, and personalizing your Android phone, restoring from a Google Backup allows you to preserve all those preferences. It ensures that when you restore your backup, your apps and their customized settings will be exactly as you left them.
Overall, restoring Google Backup to your Android phone is a practical and efficient way to safeguard your data, save time, and ensure a seamless device transition. It offers peace of mind knowing that your valuable information is backed up and easily retrievable whenever you need it.
Step 1: Connect Your Android Phone to Wi-Fi
Before you can begin restoring your Google backup to your Android phone, it is essential to ensure that your device is connected to a stable Wi-Fi network. Follow the steps below to establish a Wi-Fi connection on your Android phone:
1. Go to the ‘Settings’ menu on your Android phone. You can usually access it by swiping down from the top of the screen and tapping on the gear icon, or by locating the ‘Settings’ app in your app drawer.
2. In the ‘Settings’ menu, look for the ‘Wi-Fi’ option and tap on it. This will open the Wi-Fi settings page.
3. On the Wi-Fi settings page, you will see a list of available Wi-Fi networks. Tap on the network you want to connect to. If the network requires a password, enter it when prompted.
4. Once you have entered the correct password, your Android phone will attempt to connect to the selected Wi-Fi network. Wait for a few seconds until you see the ‘Connected’ status next to the network name.
5. Congratulations! Your Android phone is now connected to the Wi-Fi network. You can proceed with the next steps to restore your Google backup.
Step 2: Sign in to Your Google Account
In order to restore your Google backup to your Android phone, you need to sign in to your Google account. This will ensure that your backup data is accessible and can be synced to your device seamlessly.
To sign in, follow these steps:
- Unlock your Android phone and go to the Settings app.
- Scroll down and tap on “Accounts.”
- Tap on “Add Account.”
- Select “Google” from the list of account types.
- Enter your Google email address and tap “Next.”
- Enter your password and tap “Next” again.
- If prompted, review and accept the terms of service.
- After successfully signing in, your Google account will be added to your device.
Signing in to your Google account is crucial as it allows you to access your backed-up data, such as contacts, app settings, Wi-Fi passwords, and more. This ensures a smooth transition when restoring your data to your Android phone.
Once you have signed in, you can proceed to the next step of enabling backup on your Android device.
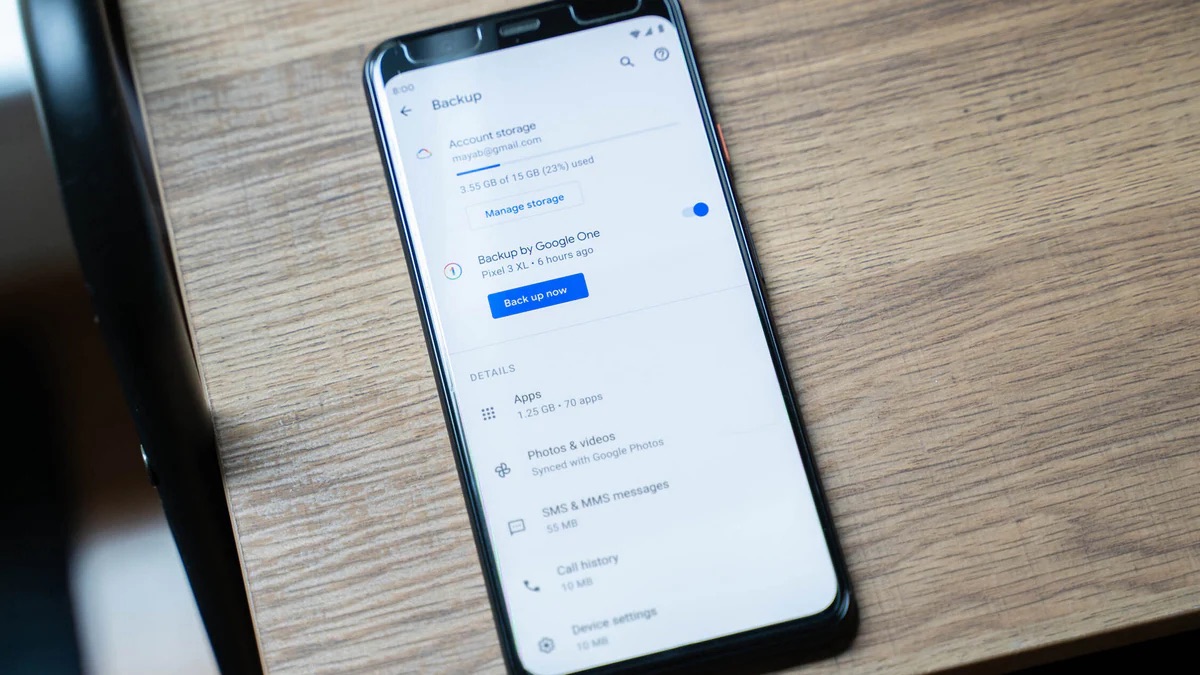
Step 3: Access Google Backup and Restore Settings
Once you have signed in to your Google account and enabled backup on your Android device, you can now access the Google Backup and Restore settings. These settings allow you to manage and restore your backed-up data easily.
To access the Google Backup and Restore settings, follow these steps:
- Go to the Settings app on your Android phone. You can usually find it in your app drawer or by swiping down from the top of the screen and tapping on the gear icon.
- Scroll down and find the “Google” option. Tap on it to enter the Google settings.
- In the Google settings menu, you will see several options. Look for the “Backup” option and tap on it.
- On the Backup page, you will find the backup settings for various types of data, such as apps, call history, contacts, device settings, and more. Tap on the type of data you want to restore.
- After selecting the type of data, you will see a switch to toggle the backup on or off. Make sure the switch is turned on for the data you want to restore.
- If you want to restore all the data associated with your Google account, tap on the “Restore” button. This will initiate the restoration process.
- Alternatively, if you only want to restore specific data, tap on the “Individual backups” option. This will show you a list of all the backups available. Select the backup you want to restore from and tap on it.
- Finally, tap on the “Restore” button to begin the restoration process for the selected backup.
It is important to note that the availability of backup and restore settings may vary slightly depending on the version of Android you are using and the device manufacturer’s customization. However, the general process should be similar across most Android devices.
By accessing the Google Backup and Restore settings, you can easily restore your backed-up data to your Android phone. Whether you need to recover lost contacts, restore app data, or retrieve important files, this feature ensures that your data is safe and accessible whenever you need it.
Step 4: Select the Backup to Restore
Once you have accessed the Google Backup settings on your Android device, you will be presented with a list of available backups. This includes backups from your current device, as well as backups from other devices associated with your Google account. Select the backup that you want to restore by tapping on it.
Google Backup provides you with a detailed list of the data that is included in each backup. This allows you to see exactly what files, settings, and apps will be restored to your device. Take a moment to review the backup content to ensure that it includes everything you need.
If you are restoring a backup from a previous device, you may see a list of multiple backups. This is because Google Backup automatically creates periodic backups, so there may be multiple versions available. In such cases, choose the backup that corresponds to the date and time closest to when you last used the previous device.
It’s also important to note that if you are using a different device, the available backups might not be compatible. Ensure that the backup you choose is compatible with your current Android device.
After selecting the backup, you will be prompted to confirm the restoration process. Once you confirm, the restoration will begin, and your device will start retrieving the selected data from the Google server. The time it takes to complete the restoration process may vary depending on the size of the backup and your internet connection speed.
During the restoration process, make sure that your device remains connected to a stable Wi-Fi network or has a strong cellular data connection. This ensures a smooth and uninterrupted restoration process.
After the restoration is complete, you will receive a notification indicating that the process was successful. You can now start using your Android device with all the restored data, settings, and apps.
Step 5: Start the Restore Process
Once you have accessed the Google Backup settings and chosen the data you want to restore, it’s time to start the restore process. Follow these simple steps to get your data back on your Android device:
- On your Android device, go to the Settings menu.
- Scroll down and tap on “System” or “Backup & Reset”, depending on your device model.
- Select “Backup” or “Restore and Backup” to access the backup settings.
- Tap on “Restore” or “Restore data” to initiate the restore process.
- You may be prompted to sign in to your Google Account again. Enter your credentials and proceed.
- Choose the backup file you want to restore from the list.
- Select the data types you want to restore, such as apps, contacts, messages, or photos.
- Tap on the “Restore” or “Start restore” button to begin the restoration.
- Depending on the size of the backup file and the speed of your internet connection, the restore process may take some time.
- Once the restore process is complete, you will see a notification indicating the successful restoration of your data.
It’s important to note that the availability of certain data types for restore may vary depending on the Android version and the apps installed on your device. Not all data may be backed up or restored seamlessly, especially if you are switching to a device with a different operating system.
Remember to keep your device connected to a stable Wi-Fi network during the restore process to ensure a smooth and uninterrupted restoration. Also, make sure your device has sufficient battery power or is connected to a power source to prevent any interruptions during the restore.
With the restore process complete, you can now enjoy the convenience of having your data back on your Android device. Whether it’s your contacts, photos, or apps, Google Backup ensures a seamless and hassle-free transition, allowing you to pick up where you left off.
Step 6: Wait for the Restore to Complete
Once you have initiated the restore process from your Google Backup settings, you will need to wait for the restore to complete. This process may take some time, depending on the amount of data being restored and the speed of your internet connection.
During the restore process, it is important not to interrupt or interfere with the ongoing backup. This means avoiding any simultaneous downloads, updates, or installations that could potentially disrupt the restore process.
While waiting for the restore to complete, it is a good idea to keep your phone connected to a stable Wi-Fi network and ensure that it has sufficient battery life. Interrupting the restore process or running out of battery power could result in incomplete or inconsistent data restoration.
It is also worth noting that certain types of data, such as app data and settings, may take longer to restore compared to other types of data like contacts or photos. This is because apps often store a significant amount of information, including preferences, login credentials, and user-generated data.
As the restore progresses, you may see notifications or progress indicators on your Android device, indicating which specific data is being restored. This can give you an idea of how far along the restore process is and what data is being retrieved.
Once the restore is complete, you will be able to access your restored data on your Android phone. This includes apps, contacts, calendar events, photos, and any other data that was backed up and successfully restored.
It is important to note that while Google Backup strives to restore as much data as possible, it is not guaranteed to restore every single piece of data on your device. Some apps or settings may not be compatible with the restore process, leading to partial restoration or exclusion of certain data.
In case you encounter any errors or issues during the restore process, you can refer to Google’s support documentation or reach out to their customer support for assistance and guidance on troubleshooting the problem.
Overall, the wait for the restore to complete is an essential part of the process. By being patient and allowing the backup to fully restore your data, you can ensure a seamless transition and have peace of mind knowing that your important information is back where it belongs.
Step 7: Verify Restored Data on Your Android Phone
Once the data has been restored to your Android phone from Google Backup, it’s important to verify that the process was successful. Follow these steps to ensure that all your data is intact on your device:
1. Start by checking your Contacts. Open your Contacts app and make sure that all your contacts are present. You can scroll through the list or use the search function to find specific contacts. If any contacts are missing, it’s possible that they were not included in the backup or there was an issue during the restoration process.
2. Next, check your Calendar. Open your Calendar app and navigate through the different dates to see if all your appointments, events, and reminders have been restored. It’s a good idea to cross-check the restored calendar events with any other devices you may have synced your calendar with.
3. Now, let’s move on to your Photos and Videos. Open your Gallery app or any other photo app on your Android phone and browse through your media files. Check if all your pictures and videos have been successfully restored. You can also try opening a few files to ensure they open without any errors.
4. Don’t forget to verify your Email accounts. Open your Email app or any other email client you use on your Android phone and check if all your email accounts are set up correctly. Send a test email to ensure that you can send and receive emails without any issues. Also, check if any previously archived or deleted emails have been restored.
5. Lastly, take a look at your installed Apps. Go to the App Drawer on your Android phone and browse through the list of installed apps. Check if all your essential apps are present and if any app data or preferences have been restored. Open a few apps to make sure they are functioning properly and that your data is intact.
If you notice any discrepancies or missing data during the verification process, it’s a good idea to go back to the Google Backup settings and initiate another restore. Make sure your internet connection is stable and allow enough time for the restoration process to complete. If the issue persists, you may need to reach out to Google support for further assistance.
Once you have successfully verified that all your data has been restored on your Android phone, you can have peace of mind knowing that your important information is safely backed up and accessible on your device.
Conclusion
Restoring Google backup to your Android phone is a simple and efficient way to transfer your data, settings, and apps from one device to another. With just a few easy steps, you can regain access to your important information and continue seamlessly where you left off.
By utilizing the power of Google’s cloud storage, you can conveniently back up and restore your device data, making it easier to switch or upgrade your phone without worrying about losing valuable information. Whether you’re transitioning to a new device or recovering from a data loss incident, Google backup provides a reliable and convenient solution.
Remember to regularly schedule backups to ensure that your data is always protected and up to date. With the ability to restore your contacts, photos, app data, and more, Google backup is a valuable tool for any Android user.
So, the next time you set up a new Android device or encounter an unfortunate data loss event, turn to Google backup to restore your data and enjoy a seamless transition. Take advantage of this easy-to-use feature and have peace of mind knowing that your valuable data is securely backed up and ready for retrieval whenever you need it.
FAQs
Q: How do I restore Google backup to my Android phone?
A: Restoring a Google backup to your Android phone is a straightforward process. Simply follow these steps:
- Ensure that your Android phone is connected to a stable internet connection.
- Go to the Settings app on your Android phone.
- Scroll down and tap on “System” or “Backup & Reset” depending on your device.
- Tap on “Backup” and then select “Google Account”.
- You will see a list of available backups. Choose the backup you want to restore.
- Tap on “Restore” and wait for the process to complete. The time taken for the restore process depends on the size of the backup.
- Once the restore is complete, your Android phone will restart, and you will find your data restored.
Q: Can I restore a Google backup to a different Android phone?
A: Yes, you can restore a Google backup to a different Android phone as long as you are using the same Google account that was used to create the backup. The process is similar to restoring a backup to the same phone. Just follow the steps mentioned in the previous question and select the backup you want to restore during the setup process on your new Android phone. Please note that some settings or data may not be restored if they are specific to the original device.
Q: Will restoring a Google backup delete my current data on the Android phone?
A: Yes, when you restore a Google backup to your Android phone, it will overwrite the existing data on the device. It is important to backup any important data or files before performing a restore. Additionally, make sure you have enough free storage space on your Android phone to accommodate the backup.
Q: Can I choose specific data to restore from a Google backup?
A: Unfortunately, when restoring a Google backup, you cannot selectively restore specific data. The restore process will restore the entire backup, including apps, settings, and data associated with the Google account. However, you can manually delete unwanted data or apps after the restore is complete.
Q: Do I need a Google account to restore a backup to my Android phone?
A: Yes, a Google account is essential to restore a backup to your Android phone. The backup and restore feature is tightly integrated with Google services, and a Google account is required to access your backup data. If you don’t have a Google account, you can create one during the setup process on your Android phone.