
Are you in a predicament where you need to restore your iPhone from an iTunes backup? Whether you’ve gotten a new iPhone, experienced a software malfunction, or simply want to revert your device back to a previous state, restoring from an iTunes backup can be a simple and effective solution. In this article, we will guide you through the process of restoring your iPhone from an iTunes backup, providing you with step-by-step instructions and valuable tips along the way. By the end of this article, you’ll have the knowledge and confidence to successfully restore your iPhone and regain access to your important data. So, let’s dive in and learn how to restore your iPhone from an iTunes backup!
Inside This Article
- What is an iTunes Backup?
- Steps to Restore iPhone from an iTunes Backup
- Common Issues and Troubleshooting
- Tips for a Successful Restoration
- Conclusion
- FAQs
What is an iTunes Backup?
An iTunes backup is a secure and convenient way to safeguard the data on your iPhone. When you create a backup using iTunes, it creates a copy of your device’s entire contents, including settings, app data, photos, videos, messages, and more. This backup is stored on your computer, providing you with a reliable backup option in case anything happens to your iPhone.
By regularly creating iTunes backups, you can protect your valuable data from accidental deletion, software crashes, or device theft. It also allows you to easily transfer your data to a new iPhone or restore it to your current device after a factory reset or software update.
It’s essential to note that an iTunes backup doesn’t include everything stored on your iPhone. Certain data, like Apple Pay information and Face ID or Touch ID settings, aren’t included in the backup for security reasons. However, these can be easily restored when you set up your iPhone again after restoring from the backup.
Overall, an iTunes backup is a vital tool to ensure the safety and integrity of your iPhone’s data. By regularly creating and updating backups, you can have peace of mind knowing that your valuable information is protected.
Steps to Restore iPhone from an iTunes Backup
Restoring your iPhone from an iTunes backup is a straightforward process that can help you regain your data and settings after a factory reset or when switching to a new device. Follow these steps to successfully restore your iPhone from an iTunes backup:
Step 1: Connect your iPhone to your computer
Using a USB cable, connect your iPhone to the computer that you have previously used for backing up your device. Launch iTunes on your computer if it doesn’t open automatically.
Step 2: Select your iPhone in iTunes
In the top-left corner of the iTunes window, you’ll find a small iPhone icon. Click on it to select your iPhone from the list of connected devices.
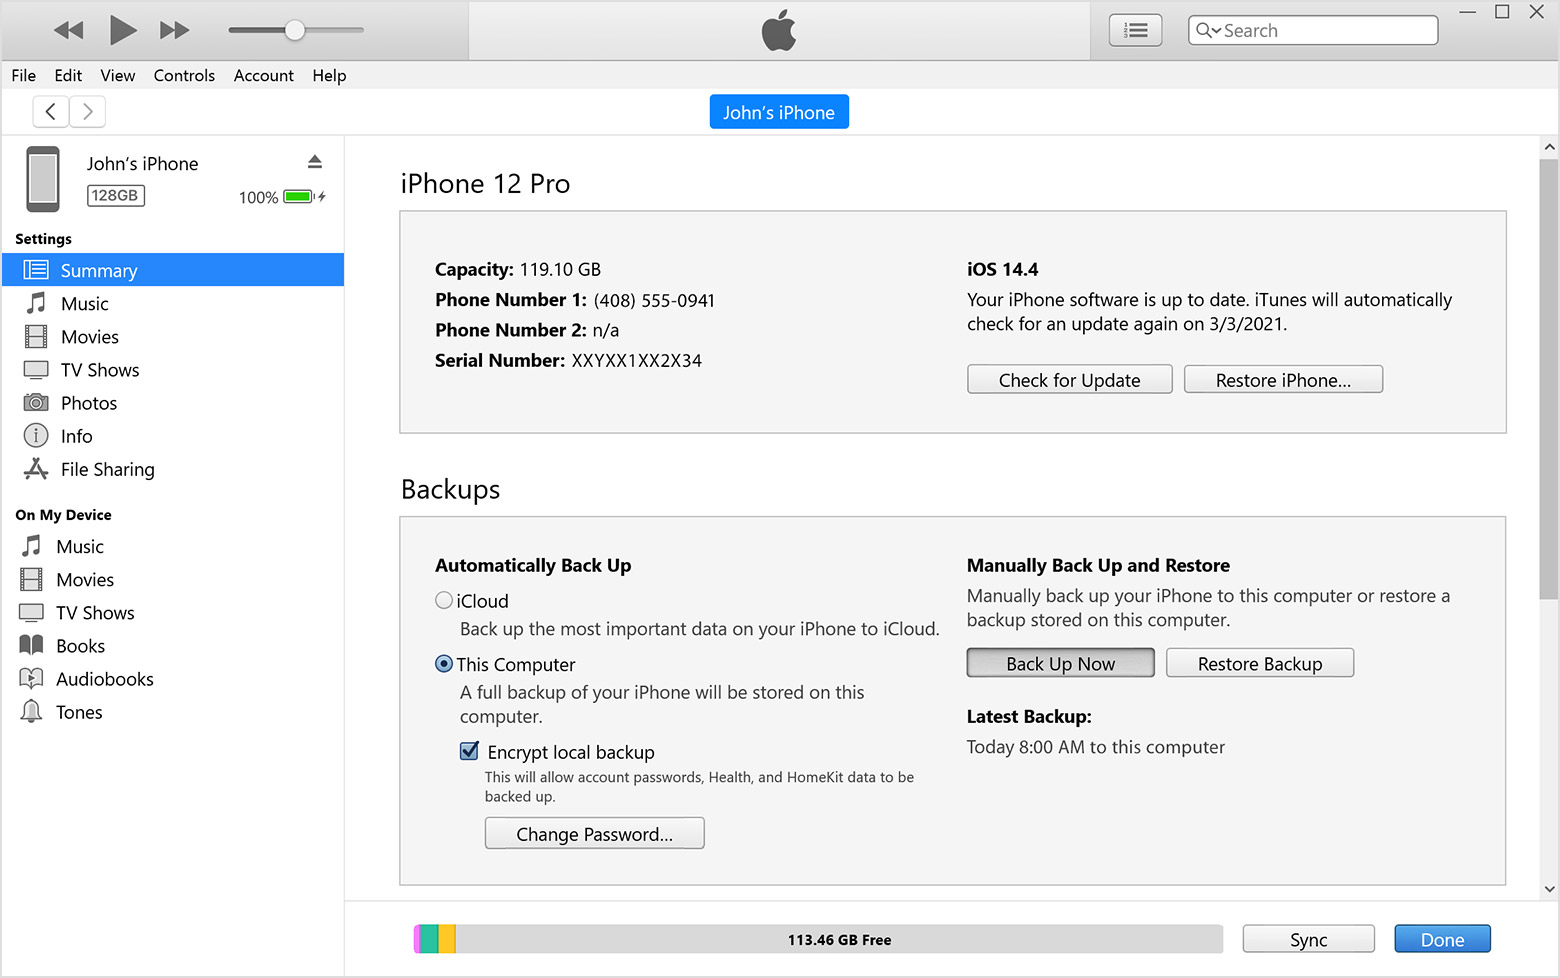
Step 3: Access the Summary tab
Once you have selected your iPhone, you will be directed to the Summary tab. Here, you will find an overview of your device’s information and settings.
Step 4: Choose “Restore Backup” option
Under the Backups section, you will see a button labeled “Restore Backup.” Click on it to proceed.
Step 5: Select the desired iTunes backup
A pop-up window will appear, displaying a list of available backups. Choose the backup that you want to restore from the list. Make sure to select the most recent backup to ensure that you have the latest data and settings.
Step 6: Begin the restoration process
After selecting the backup, click on the “Restore” button to initiate the restoration process. iTunes will now start transferring the data from the backup file to your iPhone.
Step 7: Wait for the restoration to complete
The restoration process may take some time, depending on the size of the backup and the speed of your computer. It’s important to keep your device connected to the computer and avoid any interruptions during this process.
Step 8: Set up your iPhone
Once the restoration process is complete, your iPhone will restart. Follow the on-screen instructions to set up your device, including connecting to a Wi-Fi network, signing in with your Apple ID, and configuring other settings.
Congratulations! You have successfully restored your iPhone from an iTunes backup. Your data, apps, and settings should now be restored to the state they were in when the backup was created.
Keep in mind that the restoration process will overwrite any existing data on your iPhone, so ensure that you have a recent backup before proceeding. Additionally, make sure that you have enough free space on your device to accommodate the restored data.
Common Issues and Troubleshooting
Restoring your iPhone from an iTunes backup is usually a smooth process. However, there can be some common issues that you may encounter along the way. Here are a few troubleshooting tips to help you overcome any potential obstacles:
1. Incomplete or Failed Backup
If you encounter an issue where the backup process is incomplete or fails, it could be due to various reasons such as insufficient storage space on your computer or a faulty USB cable. Ensure that you have enough free space and try using a different cable or USB port. It’s also helpful to update to the latest version of iTunes to avoid any compatibility issues.
2. Missing Data After Restoration
In some cases, you may notice that certain data is missing after restoring your iPhone from an iTunes backup. This can be frustrating, but don’t panic just yet. One common reason for missing data is if you didn’t include certain apps or content in the backup. Make sure to carefully select all the necessary items in the backup options before proceeding with the restoration.
3. Unable to Verify Apple ID
During the restoration process, you may encounter an issue where your iPhone is unable to verify your Apple ID. This can happen if you’ve recently changed your Apple ID password or if there are network connectivity issues. Double-check your Apple ID credentials and ensure that you have a stable internet connection. If the problem persists, consider signing out of your Apple ID and then signing back in.
4. Frozen or Unresponsive iPhone
If your iPhone becomes frozen or unresponsive during the restoration process, try performing a force restart. On iPhone 8 or later models, press and quickly release the Volume Up button, press and quickly release the Volume Down button, and then press and hold the Side button until you see the Apple logo. On older iPhone models, press and hold the Home button along with the Sleep/Wake button until the Apple logo appears.
5. Error Codes
There may be instances where you encounter error codes during the restoration process. Each error code corresponds to a specific issue. To troubleshoot, note down the error code and search for it on Apple’s support website. This will provide you with specific instructions on how to resolve the issue.
By keeping these common issues in mind and utilizing the troubleshooting tips provided, you can overcome any hurdles that may arise while restoring your iPhone from an iTunes backup. Remember to follow the steps carefully and be patient throughout the process.
Tips for a Successful Restoration
Restoring your iPhone from an iTunes backup can be a straightforward process, but there are some tips that can help ensure a smooth and successful restoration. Here are four key tips to keep in mind:
1. Ensure a Stable Internet Connection:
Before you begin the restoration process, make sure your iPhone is connected to a stable and reliable Wi-Fi network. A poor internet connection can result in interruptions or errors during the restoration process, potentially causing data loss or incomplete restoration.
2. Keep Sufficient Storage Space:
Check that your iPhone has enough free storage space to accommodate the backup restoration. If your device is running low on storage, consider deleting unwanted apps, photos, or videos to make room for the restored data. This will help prevent any issues or errors during the restoration process.
3. Disable Find My iPhone:
Prior to restoring your iPhone, it’s essential to disable the “Find My iPhone” feature. This security feature can interfere with the restoration process. To disable it, go to the Settings app, tap on your Apple ID, select “Find My,” and toggle off the “Find My iPhone” option.
4. Update iTunes and iPhone:
Make sure you have the latest version of iTunes installed on your computer and that your iPhone is running the latest version of iOS. Outdated software can sometimes cause compatibility issues and may hinder the restoration process. Check for updates and install them before proceeding with the restoration.
By following these tips, you can increase the chances of a successful restoration and avoid any potential issues or errors that might arise during the process. Take the time to prepare your iPhone and ensure a stable and reliable environment for the restoration, and you’ll be back up and running in no time.
Conclusion
Restoring an iPhone from an iTunes backup is a convenient and reliable way to recover or transfer your data. Whether you’re setting up a new device or fixing an issue on your current one, iTunes provides a seamless solution to restore your iPhone to a previous state.
By following the steps outlined in this guide, you can easily restore your iPhone from an iTunes backup. Remember to ensure that you have a recent backup available, either stored locally on your computer or in iCloud. Additionally, make sure you have a stable internet connection for the restore process.
It’s important to note that restoring from an iTunes backup will overwrite any existing data on your iPhone, so it’s crucial to backup and sync your device regularly to avoid data loss. Should you encounter any difficulties during the restore process, refer to the FAQs section of this article or seek assistance from Apple Support.
With the ability to retrieve your valuable data, from contacts and messages to photos and apps, restoring an iPhone from an iTunes backup offers peace of mind and helps ensure a smooth mobile experience.
FAQs
1. Can I restore my iPhone from an iTunes backup without a computer?
No, restoring an iPhone from an iTunes backup requires a computer with iTunes installed. You will need to connect your iPhone to the computer via a USB cable to complete the restoration process.
2. Will restoring my iPhone from an iTunes backup delete my data?
Restoring your iPhone from an iTunes backup will erase all the existing data on your device and replace it with the data from the backup. It is recommended to backup your iPhone before initiating the restore process to ensure you don’t lose any important information.
3. How long does it take to restore an iPhone from an iTunes backup?
The time it takes to restore an iPhone from an iTunes backup can vary depending on the size of the backup and the speed of your computer. In general, the process can take anywhere from a few minutes to several hours. It is important to have a stable internet connection and sufficient battery life on your iPhone during the restoration.
4. Can I choose which data to restore from an iTunes backup?
When restoring from an iTunes backup, you cannot selectively restore specific data. The entire backup will be restored to your iPhone, including photos, videos, contacts, apps, and settings. If you only want to restore specific data, you can consider using third-party software or services that allow more flexibility in selecting the data to restore.
5. What should I do if my iPhone backup is corrupted or incomplete?
If your iTunes backup is corrupted or incomplete, you might encounter issues while restoring your iPhone. In such cases, it is recommended to try using a different backup or creating a new one. You can also try using iCloud backup or other backup methods to ensure your data is properly backed up and can be restored if needed.