
Are you struggling to find a way to save your important documents on your iPhone? Look no further! In this article, we will guide you on how to save your docs to files on your iPhone. With the advancement of technology, our smartphones have become an essential tool for storing and accessing our important files and documents, and the iPhone is no exception. Whether it’s a PDF, Word document, spreadsheet, or any other file, you can easily save and organize them on your iPhone using the Files app. So, if you’re ready to declutter your email attachments and have all your documents neatly organized in one place, keep reading to learn how to save your docs to files on your iPhone!
Inside This Article
- Using the Files App
- Saving to iCloud Drive
- Saving to third-party file storage apps
- Saving attachments from emails to files
- Conclusion
- FAQs
Using the Files App
If you’re an iPhone user, you might be familiar with the Files app. This handy tool allows you to organize, manage, and access all your files in one place. In addition to photos, videos, and documents, the Files app can also be used to save various file types, including PDFs, presentations, spreadsheets, and more.
To save a document to the Files app on your iPhone, follow these simple steps:
- Open the document you want to save.
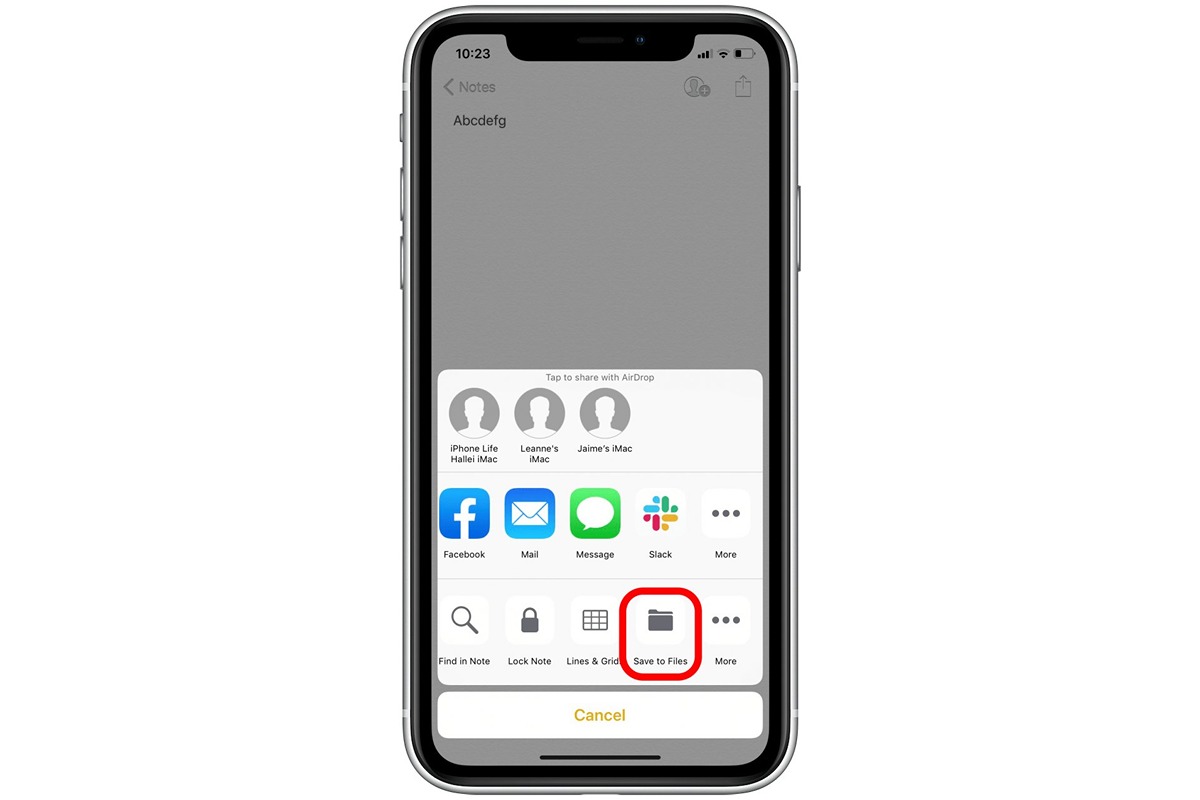
- Tap the share button, typically indicated by an arrow pointing upward.
- Scroll through the available options and select “Save to Files.”
- Navigate to the desired location in the Files app or create a new folder to save the document.
- Tap “Save” to store the file in the chosen location.
The Files app offers a convenient way to manage your saved documents. You can create folders, rename files, and even organize them using tags. Additionally, you can access your files from other Apple devices, including your iPad and Mac, using iCloud sync.
By utilizing the Files app, you can easily keep all your important documents organized, accessible, and at your fingertips whenever you need them.
Saving to iCloud Drive
Saving your documents to iCloud Drive is a convenient way to store and access your files across all your Apple devices. With iCloud Drive, you can easily sync and share your documents, photos, and other files seamlessly.
To save a document to iCloud Drive on your iPhone, follow these simple steps:
- Open the app that contains the document you want to save. It can be the Files app, Pages, Numbers, Keynote, or any other compatible app.
- Locate the file you want to save.
- Tap and hold the file to bring up the context menu.
- In the menu that appears, select the option to “Save to Files” or “Share” depending on the app you’re using.
- You’ll be presented with a list of locations to save your file. Tap “iCloud Drive” to save it to your iCloud storage.
- If you want to organize your file into a specific folder, tap the folder you wish to save it in. Otherwise, it will be saved in the main iCloud Drive folder.
- After selecting the location, tap “Save” to save the file to iCloud Drive.
Once your file is saved to iCloud Drive, you can access it from any other device signed in with your Apple ID. Whether you’re using your iPhone, iPad, or Mac, you’ll be able to locate and open your files stored in iCloud Drive.
Additionally, you can share files with others by sending them a link to the file stored in iCloud Drive. This allows for seamless collaboration and easy file sharing, making iCloud Drive a versatile and powerful tool in managing and storing your documents.
Remember to keep an eye on your iCloud storage space, as saving too many files can use up your allocated storage. You can manage your iCloud storage settings in your iPhone’s settings app to free up space or upgrade your storage plan if needed.
Saving to third-party file storage apps
Aside from the native Files app and iCloud Drive, you can also save documents directly to third-party file storage apps on your iPhone. These apps provide additional features and capabilities for organizing and accessing your files.
To save documents to a third-party file storage app, you’ll first need to download and install the app from the App Store. Once installed, follow these steps:
1. Open the app you want to save the document to. This can be an app like Google Drive, Dropbox, OneDrive, or any other supported file storage app.
2. Sign in to your account or create a new account if you don’t already have one. Make sure you remember the login credentials as you’ll need them to access your files later.
3. Once you’re signed in, locate the “Upload” or “Add” button within the app. This button is typically represented by a plus (+) symbol or an icon indicating file import.
4. Tap on the “Upload” or “Add” button and select the document you want to save from your iPhone’s storage. You can usually browse through your device’s storage to find the document or use the app’s file picker to select it.
5. Choose the desired location within the app’s file structure to save the document. You can create folders or organize the files based on your preferences. Some apps may also allow you to add tags or labels for easy searching and categorization.
6. Once you’ve selected the location and organized the file, tap on the “Upload” or “Save” button to initiate the file transfer process. The time taken for the transfer will depend on the file size and your internet connection speed.
7. After the transfer is complete, you can access and manage the saved document within the third-party file storage app. You can view, edit, rename, share, or move the document as needed.
By saving documents to third-party file storage apps, you can benefit from additional features like cross-platform access, advanced file management options, collaboration tools, and seamless integration with other productivity apps.
Remember to regularly backup your files and keep your third-party file storage app updated to ensure smooth and secure document management on your iPhone.
Saving attachments from emails to files
If you receive an email with an important document attachment that you want to save to your files on your iPhone, you can easily do so. Here’s how:
- Open the Mail app on your iPhone and navigate to the email containing the attachment.
- Tap on the email to open it, and locate the attachment within the email.
- Tap and hold on the attachment until a pop-up menu appears. From the menu, select the option to “Save to Files.”
- A sheet will appear displaying your file storage options. Choose the desired location within your files to save the attachment.
- Tap on the “Save” button to save the attachment to the selected location.
By following these simple steps, you can easily save attachments from your emails to your files on your iPhone. This allows for quick and convenient access to important documents on the go.
In conclusion, knowing how to save documents to files on your iPhone can greatly improve your productivity and organization. With the ability to store and access important files right from your device, you no longer have to rely solely on physical copies or other storage solutions. Whether you need to save important work documents, school assignments, or even personal files, the Files app on your iPhone provides a convenient and user-friendly way to manage all your documents in one place.
By following the steps outlined in this article, you can effortlessly save, organize, and access your files on your iPhone. Remember to keep your files well-organized in folders and take advantage of the different file management features in the Files app. With a little practice and familiarity with the app, you’ll soon find yourself enjoying the convenience and efficiency of having all your important documents at your fingertips.
FAQs
1. How do I save documents to Files on iPhone?
Saving documents to Files on your iPhone is simple. First, open the document you want to save, then tap the share button (usually represented by an arrow pointing upward). Select “Save to Files” from the options. Next, choose the location where you want to save the document within the Files app, or create a new folder if needed. Finally, tap “Save” to store the document in the selected location.
2. Can I organize saved documents into folders within the Files app?
Absolutely! The Files app on iPhone allows you to create and organize folders to keep your documents neatly arranged. To create a new folder, open the Files app, tap the “Browse” tab, and locate the location where you want to create the folder. Then, tap the “New Folder” button (usually represented by a “+” symbol). Give your folder a name and press “Done.” You can now move or save your documents into the new folder for better organization.
3. Can I access my saved documents offline?
Yes, you can access your saved documents offline through the Files app on your iPhone. When you save a document to the Files app, it is downloaded onto your device, allowing you to view and work with it even when you don’t have an internet connection. However, keep in mind that if the document requires an internet connection to function properly (such as accessing online sources or streaming media), those features may not be available offline.
4. Can I share saved documents from the Files app?
Absolutely! The Files app on iPhone allows you to easily share your saved documents with others. Simply open the Files app and locate the document you want to share. Tap and hold the document to bring up a contextual menu, then select “Share.” You’ll then be presented with various options to share the document, such as through email, messaging apps, or even AirDrop. Choose the desired sharing method and follow the prompts to send the document to the recipient.
5. Can I password protect my saved documents within the Files app?
Unfortunately, the Files app on iPhone does not have built-in password protection features for individual documents. However, you can use third-party apps or services that provide document encryption and password protection. These apps can integrate with the Files app and allow you to secure your sensitive documents with a password or other security measures. It’s worth exploring trusted security apps available on the App Store to find the best solution that meets your needs.