
Are you wondering how to screen record on your Samsung S20? Look no further! With the Samsung S20, capturing your screen has never been easier. Whether you want to record a tutorial, save a video call, or document your gaming achievements, screen recording can be a valuable tool. Fortunately, this feature is readily available on the Samsung S20, allowing you to effortlessly capture and share whatever is happening on your device’s screen. In this article, we will guide you through the step-by-step process of screen recording on a Samsung S20, ensuring you can make the most out of this handy feature. So, let’s dive in and uncover the secrets of screen recording on your Samsung S20!
Inside This Article
- Enabling the Screen Recording Feature
- Accessing the Screen Recorder Settings
- Adjusting the Screen Recording Options
- Initiating and Pausing the Screen Recording
- Saving and Sharing the Recorded Screen Video
- Conclusion
- FAQs
Enabling the Screen Recording Feature
The Samsung S20 is equipped with a powerful screen recording feature that allows you to capture your mobile screen activity with ease. Whether you want to create tutorials, showcase your gameplay, or simply capture a memorable moment on your device, enabling the screen recording feature is the first step.
To enable screen recording on your Samsung S20, follow these simple steps:
- First, navigate to the Home screen of your device. You can do this by pressing the Home button or swiping up from the bottom of the screen.
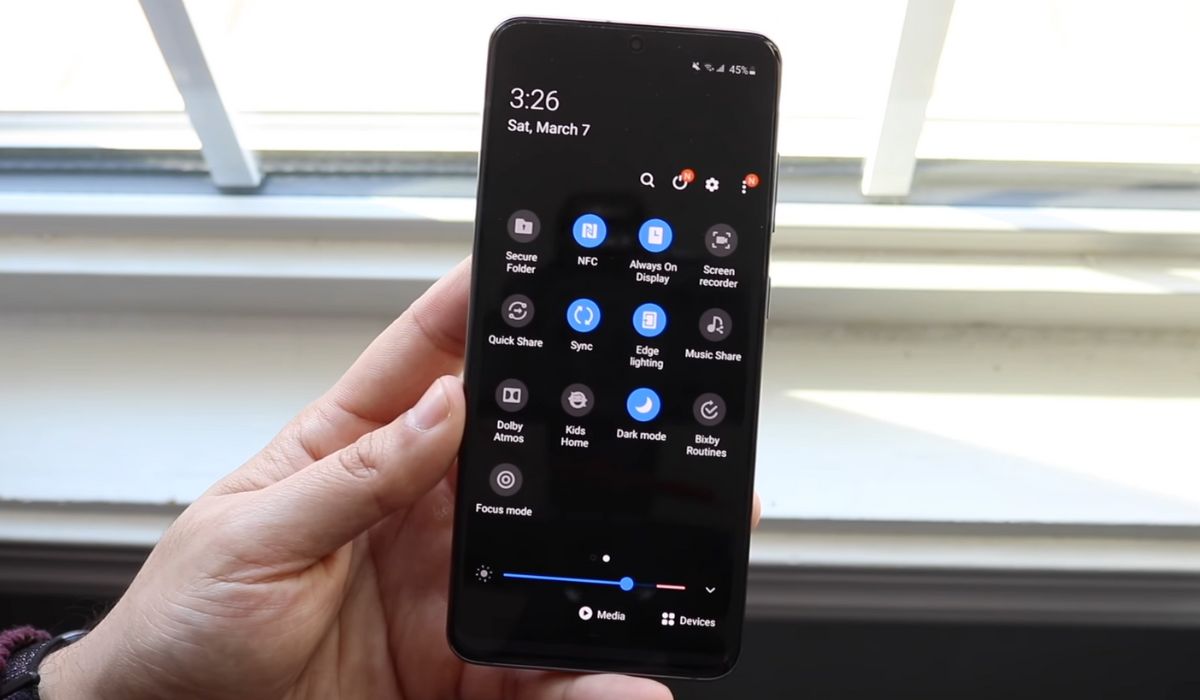
- Next, swipe down from the top of the screen to open the Notification Panel. This is where you can access various quick settings and notifications.
- In the top-right corner of the Notification Panel, you will find a set of icons. Swipe from right to left to access the second page of quick settings icons.
- Look for the “Screen Recorder” icon, which resembles a smartphone with a screen recording symbol on it. Once you find it, tap on the icon to enable the screen recording feature.
- A pop-up window will appear, prompting you to confirm the action. Tap “Start” to begin the screen recording process.
That’s it! You have successfully enabled the screen recording feature on your Samsung S20. Now, you are ready to start recording your screen and capture all the exciting moments on your device.
It is important to note that the screen recording feature may not be available in certain apps or screens due to security or privacy reasons. However, you can use it in most of the native system apps, games, and settings screens.
Accessing the Screen Recorder Settings
After enabling the screen recording feature on your Samsung S20, you may want to customize some settings to enhance your screen recording experience. To access the screen recorder settings, follow these steps:
1. Swipe down from the top of the screen to access the notification panel.
2. Locate and tap on the “Settings” gear icon, usually located at the top right corner of the panel, to open the device settings.
3. Scroll down and tap on “Advanced features.” This will open a list of additional features available on your Samsung S20.
4. Look for the “Screen recorder” option and tap on it. This will take you to the screen recording settings.
5. Here, you will find various options to customize your screen recording, such as video resolution, audio source, orientation, and more.
6. Tap on each setting to adjust it according to your preferences. For example, you can choose between recording audio from the microphone, system sounds, or both.
7. Take some time to explore and experiment with the available settings to optimize your screen recording setup.
Once you have adjusted the screen recording settings to your liking, you can proceed to initiate and record your screen activities on your Samsung S20.
Adjusting the Screen Recording Options
Once you have enabled the screen recording feature on your Samsung S20, you can take advantage of various options to customize your screen recording experience. Here are some options to adjust:
1. Audio Source: You have the choice to record audio from three sources: microphone, device audio, or both. Select the audio source that best suits your recording needs.
2. Video Quality: The Samsung S20 offers different video quality options for screen recording. Higher quality recordings will result in larger file sizes, while lower quality can help save storage space. Adjust the video quality based on your preferences and available storage capacity.
3. Resolution: You can choose the resolution at which you want to record your screen. Higher resolutions will provide a clearer and more detailed recording, while lower resolutions may result in reduced file sizes.
4. Frame Rate: Adjusting the frame rate determines the number of frames captured per second. Higher frame rates result in smoother recordings, but also larger file sizes. Consider your needs and device capabilities when selecting the appropriate frame rate.
5. Orientation: The screen recording feature allows you to choose the orientation of your video. You can select either portrait or landscape mode based on your preference or the desired video format.
6. Countdown Timer: The countdown timer feature gives you a few seconds to prepare before the screen recording begins. It can be helpful when you need to capture specific actions or moments on your screen.
7. Show Touches: Enabling the “Show Touches” option will display a visual representation of your touch interactions on the recorded screen. This is particularly useful when creating tutorials or demonstrating app functionalities.
8. Storage Location: By default, the recorded screen videos are saved to the device’s internal storage. However, you can choose to save them to an external SD card if your Samsung S20 supports it. Ensure you have sufficient storage space in your selected location.
Experiment with these options to find the optimal settings that suit your screen recording needs. Keep in mind that adjusting certain options, such as higher video quality or frame rate, may consume more system resources and battery life during recording.
Initiating and Pausing the Screen Recording
Once you have configured the screen recording settings, it’s time to start capturing your phone’s screen! To initiate the screen recording on your Samsung S20, follow these steps:
- Open the app or screen that you want to record.
- Swipe down from the top of the screen to access the notification panel. You will see a list of quick settings.
- Look for the “Screen Recorder” icon among the quick settings icons. It typically looks like a circle with a dot inside it.
- Tap on the “Screen Recorder” icon to start the recording.
Once you have initiated the screen recording, a small control panel will appear on the left side of the screen. This control panel provides you with options to pause or stop the recording, as well as access additional settings.
To pause the screen recording, simply tap on the “Pause” button on the control panel. This can be useful if you need to temporarily pause the recording without stopping it altogether. Once paused, you can resume the recording by tapping on the “Resume” button.
If you wish to stop the screen recording completely, tap on the “Stop” button on the control panel. After stopping the recording, you will be taken to the screen recording preview screen, where you can review the recorded video before saving or sharing it.
It’s worth noting that you can also use the screen recording feature while using other apps or performing different tasks on your Samsung S20. The recording will continue in the background, capturing everything happening on your screen, even if you switch between apps or open new windows.
With the ability to easily initiate and pause screen recordings, the Samsung S20 provides a convenient and efficient way to capture important moments, create tutorials, or simply record the fun activities happening on your phone’s screen.
Saving and Sharing the Recorded Screen Video
After you have successfully recorded your screen on your Samsung S20, you have the option to save and share the recorded video. Here’s how:
- Save the recorded video: Once you have finished recording, you will see a preview of the recorded video on your screen. To save the video, tap on the “Save” button usually located at the bottom-right corner of the screen. The recorded video will be saved to your device’s internal storage.
- Access the recorded video: You can find the saved recorded videos in your device’s gallery or file manager app. Look for a folder named “Screen Recordings” or a similar name. Open the folder to access your recorded videos.
- Share the recorded video: If you wish to share the recorded video with others, you can do so directly from the screen recording interface. Tap on the “Share” button, usually located next to the “Save” button. This will bring up a menu with various sharing options, such as messaging apps, email, social media platforms, or cloud storage services. Choose the desired option and follow the prompts to share the video.
- Trim the recorded video: In some cases, you may want to trim the recorded video to remove any unwanted parts or to focus on a specific segment. To trim the recorded video, you can use the built-in video editing tools available on your Samsung S20. Open the video in the gallery app or a video editing app, locate the trim function, and adjust the start and end points of the video to your preference. Once you are satisfied with the selection, save the trimmed video.
- Upload to online platforms: If you want to share the recorded video on online platforms like YouTube, Vimeo, or social media sites, you can upload the video directly from your phone. Open the platform’s app, tap on the upload button, and select the recorded video from your device’s gallery. Follow the instructions provided by the platform to complete the uploading process.
With these simple steps, you can save, share, and even edit your recorded screen videos on your Samsung S20. Whether you want to keep a personal record of your screen activities or share a tutorial with others, the screen recording feature provides you with a convenient way to capture and share your phone’s screen.
In conclusion, the Samsung S20 is not only a powerful and feature-packed smartphone, but it also offers a convenient screen recording feature. With just a few simple steps, you can easily capture and share your screen activities. Whether you want to record a tutorial, demonstrate an app, or save important information, the screen recording functionality on the Samsung S20 provides a convenient solution. By following the instructions mentioned in this article, you can start capturing high-quality screen recordings on your Samsung S20. So, go ahead and make the most out of this handy feature to enhance your mobile experience and share your content with ease.
FAQs
1. Can I screen record on my Samsung S20?
Yes, you can screen record on your Samsung S20. The screen recording feature allows you to capture and save a video of what is happening on your phone’s screen. It’s a great tool for recording tutorials, gameplay, or any other activity you want to share or save for later reference.
2. How do I screen record on my Samsung S20?
To screen record on your Samsung S20, follow these steps:
- Swipe down from the top of the screen to access the quick settings panel.
- Scroll to find the “Screen Recorder” option and tap on it.
- A small toolbar with recording controls will appear on the screen.
- You can choose to record audio from the microphone or enable the “Internal audio” option to capture system sounds.
- When ready, tap on the record button to start recording.
- To stop recording, tap on the stop button in the toolbar or swipe down the notification shade and tap on the “Stop” button.
3. Where can I find my screen recordings on a Samsung S20?
Your screen recordings are automatically saved in the gallery app on your Samsung S20. You can access them by opening the gallery app and navigating to the “Screen recordings” album. From there, you can view, edit, and share your screen recordings as you would with any other media file.
4. What format are screen recordings saved in on a Samsung S20?
Screen recordings on a Samsung S20 are typically saved in MP4 format. MP4 is a popular video file format that offers great quality while keeping the file size manageable. This format is widely supported and can be easily shared and played on various devices.
5. Can I customize the screen recording settings on my Samsung S20?
Yes, you can customize the screen recording settings on your Samsung S20. To access the screen recording settings, follow these steps:
- Open the Settings app on your Samsung S20.
- Scroll down and tap on “Advanced features”.
- Tap on “Screenshots and screen recorder”.
- From here, you can customize options such as video resolution, bit rate, audio source, and more.