
Setting the default printer on your Mac is an essential step to streamline your printing experience. Whether you have recently upgraded to macOS Ventura or using an earlier version of macOS, knowing how to set up the default printer can save you time and effort.
By designating a default printer, you can ensure that your Mac automatically selects the correct printer each time you print a document. This eliminates the hassle of manually selecting the printer you want to use and ensures that your printouts are sent to the right device.
In this article, we will guide you through the process of setting the default printer on your Mac, whether you are using the latest macOS Ventura or an earlier version. So, grab your Mac, and let’s dive into the world of efficient printing!
Inside This Article
- Method 1: Setting Default Printer through System Preferences
- Method 2: Setting Default Printer through Printers & Scanners Preferences
- Method 3: Setting Default Printer through CUPS Web Interface
- Conclusion
- FAQs
Method 1: Setting Default Printer through System Preferences
Setting the default printer on your Mac can be done easily through the System Preferences. By following these simple steps, you’ll have your preferred printer ready for use in no time:
-
Click on the Apple menu located in the top-left corner of your screen and select “System Preferences” from the dropdown menu.
-
In the System Preferences window, locate and click on the “Printers & Scanners” option. This will open the Printers & Scanners preferences.
-
In the Printers & Scanners preferences, you will see a list of printers connected to your Mac. From this list, select the printer that you want to set as the default.
-
Once you’ve selected the desired printer, click on the “Options & Supplies” button located below the printer list.
-
A new window will appear with various options for the selected printer. Within this window, locate and click on the “General” tab.
-
On the General tab, you will find a checkbox labeled “Default printer”. Click on this checkbox to mark it and set the selected printer as the default.
-
Finally, click on the “OK” button to save the changes and close the printer options window.
And there you have it! You have successfully set the default printer on your Mac through the System Preferences. This means that any time you try to print a document or file, it will automatically be sent to your chosen default printer without any additional steps.
Method 2: Setting Default Printer through Printers & Scanners Preferences
If you prefer a more straightforward method to set your default printer on your Mac, you can use the Printers & Scanners preferences. This method is especially useful if you have multiple printers connected to your Mac and want to choose the default one from within the system preferences.
To begin, follow the step-by-step guide below:
- First, click on the Apple menu icon in the top-left corner of your screen and select “System Preferences” from the dropdown menu. Alternatively, you can click on the gear icon in the Dock and choose “System Preferences.”
- In the System Preferences window, locate and click on the “Printers & Scanners” icon. This will open the Printers & Scanners preferences panel.
- Next, within the Printers & Scanners preferences panel, you will see a list of all the printers currently connected to your Mac. Select the printer that you want to set as your default.
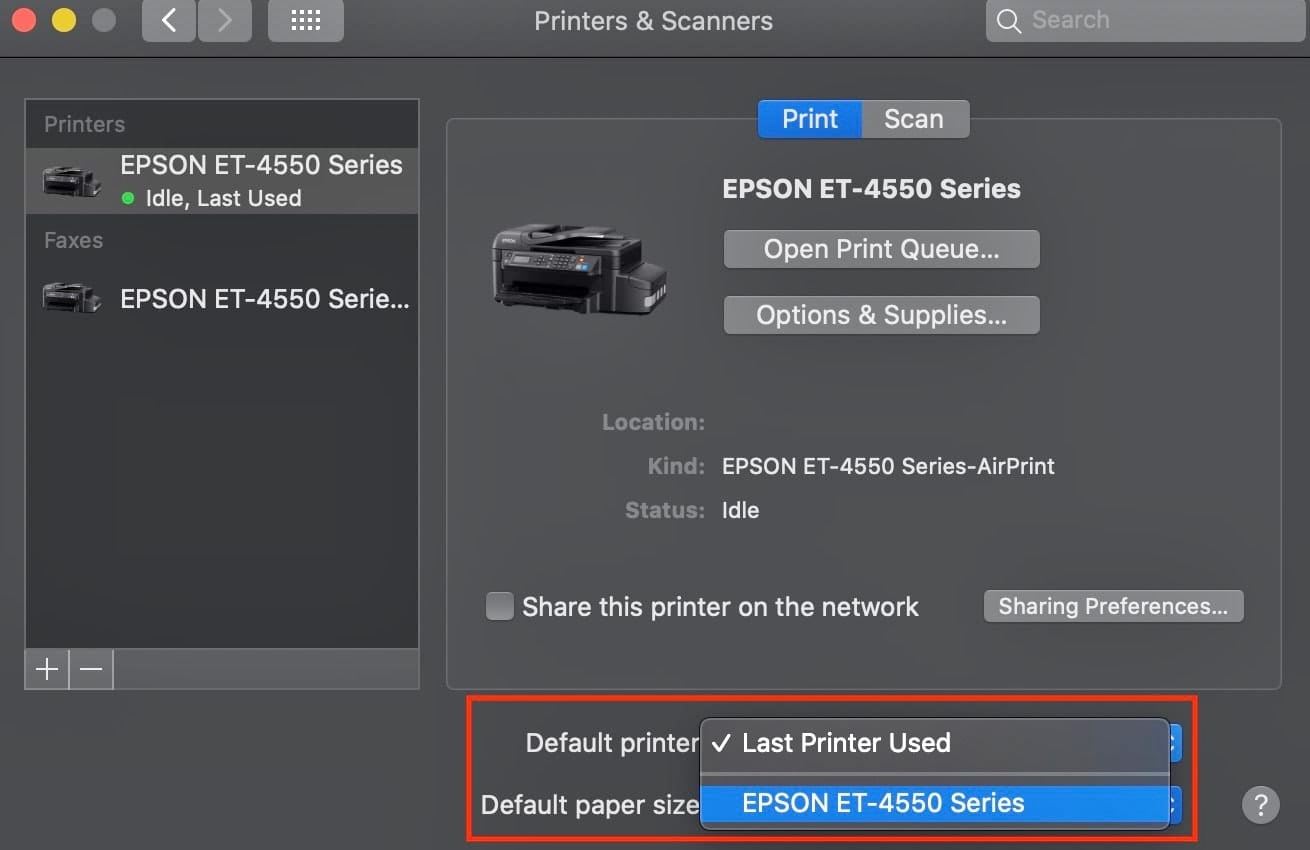
- Once you have selected the desired printer, look towards the bottom of the preferences panel, and you will see a dropdown menu labeled “Default printer.” Click on this dropdown menu.
- A list of all the available printers will appear. From this list, click on the printer that you wish to set as the default.
- After selecting the printer, close the Printers & Scanners preferences window.
- Your default printer has now been set through the Printers & Scanners preferences. Whenever you print a document, your Mac will automatically select the default printer you specified.
Setting the default printer through the Printers & Scanners preferences is a quick and convenient way to ensure that your preferred printer is always selected. It saves you the hassle of having to select the printer manually each time you print a document.
Note: It’s important to periodically check your default printer setting, especially if you connect or disconnect printers frequently. This will ensure that the correct printer is selected as the default at all times.
Method 3: Setting Default Printer through CUPS Web Interface
If you’re a Mac user and want to set your default printer through a web-based interface, you can do so using the Common UNIX Printing System (CUPS). CUPS is a powerful tool that allows you to manage and configure printers on your Mac. Follow the steps below to set your default printer using the CUPS web interface:
Step 1: Launch your preferred web browser and enter “localhost:631″ in the address bar. This will open the CUPS web interface.
Step 2: On the CUPS web page, click on the “Administration” tab. You may be prompted to enter your Mac username and password.
Step 3: Scroll down to the “Printers” section and locate the printer that you want to set as your default.
Step 4: Click on the printer name to access its settings.
Step 5: In the printer settings, locate the “Set Default Options” button and click on it.
Step 6: A new window will open with various printer options. Look for the “Default Printer” setting and select the checkbox next to it. This will set the current printer as your default.
Step 7: Once you have checked the “Default Printer” option, click on the “Set Default Options” button to save your changes.
That’s it! You have successfully set your default printer through the CUPS web interface. Now, whenever you print a document, it will be sent automatically to your default printer.
Please note that the CUPS web interface offers advanced printer management features, allowing you to configure various settings for your printer. Take some time to explore the options and customize your printing experience.
In conclusion, setting the default printer on Mac can greatly improve your printing experience and productivity. Whether you’re using macOS Ventura or an earlier version, the process is straightforward and can be done in just a few simple steps. By following the instructions outlined in this article, you’ll be able to select your preferred printer as the default option, ensuring that your print jobs always go to the right device.
Having the correct default printer set up can save you time and frustration, especially if you use multiple printers or regularly switch between different devices. With the ability to choose the default printer, you can streamline your printing workflow and ensure that documents are always sent to the right place. Remember to periodically review and update your default printer settings as needed, especially if you add or remove printers from your Mac.
So go ahead, take control of your printing preferences, and enjoy a smoother and more efficient printing experience on your Mac.
FAQs
Q: How can I set the default printer on Mac?
A: Setting the default printer on a Mac is a simple process. Just go to System Preferences, select “Printers & Scanners,” and choose the printer you want to set as default. Click on the “Set default printer” button, and you’re all set.
Q: Where can I find the System Preferences on my Mac?
A: The System Preferences icon can typically be found in the Dock, which is located at the bottom of the screen. Alternatively, you can also access it from the Apple menu by clicking on the Apple logo in the top-left corner of the screen and selecting “System Preferences.”
Q: Can I set a different default printer for different applications on my Mac?
A: Yes, you can! Mac allows you to set different default printers for different applications. To do this, open the application for which you want to set a specific default printer, go to File > Print, and select the desired printer from the printer options. Then, click on the “Show Details” button and check the “Use Last Printer Used” box. This will set the selected printer as the default for that specific application.
Q: How can I remove a printer from the list of available printers on my Mac?
A: If you want to remove a printer from the list of available printers on your Mac, go to System Preferences > Printers & Scanners. Select the printer you want to remove and click on the minus (-) button at the bottom of the printer list. Confirm the action, and the printer will be removed from your Mac.
Q: Can I add a network printer as the default printer on my Mac?
A: Yes, you can add a network printer as the default printer on your Mac. To do this, go to System Preferences > Printers & Scanners. Click on the plus (+) button to add a printer and select the “IP” tab. Enter the IP address of the network printer and choose the corresponding printer model. Then, click on “Add” to add the printer to your Mac and set it as the default if desired.