
Setting up voicemail on your iPhone 12 is a crucial step to ensure that you never miss an important message or call. Whether you’re a brand new iPhone user or simply upgrading to the latest model, this step-by-step guide will walk you through the process. With the advanced features and user-friendly interface of the iPhone 12, setting up your voicemail is a breeze. In just a few minutes, you’ll be able to personalize your voicemail greeting and access your messages with ease. Don’t let important calls go unanswered – learn how to set up voicemail on your iPhone 12 and stay connected at all times.
Inside This Article
- Setting up Your Voicemail Account
- Accessing the Voicemail Settings on iPhone 12
- Recording a Personalized Voicemail Greeting
- Retrieving Voicemail Messages on iPhone 12
- Conclusion
- FAQs
Setting up Your Voicemail Account
Setting up your voicemail account on your iPhone 12 is a simple process that allows you to receive and manage voice messages from your contacts. Follow these steps to configure and personalize your voicemail account:
1. Enable the Voicemail Feature: Begin by enabling the voicemail feature on your iPhone 12. Tap on the Phone app on your home screen, then select the Voicemail tab at the bottom right corner of the screen. If prompted, follow the instructions to set up your voicemail account with your carrier.
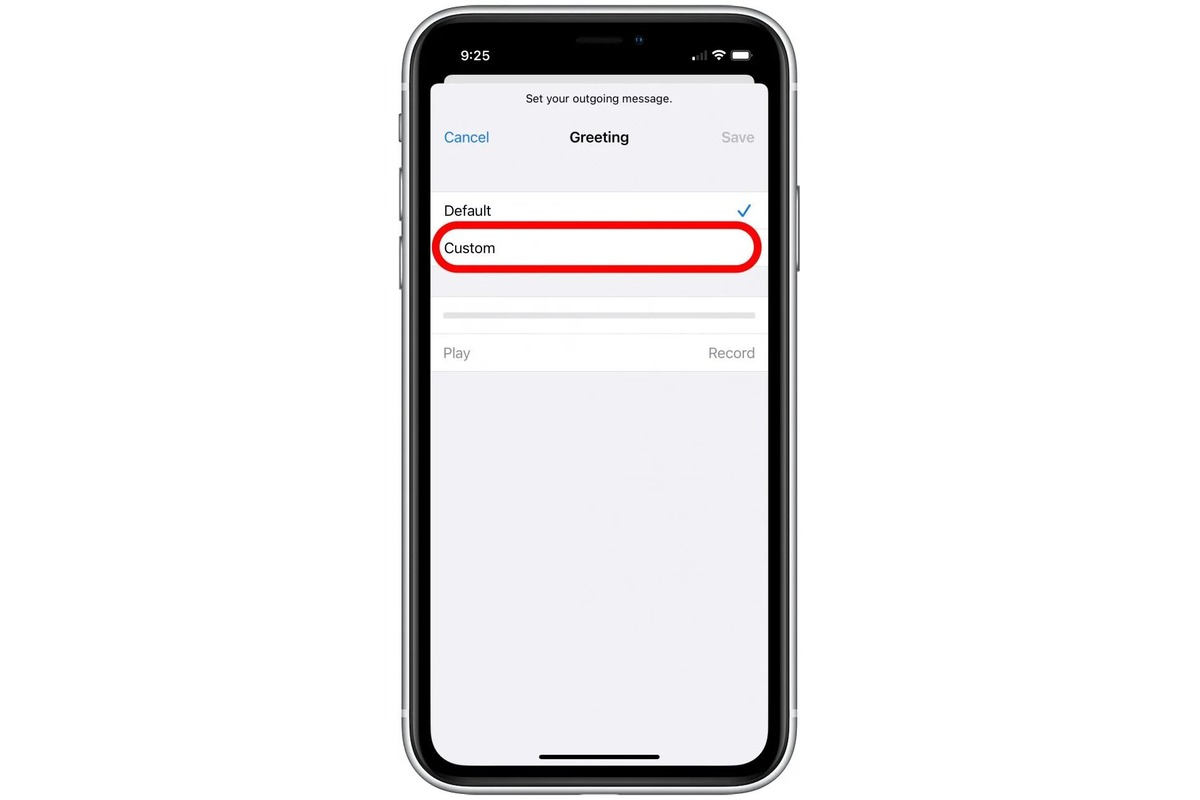
2. Set Up Your Voicemail Greeting: After enabling the voicemail feature, it’s time to set up your personalized voicemail greeting. Tap the Greeting button and then select Custom to record your own greeting. Speak clearly and concisely, and include your name or any other information you’d like to provide to callers. If you prefer to use the default greeting, simply select Default.
3. Customize Voicemail Settings: Your iPhone 12 offers various customization options for managing your voicemail. To access these settings, go back to the main Voicemail tab in the Phone app, then tap on the Voicemail button. Here, you can adjust settings such as voicemail password, greeting, playback, and notifications. Take some time to explore these settings and tailor them to your preferences.
4. Accessing and Listening to Voicemails: Once your voicemail account is set up and personalized, you can easily access and listen to your voicemails. Return to the Voicemail tab in the Phone app and you’ll see a list of your voicemails displayed. Tap on a voicemail message to listen to it. You can also tap on the “i” button next to a voicemail to view more options, such as deleting, sharing, or returning the call.
With these simple steps, you can quickly and easily set up your voicemail account on your iPhone 12. Having a well-configured voicemail account ensures that you never miss important messages and enables you to manage your voicemail settings according to your preferences.
Accessing the Voicemail Settings on iPhone 12
Setting up voicemail on your iPhone 12 is just the first step. After enabling the voicemail feature and recording a personalized greeting, you may want to customize your voicemail settings to suit your preferences. Accessing the voicemail settings on your iPhone 12 is a simple process that allows you to manage various aspects of your voicemail system.
To access the voicemail settings on your iPhone 12, follow these steps:
- Open the Phone app on your iPhone 12.
- Tap on the Voicemail tab at the bottom of the screen. This will take you to the Voicemail menu.
- At the top right corner of the Voicemail screen, you will find a button with three dots. Tap on it to access the voicemail settings.
- A drop-down menu will appear with various options for managing your voicemail settings.
From the voicemail settings menu, you can perform a range of actions, such as:
- Change voicemail password: It’s important to regularly update your voicemail password for security reasons. This option allows you to change your voicemail password to a new one of your choice.
- Customize voicemail greeting: If you want to change your voicemail greeting, this is where you can do it. You can record a new greeting to personalize your voicemail or select a default greeting provided by your service provider.
- Enable or disable transcription: iPhone 12 offers the ability to transcribe your voicemails into text. You can choose to enable or disable this feature based on your preference.
- Manage blocked callers: If there are specific callers you want to block from leaving you voicemails, this option allows you to manage your blocked callers list.
- Change voicemail storage settings: Depending on your storage preferences, you can choose to store voicemails on your iPhone or on the server. This option allows you to adjust the voicemail storage settings accordingly.
By accessing the voicemail settings on your iPhone 12, you have control over how your voicemail system operates. You can personalize your greetings, manage blocked callers, change storage settings, and more.
Remember to regularly check your voicemail settings to ensure they are up to date and reflect your preferences. With the ability to customize and manage your voicemail settings, you can streamline your voicemail experience and ensure that you never miss an important message.
Recording a Personalized Voicemail Greeting
When setting up your voicemail on your iPhone 12, one of the first things you’ll want to do is record a personalized voicemail greeting. This is the message that callers will hear when they reach your voicemail inbox. It’s an opportunity for you to make a good impression and provide important information to your callers.
To record a personalized voicemail greeting on your iPhone 12, follow these simple steps:
- Open the Phone app on your iPhone 12.
- Tap on the Voicemail tab located at the bottom of the screen.
- Tap on “Greeting” or “Customize” depending on your iOS version.
- Tap on “Record” or “Custom” to begin the recording process.
- Hold your iPhone up to your ear and speak clearly and audibly.
- When you’re finished recording, tap on “Done” or “Save” to save your voicemail greeting.
It’s important to take your time when recording your voicemail greeting. Speak clearly and provide information such as your name, a brief message, and any instructions you want to give your callers. Remember, this is often the first impression callers will have of you, so make sure to sound professional and friendly.
If you’re not satisfied with your recording, don’t worry. You can always re-record your voicemail greeting by following the same steps mentioned above.
Once you have recorded your personalized voicemail greeting, callers will hear it when they reach your voicemail inbox. It adds a personal touch to your communication and ensures that your callers receive important information even when you’re not available to take their call.
Retrieving Voicemail Messages on iPhone 12
After successfully setting up your voicemail on your iPhone 12, you’ll need to know how to retrieve and listen to your voicemail messages. Fortunately, the process is simple and can be done directly from your device. Here’s a step-by-step guide on how to retrieve voicemail messages on your iPhone 12:
1. Open the Phone app on your iPhone 12 by tapping the Phone icon on your home screen.
2. At the bottom right corner of the screen, tap the “Voicemail” tab, represented by an icon of a tape recorder.
3. You’ll be taken to the Voicemail section, where you’ll see a list of all your voicemail messages.
4. To listen to a voicemail message, simply tap on it from the list. The voicemail will automatically begin playing.
5. While listening to a voicemail message, you’ll see various options appear on the screen, such as “Pause,” “Skip backward,” and “Skip forward.” Use these options to control playback.
6. If you want to delete a voicemail message, swipe left on the message and tap the “Delete” button that appears. Alternatively, you can tap “Delete All” at the top left corner of the screen to delete all voicemail messages at once.
7. To save a voicemail message, tap the “Share” button while listening to the message. From there, you can choose to save the voicemail to your Notes, Voice Memos, or send it via Messages or Mail.
8. After listening to a voicemail message, you have the option to call the person back directly from the Voicemail screen. Simply tap the blue “Call Back” button next to the voicemail message.
9. If you have multiple phone numbers associated with your iPhone 12, you may need to select the appropriate phone number to access voicemail messages specific to that number. To do this, go back to the Phone app, tap on the “Keypad” tab at the bottom, and enter your voicemail password. Then, follow the prompts to switch between phone numbers.
10. Finally, remember to periodically check your Voicemail section on your iPhone 12 to ensure you don’t miss any important messages. Voicemail messages will remain on your device until you delete them.
By following these simple steps, you’ll be able to easily retrieve and manage your voicemail messages on your iPhone 12. Whether it’s listening to a message, saving it for later, or calling the person back, the Voicemail feature on your iPhone 12 offers a convenient way to stay connected.
In conclusion, setting up voicemail on iPhone 12 is a straightforward process that ensures you never miss important messages. Whether you’re a first-time iPhone user or upgrading to the latest model, following the steps outlined in this article will help you configure your voicemail settings with ease.
Remember, voicemail is a valuable tool for communication, allowing you to receive and manage messages at your convenience. By personalizing your voicemail greeting and enabling features like visual voicemail, you can enhance your experience and stay organized.
With the guidance provided in this article, you have the knowledge to navigate the voicemail setup process on your iPhone 12 confidently. Don’t let important information slip through the cracks – take control of your voicemail and ensure you’re always connected.
FAQs
1. How do I set up voicemail on the iPhone 12?
2. What happens if I don’t set up voicemail on my iPhone 12?
3. Can I access my voicemail remotely?
4. How long can I store voicemails on my iPhone 12?
5. Can I personalize my voicemail greeting on the iPhone 12?