
Welcome to our comprehensive guide on how to set up voicemail on the latest iPhone 13! Having a functional voicemail is an essential feature for any smartphone user. Whether you’re busy, unable to answer a call, or simply prefer listening to messages at your convenience, setting up voicemail can greatly enhance your mobile phone experience.
In this article, we will walk you through the step-by-step process of setting up voicemail on your iPhone 13. We’ll cover everything from accessing the voicemail menu to recording a personalized greeting. With our easy-to-follow instructions, you’ll have your voicemail up and running in no time.
So, if you’ve just gotten your hands on the fantastic iPhone 13 and are eager to make the most of its features, read on to learn how to set up voicemail and ensure you never miss an important message again.
Inside This Article
- Setting up Visual Voicemail on iPhone 13
- Configuring Voicemail Greeting on iPhone 13
- Checking Voicemail on iPhone 13
- Managing Voicemail Settings on iPhone 13
- Conclusion
- FAQs
Setting up Visual Voicemail on iPhone 13
The iPhone 13 comes equipped with a convenient feature called Visual Voicemail, which allows you to access and manage your voicemail messages with ease. To set up Visual Voicemail on your iPhone 13, follow these simple steps:
- Ensure that your iPhone 13 is connected to a cellular network or Wi-Fi.
- Open the Phone app on your iPhone 13 by tapping the green phone icon on your home screen.
- In the bottom menu, select the “Voicemail” tab. If prompted, enter your voicemail password.
- If you haven’t set up a voicemail password before, follow the on-screen instructions to create one. This step is essential to protect the privacy and security of your voicemail messages.
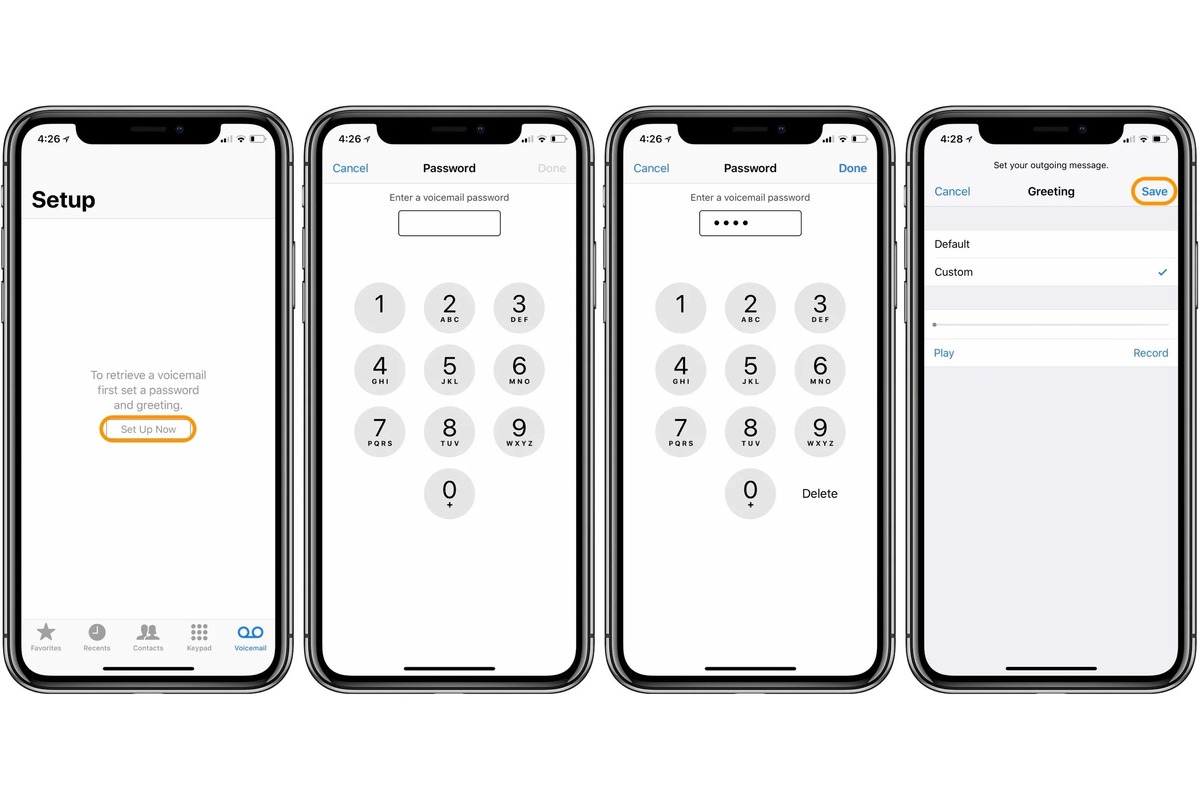
- Next, tap on the “Set Up Now” option to begin the setup process.
- Your iPhone 13 will now contact your wireless carrier to gather the necessary information to set up Visual Voicemail. This may take a few moments.
- Once the setup is complete, you will see a list of your voicemail messages in the Voicemail tab. You can simply tap on a message to play it, or swipe left to delete it.
That’s it! You have successfully set up Visual Voicemail on your iPhone 13. Now you can quickly access and listen to your voicemail messages directly from the Voicemail tab in the Phone app.
Configuring Voicemail Greeting on iPhone 13
Setting up a personalized voicemail greeting on your iPhone 13 adds a personal touch and lets callers know they’ve reached the right person. Whether you want to keep it professional or inject some personality, customizing your voicemail greeting is quick and easy. Here’s how you can do it:
- Open the Phone app on your iPhone 13.
- Tap the Voicemail tab at the bottom of the screen.
- Press the “Greeting” option located in the upper-left corner of the voicemail screen.
- You will see a list of available voicemail greetings. Select the one you want to use or tap “Custom” to record your own.
- If choosing “Custom,” tap the “Record” button to start recording your greeting.
- Follow the prompts and record your personalized voicemail message.
- You can preview your greeting by tapping the “Play” button.
- If you are satisfied with your recording, tap “Save” to set it as your voicemail greeting.
It’s important to note that the maximum length for a custom voicemail greeting on iPhone 13 is 2 minutes. Keep your greeting concise and to the point, while still conveying the necessary information for callers. Additionally, it’s a good idea to avoid dead air or long pauses in your recording to ensure a smooth and professional greeting.
Remember, you can always change your voicemail greeting whenever you want. Simply follow the steps mentioned above, and select a new greeting or record a fresh one to update your voicemail message.
Customizing your voicemail greeting on your iPhone 13 allows you to make a lasting impression on callers and adds a personal touch to your communication. Take a few moments to configure your voicemail greeting and enhance your overall phone experience.
Checking Voicemail on iPhone 13
Voicemail on the iPhone 13 is a convenient feature that allows you to access and listen to your voicemail messages at any time. Here’s how you can easily check your voicemail on your iPhone 13:
1. Open the Phone app on your iPhone 13. The Phone app icon looks like a green phone receiver on a white background.
2. At the bottom of the screen, you’ll see several tabs. Tap on the “Voicemail” tab, which is represented by an icon of a cassette tape.
3. You’ll now see a list of your voicemail messages. Each message will display the caller’s name or phone number, as well as the date and time the message was received.
4. To listen to a voicemail message, simply tap on it. The message will automatically start playing, and you can adjust the volume using the side volume buttons on your iPhone 13.
5. While listening to a voicemail message, you have several options available. You can pause or resume playback by tapping the play/pause button. You can also skip to the next or previous message by using the skip buttons.
6. If you want to delete a voicemail message, swipe left on the message and tap the “Delete” button that appears. Alternatively, you can tap the “More” button to access additional options, such as saving the message or sharing it.
7. After you’ve listened to a voicemail message, it will be marked as “read” and moved to the “Deleted Messages” folder. If you want to keep a voicemail message for future reference, you can save it by tapping the “Save” button.
8. To exit the Voicemail screen and return to the main Phone app, simply tap the back arrow located at the top-left corner of the screen.
Now you know how to easily check your voicemail messages on your iPhone 13. It’s a simple and efficient way to stay connected and stay on top of your voice messages.
Managing Voicemail Settings on iPhone 13
Managing voicemail settings on your iPhone 13 is a straightforward process that allows you to customize and control how your voicemails are received and stored. Follow these simple steps to manage your voicemail settings on your iPhone 13:
1. Go to the home screen of your iPhone 13 and tap on the “Phone” app.
2. In the bottom menu, select the “Voicemail” tab. This will bring up your voicemail inbox.
3. In the upper-right corner of the screen, tap on “Greeting”. This will open the voicemail greetings options.
4. To change your voicemail greeting, tap on “Custom”. You can record a new voicemail greeting or select an existing one from the list.
5. Tap on “Save” to set your new voicemail greeting.
6. To change the voicemail password, tap on “Change Voicemail Password”. Follow the prompts to create a new password and confirm it.
7. If you have multiple carrier numbers on your iPhone 13, you can select which number’s voicemail you want to manage by tapping on the “Voicemail” tab and selecting the desired number from the list.
8. If you wish to delete voicemails, swipe left on each voicemail message and tap on “Delete”. You can also tap on “Clear All” to delete all voicemail messages.
9. To change the voicemail notification sound, go to “Settings”, then tap on “Sounds & Haptics”. From there, select “Voicemail” and choose your preferred notification sound.
10. To enable or disable voicemail transcription, go to “Settings”, then tap on “Phone”. Scroll down and toggle the “Voicemail Transcription” option on or off.
11. To adjust the voicemail storage duration, go to “Settings”, then tap on “Phone”. Scroll down and tap on “Deleted Messages”. Select the desired storage duration for your deleted voicemail messages.
By following these steps, you can easily manage your voicemail settings on your iPhone 13, ensuring that your voicemail experience is tailored to your preferences.
Conclusion
In conclusion, setting up voicemail on your iPhone 13 is a simple and straightforward process that ensures you never miss an important message again. By following the steps outlined in this article, you can easily customize your voicemail greeting, access and manage your voicemail messages, and even personalize your voicemail settings to suit your preferences.
Remember, having a properly set up voicemail not only enhances your communication capabilities but also projects a professional image to your contacts. So, whether you’re using your iPhone for personal or business purposes, taking a few minutes to set up your voicemail can greatly improve your overall user experience.
With the iPhone 13’s advanced features and user-friendly interface, you can stay connected and organized with ease. So don’t delay, get your voicemail up and running on your iPhone 13 today and enjoy the convenience and flexibility it brings to your daily communication.
FAQs
1. How do I set up voicemail on my iPhone 13?
To set up voicemail on your iPhone 13, follow these steps:
- Open the Phone app on your iPhone 13.
- Tap the Voicemail tab located at the bottom right corner of the screen.
- Press the Set Up Now button.
- Enter a custom voicemail greeting and tap Done to save it.
- You will be prompted to create a voicemail password. Follow the instructions to set a secure password.
- Once your voicemail is set up, you can access it by tapping the Voicemail tab in the Phone app.
2. Can I change my voicemail greeting on the iPhone 13?
Yes, you can change your voicemail greeting on the iPhone 13. Here’s how:
- Open the Phone app on your iPhone 13.
- Tap the Voicemail tab at the bottom right corner of the screen.
- Press the Greeting option located at the top left corner of the screen.
- Select the custom greeting you want to use or create a new one.
- Tap Done to save your changes.
3. How do I listen to my voicemail messages on the iPhone 13?
To listen to your voicemail messages on the iPhone 13, follow these steps:
- Open the Phone app on your iPhone 13.
- Tap the Voicemail tab located at the bottom right corner of the screen.
- Select the voicemail message you want to listen to.
- Tap the Play button to listen to the message.
- You can also swipe left on a voicemail message to access options like delete, call back, or reply with a message.
4. How do I delete a voicemail message on the iPhone 13?
To delete a voicemail message on the iPhone 13, follow these steps:
- Open the Phone app on your iPhone 13.
- Tap the Voicemail tab located at the bottom right corner of the screen.
- Swipe left on the voicemail message you want to delete.
- Tap the Delete button that appears on the right side of the message.
5. How can I change my voicemail password on the iPhone 13?
To change your voicemail password on the iPhone 13, follow these steps:
- Open the Settings app on your iPhone 13.
- Scroll down and tap Phone.
- Tap Change Voicemail Password.
- Enter the current voicemail password.
- Set a new voicemail password following the on-screen instructions.
- Once the new password is set, tap Done to save the changes.