
The iPhone, with its advanced features and capabilities, has become an indispensable tool in our modern lives. Whether you’re using it for navigation, finding nearby attractions, or accessing personalized services, setting your location on your iPhone is crucial. Knowing how to set your location not only ensures accurate results but also enhances your overall user experience.
In this article, we will guide you through the process of setting your location on your iPhone. Whether you want to enable location services, change your location settings, or optimize location accuracy, we’ve got you covered. So, let’s dive in and discover how to maximize the benefits of location services on your iPhone.
Inside This Article
- Enabling Location Services
- Adjusting Location Settings for iPhone
- Setting Location for Weather and Time
- Changing Location Services for Specific Apps
- Conclusion
- FAQs
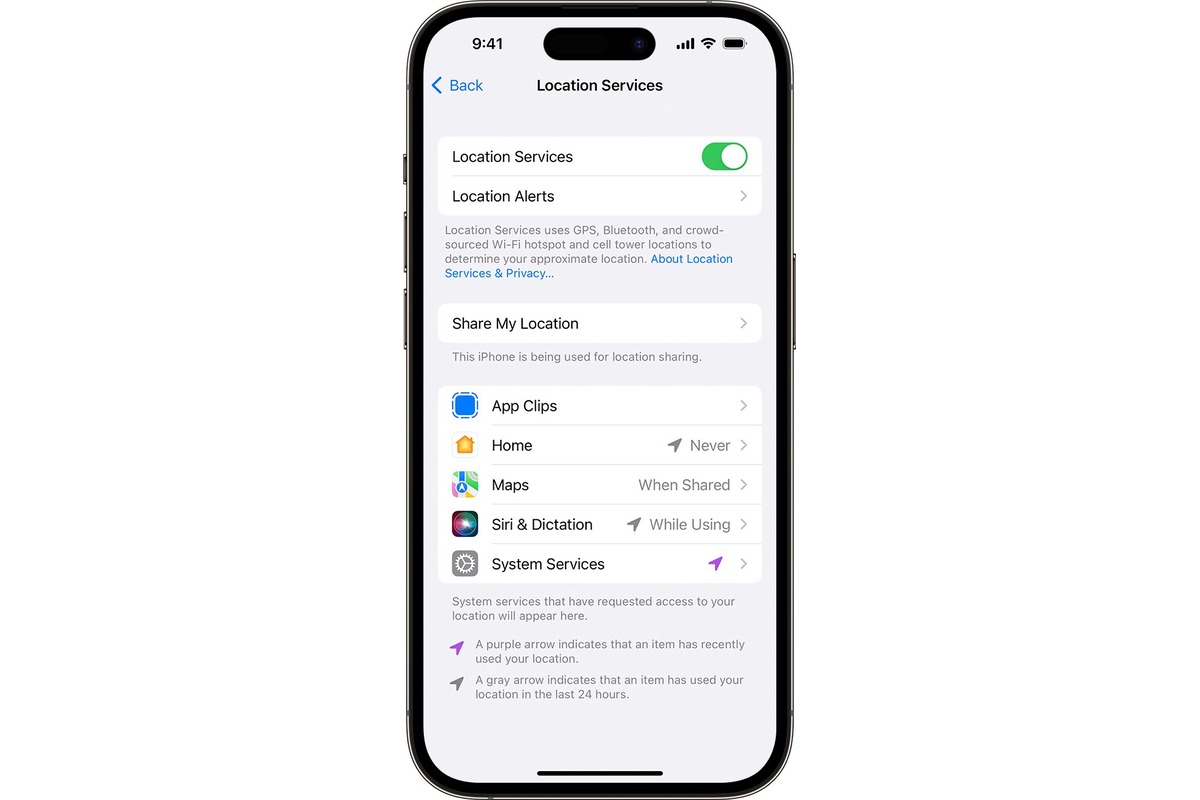
Enabling Location Services
Enabling Location Services on your iPhone allows you to take full advantage of location-based features and services. Whether you’re using navigation apps, checking the weather, or looking for nearby restaurants, having accurate location information is crucial. Here’s how you can enable Location Services on your iPhone:
- Open the Settings app: Launch the Settings app on your iPhone by tapping on the gear icon located on your home screen.
- Find Privacy: Scroll down and tap on the Privacy tab, which is represented by a hand icon.
- Tap on Location Services: Within the Privacy settings, you’ll find the Location Services option. Tap on it to access the location settings.
- Toggle on Location Services: To enable Location Services, simply toggle the switch to the right. It will turn green, indicating that Location Services is now enabled on your iPhone.
Enabling Location Services is a straightforward process and allows your iPhone to determine your location accurately. However, it’s essential to note that enabling Location Services also means that certain apps can access your location data. Therefore, it’s crucial to adjust your location settings for individual apps to ensure privacy and control over your personal information.
Adjusting Location Settings for iPhone
Adjusting the location settings on your iPhone is essential for various apps and services to work effectively. Whether you want precise weather updates, accurate directions, or location-based reminders, customizing your location settings is crucial. Here’s a step-by-step guide on how to adjust the location settings for your iPhone.
1. Open the Settings app: Locate the Settings app on your iPhone’s home screen and tap on it to open.
2. Tap on Privacy: Once you are in the Settings app, scroll down and tap on the Privacy option.
3. Select Location Services: Under Privacy, you will find the Location Services option. Tap on it to proceed.
4. Enable Location Services: On the Location Services page, you can toggle the switch to enable or disable location services for all the apps on your iPhone.
5. Customize Location Services: If you prefer to have more control over which apps can access your location, you can customize the settings individually. Scroll down to see the list of apps and choose how you want each app to use your location: Always, While Using the App, or Never.
6. Manage System Services: To further fine-tune your location settings, scroll down to the bottom of the Location Services page and tap on System Services. Here, you can enable or disable specific system services that rely on your location, such as Find My iPhone, Emergency SOS, and more.
7. Adjust Location Accuracy: By default, your iPhone will use a combination of GPS, Wi-Fi, Bluetooth, and cellular data to determine your location accurately. However, if you want to conserve battery life, you can toggle off the Precise Location option, which will use only Wi-Fi and cellular networks to estimate your location.
8. Manage Significant Locations: Your iPhone keeps track of significant locations you frequently visit. If you want to disable this feature, scroll down to the bottom of the Privacy page and tap on Location Services > System Services > Significant Locations. From there, you can toggle off the Significant Locations option, or you can delete specific locations from the list.
By following these steps, you can easily adjust the location settings on your iPhone to suit your preferences and privacy concerns. Remember to review your location settings periodically to ensure that your iPhone is using your location data in the way you want it to. With the right location settings in place, you can enjoy a seamless and personalized mobile experience.
Setting Location for Weather and Time
One of the most convenient features of an iPhone is its ability to provide accurate weather and time information based on your location. By setting your location for weather and time, you can ensure that you always have access to up-to-date information tailored to your specific location.
To set your location for weather and time on your iPhone, follow these simple steps:
- Open the “Settings” app on your iPhone.
- Scroll down and tap on “Privacy”.
- Select “Location Services”.
- Make sure that “Location Services” is turned on at the top of the page.
- Scroll down to find the “Weather” app and tap on it.
- Choose the option that allows the app to access your location “While Using the App” or “Always”.
- Go back to the previous page and scroll down to find the “Clock” app.
- Tap on “Clock” and select the option to allow the app to access your location.
By enabling location access for the Weather and Clock apps, your iPhone will be able to automatically update the weather information and adjust the time based on your current location. This means that you will always have the most accurate information at your fingertips, without having to manually input your location.
It’s important to note that enabling location access for these apps may drain your battery faster, as the apps will be actively using your location data. If you’re concerned about battery life, you can choose to allow the apps to access your location only when you’re using them, rather than “Always”. Keep in mind that this may result in slightly delayed updates for the weather and time information.
Now that you’ve set your location for weather and time on your iPhone, you can enjoy the convenience of having personalized weather forecasts and accurate time information wherever you go. Whether it’s checking the weather before heading out for the day or ensuring that your phone automatically adjusts to the correct time zone when traveling, your iPhone has you covered.
Changing Location Services for Specific Apps
One of the great features of an iPhone is its ability to provide location-specific information through various apps. However, there may be instances where you want to change the location settings for specific apps. Whether it’s for privacy reasons or to access location-specific features in different regions, here’s how you can do it:
1. To begin, open the “Settings” app on your iPhone and scroll down until you find the “Privacy” option. Tap on it to proceed.
2. Within the “Privacy” section, you’ll see a list of different categories. Look for and tap on “Location Services.”
3. This will take you to a page with a list of all the apps on your iPhone that access your location. Scroll through the list and select the app for which you want to change the location settings.
4. Once you’ve selected the desired app, you’ll see three options: “Never,” “While Using the App,” and “Always.” Choose the option that best suits your needs.
5. If you select “Never,” the app will never have access to your location. If you choose “While Using the App,” the app will only have access to your location while it is actively open and being used. And if you opt for “Always,” the app will have access to your location even when it’s running in the background.
6. After selecting the preferred option, simply exit the settings and the changes will be applied.
By adjusting the location services for specific apps, you have control over which apps have access to your location. This helps to protect your privacy and ensures that you only provide location data to apps that truly need it.
Remember, changing the location settings for specific apps may affect their functionality. Some apps may rely heavily on location data, and restricting access may limit their features or render them unusable in certain situations. So, consider your decision carefully based on your specific needs and preferences.
Conclusion
Setting your location on your iPhone is a simple and essential feature that allows you to personalize and customize your device’s functionality. Whether you want to access location-based services, track your movements, or just want to keep up with the local time, knowing how to set your location on your iPhone is crucial.
By following the steps outlined in this guide, you can easily set your location on your iPhone and enjoy the benefits that come with it. From getting accurate weather information to finding nearby restaurants or attractions, having your location set correctly opens up a world of possibilities.
Remember to refine your location settings and privacy preferences to ensure you are comfortable with the information your iPhone shares. With a secure and properly configured location, you can make the most out of your iPhone and enhance your overall user experience.
So go ahead, explore the world with your iPhone, and let it help you navigate through life, while keeping you connected and informed right at your fingertips.
FAQs
1. Why is setting your location on iPhone important?
Setting your location on iPhone is important because it allows you to access location-based services and applications. Whether it’s finding nearby restaurants, getting accurate weather updates, or using navigation apps, having your location set correctly ensures that you receive relevant information and personalized experiences.
2. How do I set my location on iPhone?
To set your location on iPhone, follow these steps:
a. Go to “Settings” on your iPhone.
b. Scroll down and tap on “Privacy”.
c. Tap on “Location Services”.
d. Toggle the switch to enable location services if it’s off.
e. Scroll down and tap on the app for which you want to set the location.
f. Choose the desired location option such as “While Using the App” or “Always”.
g. Exit the settings, and your location will be set for the selected app.
3. Can I set a fake location on my iPhone?
Yes, you can set a fake location on your iPhone. There are several apps available on the App Store that allow you to spoof or fake your GPS location. These apps can be useful for various purposes, such as location-based gaming or privacy concerns. However, it’s worth noting that faking your location is against the terms of service for many applications, and it may have legal ramifications in some cases. Use these apps responsibly and within the boundaries of the law.
4. Will setting my location on iPhone drain my battery?
Setting your location on iPhone does consume battery, especially when location services are enabled for several apps. This is because the GPS radio and other sensors continually collect and transmit location data. However, the exact impact on battery life will depend on various factors, such as the number of apps using location services, the frequency of location updates, and your overall battery usage. To minimize battery drain, it’s recommended to only enable location services for necessary apps and to be mindful of apps constantly accessing your location.
5. Is it possible to set different locations for different apps on iPhone?
Yes, it is possible to set different locations for different apps on iPhone. As mentioned earlier, when you navigate to the Location Services section in the Settings app, you have the option to select the location preferences for each installed app individually. This allows you to customize the location settings depending on your preferences and requirements for each app. Keep in mind that some apps may require constant access to your location, while others may only need it while you’re actively using them.