
Are you experiencing issues with your phone line? Do you need to splice it and don’t know where to start? Don’t worry, we’ve got you covered! In this article, we will guide you through the process of splicing a phone line, ensuring a smooth and uninterrupted connection. Whether you are looking to repair a damaged line or extend the reach of your phone service, understanding how to splice a phone line is an essential skill for any DIY enthusiast. From gathering the necessary tools to correctly connecting the wires, we will provide you with step-by-step instructions and useful tips to make the process as seamless as possible. So grab your tools and let’s get started splicing that phone line!
Inside This Article
Background Information
In today’s modern society, communication plays a vital role in our daily lives. With the proliferation of smartphones, landline phones may seem less prominent, but they still hold importance in certain situations. Whether you need to repair a damaged phone line or extend it to reach a different location, knowing how to splice phone lines can be a valuable skill.
Splicing phone lines involves joining or connecting two or more wires together to establish a continuous electrical path. This process enables the transmission of signals and ensures a seamless phone connection. However, it is essential to have a basic understanding of phone line wiring and the necessary tools before attempting any splicing.
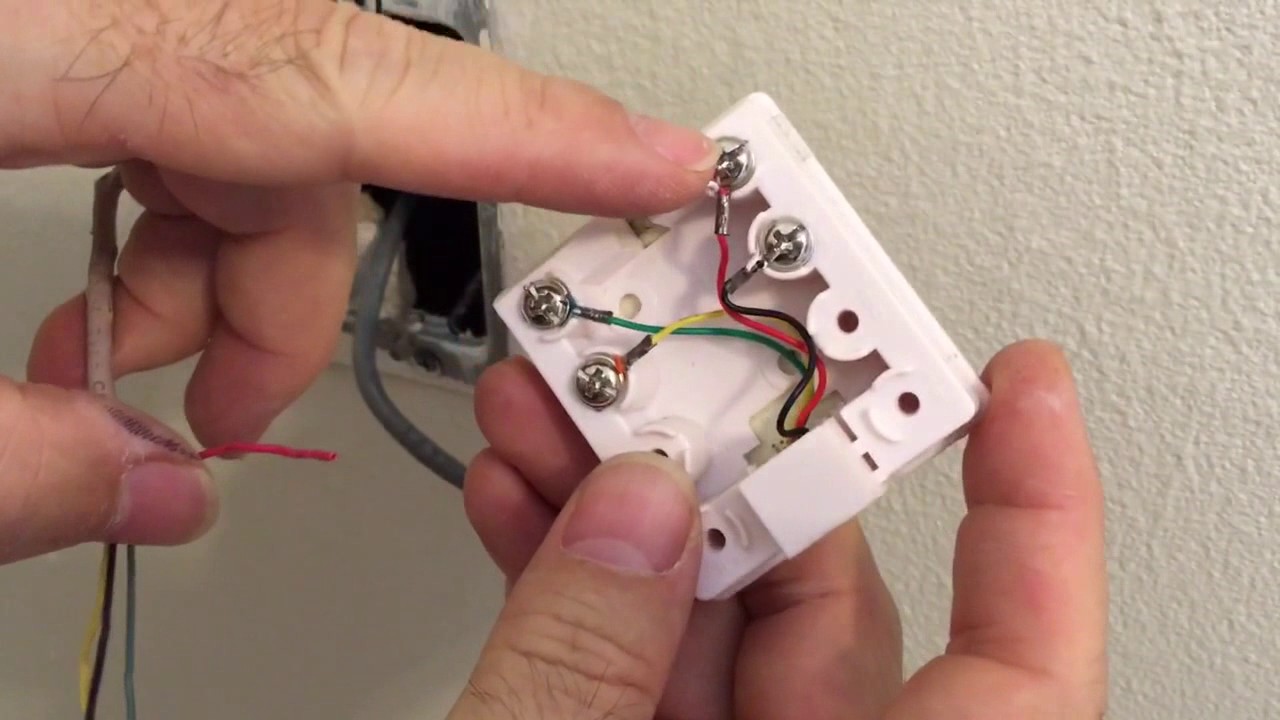
Phone lines typically consist of multiple insulated wires enclosed within a protective sheath. Each wire serves a specific purpose, such as transmitting voice or data signals. The standard color codes for phone line wires are red, green, yellow, and black, although variations can exist depending on the system.
Before attempting any splicing, it is crucial to identify the type of phone line you are working with. There are mainly two types: twisted pair phone lines and coaxial phone lines. Twisted pair phone lines rely on multiple twisted pairs of wires, while coaxial phone lines use a center conductor enclosed by an insulating layer and an outer metal shield.
Understanding the structure and type of phone line you are dealing with is essential. It helps ensure that you select the appropriate splicing method and use the correct tools for the job. Additionally, it reduces the risk of damaging the phone lines or compromising the quality of the connection.
Now that we have covered the background information, let’s move on to the tools required for splicing phone lines.
Tools Required
When it comes to splicing a phone line, having the right tools is essential to ensure a successful and efficient process. Here are the tools you will need to get the job done:
- Telephone Line Tester: This tool will help you determine if the phone line is active and ready for splicing. It allows you to check for any issues such as loose connections or line disruptions.
- Wire Strippers: A reliable pair of wire strippers is crucial for removing the insulation from the phone line cables. This allows for a clean and secure connection.
- Crimping Tool: A crimping tool is used to secure the connection between the spliced wires. It ensures a tight and stable joint, minimizing the risk of disconnection or signal loss.
- Electrical Tape: Electrical tape is used to insulate and protect the spliced wires. It prevents any exposed wires from coming into contact with each other, reducing the risk of electrical hazards.
- Heat Shrink Tubing: Heat shrink tubing provides an extra layer of protection for the spliced area. Once heated, it shrinks down to provide a tight seal, enhancing the durability and reliability of the splice.
- Wire Connectors: Wire connectors, also known as wire nuts, are used to join the two ends of the phone line cables together. These connectors create a secure and reliable connection, ensuring proper signal transmission.
- Needle-Nose Pliers: Needle-nose pliers come in handy for manipulating and bending the wires during the splicing process. They provide precise control and allow for easy handling of small parts.
- Wire Cutter: A wire cutter is used to trim and cut the excess wire after completing the splice. It ensures a neat and tidy finish, reducing any potential hazards or interference.
Make sure to have all these tools readily available before starting the splicing process. Having the right tools will not only make the splicing easier but also contribute to a safe and reliable phone line connection.
Step-by-Step Guide
Splicing a phone line may seem like a daunting task, but with the right tools and a step-by-step approach, it can be a simple and rewarding DIY project. Follow these steps to successfully splice your phone line:
- Gather the necessary tools: Before you begin, make sure you have the following tools handy:
- Wire cutters/strippers
- Telephone splicing connectors
- Electrical tape
- Screwdriver (if applicable)
- Heat shrink tubing (optional)
- Turn off the power: Safety should always be your priority. Before working on any electrical connections, ensure that the power to the phone line is turned off to avoid any potential hazards.
- Identify the phone line: Locate the section of the phone line that you want to splice. This is usually marked by a junction box or a telephone wall jack.
- Prepare the wires: Use the wire cutters/strippers to carefully strip the insulation from the ends of the phone line wires. Ensure that the stripped ends are clean and free from any frayed strands.
- Connect the wires: Insert the stripped ends of the wires into the telephone splicing connector. Twist the connector clockwise to secure the connection. If necessary, use a screwdriver to tighten the connector screws.
- Insulate the connection: Wrap the connection point with electrical tape to provide insulation and protect it from moisture and other external elements. For added protection, you can also use heat shrink tubing by sliding it over the connection and applying heat to shrink it in place.
- Test the connection: Once the splicing is complete, turn the power back on and test the phone line to ensure that the connection is secure and the phone is working properly. Make a test call to verify the line’s functionality.
- Secure the wires: Neatly bundle and secure the wires using cable ties or wire clips to prevent any accidental damage or tangling in the future. This will also help maintain a tidy and organized setup.
Remember, if you are unsure about any step or lack the necessary experience, it’s always best to consult a professional to ensure a safe and efficient installation. By following this step-by-step guide and taking proper precautions, you’ll be able to splice your phone line with ease and maintain reliable communication within your home or office.
Conclusion
Splicing a phone line is a useful skill that can save you time and money. Whether you need to extend a phone line, repair a damaged wire, or simply rearrange your phone setup, knowing how to splice a phone line will come in handy.
By following the proper steps and using the right tools, you can successfully splice a phone line without any issues. Remember to prioritize safety by disconnecting the line from the main power source before beginning any work. Additionally, make sure to use the appropriate connectors and insulation materials to ensure a secure and reliable splice.
With practice, you can become proficient in splicing phone lines and tackle various phone-related projects with confidence. So the next time you encounter a phone line issue, you can rely on your newly acquired knowledge to get the job done efficiently.
By mastering the art of splicing phone lines, you can become your own handyman and troubleshooter when it comes to your phone setup. So go ahead and give it a try – you’ll be amazed at how empowering it feels to take control of your phone infrastructure.
FAQs
1. What does it mean to splice a phone line?
Splicing a phone line refers to joining or connecting two separate sections of a phone line together. This can be done to extend the length of a phone line, repair a damaged section, or create new connections within a phone network.
2. Why would I need to splice a phone line?
There are several reasons why you might need to splice a phone line. One common reason is to extend the reach of a phone line to a different room or location in your home or office. Another reason may be to repair a damaged section of the line that is causing signal issues. Additionally, if you are setting up a new phone network or adding new devices, you may need to splice the lines to create the necessary connections.
3. Can I splice a phone line myself?
Yes, you can splice a phone line yourself if you have the necessary knowledge and tools. However, it is important to note that working with phone lines can be complex, and if not done correctly, it can result in signal degradation or even damage to your phone system. If you are unsure about your abilities or the requirements of the job, it is recommended to seek professional assistance.
4. What tools do I need to splice a phone line?
To splice a phone line, you will typically need a few essential tools, including wire cutters/strippers, a crimping tool, a modular jack, and crimp connectors. These tools will allow you to properly cut and strip the wires, connect them to the jack, and secure the connections using crimp connectors.
5. Are there any safety precautions I should take when splicing a phone line?
Yes, there are a few safety precautions you should follow when splicing a phone line. First, ensure that the phone line is disconnected from any power source to avoid electrical shocks. Additionally, make sure to work in a well-ventilated area and take necessary precautions to protect yourself from any harmful substances, such as insulation materials. If you are not confident in your ability to safely handle the task, it is best to consult a professional.