
Are you ready to level up your photography game with your iPhone? Taking 360 photos allows you to capture immersive, panoramic images that go beyond traditional photos. With the advanced camera capabilities of the iPhone, you can easily capture stunning 360-degree photos that provide a unique perspective and capture every detail of your surroundings. Whether you’re exploring a breathtaking landscape, documenting a memorable event, or showcasing a property for sale, knowing how to take 360 photos on your iPhone can take your photography skills to new heights. In this article, we’ll guide you through the process of taking 360 photos on your iPhone, from choosing the right app to capturing the perfect shot. Get ready to unleash your creativity and capture moments like never before!
Inside This Article
- Overview
- Method 1: Using the Panorama Mode
- Method 2: Using a 360 Photo App
- Method 3: Using a 360° Camera Attachment
- Troubleshooting Tips
- Conclusion
- FAQs
Overview
Are you ready to capture breathtaking 360 photos on your iPhone? With the advancements in technology, taking immersive photos has never been easier. Whether you want to capture stunning landscapes or create interactive memories, there are several methods you can use to achieve this. In this article, we will explore three different methods to help you take 360 photos on your iPhone.
We will start by diving into the built-in Panorama mode on your iPhone. This mode allows you to capture wide-angle photos by panning your device. We will also explore using dedicated 360 photo apps that leverage your iPhone’s camera capabilities to create panoramic images. Lastly, we will discuss using a 360° camera attachment for a more professional and versatile approach to capturing 360 photos.
Regardless of which method you choose, these techniques will help you unlock the potential of your iPhone’s camera and capture stunning moments in a whole new way. So, grab your iPhone and let’s get started on this exciting photographic journey!
Method 1: Using the Panorama Mode
One of the easiest ways to take 360 photos on your iPhone is by using the built-in Panorama mode. This feature allows you to capture a wide-angle shot by panning your phone from left to right or vice versa.
To use the Panorama mode, simply open your iPhone’s camera app and swipe left on the shooting modes until you find the “Pano” option. Tap on it to select Panorama mode.
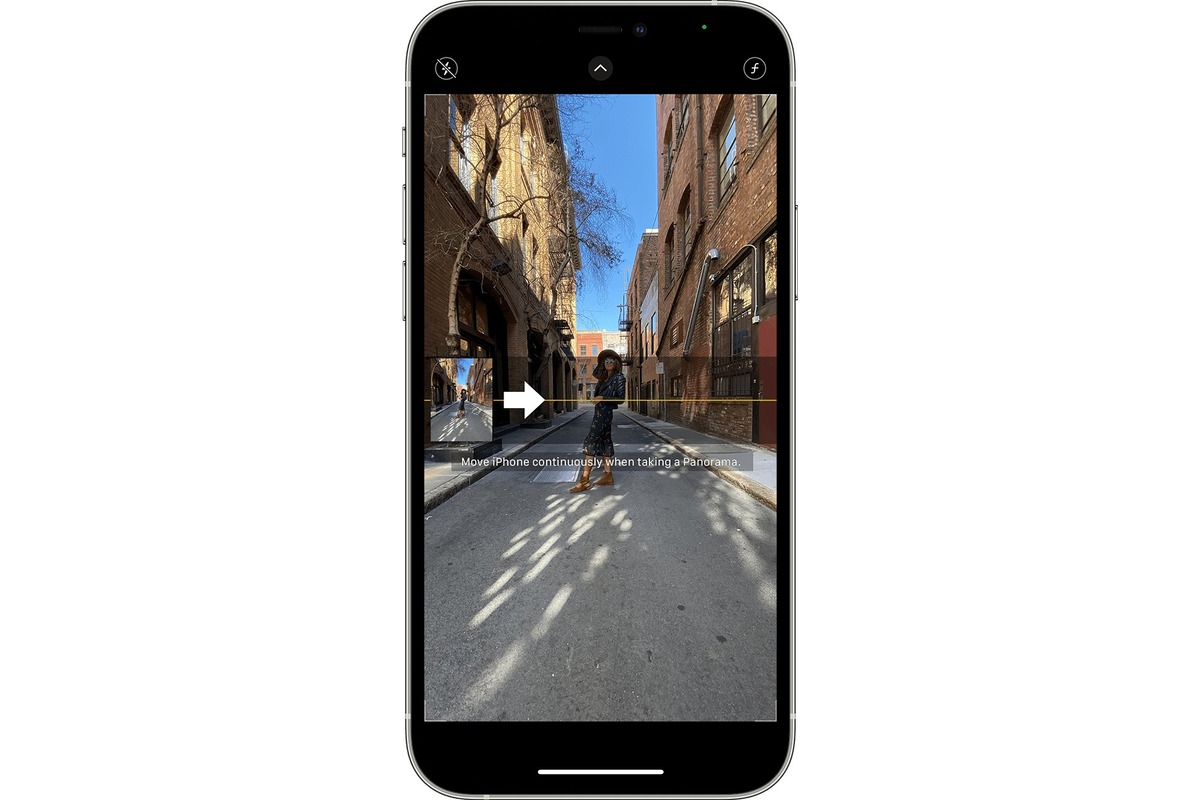
Once you’re in Panorama mode, hold your iPhone in a vertical position and tap the capture button. Slowly move your phone from one side to the other while keeping it level and aligned with the on-screen guide.
As you move, the camera will automatically capture multiple images and stitch them together to create a seamless panoramic shot. Make sure to move at a steady pace to ensure smooth stitching.
When you’ve captured the desired scene, tap the capture button again to stop the panorama. You can then view the 360 photo by swiping left or right on the screen.
Keep in mind that the Panorama mode has its limitations. It works best for capturing landscapes or wide-open spaces, but it may not be suitable for capturing detailed close-ups or moving subjects.
However, if you’re looking for a quick and easy way to take 360 photos on your iPhone without any additional equipment or apps, the Panorama mode is a great option to consider.
Method 2: Using a 360 Photo App
If you want to capture stunning 360-degree photos on your iPhone, using a dedicated 360 photo app is a great option. There are numerous apps available on the App Store that allow you to easily create immersive photos with just a few taps. Here’s how you can use a 360 photo app to take awe-inspiring shots:
1. Start by browsing the App Store and look for a reputable 360 photo app. Some popular options include Google Street View, Panorama 360, and Roundme.
2. Once you’ve found the app that suits your needs, install it on your iPhone and open it up.
3. Familiarize yourself with the app’s features and settings. Each app may have a slightly different interface, but the basic functionality remains the same.
4. Typically, these apps utilize your iPhone’s gyroscope and accelerometer sensors to track your movements and capture the entire 360-degree scene. Make sure to hold your phone steady and rotate it slowly in a complete circle to capture the full panorama.
5. Some apps may also provide additional options, such as adding filters, adjusting exposure, or even integrating augmented reality elements into your photos. Explore these features to enhance your creative possibilities.
6. Once you’re satisfied with your shot, save the photo to your iPhone’s camera roll. From there, you can easily share it with friends and family or upload it to social media platforms to showcase your photography skills.
Using a 360 photo app offers a convenient and user-friendly way to capture breathtaking images. Whether you want to capture the beauty of a scenic landscape or document a memorable moment with friends, these apps provide an immersive and engaging photo-taking experience.
Remember to experiment with different angles and subjects to truly make the most of your 360-degree photos. So go ahead and give it a try—you’ll be amazed by the unique perspectives you can capture with the help of a 360 photo app on your iPhone!
Method 3: Using a 360° Camera Attachment
If you’re looking to capture stunning 360-degree photos on your iPhone, one of the most effective methods is to use a 360° camera attachment. These compact devices are specifically designed to capture immersive photos with a complete field of view. Here’s how you can use a 360° camera attachment to take breathtaking photos.
1. Choose a Compatible 360° Camera Attachment: Start by selecting a 360° camera attachment that is compatible with your iPhone model. There are various options available on the market, ranging from budget-friendly options to high-end professional-grade attachments. Research and choose the one that best fits your needs and budget.
2. Connect the Camera Attachment: Once you have your 360° camera attachment, follow the manufacturer’s instructions to connect it to your iPhone. Most attachments connect via the charging port or wirelessly through Bluetooth or Wi-Fi. Make sure the attachment is securely connected to your phone to ensure stability while capturing photos.
3. Install the Companion App: Many 360° camera attachments have their dedicated companion app that provides additional features and settings. Download and install the app on your iPhone from the App Store. Follow the app’s instructions for pairing the camera attachment with your iPhone.
4. Familiarize Yourself with the Settings: Launch the companion app, and take some time to explore the settings and options available to you. Different camera attachments may offer various shooting modes, such as automatic, manual, or even time-lapse. Experiment with the settings to understand their impact on the final photo results.
5. Find the Perfect Composition: With a 360° camera attachment, you have the ability to capture your surroundings in its entirety. Look for unique angles, interesting landscapes, or captivating scenes to create visually striking photos. Experiment with different perspectives and compositions to create photos that stand out.
6. Capture the Photo: Once you have found the perfect composition, press the capture button on the companion app or use the physical button on the camera attachment to start taking the photo. Keep the camera steady and try to avoid any sudden movements to ensure a clear and sharp image.
7. Post-Processing and Sharing: After capturing the photo, you can make use of the editing tools available in the companion app to enhance the image further. Adjust settings like brightness, saturation, and contrast to bring out the best in your 360-degree photo. Once you’re satisfied with the final result, you can easily share it on social media platforms or with friends and family.
Using a 360° camera attachment offers a convenient and efficient way to capture immersive photos on your iPhone. Whether you’re a professional photographer or simply enjoy documenting your adventures, this method will allow you to create stunning 360-degree images with ease.
Troubleshooting Tips
While taking 360 photos on your iPhone can be an incredible experience, there may be instances when you encounter glitches or face challenges. To help you address any troubleshooting issues successfully, here are some useful tips:
- Ensure Sufficient Storage Space: 360 photos can take up a significant amount of storage space on your iPhone. Before you start capturing, make sure you have enough available storage to avoid any disruptions during the process.
- Check Battery Life: Taking 360 photos can be battery-intensive. It’s essential to have a fully charged iPhone or keep it connected to a power source to prevent your device from running out of battery mid-way through capturing your shot.
- Use Stable Tripod or Mount: Stability is crucial when taking 360 photos, as any movement or shake can affect the final result. Investing in a tripod or mount for your iPhone will help you capture steady shots, especially in low-light conditions.
- Clear Lens and Camera App Cache: Over time, fingerprints, dust, or debris can accumulate on your iPhone lens, affecting the quality of your 360 photos. Regularly clean the lens with a soft cloth to ensure clarity. Additionally, clearing the cache of your camera app can resolve any performance issues.
- Close Unnecessary Apps: Running multiple apps in the background can consume memory and processing power, potentially impacting the performance of your camera app. Close any unnecessary apps before starting your 360 photo session.
- Restart Your iPhone: If you encounter any technical glitches or experience slow performance while taking 360 photos, a simple restart of your iPhone can often resolve the issue. This clears the device’s memory and can bring it back to optimal performance.
- Update Camera App: Ensure that you have the latest version of your camera app installed on your iPhone. Developers frequently release updates to fix bugs and improve performance, so keeping your app up to date is crucial for a smooth 360 photo experience.
- Choose Ideal Lighting Conditions: Lighting plays a vital role in capturing stunning 360 photos. Opt for well-lit environments or experiment with different light sources to achieve the desired effect. Avoid excessive shadows or harsh lighting, as they can affect the overall quality of your images.
- Master the Stitching Process: Stitching is the process of merging multiple images together to create a seamless 360 photo. If you notice any misalignments or inconsistencies in your photos, take the time to practice and improve your stitching skills to achieve better results.
- Experiment and Have Fun: Don’t be afraid to explore and experiment with different techniques, apps, and accessories to enhance your 360 photo-taking experience. The more you practice and play around, the more you’ll learn and improve your skills.
By following these troubleshooting tips, you can overcome common challenges and enjoy capturing breathtaking 360 photos on your iPhone. Remember, practice makes perfect, so keep exploring and refining your techniques to create stunning immersive visual memories.
In conclusion, taking 360 photos on your iPhone is a truly immersive and exciting experience. With the advancements in technology and the development of dedicated apps and accessories, capturing stunning 360-degree photos has never been easier.
Whether you want to capture breathtaking landscapes, document special events, or simply explore the world around you in a whole new way, your iPhone can be your best companion. By following the step-by-step guide we’ve provided, you’ll be able to take stunning 360 photos with ease.
Remember to experiment with different techniques, angles, and perspectives to add your personal touch to your photos. Share your creations on social media or with friends and family to showcase your photography skills and inspire others.
So, grab your iPhone, unleash your creativity, and embark on a journey to capture the world in 360 degrees. Happy snapping!
FAQs
1. Can I take 360-degree photos on my iPhone?
Yes, you can take 360-degree photos on your iPhone. With the advancement of technology, it is now possible to capture immersive 360-degree photos using your iPhone’s camera.
2. Which iPhone models support 360-degree photo capture?
Most recent iPhone models, starting from the iPhone 7 and newer, support 360-degree photo capture. However, it’s always a good idea to check your specific iPhone model to ensure it has the necessary camera capabilities.
3. Do I need a special app to take 360-degree photos on my iPhone?
There are dedicated 360-degree photo apps available on the App Store that can enhance your experience and provide additional features for capturing and editing 360-degree photos. Some popular apps include Google Street View, Panorama 360, and Cardboard Camera.
4. How do I take a 360-degree photo on my iPhone?
To take a 360-degree photo on your iPhone, you can follow these steps:
1. Open the 360-degree photo app on your iPhone.
2. Position yourself at the starting point of your desired 360-degree view.
3. Follow the app’s instructions to capture the first image.
4. Slowly rotate your iPhone 360 degrees in a smooth motion while keeping it level.
5. The app will guide you to capture the remaining images until you complete a full circle.
6. Once you’ve captured all the necessary images, the app will stitch them together to create a seamless 360-degree photo.
Remember to keep your iPhone steady and move slowly to ensure optimal photo quality.
5. What can I do with my 360-degree photos?
Once you’ve captured your 360-degree photos on your iPhone, you can explore various options:
– Share your photos on social media platforms and allow your friends and followers to immerse themselves in your captured moments.
– Utilize virtual reality (VR) viewers or headsets to experience your photos in a more immersive way.
– Edit your photos using dedicated 360-degree photo editing apps to enhance colors, add filters, or adjust the perspective.
– Create interactive 360-degree tours or panoramic views for real estate listings or travel destinations.
The possibilities are endless, so get creative and make the most out of your 360-degree photos!