
Are you upgrading to a new iPhone and don’t want to lose your precious phone number? Transferring your phone number from one iPhone to another is a fairly simple process that ensures you can keep your existing contact information and avoid any disruptions in your communication. Whether you’re switching to the latest iPhone model or simply need to replace your current device, this guide will walk you through the steps of transferring your phone number seamlessly. From backing up your data to activating your new phone, we’ll cover all the crucial details so you can enjoy a smooth transition without any hassle. Follow these instructions to ensure that your new iPhone is up and running with your familiar phone number in no time!
Inside This Article
- How to Transfer Phone Number from iPhone to iPhone
- Backup Your Current iPhone
- Sign Out of iCloud and iMessage on Your Current iPhone
- Restore Your New iPhone from Backup
- Update Your Phone Number on Your New iPhone
- Conclusion
- FAQs
How to Transfer Phone Number from iPhone to iPhone
Transferring your phone number from one iPhone to another can be a seamless process if you follow the right steps. Whether you have purchased a new iPhone or simply want to switch to a different device, transferring your phone number ensures that you can continue to receive calls and messages without any interruption.
Here are the step-by-step instructions to transfer your phone number from iPhone to iPhone:
- Step 1: Backup your old iPhone
- Step 2: Prepare your new iPhone
- Step 3: Restore your new iPhone from backup
- Step 4: Activate your new iPhone with the transferred phone number
The first thing you need to do is create a backup of all the data on your old iPhone. This can be done by connecting your iPhone to a computer and using iTunes or by using iCloud to backup your device wirelessly. By backing up your iPhone, you will ensure that all your contacts, messages, and settings are saved.
Once you have backed up your old iPhone, it’s time to prepare your new iPhone for the transfer. Insert your SIM card into the new iPhone and turn it on. Follow the initial setup instructions until you reach the Apps & Data screen.
On the Apps & Data screen, select the “Restore from iCloud Backup” or “Restore from iTunes Backup” option, depending on where you created your backup. Sign in with your Apple ID and choose the most recent backup that contains your phone number and other data. Wait for the restoration process to complete, which may take some time depending on the size of your backup and the speed of your internet connection.
Once the restoration is complete, your new iPhone will display a message saying “Your iPhone has been activated.” Your phone number should automatically transfer to the new device, and you can start using it right away. Test the phone by making a call or sending a text message to ensure that everything is working properly.
That’s it! You have successfully transferred your phone number from your old iPhone to your new iPhone. You can now enjoy using your new device without any hassle. Remember to keep your old iPhone as a backup, in case you need to retrieve any data or access any apps that were not transferred during the process.
Backup Your Current iPhone
Before transferring your phone number from your old iPhone to your new iPhone, it is crucial to create a backup of your current iPhone. This ensures that all your important data, including your contacts, messages, apps, and settings, are safely stored and can be easily restored onto your new device.
To backup your iPhone, follow these simple steps:
- Connect your iPhone to a Wi-Fi network.
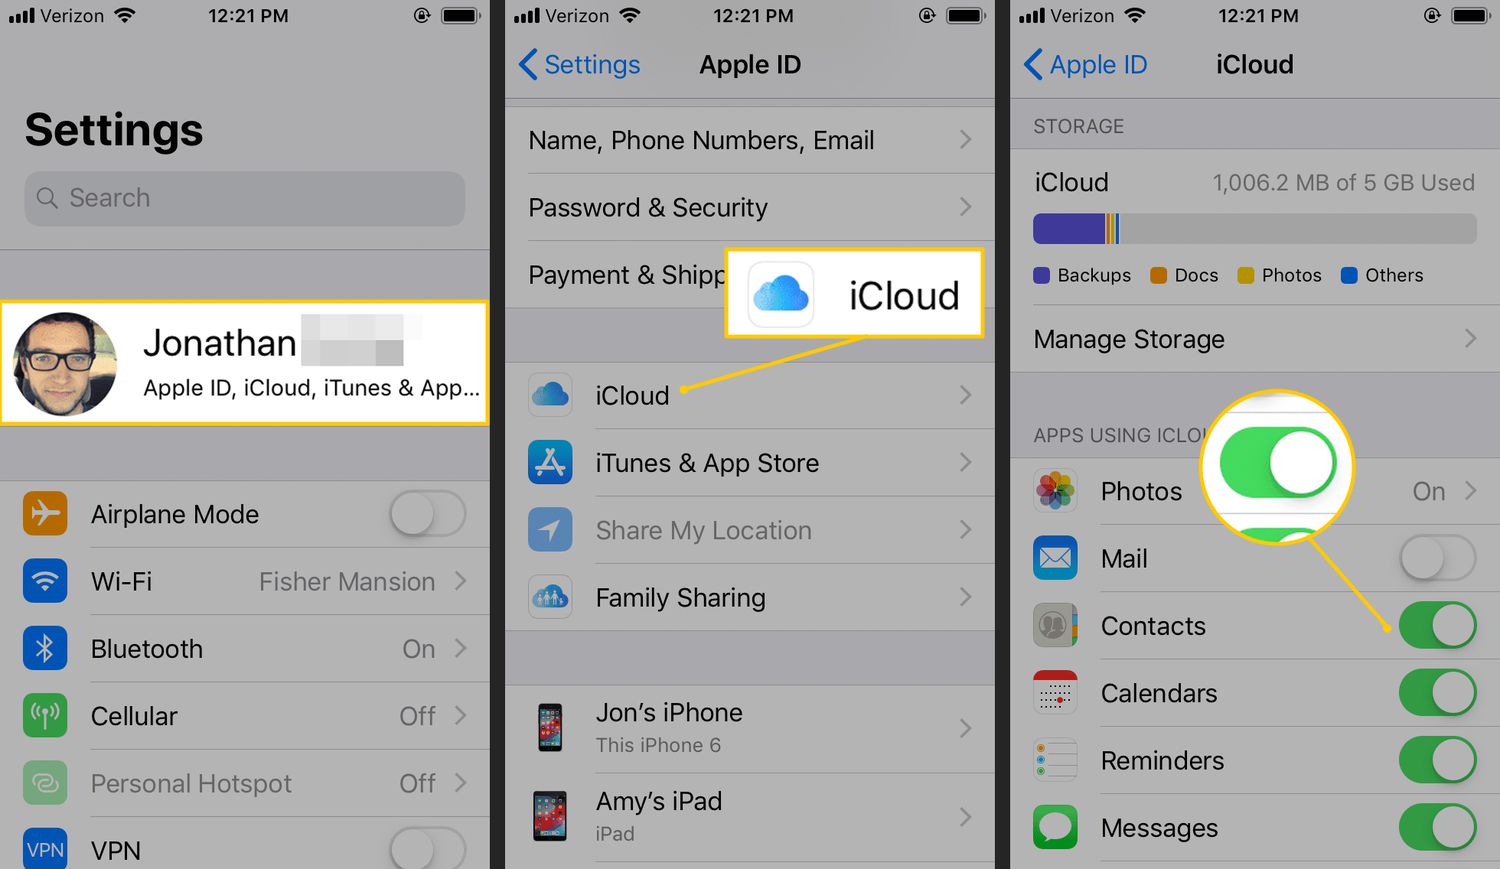
- Open the Settings app on your iPhone.
- Scroll down and tap on “iCloud”.
- Tap on “iCloud Backup”.
- Toggle the “iCloud Backup” switch to enable it if it’s not already turned on.
- Tap on “Back Up Now” to initiate the backup process.
- Ensure that your iPhone remains connected to Wi-Fi and plugged into a power source until the backup is complete.
Once the backup is finished, you can proceed to the next step of transferring your phone number to your new iPhone.
Sign Out of iCloud and iMessage on Your Current iPhone
Before you transfer your phone number from your old iPhone to your new iPhone, it’s important to sign out of iCloud and iMessage on your current device. This will ensure a smooth and seamless transfer process, without any hiccups or complications.
Signing out of iCloud on your iPhone is straightforward. Simply open the Settings app, tap on your Apple ID at the top of the screen, and scroll down to find the “Sign Out” option. Tap on it, and you’ll be prompted to confirm your decision. Enter your Apple ID password, and your iPhone will sign out of iCloud.
When it comes to iMessage, open the Settings app, tap on “Messages,” and toggle off the switch next to “iMessage.” This will disable iMessage on your current iPhone, ensuring that your phone number is not associated with any iMessage accounts.
It’s important to note that signing out of iCloud and iMessage on your current iPhone doesn’t mean you’re permanently losing your data or messages. By signing into iCloud on your new iPhone, you’ll be able to restore your data seamlessly and continue using iMessage with your transferred phone number.
Restore Your New iPhone from Backup
Once you have prepared your new iPhone, the next step is to restore it from your backup. This process will transfer all the data, including your phone number, from your old iPhone to the new one. Here’s how you can do it:
1. Connect your new iPhone to your computer using the USB cable. Launch iTunes, if it doesn’t open automatically.
2. In iTunes, select your new iPhone under the “Devices” section.
3. Click on the “Summary” tab and then choose “Restore Backup.”
4. A window will pop up displaying a list of recent backups. Select the backup that contains your phone number and other important data. If you have encrypted backups, you will need to enter the password.
5. Click on “Restore” and wait for the process to complete. It may take a few minutes depending on the size of the backup and the speed of your computer.
6. Once the restore process is finished, your new iPhone will restart automatically. You may be prompted to enter your Apple ID and password to complete the setup.
7. Follow the on-screen instructions to set up your new iPhone. Make sure to choose “Restore from iCloud Backup” and select the same backup that you used in iTunes.
8. Wait for the restore process to finish. This may take some time, especially if you have a large amount of data on your old iPhone.
9. Once the restore is complete, your new iPhone will restart again. You should now have all your data, including your phone number, transferred to your new device.
It’s worth mentioning that the process of restoring from a backup will only transfer data that was present on your old iPhone at the time of the backup. Any data or changes made after the backup will not be included. Therefore, it’s important to back up your old iPhone right before you switch to the new one to ensure that you have the most up-to-date information.
By following these steps, you can easily restore your new iPhone from backup and have all your essential data, including your phone number, seamlessly transferred to your new device.
Update Your Phone Number on Your New iPhone
When you get a new iPhone, one of the first things you’ll want to do is update your phone number. This is important because your phone number is tied to various services like iMessage, FaceTime, and iCloud. By updating your phone number, you ensure that your new iPhone is properly configured and all your important services work seamlessly.
To update your phone number on your new iPhone, follow these simple steps:
- Open the Settings app: Tap on the Settings app on your new iPhone’s home screen. The Settings app is represented by a gray gear icon.
- Scroll down and tap on “Phone”: From the list of options in the Settings menu, locate and tap on “Phone”.
- Select “My Number”: On the “Phone” screen, you will see the option “My Number”. Tap on it.
- Edit your phone number: A new screen will appear displaying your current phone number. Tap on the number field to edit your phone number.
- Enter your new phone number: Use the on-screen keyboard to enter your new phone number. Double-check to make sure you have entered it correctly.
- Save your changes: Tap on “Save” to save your new phone number.
After completing these steps, your new phone number will be updated on your iPhone. This ensures that your iPhone is properly registered with your cellular network provider and any associated services.
It’s important to note that updating your phone number may also require you to activate your new iPhone with your cellular network provider. If prompted, follow the instructions provided by your network provider to complete the activation process.
In addition, if you use services like iMessage and FaceTime, you may need to update your phone number in the settings of these apps as well. This will ensure that your contacts can reach you using your new phone number for these services.
By following these simple steps, you can easily update your phone number on your new iPhone and ensure that all your important services are ready to go on your new device.
Conclusion
Transferring your phone number from one iPhone to another can seem like a daunting task, but with the right knowledge and steps, it can be a seamless and hassle-free process. Whether you are upgrading to a new iPhone or simply want to switch devices, transferring your phone number ensures that you can stay connected and continue using your existing number.
By following the methods outlined in this article, you can easily transfer your phone number from iPhone to iPhone. Whether it’s through your carrier, using iCloud or iTunes backup, or using a third-party app, you have several options to choose from.
Remember to back up your data before proceeding with any transfer method, as data loss is always a possibility. Additionally, double-check with your carrier for any specific requirements or procedures they may have in place.
Now that you have the knowledge to transfer your phone number, you can confidently switch iPhones and continue using your existing number. Enjoy your new device and stay connected!
FAQs
Q: Can I transfer my phone number from one iPhone to another?
Yes, you can transfer your phone number from one iPhone to another. It involves a simple process that allows you to seamlessly transition your phone number and contacts to a new device.
Q: How do I transfer my phone number to a new iPhone?
To transfer your phone number to a new iPhone, you can follow these steps:
1. Make sure both iPhones are connected to Wi-Fi.
2. On your old iPhone, go to “Settings” and tap on your name at the top of the screen.
3. Select “iCloud” and enable “Contacts” sync if it’s not already on.
4. On your new iPhone, go through the initial setup process until you reach the “Apps & Data” screen.
5. Choose “Restore from iCloud Backup” and sign in with your Apple ID.
6. Select the backup that contains your phone number and complete the setup.
Your phone number and contacts will be transferred to your new iPhone.
Q: Can I transfer my phone number to a different carrier when getting a new iPhone?
Yes, you can transfer your phone number to a different carrier when getting a new iPhone. This process is known as porting your number. In order to do this, you will need to contact your new carrier and provide them with the necessary information to initiate the transfer. Keep in mind that there may be fees or restrictions associated with porting your number, so it’s always a good idea to check with your new carrier beforehand.
Q: Will transferring my phone number to a new iPhone delete my data?
Transferring your phone number to a new iPhone does not delete your data. The process mainly involves transferring your phone number and contacts, while your data, such as photos, videos, and apps, is typically backed up and restored separately. It’s always a good practice to back up your old iPhone before transferring your phone number to ensure that your data is safe and can be easily restored on your new device.
Q: Do I need a SIM card to transfer my phone number to a new iPhone?
Yes, you will need a SIM card to transfer your phone number to a new iPhone. The SIM card contains your phone number and other subscription information, such as carrier network settings. When you activate your new iPhone, you will need to insert the SIM card from your previous iPhone or contact your carrier to obtain a new SIM card if necessary. Without a SIM card, you won’t be able to make calls or use cellular data on your new iPhone.