
The iPhone 14 is the latest addition to Apple’s line of innovative smartphones, boasting advanced features and cutting-edge technology. If you’re a proud owner of the new iPhone 14 and want to transfer your SIM card and phone number to your new device, you’re in the right place. In this article, we will guide you through the simple and easy process of transferring your SIM card to an iPhone 14, ensuring a seamless transition without affecting your phone number or contacts. Whether you’re upgrading from an older iPhone or switching from another device, we’ve got you covered. Get ready to make the most of your new iPhone 14 as we delve into the steps required to transfer your SIM card and phone number.
Inside This Article
- What is SIM card transfer?
- Steps to transfer your SIM to an iPhone 14:
- Transferring your phone number to an iPhone 14:
- Troubleshooting common issues during SIM card transfer:
- Conclusion
- FAQs
What is SIM card transfer?
SIM card transfer refers to the process of moving your SIM card from one mobile device to another, while retaining your phone number and associated mobile network service. When you purchase a new iPhone 14, transferring your SIM card allows you to seamlessly transition your existing phone number and network service to the new device. It eliminates the need to change phone numbers or seek new service providers.
A SIM card, or Subscriber Identity Module, is a small chip that stores information about your phone number, network authentication, and allows you to connect to your service provider’s network. By transferring your SIM card to your new iPhone 14, you can quickly and easily transfer your existing mobile network service without any interruption.
Sim card transfer can be done by inserting the SIM card into the designated slot of the new iPhone 14. It typically requires a compatible SIM card size, which in the case of the iPhone 14, may be a nano-SIM or eSIM depending on the specific model. It is important to ensure that your existing SIM card is compatible with the new device before proceeding with the transfer.
Additionally, SIM card transfer may involve activating your new iPhone 14 with your carrier. This might require entering specific activation codes or following instructions provided by your carrier to complete the process. It is recommended to follow the instructions provided by your carrier or refer to the iPhone 14 user manual for detailed steps on SIM card transfer.
Overall, SIM card transfer is a straightforward process that allows you to easily switch mobile devices while retaining your phone number and network service. It offers convenience and avoids the hassle of having to change phone numbers or deal with new service providers. By following the necessary steps and ensuring compatibility, you can seamlessly transfer your SIM card to your new iPhone 14 and continue using your existing mobile network service.
Steps to transfer your SIM to an iPhone 14:
Transferring your SIM card to a new iPhone is a simple process that ensures you can continue using your existing mobile number and data plan. Follow these step-by-step instructions to seamlessly transfer your SIM card to your new iPhone 14:
- Power off both devices: Begin by turning off your old iPhone and your new iPhone 14. This will ensure a safe and smooth transfer process.
- Locate the SIM card tray: On your new iPhone 14, look for the SIM card tray. It is usually located on the side of the device. The exact location may vary depending on the iPhone model, so refer to the manufacturer’s guide if needed.
- Eject the SIM card tray: To access the SIM card tray, you will need a SIM card ejector tool or a small paperclip. Insert the tool into the small pinhole next to the SIM card tray and apply gentle pressure until the tray pops out.
- Remove the SIM card: Carefully remove the SIM card from your old iPhone, taking note of its orientation. Place it in the SIM card tray of your new iPhone 14, lining up the notches to ensure it fits properly.
- Insert the SIM card tray: Gently push the SIM card tray back into the iPhone 14 until it clicks into place. Ensure that it is securely inserted to avoid any connectivity issues.
- Power on your new iPhone 14: Press and hold the power button on your new iPhone 14 until the Apple logo appears. This indicates that the device is powering on.
- Activate your SIM card: Once your iPhone 14 is powered on, follow the on-screen prompts to activate your SIM card with your mobile service provider. This may involve confirming your phone number, entering your account information, or connecting to a Wi-Fi network.
- Test your SIM card: Once activation is complete, make a test call, send a text message, and connect to the internet to ensure that your SIM card is functioning properly on your new iPhone 14.
Following these steps will allow you to successfully transfer your SIM card to your new iPhone 14, enabling you to continue using your existing phone number and data plan without interruption.
Transferring your phone number to an iPhone 14:
When you purchase a new iPhone 14, one of the essential tasks is transferring your phone number to the new device. This ensures that you can continue making and receiving calls and text messages without any disruptions. The process of transferring your phone number to an iPhone 14 is relatively straightforward and can be completed in just a few simple steps.
The first step is to ensure that your old phone and iPhone 14 are both powered on and have a cellular connection. This is important as it allows both devices to communicate and transfer the necessary information. Once your devices are powered on, you can proceed with the transfer process.
To begin, insert your existing SIM card into the SIM card slot of your iPhone 14. The SIM card slot is usually located on the side of the device. If your old phone uses a different SIM card size, you may need to obtain a new SIM card from your mobile carrier that is compatible with the iPhone 14.
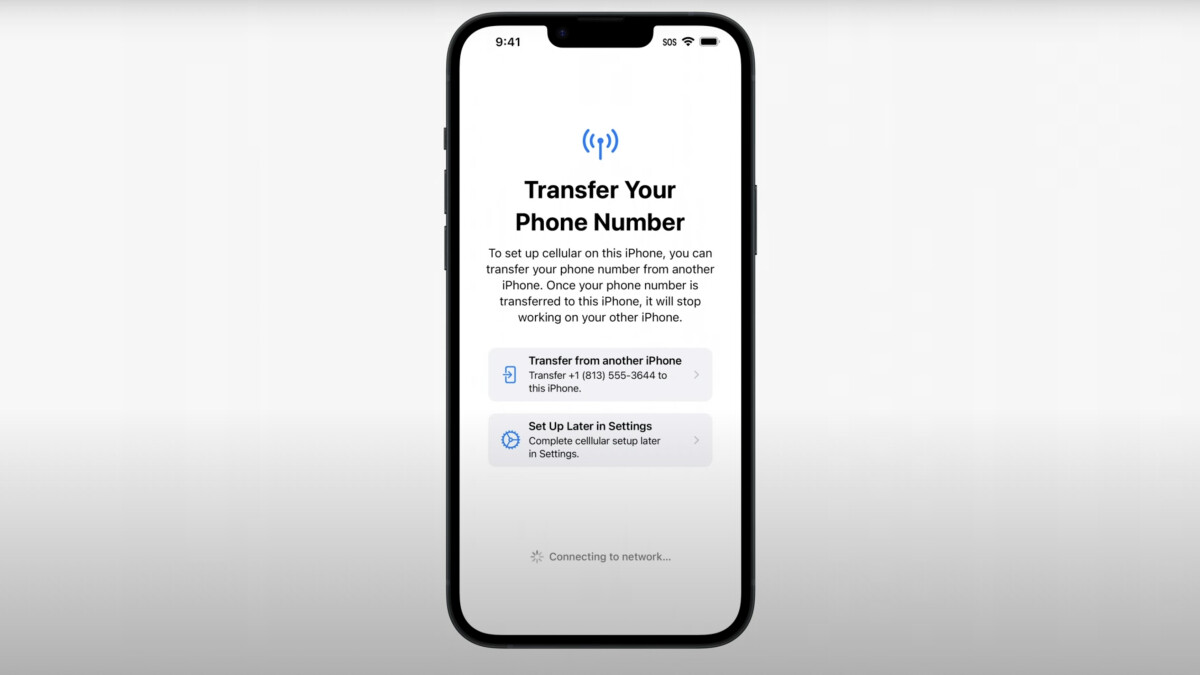
Once you have inserted the SIM card, you can start the setup process on your iPhone 14. Follow the on-screen instructions to select your language, connect to a Wi-Fi network, and sign in to your Apple ID. During the setup, you will be prompted to transfer your phone number. Select the option to transfer your number and follow the additional instructions provided.
After confirming your intention to transfer your phone number, your iPhone 14 will initiate the transfer process. This may take a few minutes, so it’s important to remain patient. During the transfer, your old phone may lose service temporarily, but once the process is complete, your phone number will be associated with your iPhone 14.
It’s worth noting that the exact steps and options during the setup process may vary slightly depending on your mobile carrier and the version of iOS running on your iPhone 14. However, the general process of transferring your phone number remains the same.
If you encounter any issues during the transfer process, it’s advisable to contact your mobile carrier for assistance. They can provide the necessary guidance and troubleshooting steps to ensure a successful transfer of your phone number.
Once the transfer is complete, you can start enjoying your new iPhone 14 with your existing phone number. Make sure to test your phone’s functionality by placing test calls and sending text messages to confirm that everything is functioning as expected.
Transferring your phone number to an iPhone 14 is a crucial step in setting up your new device. By following the steps outlined above, you can seamlessly transition your phone number and ensure a smooth user experience on your iPhone 14.
Troubleshooting common issues during SIM card transfer:
Transferring your SIM card to a new iPhone 14 can sometimes come with its fair share of challenges. From compatibility issues to technical glitches, it’s important to be prepared for any hiccups that may arise during the process. Here are some common issues you might encounter and how to troubleshoot them:
1. SIM card not recognized: One of the most common problems is when your new iPhone doesn’t recognize your SIM card. Begin by ensuring that the SIM card is properly inserted into the SIM tray. Gently remove the SIM card, wipe it clean, and reinsert it. If the issue persists, try restarting your iPhone or toggling the Airplane mode on and off.
2. No service or poor signal: If you’re experiencing no service or a weak signal after transferring your SIM card, check if your iPhone is in an area with good network coverage. If you’re sure that the network coverage is not the issue, try toggling the Cellular Data option on and off in your Settings. You can also try resetting your network settings by going to Settings, General, Reset, and selecting “Reset Network Settings.”
3. Incompatible SIM card: The iPhone 14 supports different SIM sizes, such as nano-SIM and eSIM. If your SIM card is not compatible with the iPhone 14 model, you may need to contact your mobile service provider to obtain a new SIM card that fits the device. They will assist you in transferring your phone number and data to the new SIM card.
4. Activation issues: Sometimes, you may encounter issues when activating your new iPhone with your SIM card. Make sure that you have an active cellular plan with your service provider. If the activation process fails, try using iTunes or connecting to a computer with the latest version of iTunes installed. This can often help resolve activation problems.
5. Error messages: If you encounter error messages during the SIM card transfer process, note down the error code or message and perform a quick internet search to find specific troubleshooting steps. Many times, a simple reboot or software update can resolve the issue.
6. Loss of contacts or data: In rare cases, transferring your SIM card to a new device may result in a loss of contacts or other data. To prevent this, ensure that your contacts and data are backed up before initiating the transfer. You can use cloud services or transfer your data to a computer for safekeeping.
Conclusion
Transferring your SIM card and phone number to an iPhone 14 can be a smooth and straightforward process. By following the steps outlined in this guide, you can ensure that your transition is seamless and hassle-free.
Remember to back up your data and contacts before switching devices to avoid any potential loss. In addition, reach out to your carrier for any specific instructions or assistance they may provide.
The iPhone 14 offers a state-of-the-art mobile experience, and with your SIM card and phone number transferred, you can enjoy all its features and capabilities without interruption. Stay connected with your loved ones and maximize the full potential of your new device.
We hope this guide has been helpful in guiding you through the process of transferring your SIM card and phone number to an iPhone 14. Now, go ahead and enjoy your enhanced mobile experience!
FAQs
Q: Can I transfer my SIM card and phone number to an iPhone 14?
A: Yes, you can transfer your SIM card and phone number to an iPhone 14. The process is straightforward and ensures that you can continue using your existing phone number on your new device.
Q: How do I transfer my SIM card to an iPhone 14?
A: To transfer your SIM card to an iPhone 14, you will need to locate the SIM card slot on your device. This can usually be found on the side or the top of the iPhone. Once you’ve located the slot, use a SIM card removal tool or a paperclip to gently push into the small hole next to the slot. This will eject the tray, allowing you to remove and insert your SIM card. Make sure the SIM card is properly aligned in the tray before reinserting it into your iPhone.
Q: Can I transfer my phone number to an iPhone 14 if I’m switching from a different carrier?
A: Yes, you can transfer your phone number to an iPhone 14 even if you’re switching from a different carrier. This process is called porting your number, and it allows you to keep your existing phone number when you switch to a new carrier or device. To do this, you will need to contact your current carrier and provide them with the necessary information to initiate the number transfer.
Q: Will transferring my SIM card and phone number to an iPhone 14 affect my data?
A: Transferring your SIM card and phone number to an iPhone 14 will not affect your data. Your data, including contacts, messages, and apps, is stored on your SIM card or in the cloud, not on the physical device. When you insert your SIM card into your new iPhone, your data will remain intact, allowing you to seamlessly transition to your new device without losing any important information.
Q: Can I transfer my SIM card and phone number to an iPhone 14 if I have an eSIM?
A: If you currently have an eSIM (embedded SIM) on your existing device, you can still transfer your phone number to an iPhone 14. iPhone 14 models support both physical SIM cards and eSIMs, giving you the flexibility to choose the option that works best for you. To transfer your eSIM, you will need to contact your carrier and follow their instructions to activate the eSIM on your new iPhone.